What will I Learn?
This tutorial covers these topics:
- You will learn about basics of Web Scrapping and python package used for it,
- You will learn to setup environment for this web scrapping project.
- You will learn different functions of BeautifulSoup and create a simple web scrapper.
- You will learn to write extracted data into CSV file.
Requirements:
- A PC/laptop with Windows / OSX/ Linux
- Python 2.7 or Python 3 installed
- Any Python IDE installed
- pip preinstalled
Note: This tutorial is performed in my Laptop with Ubuntu OS 17.1, 64 bit and I used Pycharm IDE.
Setting Up Environment
We will install Beautiful Soup and Requests library using pip. Go to Command line/ Terminal in your laptop/PC
pip install beautifulsoup4
pip install requests
Difficulty
Basic: Anyone with basic knowlwdge of Python can catch up this tutorial.
What is Web Scrapping?
Web Scrapping is the technique to extract the data from websites.It is also known as web harvesting or web data extraction. With web scrapping we can extract data which makes analysis easier. The two steps that are involved in web scrapping are fetching web page and extracting data from it.
What is BeautifulSoup?
BeautifulSoup is a python package which is used to parse HTML and XML documents. BeautifulSoup can't fetch the data, it can only parse the fetched data. To fetch the web page we use Requests package.
Starting the web scrapping tutorial:
To scrape a website first we need to fetch it and then parse it. To do so, we need to import libraries first.
from bs4 import BeautifulSoup
import requests
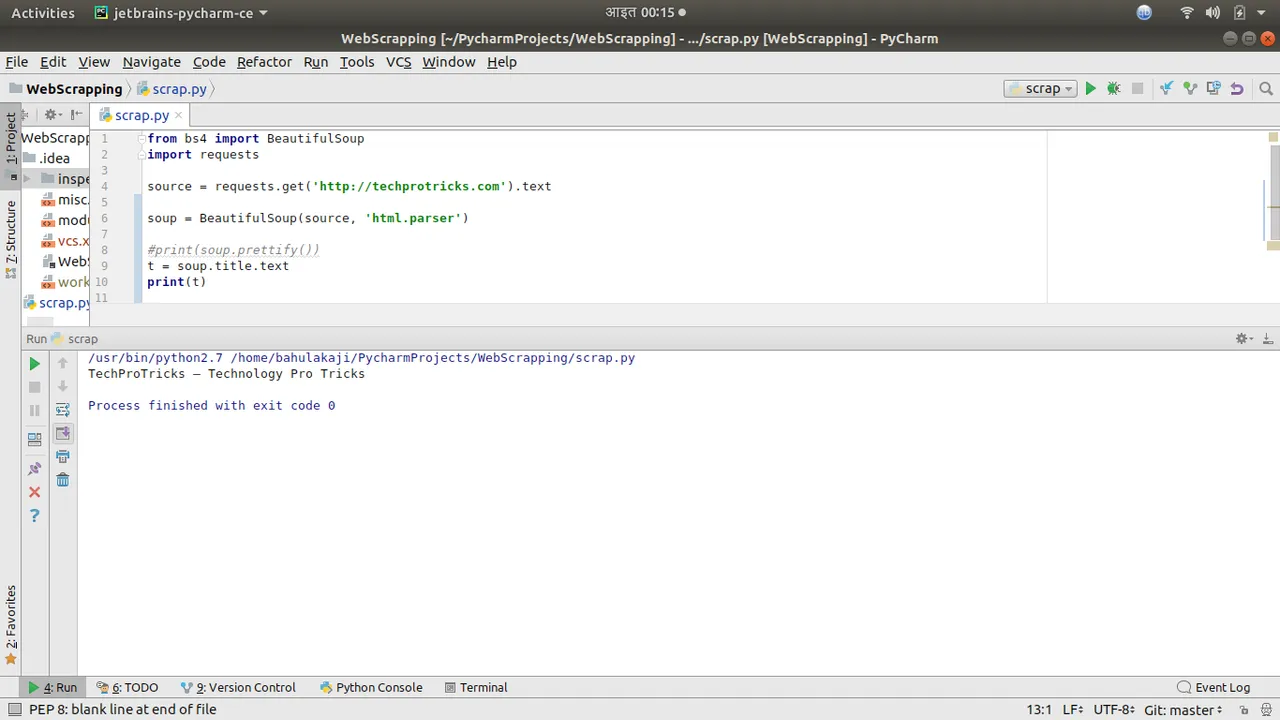
Now, the libraries are imported, we need to fetch the website using requests.get method. The fetched website is then passed to BeautifulSoup instance, created as soup and can be printed using print function. prettify() formats the fetched HTML nicely.
source = requests.get('http://techprotricks.com').text
soup = BeautifulSoup(source, 'lxml')
print(soup.prettify())
Note: This domain techprotricks.com is owned by me and you can use to scrape for learning purpose only.
You can see the fetched html here
If we comment the print function in above code and add these
t = soup.title.text
print(t)
two lines of code then, it will print title of the website.
Now, we start with extracting data from a single article of the website and then we will extract from all articles in the home page.
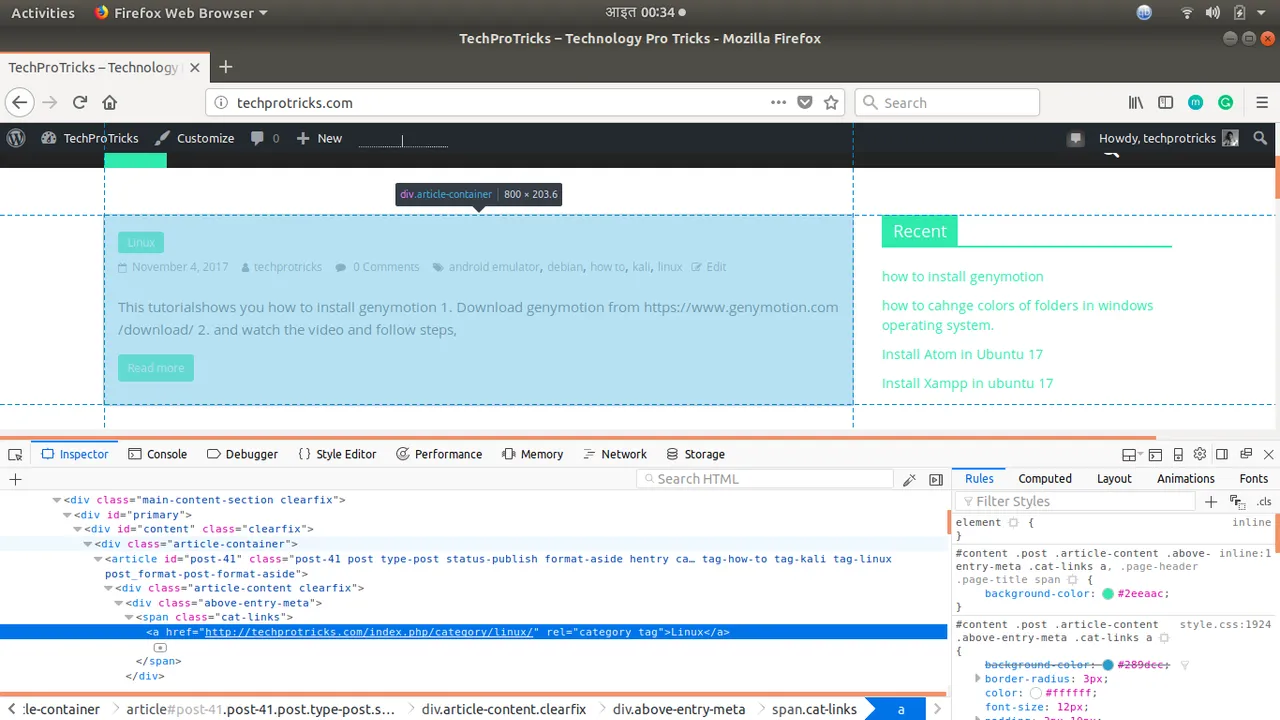
We will comment the code which extracts title from the website and add other code to print out information of article from html. To find out the class of article in website, we inspect the element in browser and hover over it and we will select the class which covers the area of a single article from home page.
article = soup.find('article')
print(article.prettify())
To view printed article information click here It's a piece of HTML code ectracted from fetched.html which consists information related to first article in the website.
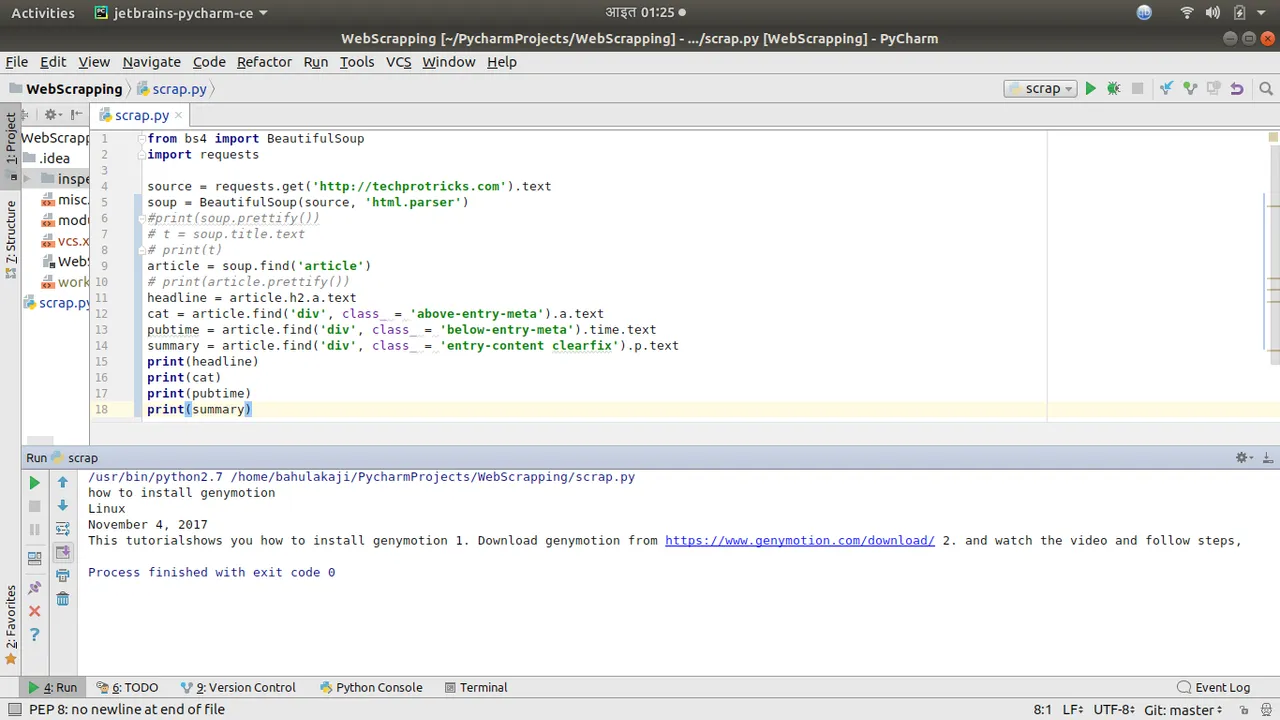
We will extract now headline of article, Category of article, Published date and Summary of the article.
find()
function takes two parameters touniquely identify the needed tag, tag_name as the first argument and the class_ argument which takes the class attribute of the tag.
.text
gives output as plain text
Commenting the print function of article we will add these codes.
headline = article.h2.a.text
cat = article.find('div', class_ = 'above-entry-meta').a.text
pubtime = article.find('div', class_ = 'below-entry-meta').time.text
summary = article.find('div', class_ = 'entry-content clearfix').p.text
print(headline)
print(cat)
print(pubtime)
print(summary)
We have extracted these data from a single post. Now we will use a loop and change few line of codes to do this for all post in a home page. Changes and result can be seen on the screenshot below.

Writing extracted data to CSV files.
CSV stands for Comma Separated Values. These file stores tabular data in plain text separated by commas.
We will create a csv file in the same directory as of our project and open it by adding this line of code:
csv_file = open('techprotricks.csv','w')
Running this line will automatically create techprotricks.csv file and opens it.
The name of the file is "techprotricks.csv" and 'w' in above code represents 'write' which allows our program to write on the CSV file we made. Now, we have to add data inside CSV so we use the writer function.
writer()
function will create an writing object.
writerow()
function will iterate data in rows.
Our final code looks like:
from bs4 import BeautifulSoup
import requests
import csv
source = requests.get('http://techprotricks.com').text
soup = BeautifulSoup(source, 'html.parser')
csv_file = open('techprotricks.csv','w')
csv_writer = csv.writer(csv_file)
csv_writer.writerow(['headline','Category','Published Date','Summary'])
for article in soup.find_all('article'):
   headline = article.h2.a.text
   print(headline)
   cat = article.find('div', class_='above-entry-meta').a.text
   print(cat)
   pubtime = article.find('div', class_='below-entry-meta').time.text
   print(pubtime)
   summary = article.find('div', class_='entry-content clearfix').p.text
   print(summary)
   csv_writer.writerow([headline, cat, pubtime, summary ])
csv_file.close()
Check the CSV file here
We can view this CSV file in any spreadsheet applications like MS Excel, LibreOffice Calc, etc. in tabular form.
You can download the source code of this project from my github repo. Click here to download.
Posted on Utopian.io - Rewarding Open Source Contributors