Hola queridos amigos de esta bella comunidad #HIVEDIY, espero todos se encuentren bien al lado de sus seres queridos, hoy vengo muy emocionada a participar en este concurso organizado por hivediy bajo la moderación de @gaboamc2393 donde nos piden elaborar una tarjeta para nuestro hive preferido, les cuento que aunque soy nueva en la plataforma hay una persona con la que me identifico mucho y que también es nueva en Hive, a la que admiro por la calidad de sus trabajos, es mi amiga Dayadam, me inspiré en su gatica Michi para hacer la tarjeta, aprovecho la oportunidad para invitar a mi amiga @nani11 a Participar en el Concurso.
Hello dear friends of this beautiful community #HIVEDIY, I hope everyone is well with their loved ones, today I come very excited to participate in this contest organized by hivediy under the moderation of @gaboamc2393 where we are asked to develop a card for our favorite hive, I tell you that although I am new to the platform there is a person with whom I identify a lot and who is also new to Hive, whom I admire for the quality of their work, is my friend Dayadam, I was inspired by her kitty Michi to make the card, I take the opportunity to invite my friend Participate in the Contest.
En el interior de mi tarjeta dice lo siguiente:
On the inside of my card it says the following:
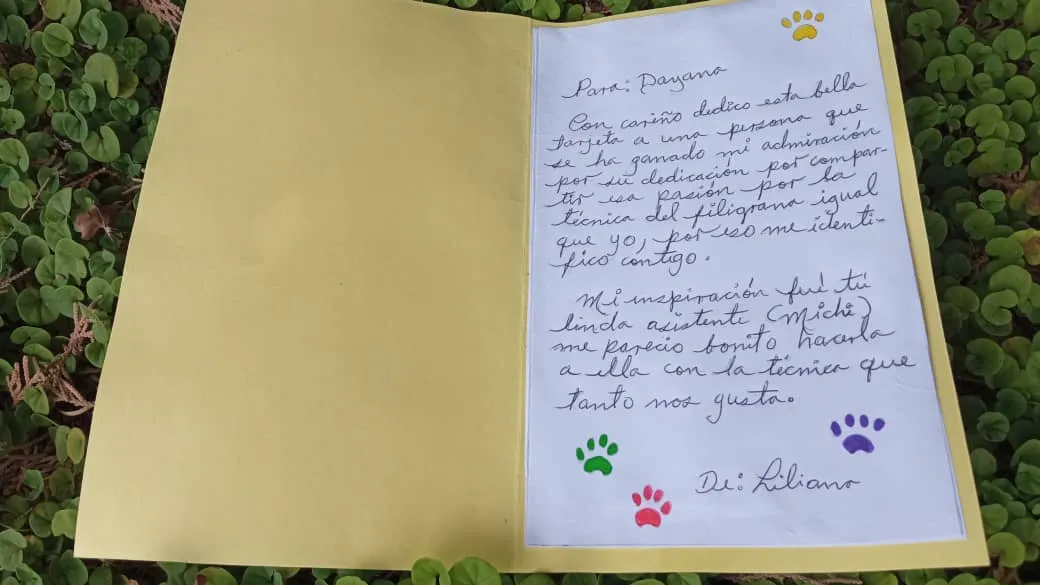
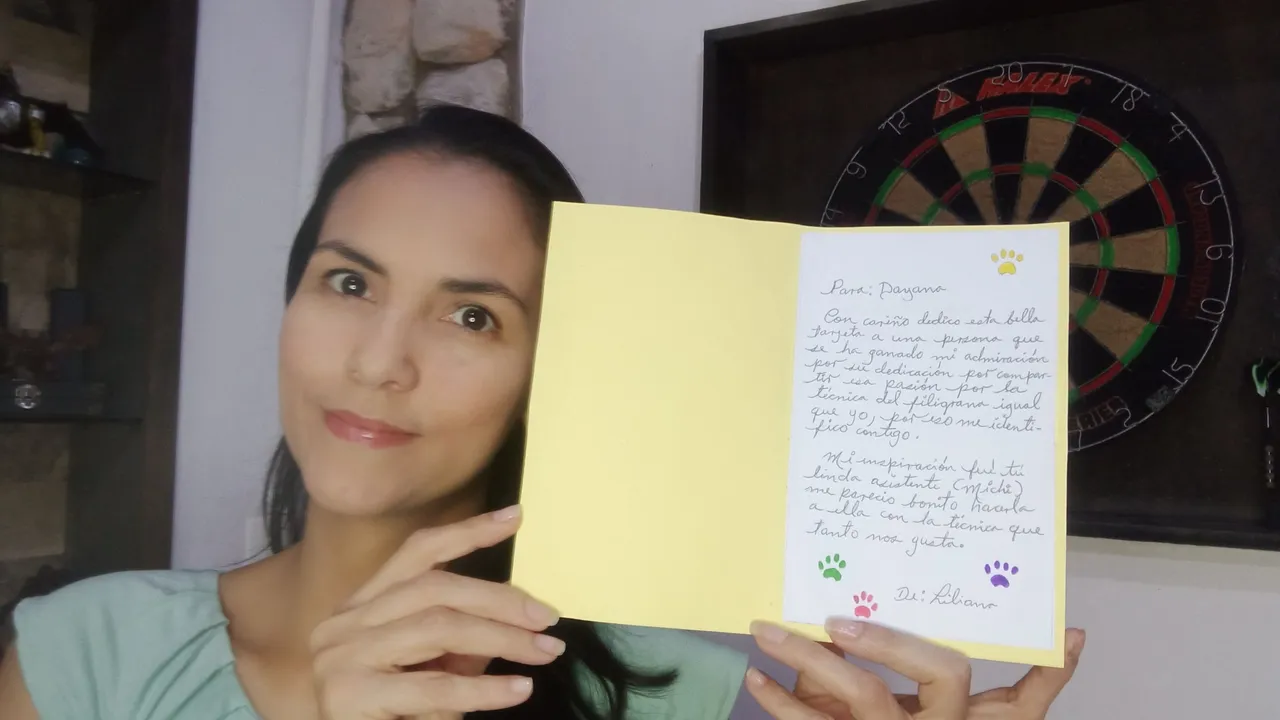
Para : Dayana.
To: Dayana.
Con cariño dedico esta bella tarjeta a una persona que se ha ganado mi admiración por su dedicación, por compartir esa pasión por la técnica del filigrana igual que yo, por eso me identifico contigo.
With affection I dedicate this beautiful card to a person who has earned my admiration for her dedication, for sharing her passion for the filigree technique as I do, that's why I identify with you.
Mi inspiración fue tu linda asistente (Michi) me pareció bonito hacerla a ella con la bella técnica que tanto nos gusta.
My inspiration was your pretty assistant (Michi) I thought it was nice to do her with the beautiful technique that we like so much.
De: Liliana
From: Liliana
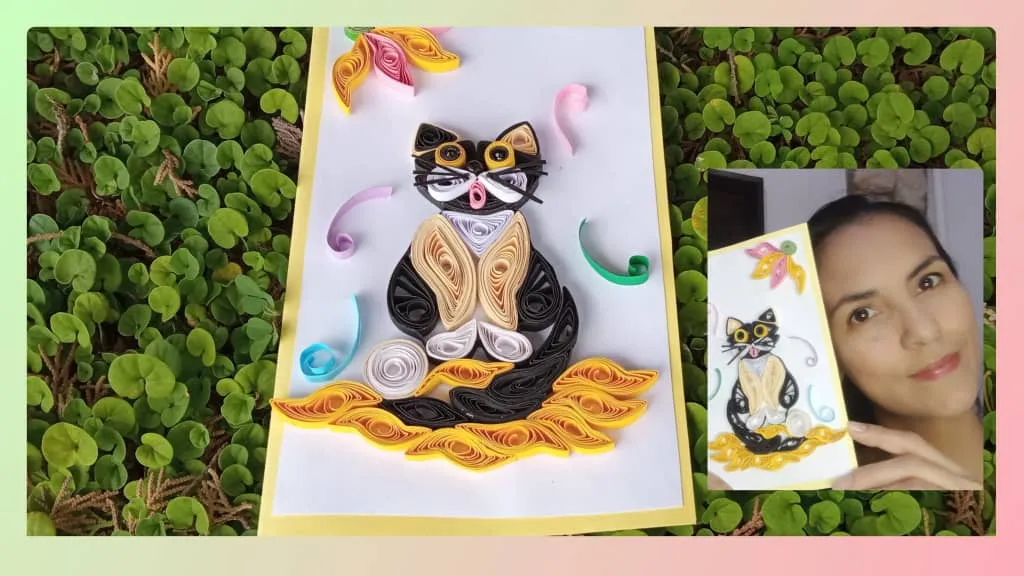
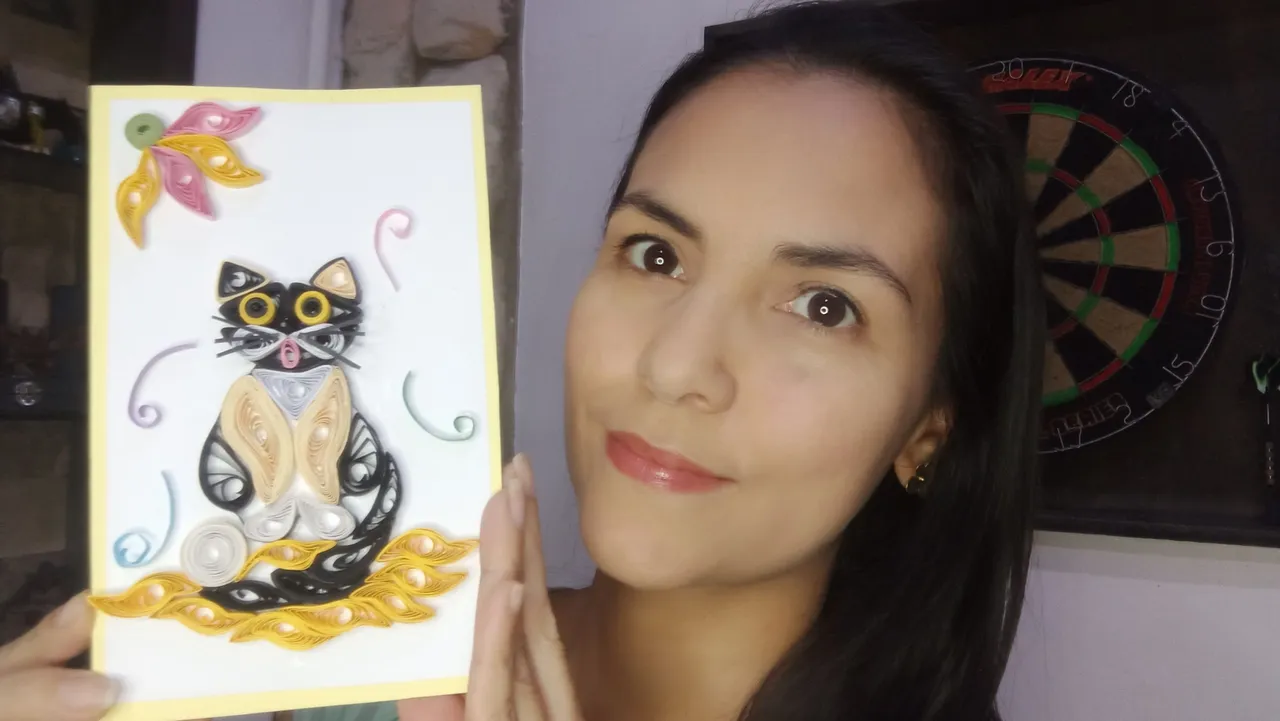
😺Tarjeta en filigrana linda gatica Michi😺
😺 Filigree card cute kitten Michi😺
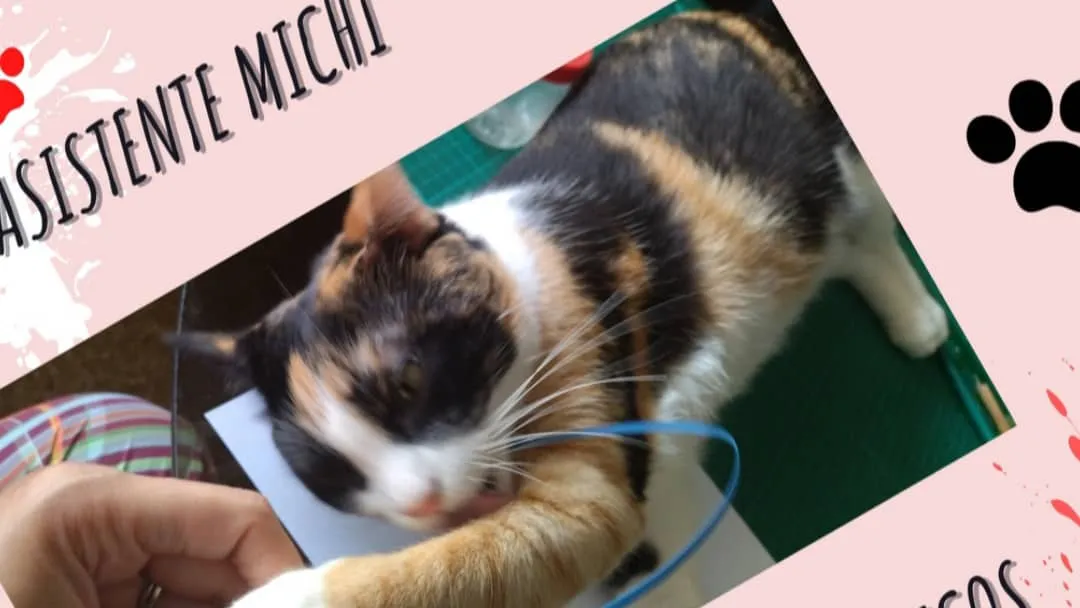
En la siguiente foto esta la bella Michi que fue mi inspiración para elaborar esta tarjeta.
In the following photo is the beautiful Michi who was my inspiration to make this card.
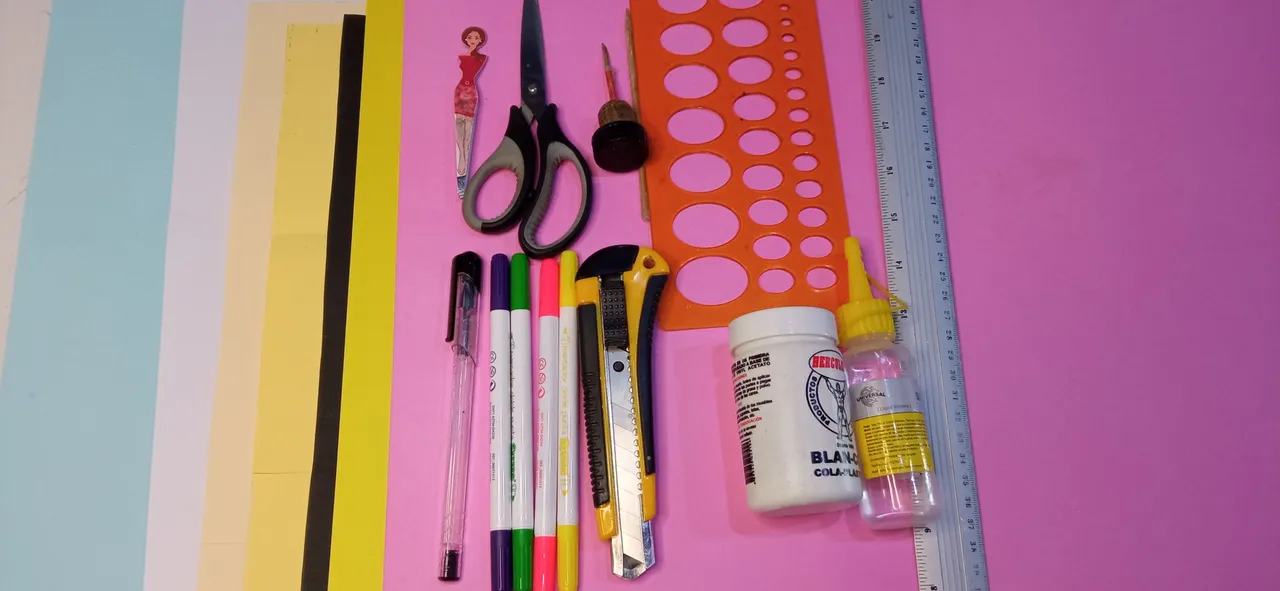
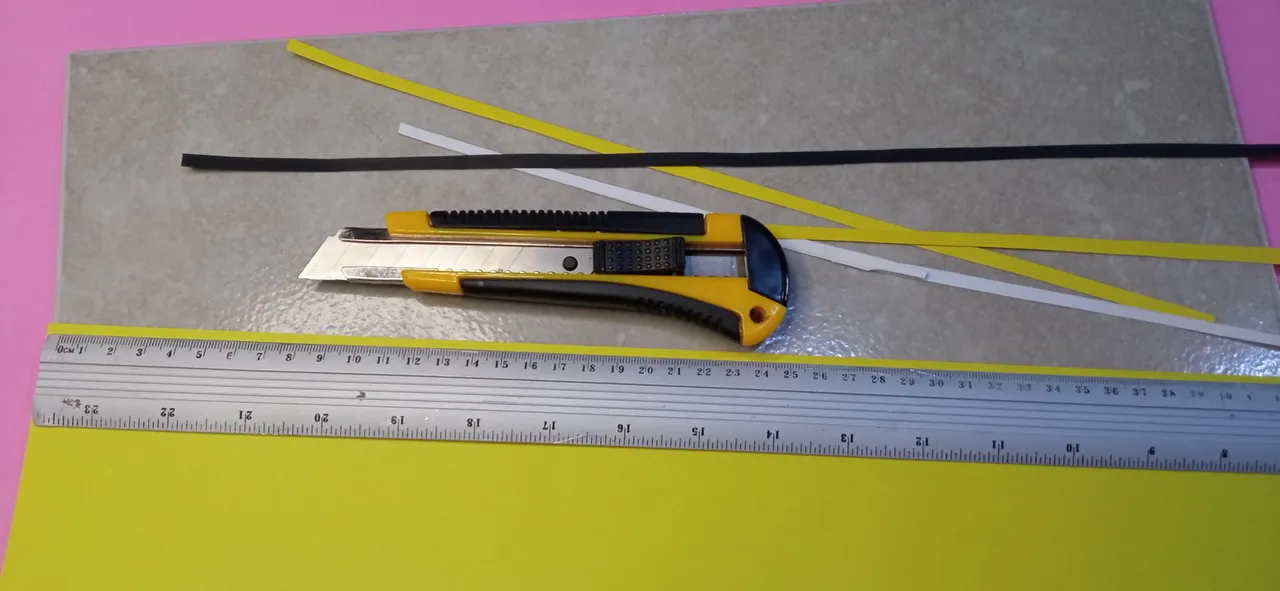
Materiales
Materials
.
Pasos para la elaboración
Processing steps
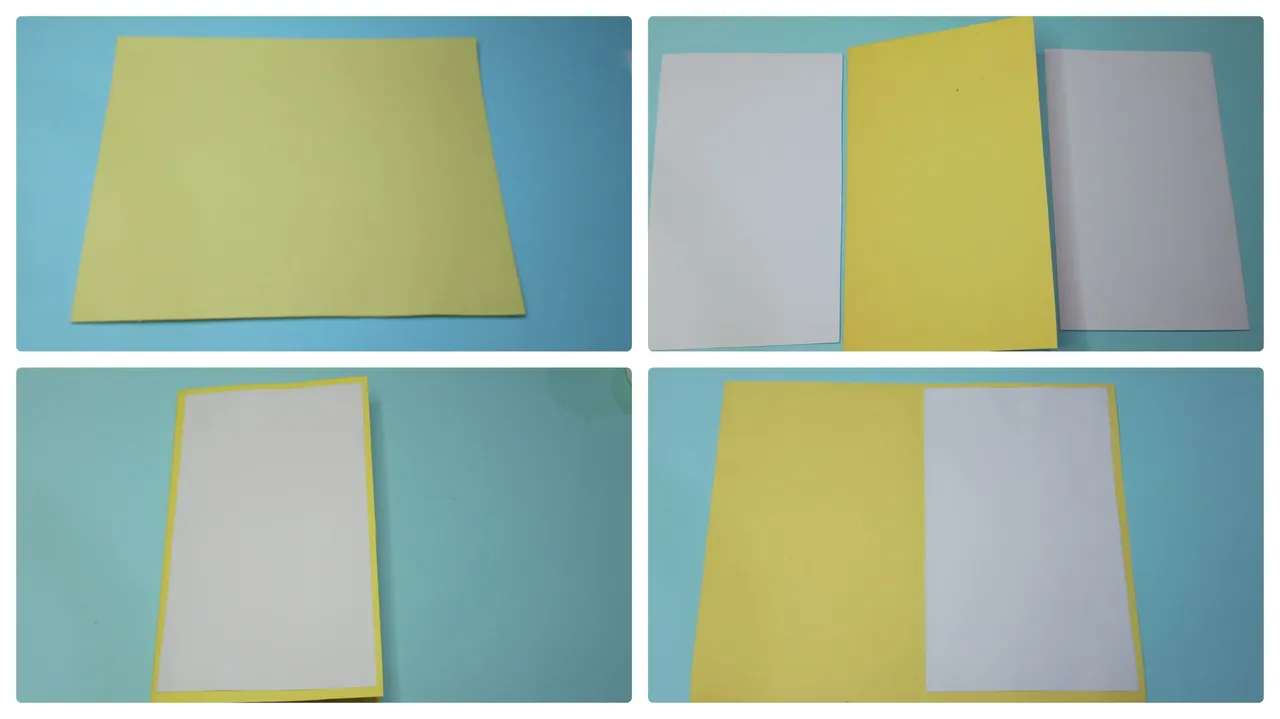
Paso 1
Lo primero que haremos es cortar la cartulina amarilla de 24 cm por 19 cm esta será la base para nuestra tarjeta, luego cortamos 2 pedazos de la cartulina blanca de 11 cm por 18 cm y las pegamos a la cartulina amarilla.Step 1
The first thing we will do is cut the yellow cardboard 24 cm by 19 cm this will be the base for our card, then we cut 2 pieces of the white cardboard 11 cm by 18 cm and glue them to the yellow cardboard.
Paso 2
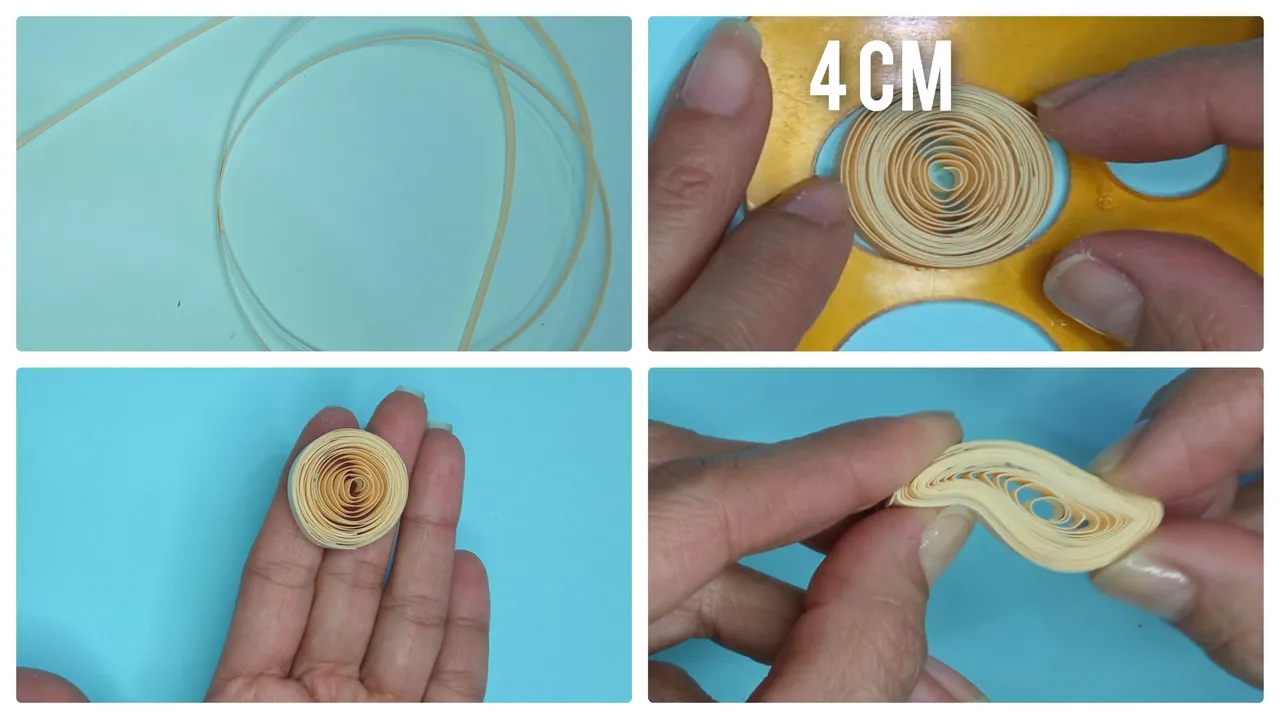
Ahora procedemos a cortar con el cúter tiras de cartulina de 0,5 cm por 43 cm.Step 2
Now we proceed to cut with the cutter cardboard strips of 0.5 cm by 43 cm.
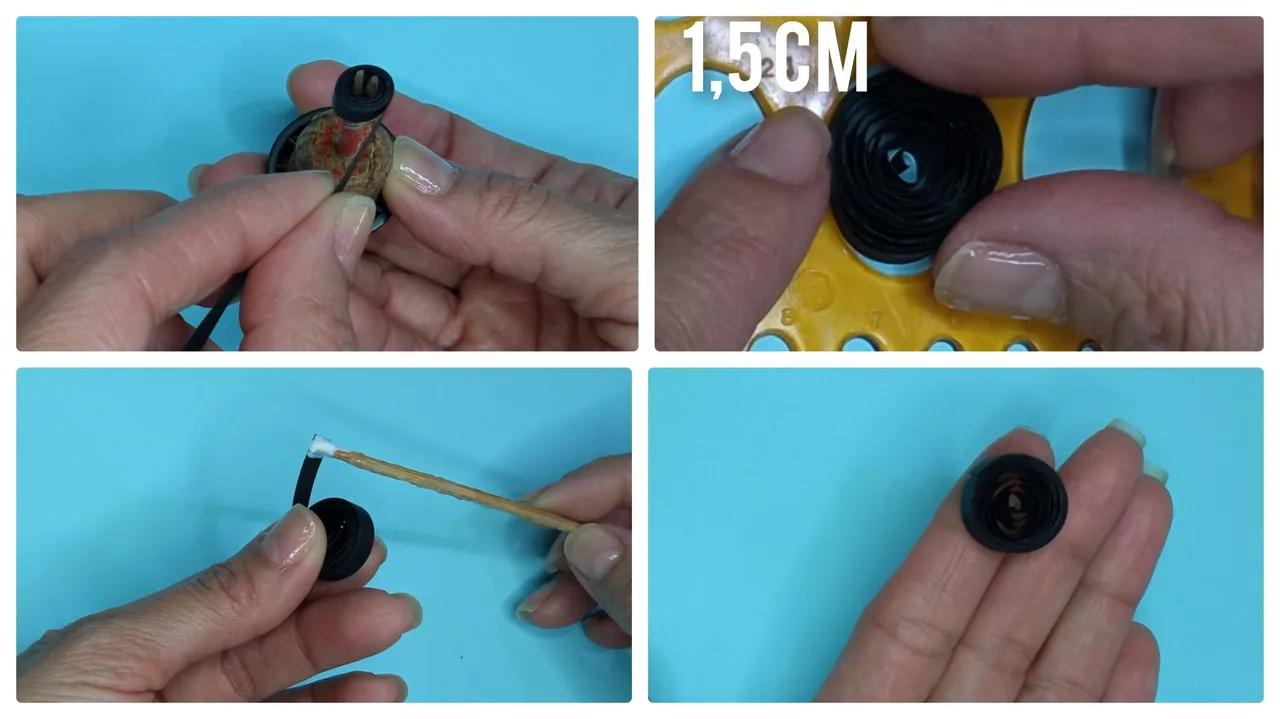
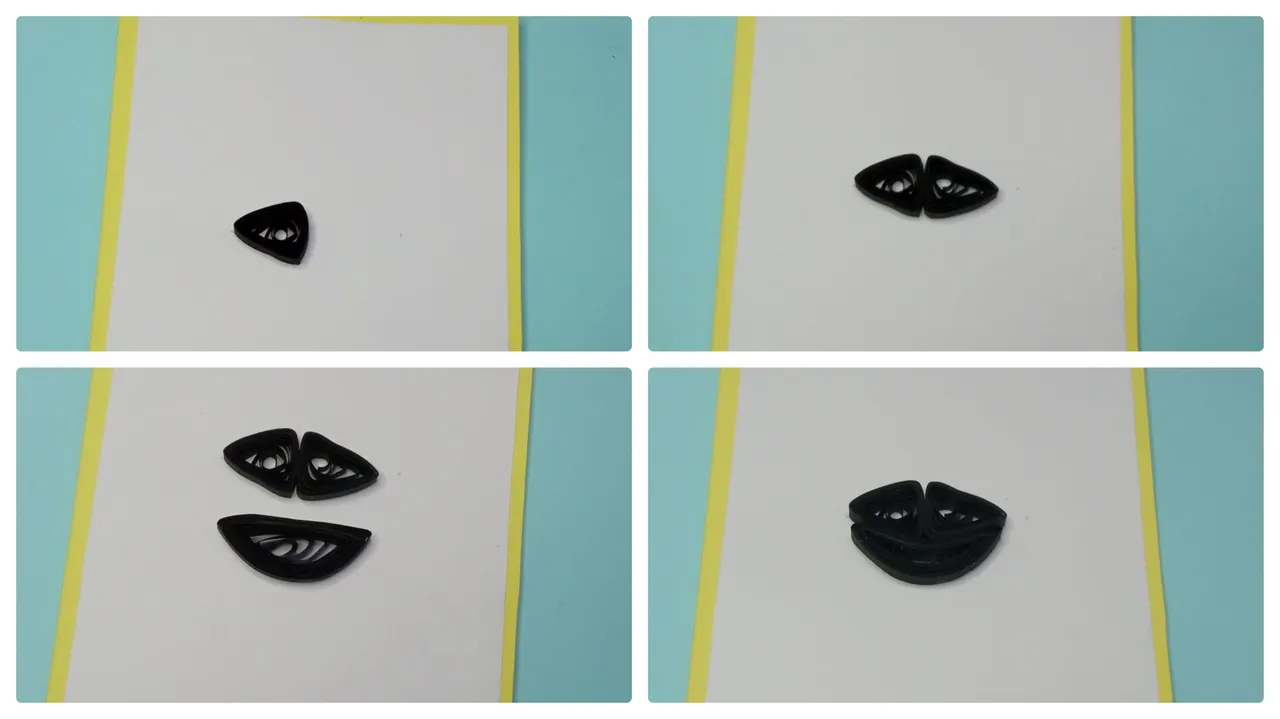
Paso 3
Seguidamente tomamos una tira negra e introducimos en el enrollador y damos vueltas sobre ella misma hasta el final, luego colocamos en la plantilla y soltamos con cuidado, después colocamos pega blanca en la punta y ya tendremos un circulo abierto.Step 3
Next we take a black strip and introduce it into the winder and turn it around until the end, then we place it on the template and carefully release it, then we place white glue on the tip and we will have an open circle.
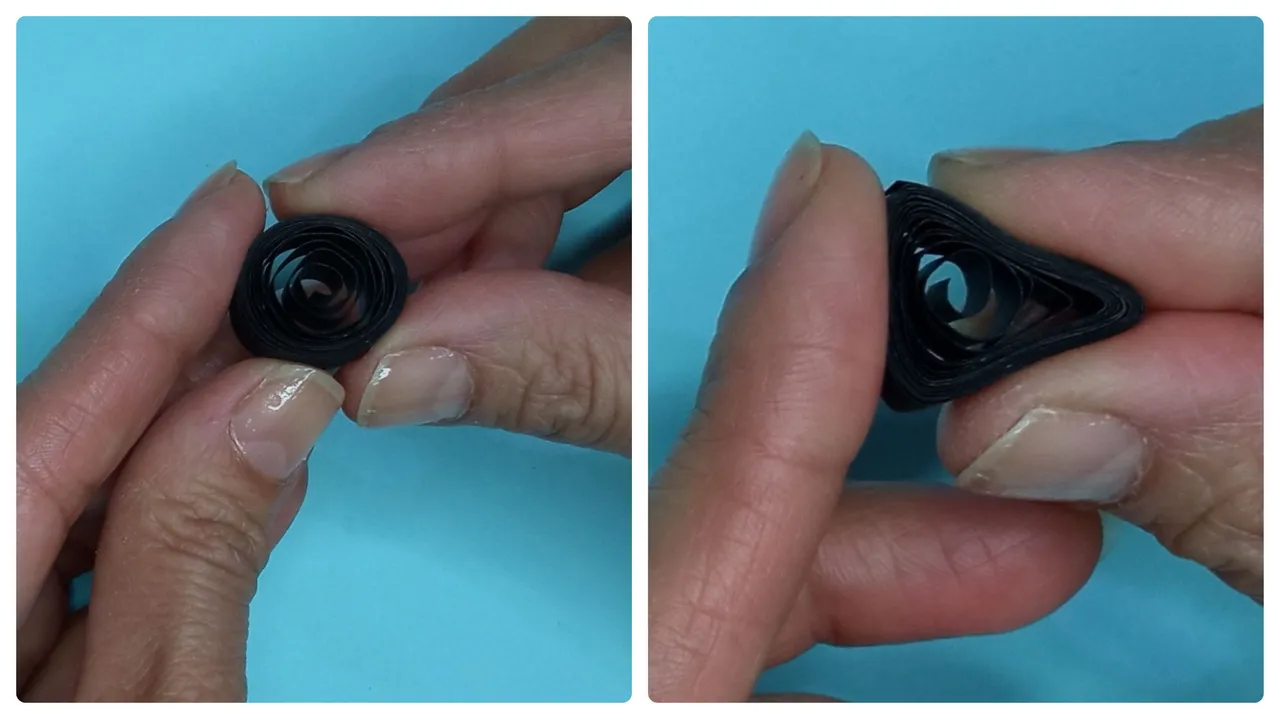
Paso 4
Después tomamos el círculo abierto y hacemos una de la formas básicas del filigrana llamada triángulo, con los dedos índice y pulgar de la mano derecha hacemos presión y con el índice de la mano izquierda ayudamos a dar forma de triangulo, haremos 2 de estos.Step 4
Then we take the open circle and make one of the basic filigree shapes called triangle, with the index finger and thumb of the right hand we make pressure and with the index finger of the left hand we help to shape the triangle, we will make 2 of these.
Paso 5
Pegamos 4 tiras negras y hacemos un circulo abierto explicado en el paso 3, luego hacemos una media luna aplastando con ambas manos los extremos del círculo abierto.Step 5
Paste 4 black strips and make an open circle as explained in step 3, then make a half moon by flattening the ends of the open circle with both hands.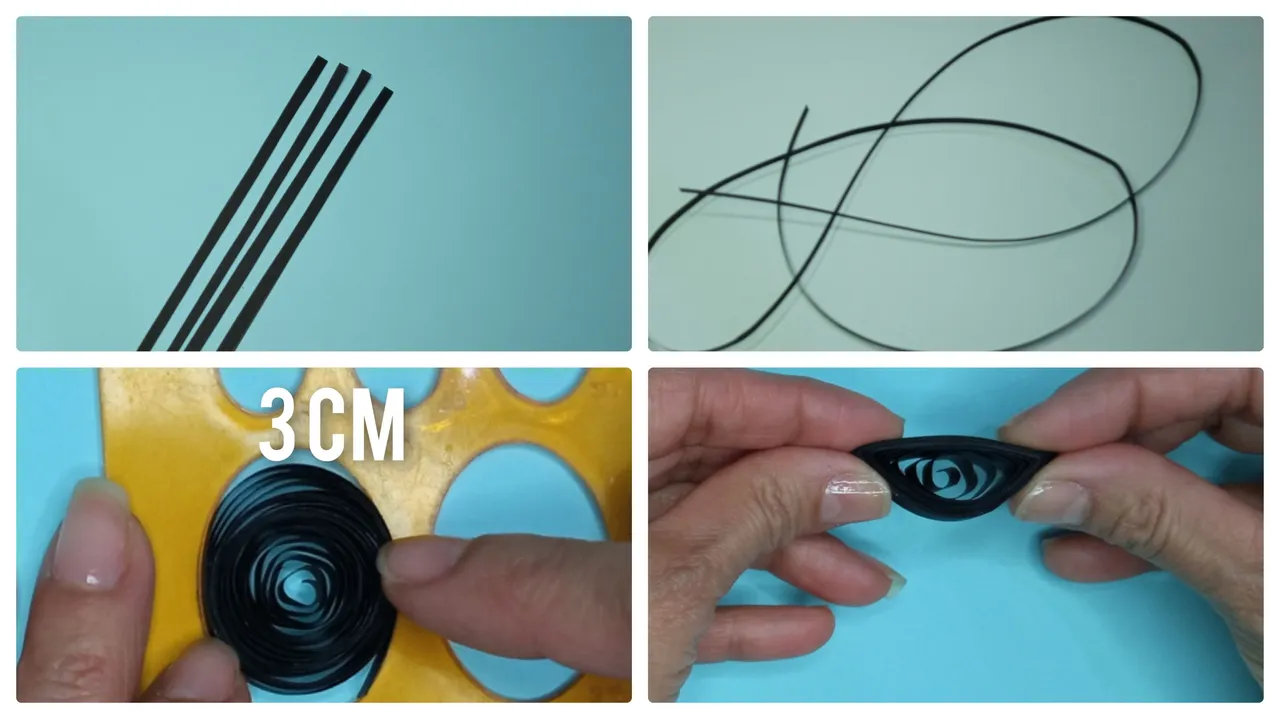
Paso 6
Luego comenzamos por armar la cabeza de nuestro bello gato michi, pegando los 2 triángulos y luego la media luna.Step 6
Then we start by assembling the head of our beautiful michi cat, gluing the 2 triangles and then the half moon.
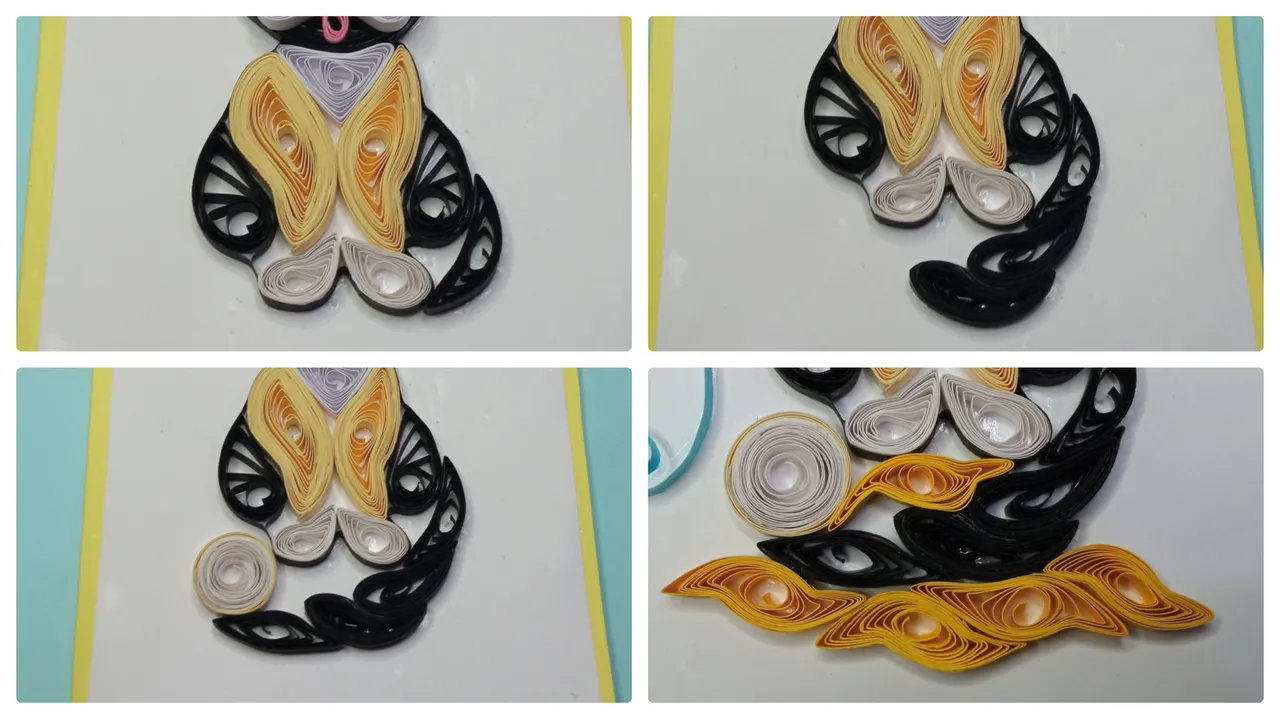
Paso 7
Ahora haremos 2 triángulos de la misma manera como hicimos en el paso 4 pero con tiras de 21,5 de largo beige y negra estas serán las orejas, después haremos los ojos con tiras amarillas y negras de 21,5 cm de largo cada una enrollamos hasta formar un círculo cerrado, procedemos a pegarlos y también pegamos 2 brillanticos negros en el centro de los ojos para darle un brillo lindo.Step 7
Now we will make 2 triangles in the same way as we did in step 4 but with strips of 21.5 cm long beige and black these will be the ears, then we will make the eyes with yellow and black strips of 21.5 cm long each one we roll up to form a closed circle, we proceed to glue them and we also glue 2 black glitter in the center of the eyes to give it a nice shine.
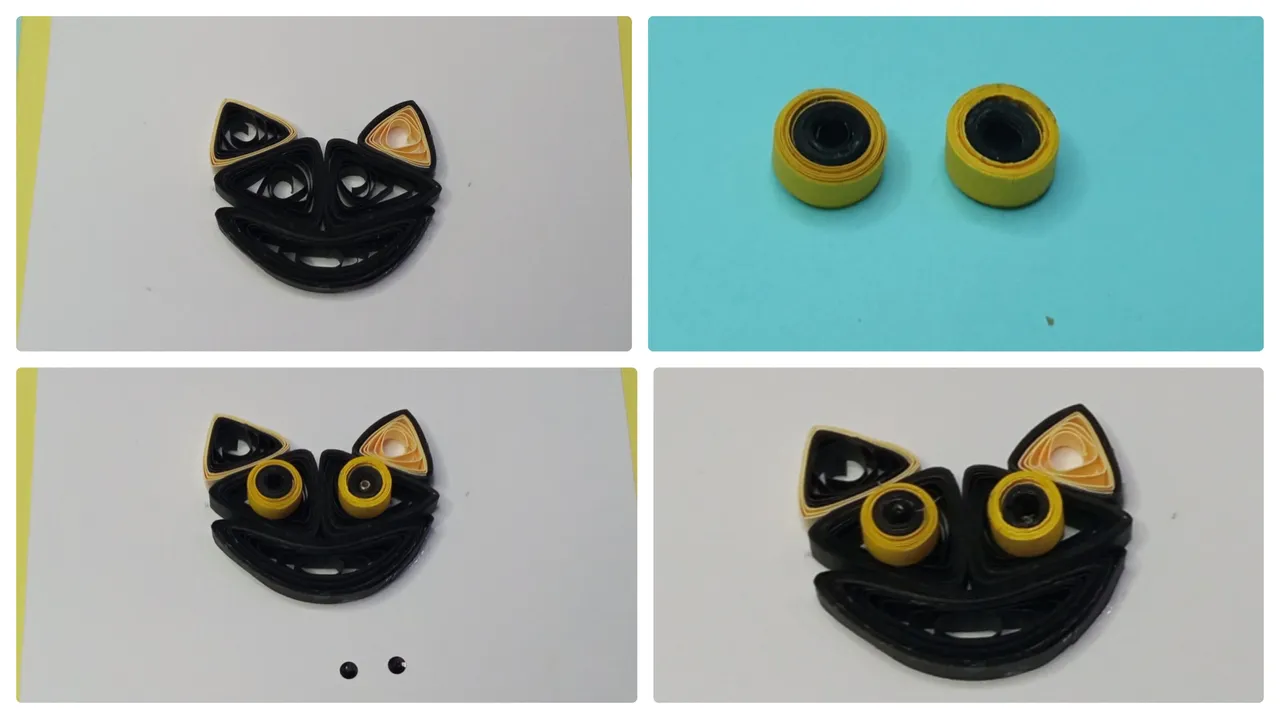
Paso 8
Para las mejillas del gatico haremos 2 gotas blancas partiendo de un círculo abierto con tiras de 21,5 cm presionamos un extremo con los dedos índice y pulgar formando así una gota y pegamos, hacemos la lengua con una tira rosada de la misma manera.Step 8
For the cheeks of the kitten we will make 2 white drops starting from an open circle with 21.5 cm strips, press one end with the index finger and thumb forming a drop and glue, we make the tongue with a pink strip in the same way.

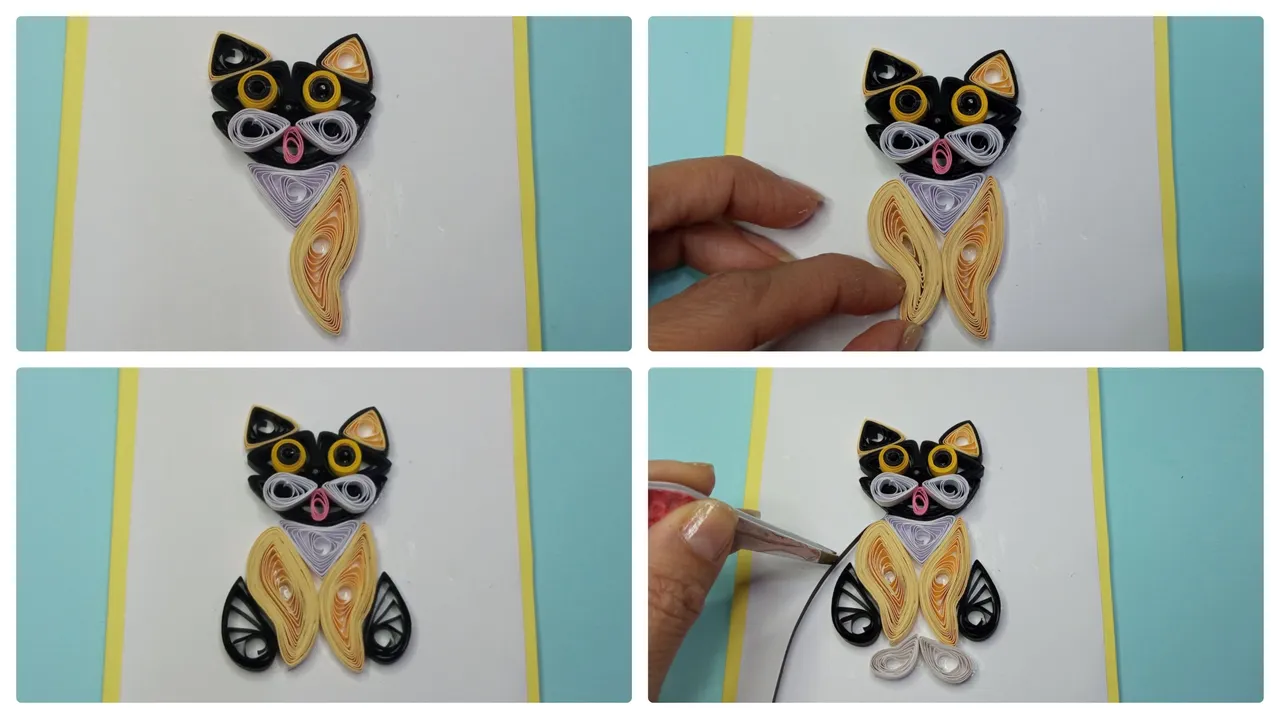
Paso 9
Ahora haremos las patas delanteras del gatico y para estas pegamos 4 tiras de 43 cm cada una y formamos un círculo abierto, luego con los dedos índices y pulgares damos forma de hoja, hacemos 2 de estas.Step 9
Now we will make the front paws of the kitten and for these we glue 4 strips of 43 cm each and form an open circle, then with the index fingers and thumbs we make a leaf shape, we make 2 of these.
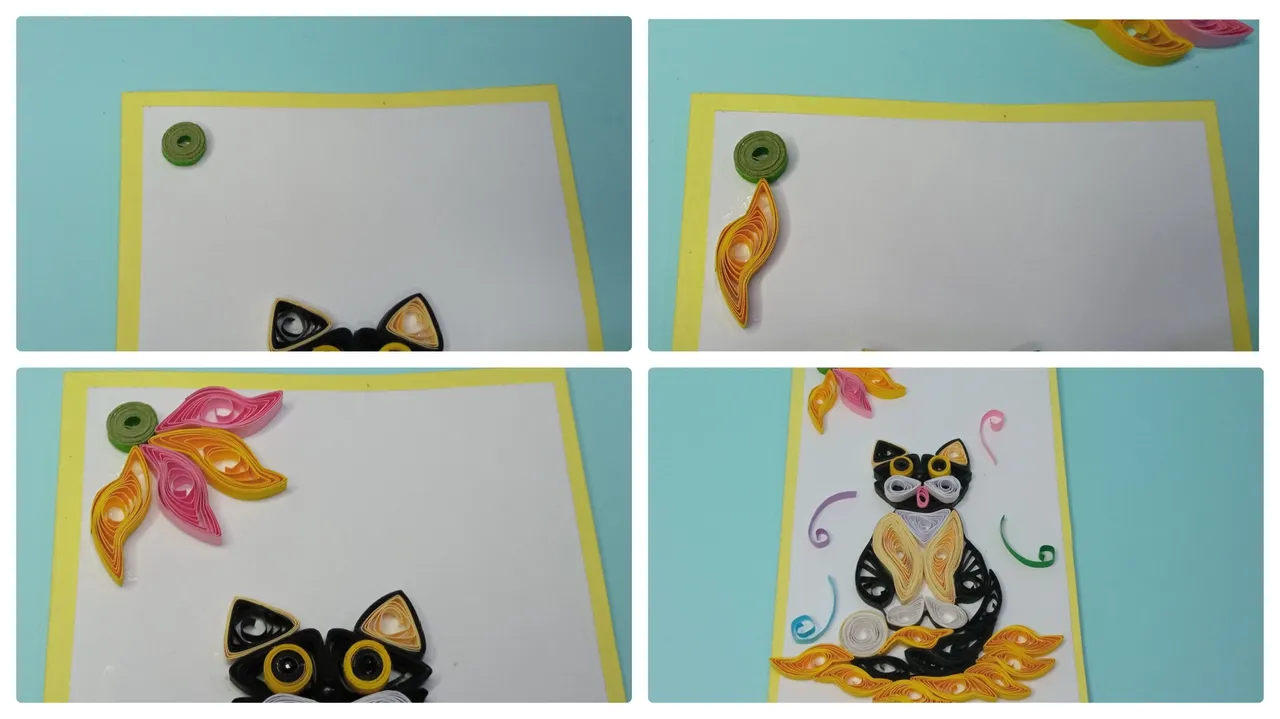
Paso 10
Ya nuestro gatico esta tomando forma, pegamos un triangulo blanco en el pecho, las 2 gotas beige, 2 gotas negras y 2 blancas, estas las haremos con tiras de 21,5 cm de largo, luego bordeamos con una tira negra.Step 10
Now our kitten is taking shape, we glue a white triangle on the chest, the 2 beige drops, 2 black drops and 2 white drops, these we will do with strips of 21.5 cm long, then we border with a black strip.
Paso 11
Para la cola haremos gotas negras con tiras de 43 cm de largo y vamos dando forma a medida que vamos pegando, después con tiras amarillas de 43 cm de largo haremos hojas como las hicimos en el paso 9, las pegamos para simular el piso donde se apoyara nuestro Michi.Step 11
For the glue we will make black drops with strips of 43 cm long and we will give shape as we go gluing, then with yellow strips of 43 cm long we will make leaves as we did in step 9, we glue them to simulate the floor where our Michi will rest.
Paso 12
Para la flor comenzamos haciendo un círculo cerrado verde con una tira de 21,5 cm de largo, luego pegamos hojas amarillas y rosadas que haremos de la misma manera como las hicimos en el paso 9, luego pegamos pequeñas tiras de colores, estas tiras simbolizan las tiras de filigrana donde siempre se enreda la pequeña Michi.Step 12
For the flower we start by making a green closed circle with a 21.5 cm long strip, then we glue yellow and pink leaves that we will do in the same way as we did in step 9, then we glue small colored strips, these strips symbolize the filigree strips where little Michi always gets tangled.
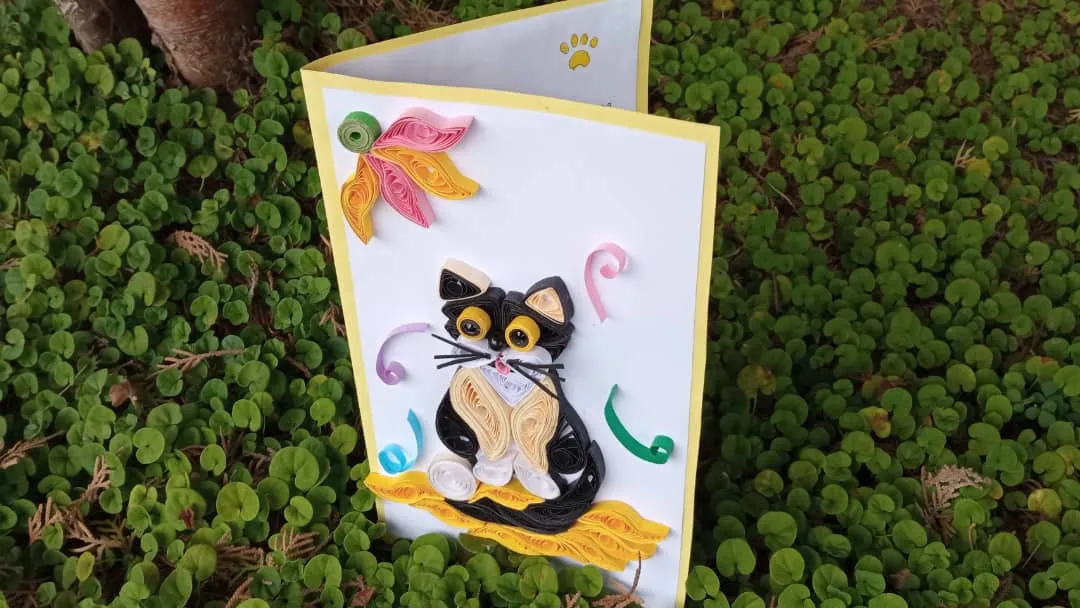
Paso 13
Por último hacemos el escrito para la tarjeta y con marcadores de colores haremos pequeñas huellas.Step 13
Finally we make the writing for the card and with colored markers we will make small footprints.

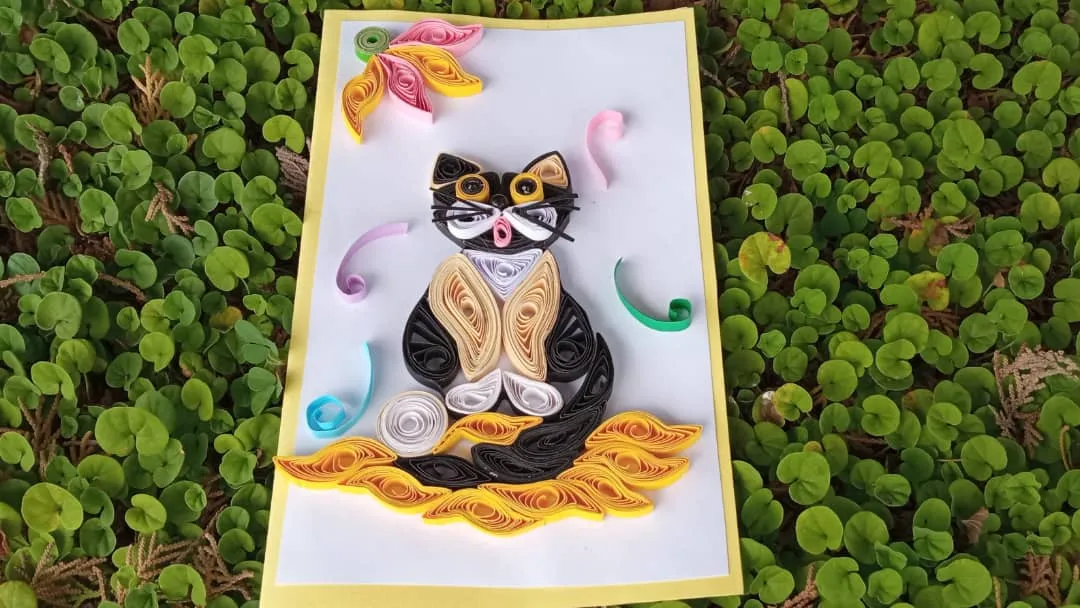
Y de esta manera ya tendremos una hermosa tarjeta de gatico (Michi), espero les agrade mucho amigos y sobre todo a mi mi hiver favorita
And this way we will already have a beautiful card of kitty (Michi), I hope you like it a lot friends and especially my favorite hiver.
Todas las fotos son tomadas de mi teléfono Redmi 9, para los collages usé la aplicación collage maker y para la traducción usé el traductor Deepl.
Todas las fotos son tomadas de mi teléfono Redmi 9, para los collages usé la aplicación collage maker y para la traducción usé el traductor Deepl.