Many years ago I took a photography class with the great fine-art photographer Michael Kenna, whose exquisite black-and-white photographs of landscapes, especially at night, are still considered classics. Every week, before class started, the students would hang their photographs (or “work” as we called them) on the wall. Kenna walked into class holding two L-shaped pieces of cardboard and immediately went to work on the photographs. He used the L's to crop each photograph in a variety of ways until he coaxed a much stronger image from the photograph.

Cropping, the removal of unwanted areas of an image, is probably the most basic photographic manipulation. In film days it was done in the darkroom or even by trimming the photograph itself. Today it is a basic function of photo-editing software.
I must admit, though, I took Kenna's cropping lessons with a pinch of salt. That's because I was grounded in traditional photographic discipline which strongly discouraged cropping. Following the French great Henri Cartier-Bresson, many black-and-white photographers eschewed cropping. To prove this they printed their negatives to include a thin edge around the image corresponding to negative rebate. So their photographic prints contained a thin black border around the image. If you look carefully at any of Cartier-Bresson's images, you will see black borders, proving it was an uncropped image.
I should explain the reason for this belief. Photographers strongly felt that the image should be “composed” or arranged within the viewfinder. When taking the picture, if you thought “Oh, I can fix that photo later with cropping,” you would not strive for the strongest possible image and become a lazy photographer.
I certainly believe this for most types of photographic subjects, such as people, landscapes, buildings, streets, etc and try to compose in the viewfinder without having to resort to cropping.
But since I started photographing birds and wildlife, I have come to embrace cropping as a creative tool. A bird or an animal is usually a small part of the entire frame because it is far away. Presenting this picture to the viewer without cropping is of little value. Cropping the picture magnifies the subject and brings it to the centre of attention. Unlike the limited freedom of cropping in the film darkroom, the vast megapixels of the digital camera allow me great flexibility in cropping.
Good cropping is very much an intuitive exercise. The photographer must have a sense of the geometry of the image; the crop should reinforce this geometry and not fight it. Many photographs have a direction associated with them and the crop must respect that. It goes without saying that the crop should not remove important parts of an image, such as a person's legs or a bird's tail.
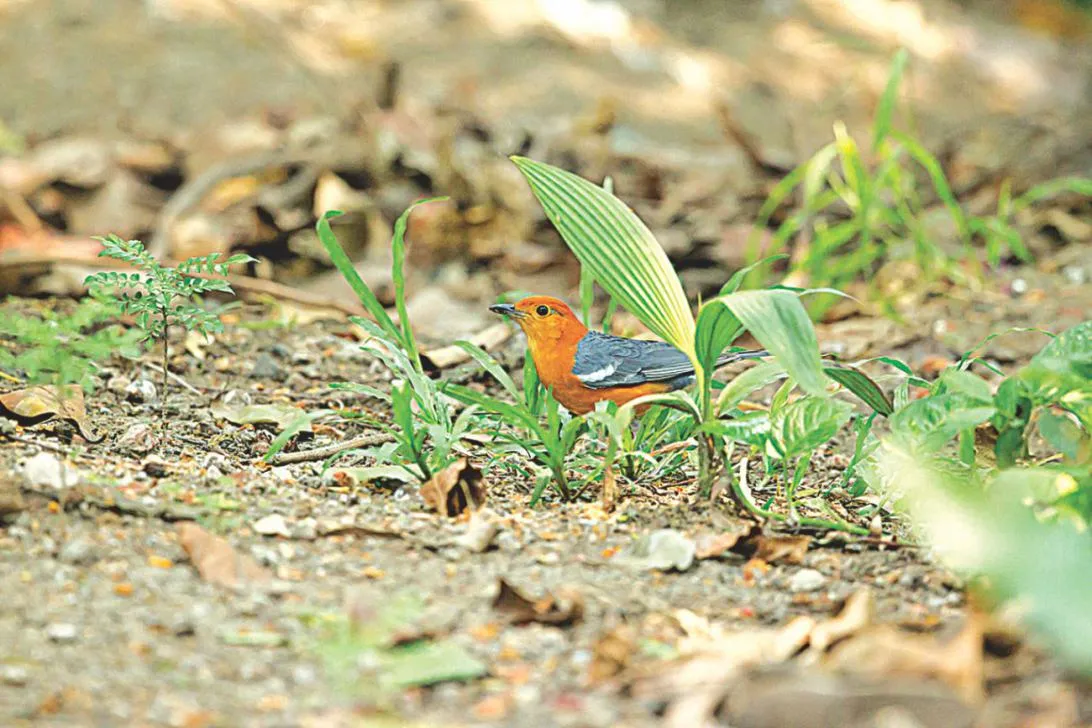
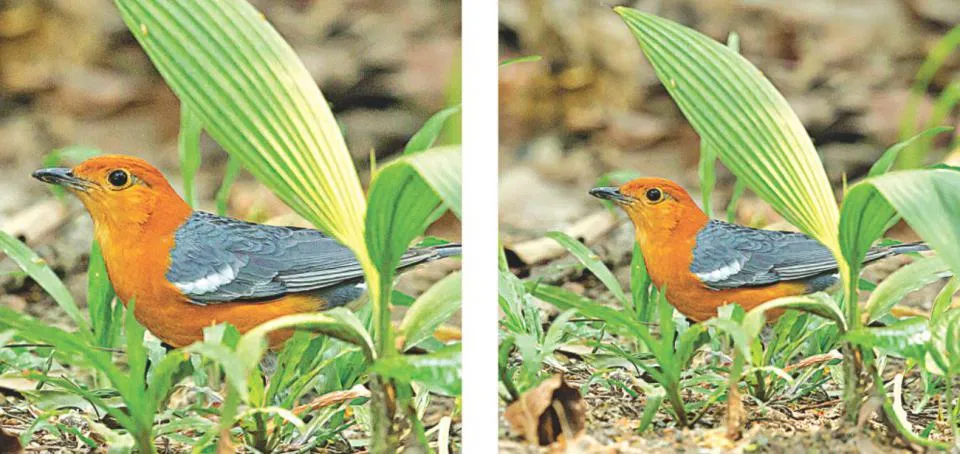
An example of good and bad cropping is shown above. The original image is shown on top. In the crop on the left side, the tail is cut off and the bird's head, facing left, needs more space for the eyes to “look into.” A better crop on the right solves both issues.
So give creative cropping a try. Look at the proportion and overall balance of the image. Avoid placing the subject in the middle of the frame to avoid monotony. With practice, cropping will become another creative tool in your photographer's toolbox.