Welcome to one of the most technically challenging Milkyway shots I've ever created. I hope you find the following both inspiring, educational, and a good insight into the work that myself and a lot of other photographers go to in order to create pieces such as this.
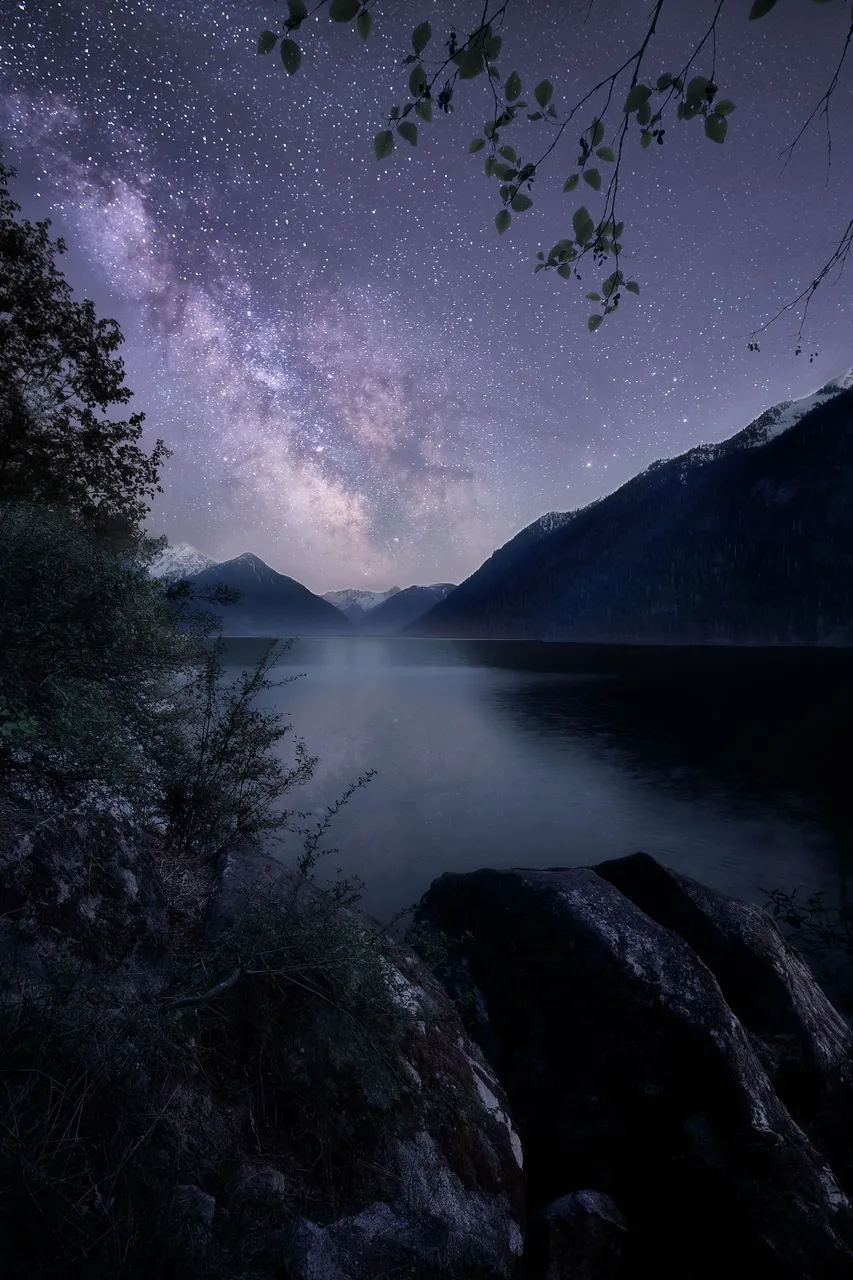
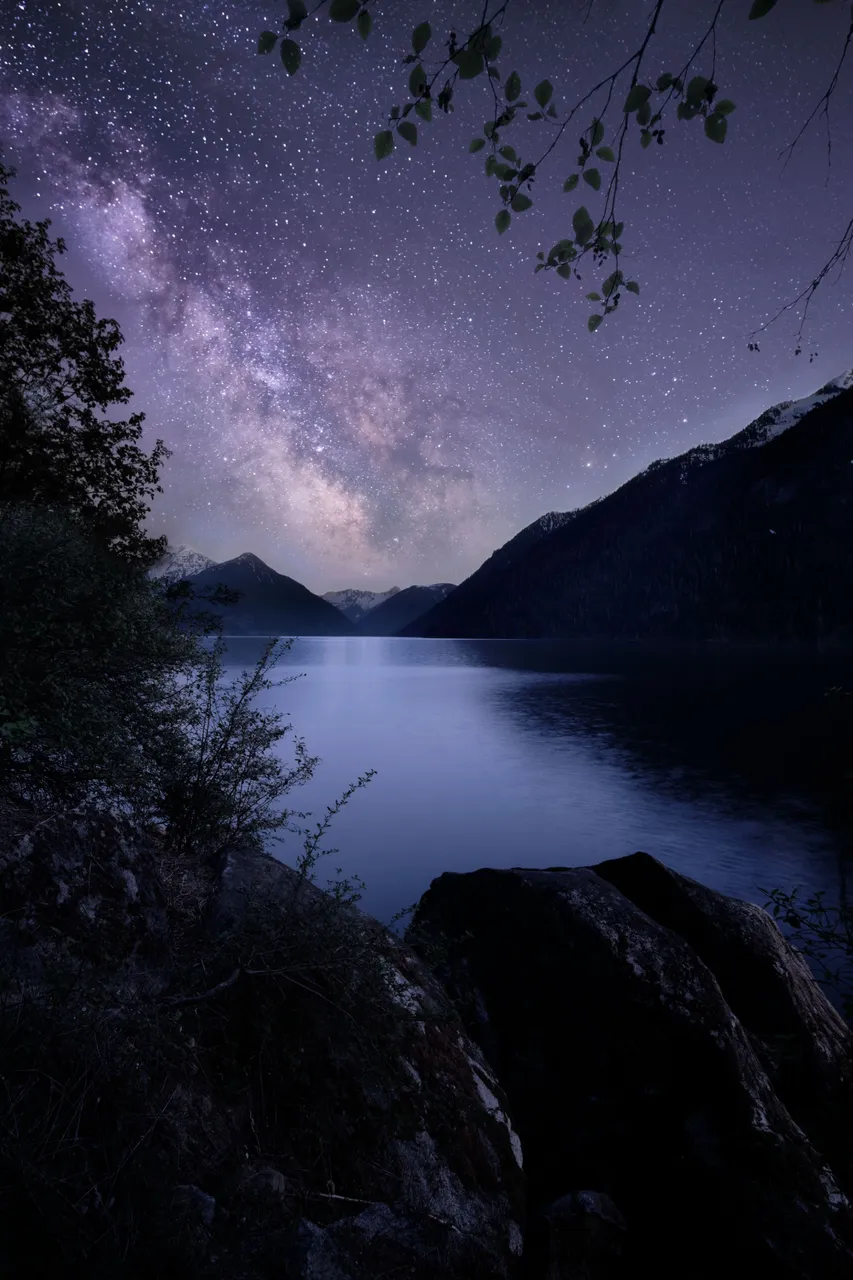
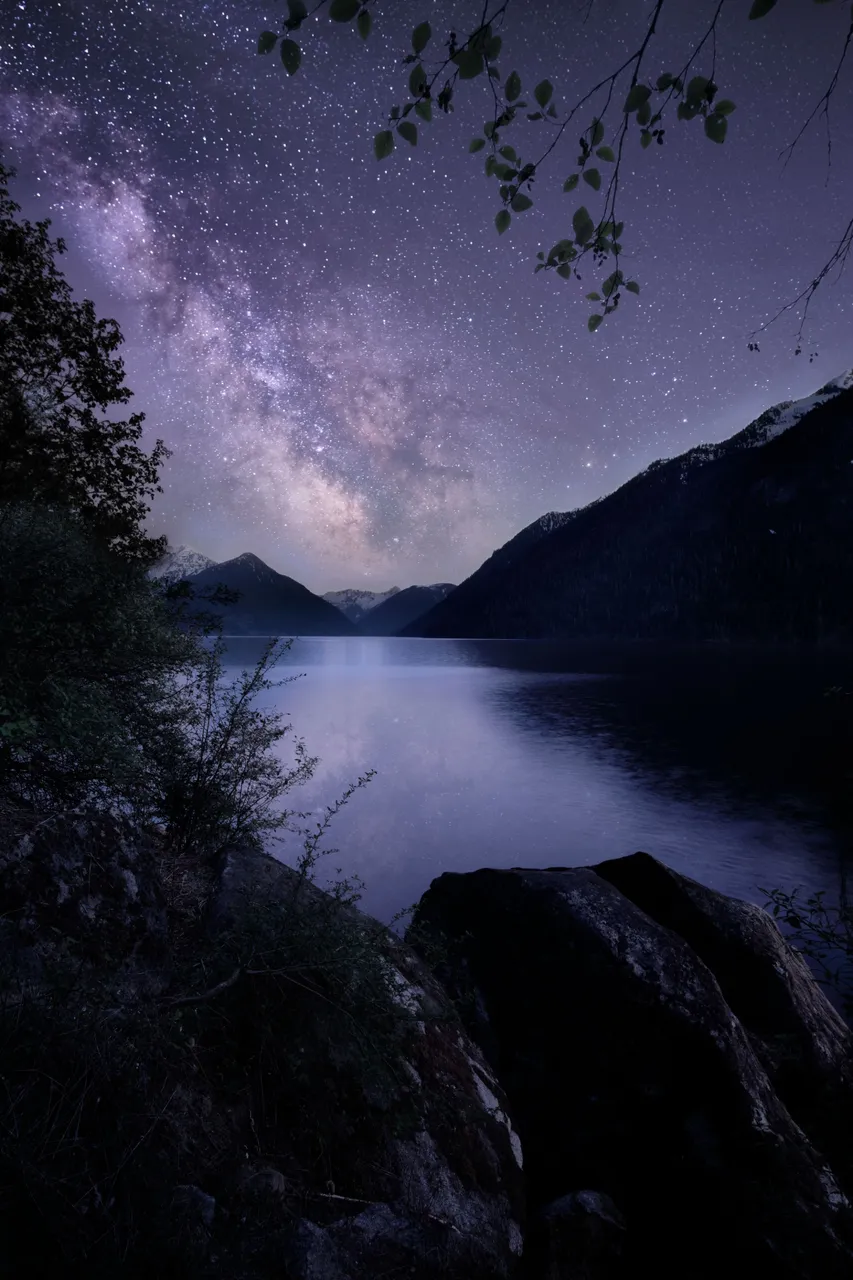
The Final Image
Why start here? - well, mostly because this first images becomes the main blog image. But secondly, because it will act as an immediate impression of this image. An end goal, so that as you see the next images you can understand where we are going. This will be a broad overview of how I planned and executed this shot, as well as the thought process behind my editing choices.
Step 1 - Location Scouting
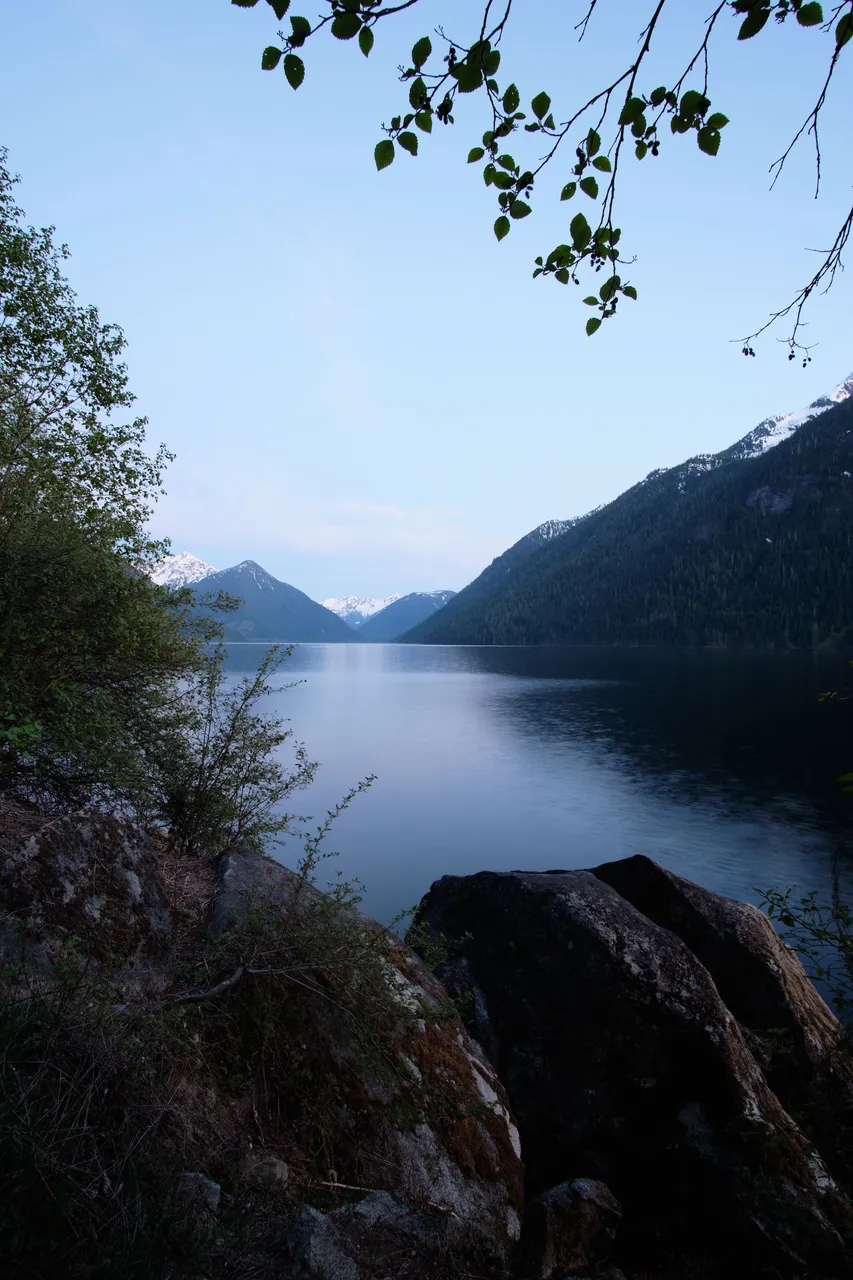
When I decided to attempt a shot at the milkyway here I did so on a whim the night before as I was looking at the weather. I use a variety of sources to figure out the likely-hood of a successful Milkyway shot, but I'll review that in a different post. For now, what you need to know is that the weather was clear, the time of year was right, and I had the time and energy to be up all night. I arrived at this lake an hour before sunset giving me enough time to walk around the area and scout out multiple potential shots I could take.
 |  |
|---|
Scouting your location in the daylight is one of the most important steps, unless you're already familiar with the location. It gives you a chance to see everything nicely lit, without stumbling through the dark searching for good foreground elements.
I ended up on this small side dirt road with just enough space to pull over and park. The image on the right was the scene I thought I would capture. In the remaining light of the day I took a variety of shots to end up with this final composition. I setup my tripod and returned to my car for a nap as the sun went down.
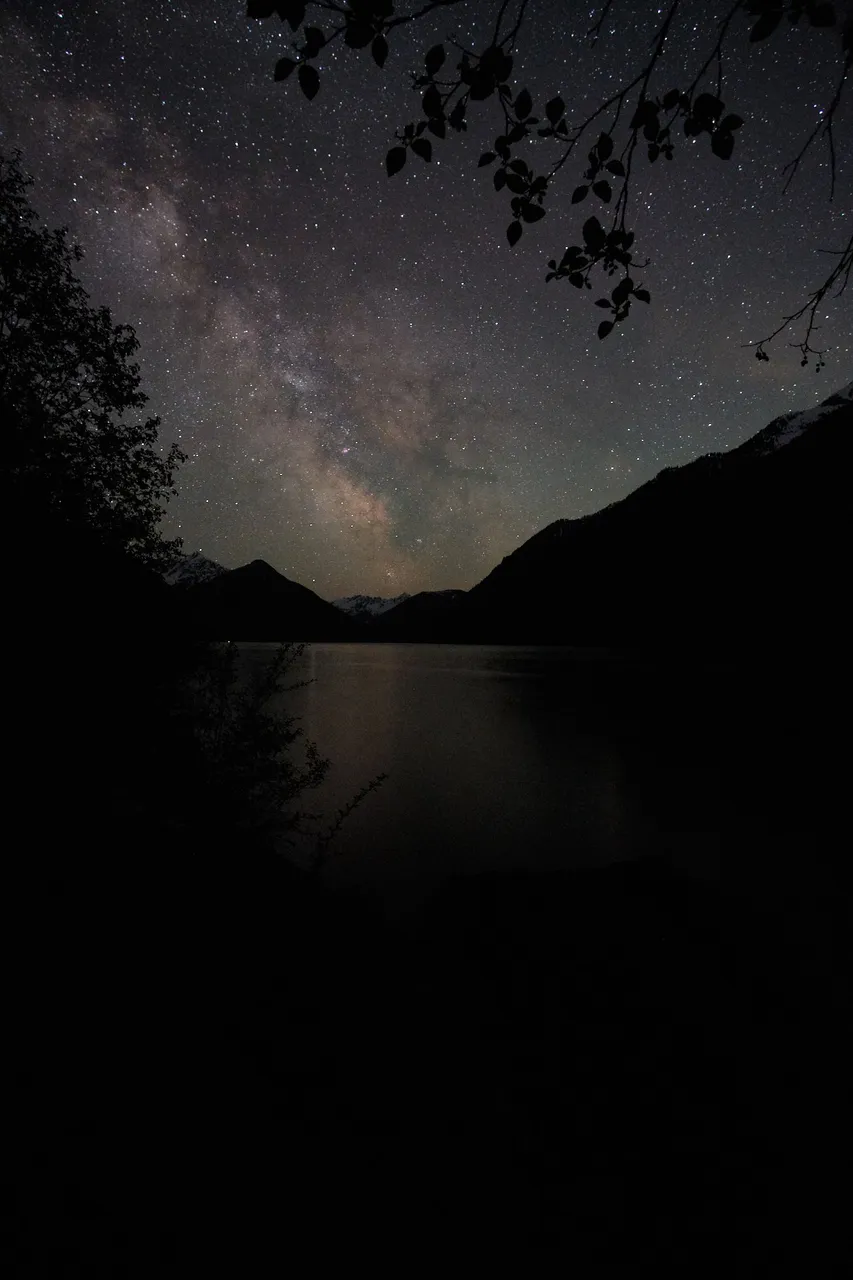
Blue Hour - A Shooting the Foreground
Blue Hour is what I would argue is the most important shot. The light that occurs during the blue hour will make every foreground of a milkway that much easier to work with. You could shoot in the midst of the dark night, stack a bunch of frames or use noise reduction methods to help with the foreground... but it is many many times easier to just blend a blue hour frame into your final image.
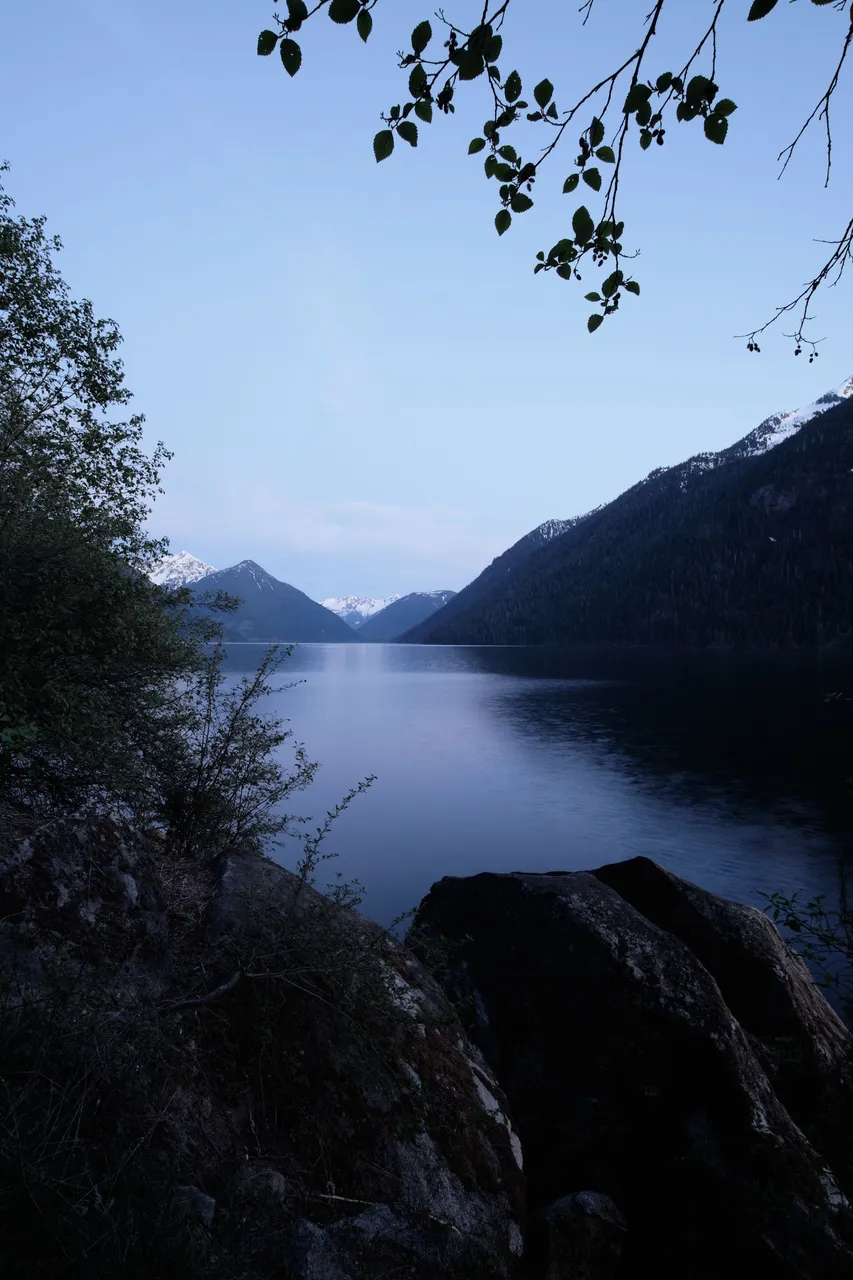
When my alarm went off at the start of blue hour I just hopped out of the car, put my camera on the tripod, and snapped the first frame of my final image. Below, is the unedited and the prepared RAW image that was used for the foreground - the Blue Hour Shot
|  | |
|---|---|---|
| Unedited RAW | Prepared RAW |
Rokinon 12mm, f/8, ISO400,2.1s
What you'll notice is there is very little that is changed here. The only true adjustments are darkening the shadows a bit, adding a slight purple/blue tinge, and reducing some of the contrast. Thats usually all that is needed. There isn't much light at night, and the deep dark of space creates more blue like tones to the eyes. So thats all that I needed to change to make it match the colors of the night. I've ignored the sky entirely, because I plan to replace it shortly.
The Milkyway - The Battery Drainer
Next it's time to setup the shots for the milkyway. You'll see from my catalog here that I took no shortage of frames. 109 to be exact, plus 5 dark frames.
Dark frames are used in software to help reduce sensor noise. When you leave your camera on taking continuous frames for so long the electronics get tired and start producing hot pixels and noise, neither of which are good for your image. The easiest way to do this is use an intervalometer to set up reoccurring shutter fires without you needing to be there to manually press the button. You can also figure out your shutter speed with these two handy rules.
| For Online | 500/focal length | 500/20mm = 25sec |
|---|---|---|
| For Print | 400/focal length | 400/20mm = 20sec |
For my setup, I was using the Rokinon 12mm for Fujifilm X-Mount. Factoring in the crop factor, I get the following -> 400 / (12mm x 1.5crop) = 22.2sec ~ 20 sec shutter speed.
I set my intervalometer to 21sec, and told it to fire infintiely. That gives approximately 1sec in between frames. Shutter speed is important because if you leave your shutter open too long you'll get blurred stars as they transit across the sky. Keep this in mind!
Once finished, I plug these all into a software called Sequator to create the combined image. You'll see why below.
 |  |  | 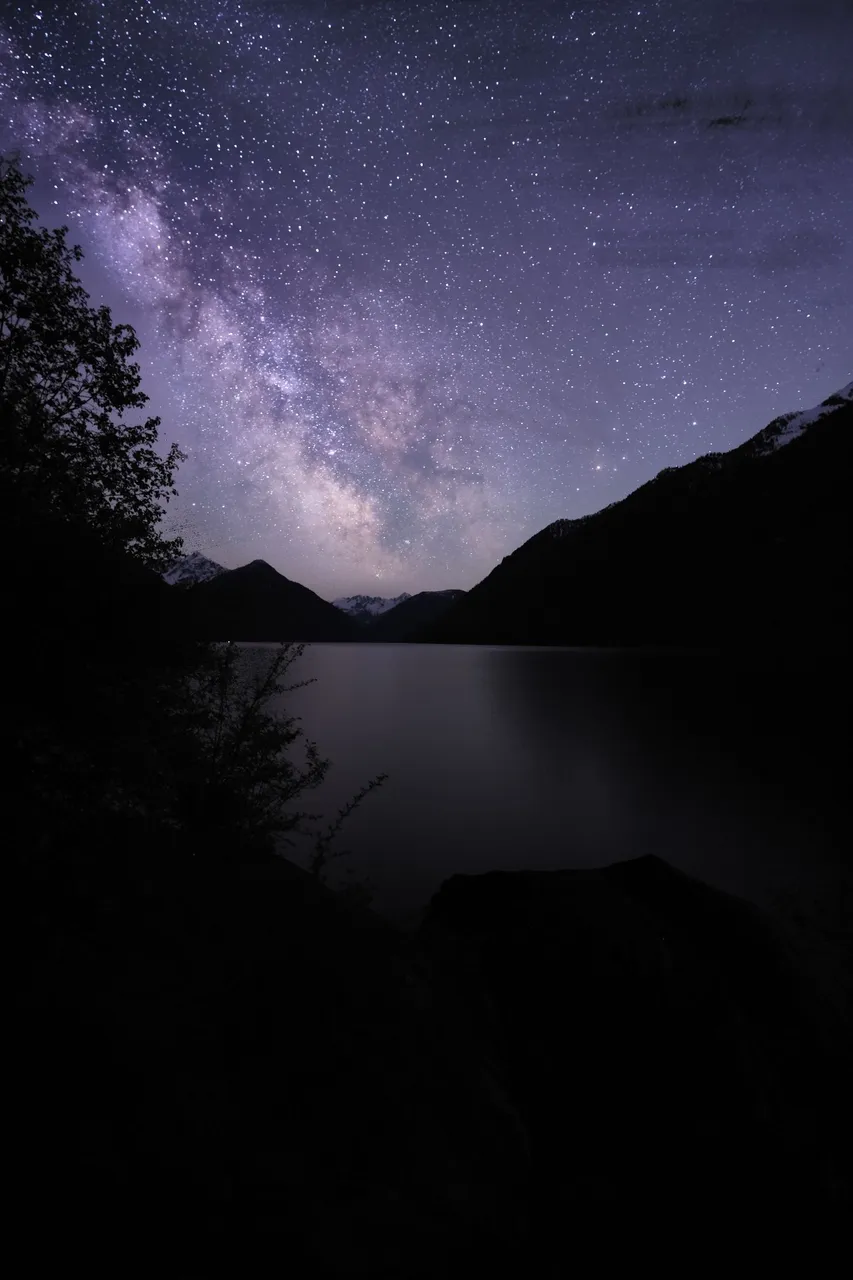 |
|---|---|---|---|
| SKY RAW | +3 Exposure | Prepared RAW | Sequator Merge |
                                        Rokinon 12mm, f/2.2, ISO800, 20s
                                            Total Merge time = 35min
Looking at these four images it should be clear why I use Sequator to help my process my astrophotography. The incredible amount of brightness, color, and noise reduction the software can pull from the combined images is insane! And even better, the more frames you have the more you pull. It only needs a min. of 4 frames too. The software merges and aligns the entire sky, keeps the foreground still, and uses an algorithm to produce the best color depth it can.
Processing the Final Image
This is the hardest part. Most people would choose to use a software like photoshop Photoshop to do this. You can also use others like GIMP, or competitor options like Affinity Photo or Corel Paintshop Pro. I personally use Affinity Photo.
First you'll want to bring in both your Blue Hour and Sequator Merge Files. If your software has an auto-align option I'd use it here. However, if you don't, or yours doesn't work quite right like mine didn't, just take the top layer and change its layering type to difference and manually stretch it from there. I'd recommend placing the Sequator Merge image layer on top.
Apply a mask to the sky image, and mask out the foreground. This is what you should get.
| |  |
|---|---|---|
| Blue Hour | Sequator Merge | Blended Image |
Something important to note is the tree branches missing from the Sequator Merge. Sequator can't deal with objects in the sky very well, it does better at ground level items. This was easily one of the hardest parts of this image. Blending these branches back into the sky in a believable way. Keep things like this in mind if you go choose to shoot astro... it will haunt you in the post processing.
Now, the next issue we need to deal with is the dynamic range. Its ugly. The lake is bright like daytime, and the rest of the image is dark like it should be. Its also too "clean". So we need to bring this image back to reality. My tip for this; take some video on your phone and describe the colors you see during the night you take your image. For my edit here, I've added some false light pollution to help blend the sky and mountains together better, as well as some fake mist off in the far distance to give the lake more realistic nighttime feel.
Another thing to note is the color of the water versus the sky. The sky has a more purple tinge to it, while the water remains blue in the initial blend.
To fix this I first did some color adjustments and shifted the blues in the water towards purples. I also wanted to capture the reflection, something I've witnessed before and felt was fitting to this scene. And while there was some reflection here in reality, the lake was far too windy that night to truly show the reflection in any meaningful way. I've inverted and masked the milkyway into the water here as my small cheat.
|  |  |
|---|---|---|
| Blended Image | Blend w/ - Reflection | Reflection with Reduced Opacity |
Between the 2nd and 3rd shot above here the biggest changes I've made were specifically to the way the water blended with the mountains, the reflection opacity and saturation, and also how clear the stars were. Water blurs things, so I tried to blur and obscure the reflection slightly as well.
| |
|---|---|
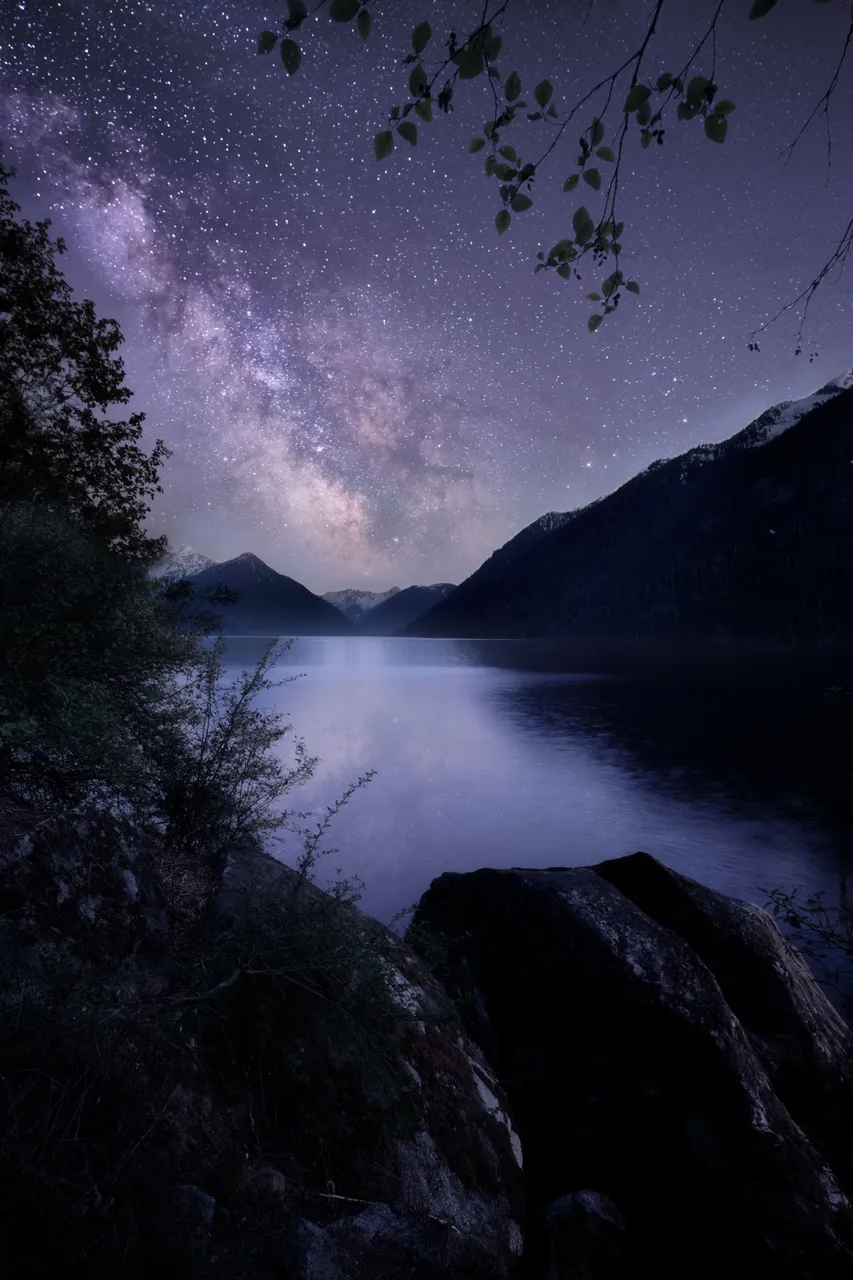
| Reflection with Reduced Opacity | Final Image |
I decided after sitting on this image for a few weeks that the water was still too intense, so the final step I took was further reducing the waters saturation and giving it a slight shift back towards to blue. Adding in further mist, and some glow to the overall image along with a shadows boost to bring some more details into the darkest parts of the image.
There are still many things I'd like to tweak further on this image - especially now that I'm once again revisiting the steps I'd taken to create this. New techniques and preferences... but we all have to stop somewhere. And so that's where this image will remain for the foreseeable future.
I hope you enjoyed this start to finish look behind the scenes at how I create this image! Now go shoot some stars yourself!
The Final Image
If you've enjoyed this blog please consider supporting my work through HIVE/Dyptre or following me on Twitter/Dyptre or Instagram/Dyptre