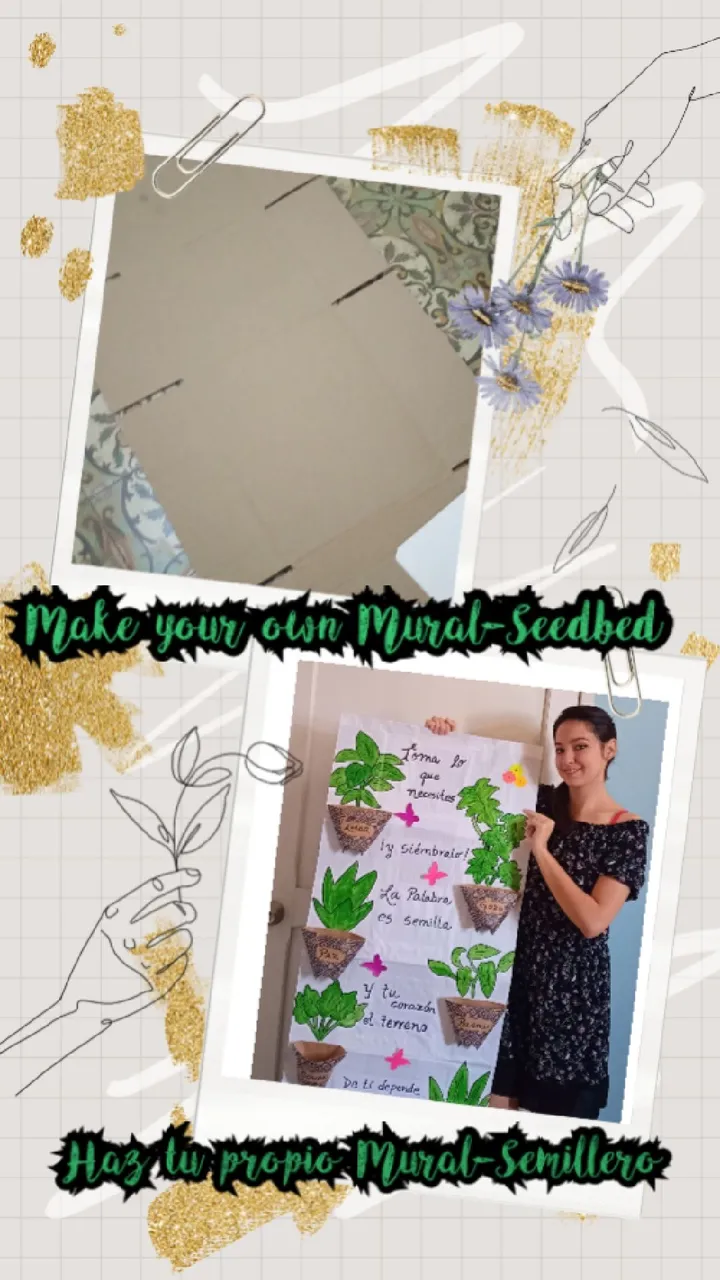
Hello everyone!!! Welcome to my Blog. In this tutorial I want to leave you with a great idea so that you can make your own seed mural. I love the concept of this mural, because it is based on the idea that love, patience, joy, faith, etc. are not fruits that can be found in the wild. Rather, it is up to each person who wishes to have them to cultivate them with effort and dedication. Just as a plant should be cared for, in order to enjoy its beauty and benefits.
It is an interactive mural, since it invites each person to take from the pots (each one represents love, joy, peace, etc.) a promise found in the Bible about the fruit in question. It seems to me a super fun idea to transmit a powerful teaching to children fundamentally, but also for any other age it is valid and necessary. About self-determination and responsibility in personal growth and development. I made this mural-seedbed for my church, but I think it is an adaptable idea for other environments, such as a school.
Hola a todos!!! Bienvenidos a mi Blog. En este tutorial deseo dejarles una idea genial para que puedan elaborar su propio mural-semillero. Me encanta el concepto de este mural, pues se basa en la idea de que el amor, la paciencia, el gozo, la fe, etcétera; no son frutos que se encuentren por ahí silvestres. Sino que a cada persona que desee tenerlos, le tocará cultivarlos con esfuerzo y dedicación. Justo como se debe cuidar una planta, para luego disfrutar de su belleza y sus beneficios.
Es un mural interactivo, pues invita a que cada persona tome de las macetas (cada una representa amor, gozo, paz, etc.) una promesa que se halla en la Biblia acerca del fruto en cuestión. Me parece una idea súper divertida para transmitir una enseñanza poderosa a los niños fundamentalmente, pero también para cualquier otra edad es válida y necesaria. Acerca de la autodeterminación y responsabilidad en el desarrollo y crecimiento personal. Yo realicé este mural-semillero para mi Iglesia, pero creo que es una idea adaptable para otros ámbitos, como por ejemplo una escuela.
Materials and instruments
Cardboard box
White sheets
Black, red and blue markers
Pencil and eraser
Colored paper
Green acrylic paint
Glue
Wire
Materiales e instrumentos
Caja de cartón
Hojas blancas
Marcadores negro, rojo y azul
Lápiz y goma de borrar
Papeles de colores
Pintura acrílica de color verde
Pegamento
Alambre
Step by Step
Paso a Paso
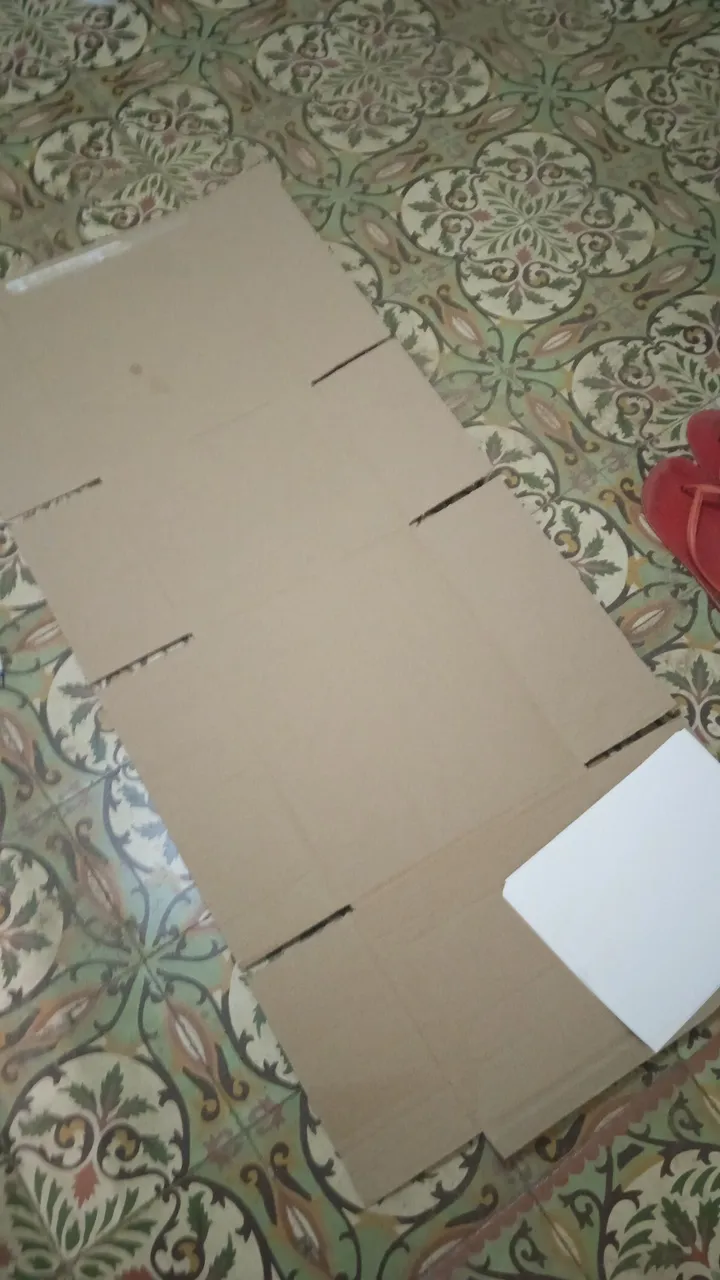
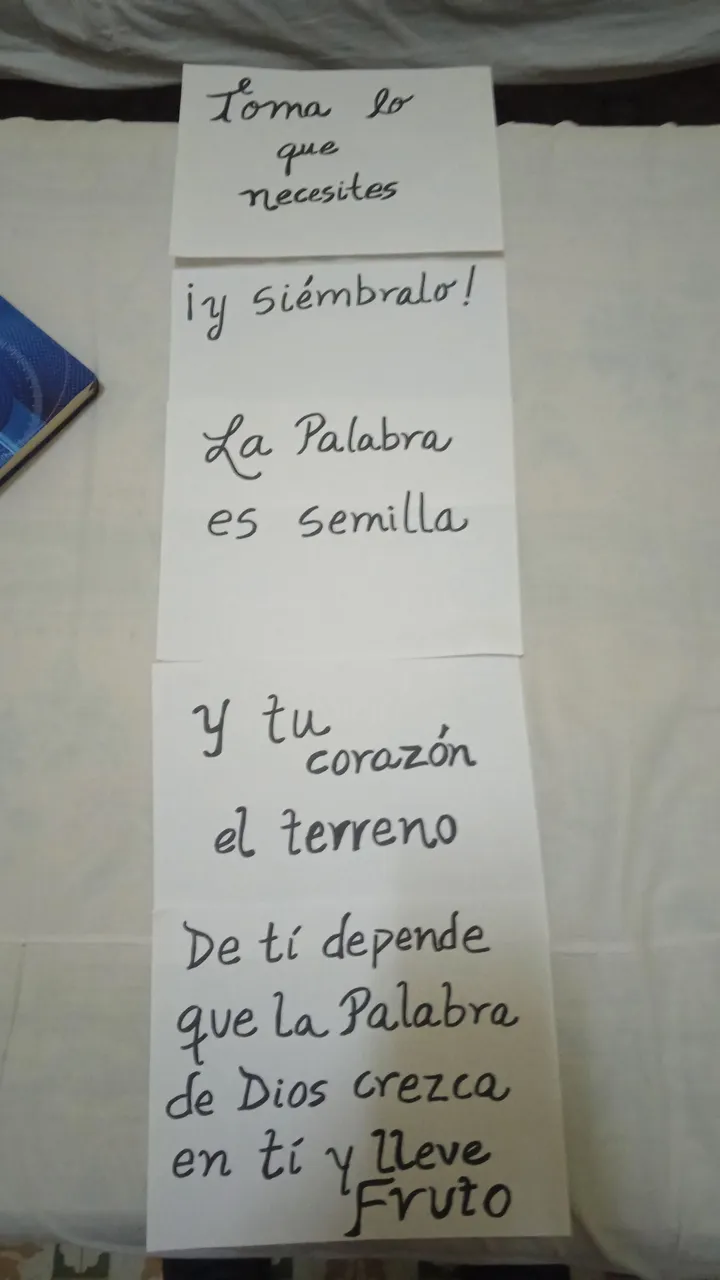
Step 1
Disassemble the cardboard box. Glue several white sheets of paper one after the other to write the central message you wish to convey, using black marker.
Paso 1
Desarmar la caja de cartón. Pegar varias hojas blancas una a continuación de otra para escribir el mensaje central que se desea transmitir, con marcador negro.
Step 2
Proceed to paper the cardboard with sheets of white paper, so that the message we wrote is in the center. To glue the sheets I used a glue that I made myself with water and flour. It is a good option if you don't have industrial glue. Although it is necessary to be careful not to spread too much so that the paper does not wrinkle.
Step 3
Draw 6 plants to give the illusion that they are coming out of the pots that we will later make. I found it easier to do the sketch in pencil first and then color it with green acrylic paint and finally go over the outlines with black marker. To make the mural more beautiful, you can draw each plant different from the others. This will make it more colorful and eye-catching.
Step 4
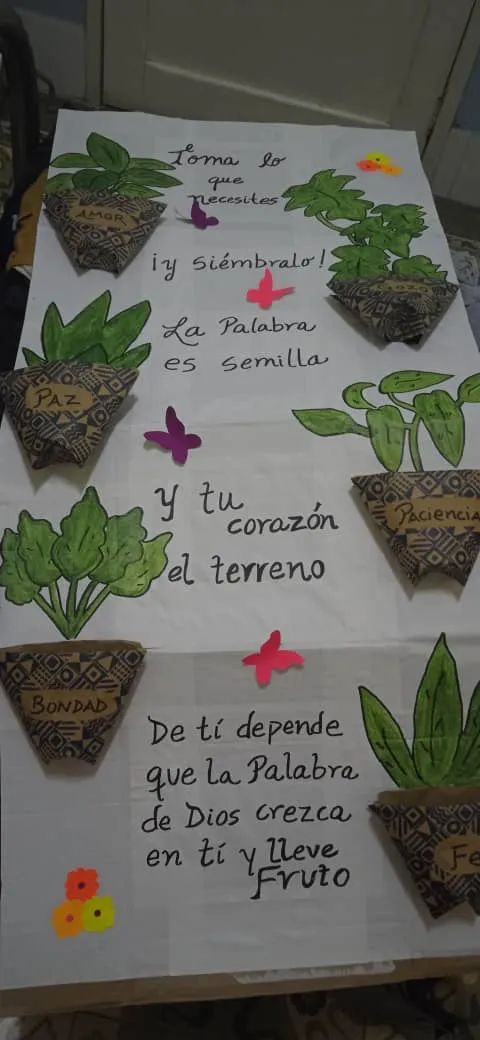
Make the paper pots.
Make the paper pots. I made them out of origami with colored paper, they were simple but very pretty. Do not forget to write on each pot the corresponding fruit: love, joy, peace, patience, kindness and faith.
Paso 2
Proceder a empapelar el cartón con hojas de papel blanco, de manera que quede en el centro el mensaje que escribimos. Para pegar las hojas utilicé un pegamento que elaboré yo misma con agua y harina. Es una buena opción si no tienes el pegamento industrial. Aunque es necesario ser cuidadosos de no untar demasiado para que no se arrugue el papel.
Paso 3
Dibujar 6 plantas para que dé la ilusión de que salen de las macetas que posteriormente elaboraremos. A mí me resultó más fácil hacer primero el boceto a lápiz y luego colorearlo con pintura acrílica verde y por último repasar los contornos con marcador negro. Para que quede más bonito el mural, pueden dibujar cada planta diferente a las demás. Eso lo hará más vistoso y llamativo.
Paso 4
Hacer las macetas de papel. Yo las hice de origami con papel de color, quedaron sencillas pero muy bonitas. No olvidar escribir en cada maceta el fruto que corresponda: amor, gozo, paz, paciencia, bondad y fe.
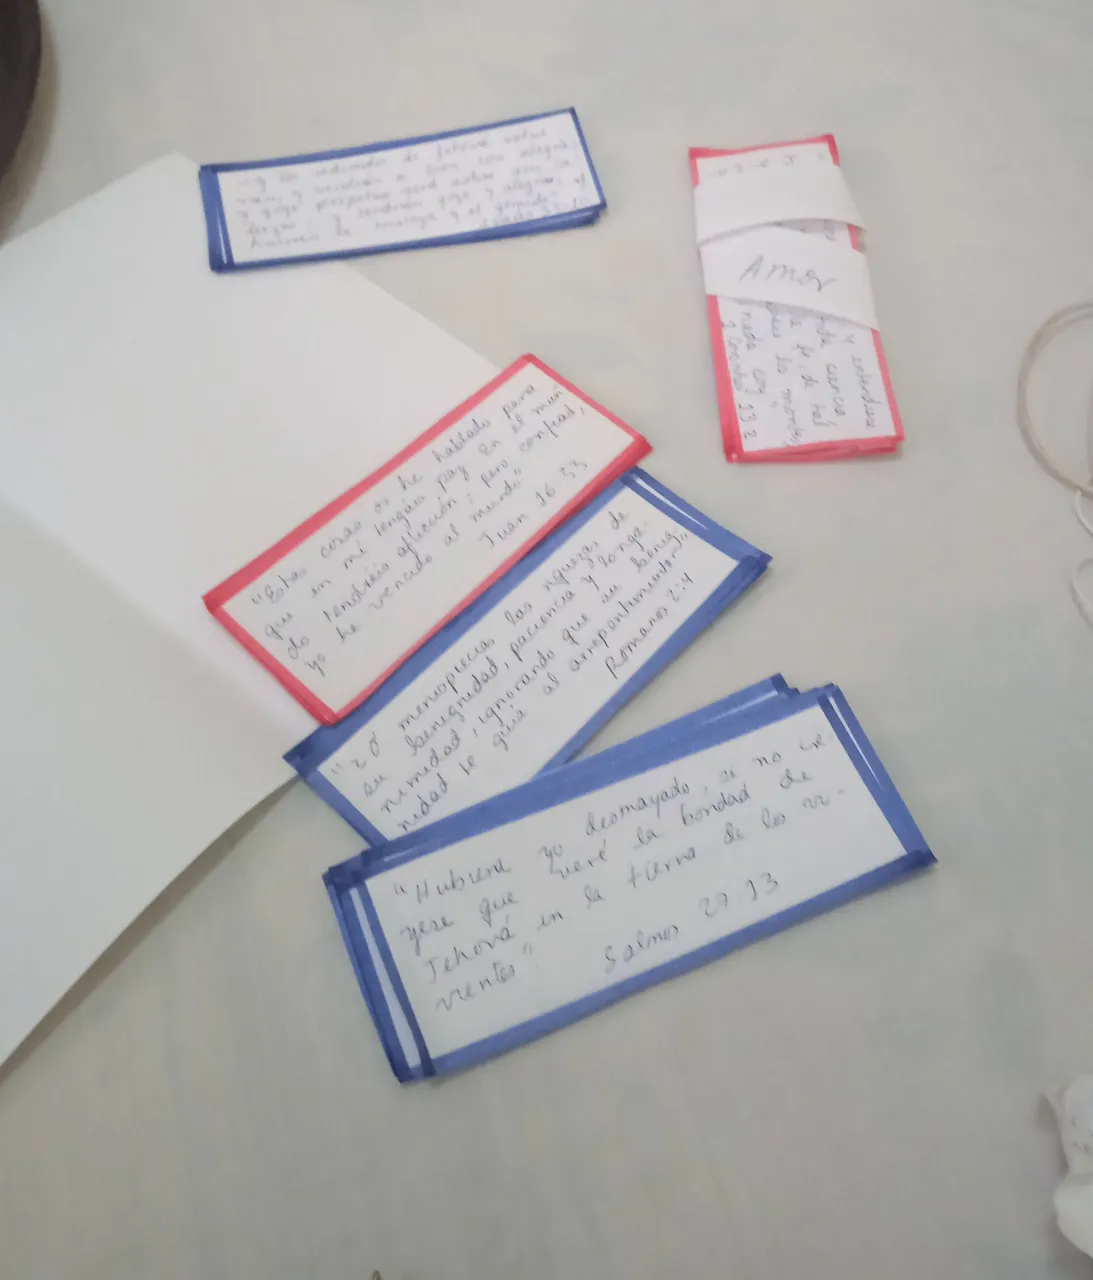
Step 5
Make the cards that will go inside each pot. I put 10 promises in each pot. Be careful to use promises that correspond to the fruit in each pot. To decorate the cards I put blue or red marker around the edges.
Step 6
For the finishing and final details I used colored paper. I made flowers that I glued on the mural, as well as some butterflies that I glued in relief to give the sensation that they are flying. In addition, I made a wire hitch at the back of the mural to be able to hang it on the wall.
Paso 5
Elaborar las tarjetas que irán dentro de cada maceta. Yo puse 10 promesas en cada maceta. Es necesario ser cuidadosos en emplear promesas que correspondan con el fruto de cada maceta. Para decorar las tarjetas les pasé en los bordes marcador azul o rojo.
Paso 6
Para el acabado y los detalles finales utilicé papeles de colores. Hice flores que pegué en el mural, así como unas mariposas que pegué a relieve para dar la sensación de que están volando. Además, le hice un enganche con alambre, por detrás al mural para poder colgarlo en la pared.
Result
Resultado
When I took the mural to the church everyone was very excited to interact with it. It gave even more color and life to the church, being something different and new. Later the children's teachers used it for their classes and to decorate the classroom.
I hope you liked this tutorial and that it will inspire you for new creations.
Big hugs to all of you. Thanks for reading me!
Cuando llevé el mural a la Iglesia todos se animaron mucho para interactuar con el mismo. Le dio aún más color y vida al templo, al ser algo diferente y nuevo. Posteriormente las maestras de los niños lo emplearon para darles sus clases y para decorar el aula.
Espero que les haya gustado este tutorial y los ayude a inspirarse para nuevas creaciones.
Un abrazo grande a todos. Gracias por leerme!!!

✍🏻 Original content by @lagoticaderocio🌺
📷 Photos edited by Canva and PicsKit📷
✨Translation by DeepL✨
✍🏻 Contenido original por @lagoticaderocio🌺
📷 Fotos editadas por Canva y PicsKit📷
✨Traducción por DeepL✨