(ENG)
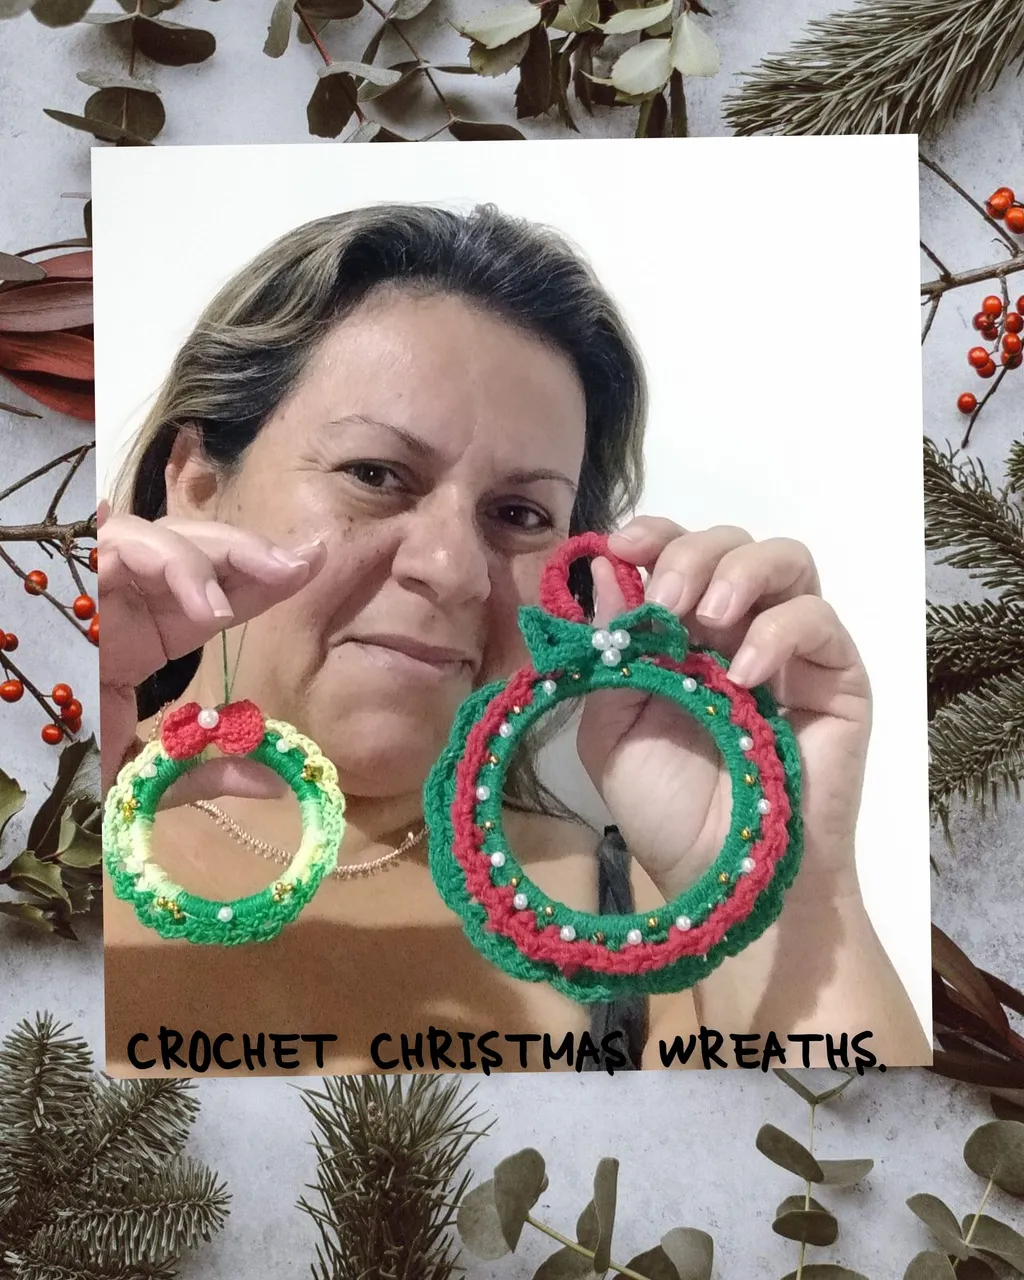
Hello everyone, it is a pleasure to greet all of you, DIY lovers and creators par excellence who make life at @diyhub. Today I am going to show you a very simple step by step, this time, it is two models of Christmas wreaths, crocheted and where I also used the edges of plastic cups, the result is really beautiful, you could use these as pendants on Christmas trees, wreaths, wherever you want.
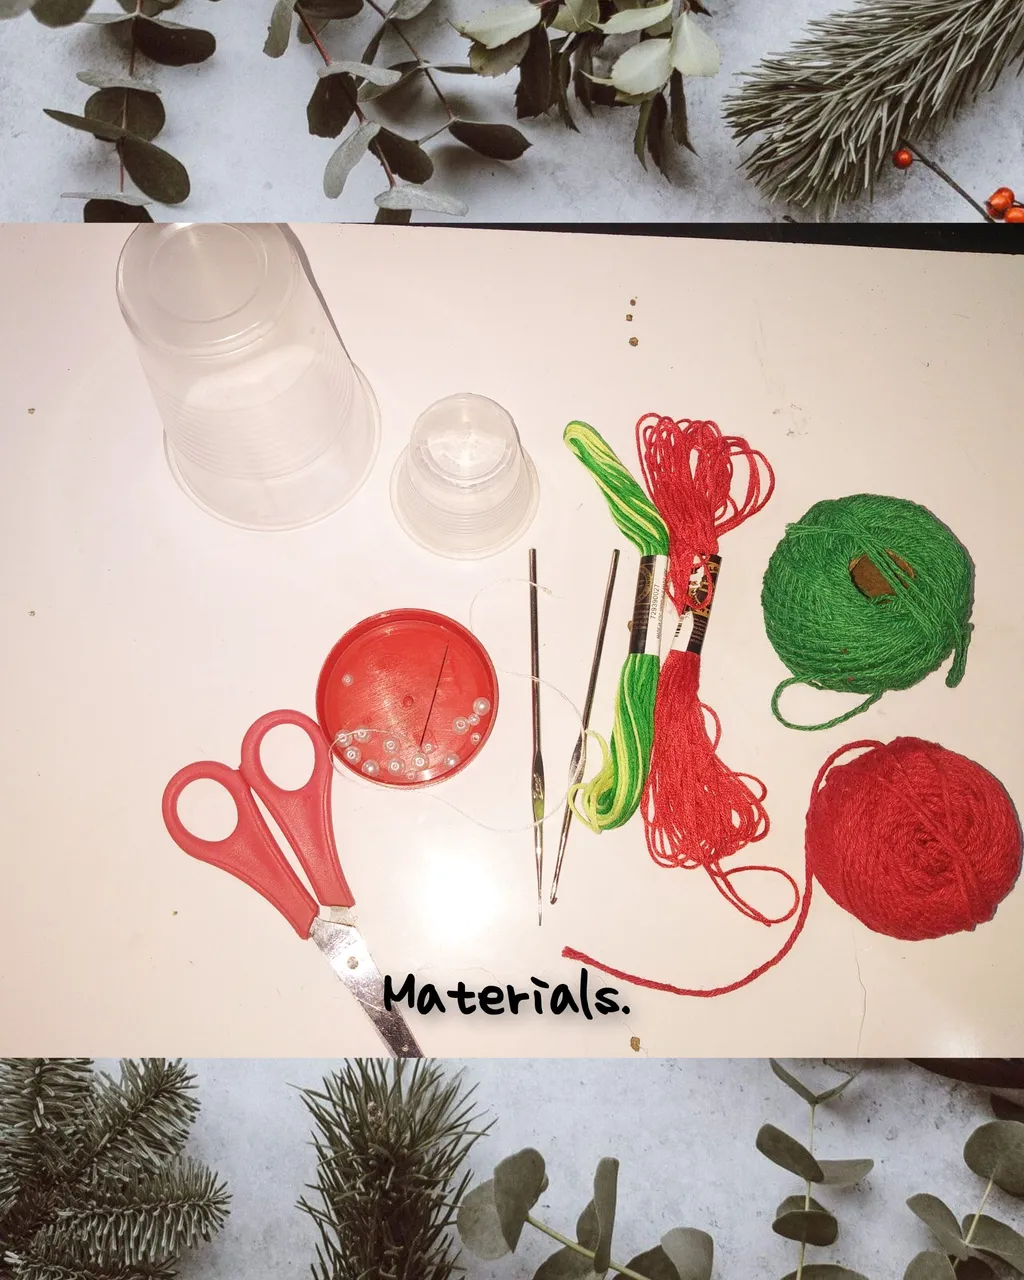
Materials:
. Plastic cups n6 and n2.
. Skein of nuanced light and dark green color.
. Red skein
. Christmas green16 and red knitting yarn.
. White pearls, number 4, 6.
. Small golden pearls.
. Knitting needle.
. Needle and thread for sewing. . Scissors.
STEPS:
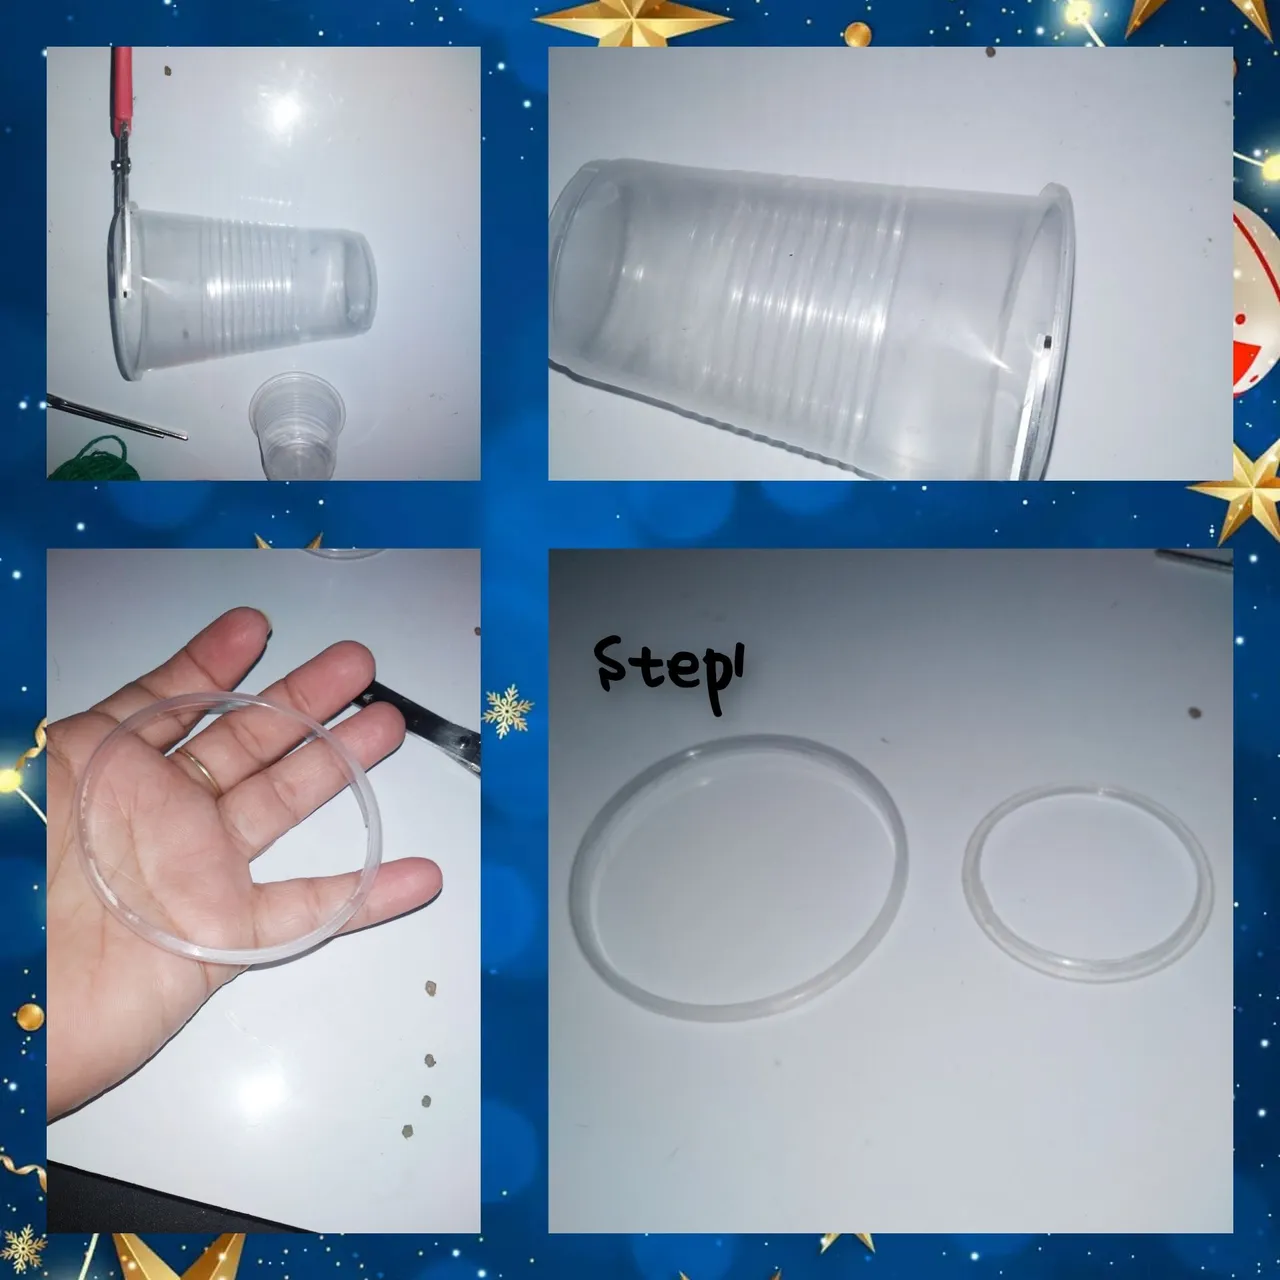
1.) Making small cuts in the upper part of the plastic cups, I extract the rings, which form the rim of these.
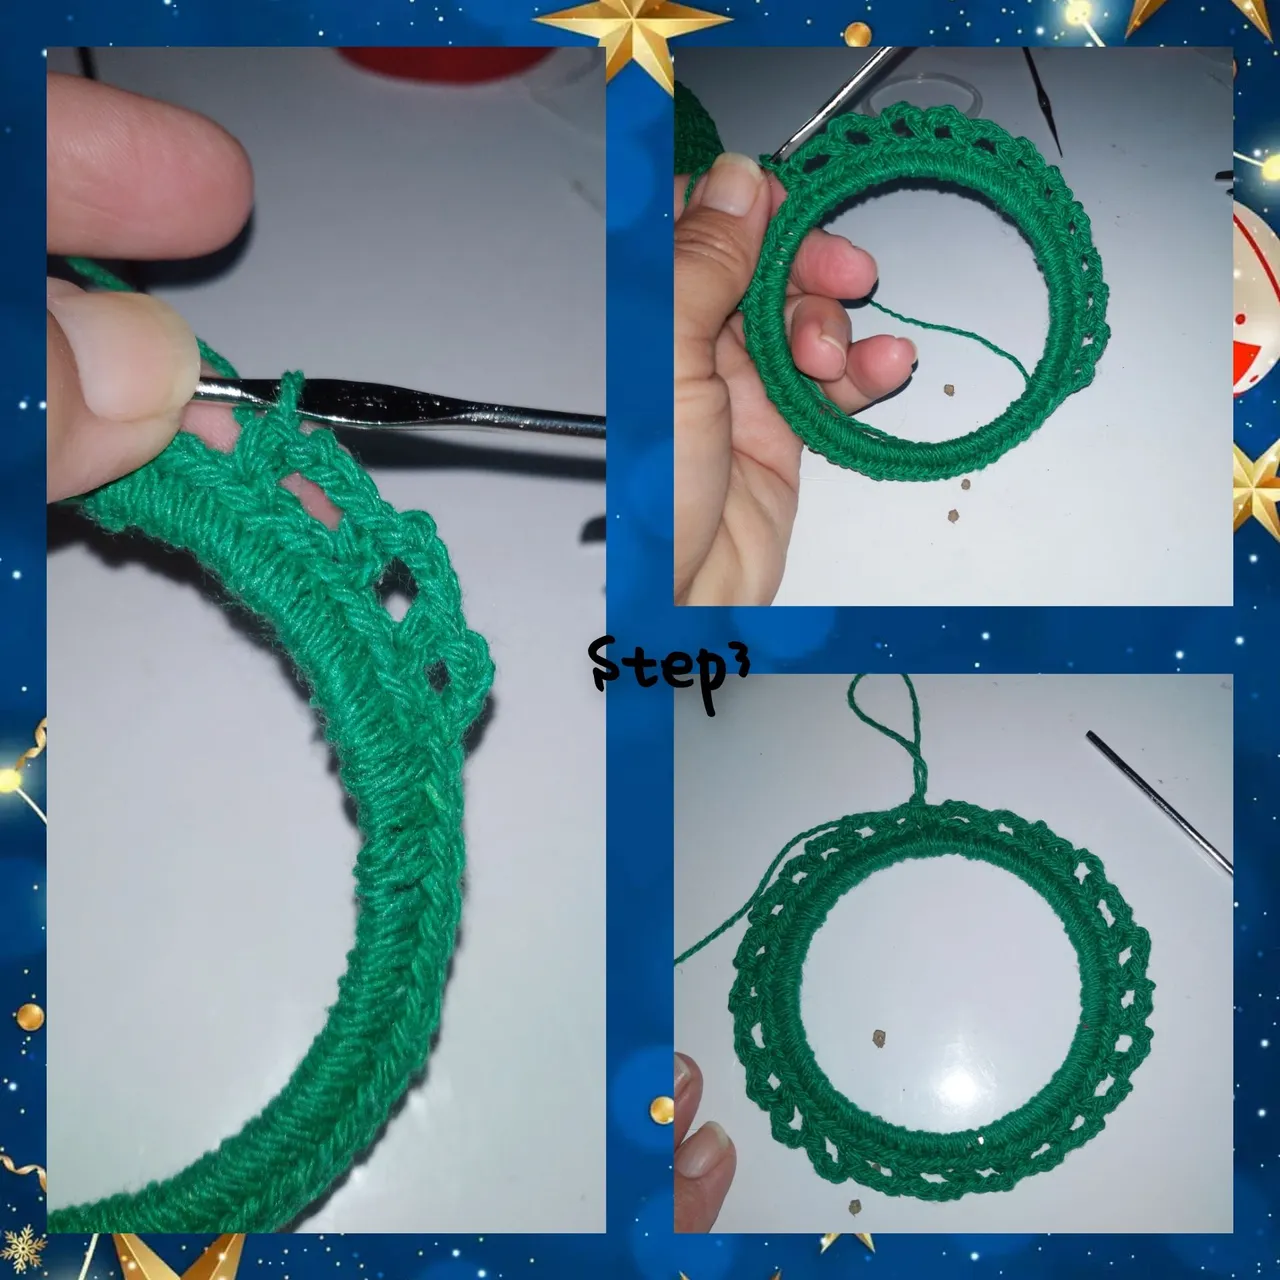
2.) I take the hoop from the #6 plastic cup, and with the Christmas green knitting thread, using the needle, I begin to knit half stitches, throughout the entire length of the hoop, when I reach the starting place, I knit slip stitch.

3.) I continue and knit three chain stitches, leave a space and in the third I knit a half stitch. And in this way, I repeat. Throughout the journey, until I reach the starting point, located here, I leave a double strand of thread.
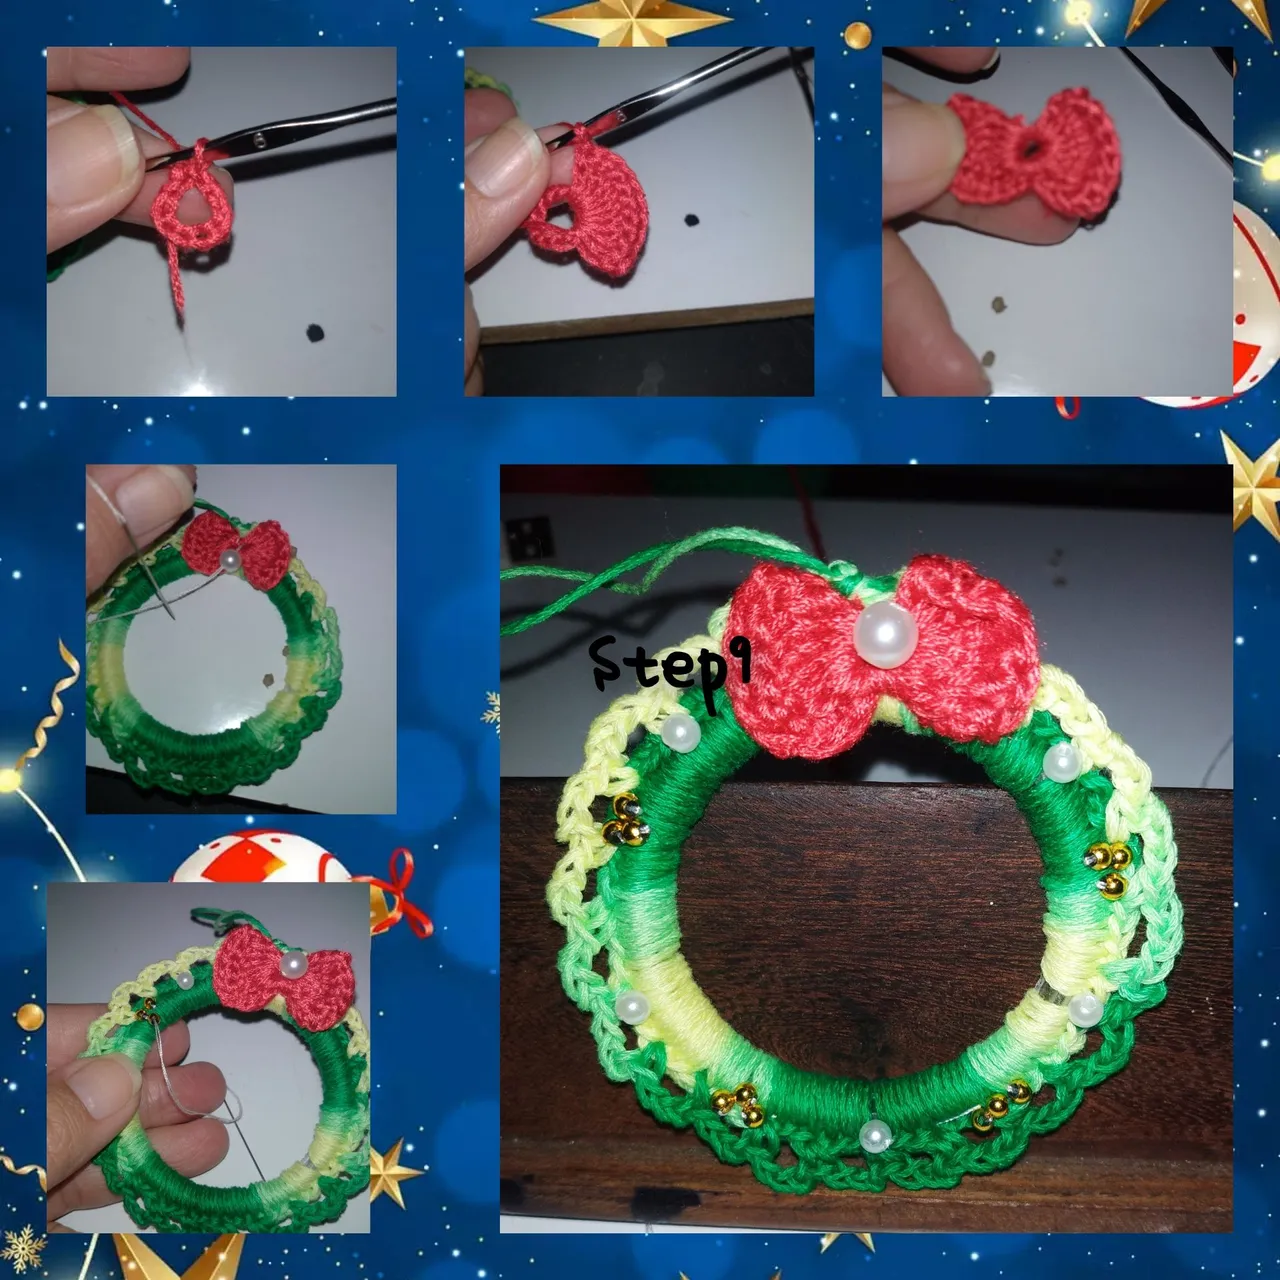
4.) I fill the double strands of thread, with half putos, when I reach the starting point, I leave a new strand of double thread, and fill. Thus shaping a bow, which defines the top part of the Christmas wreath.
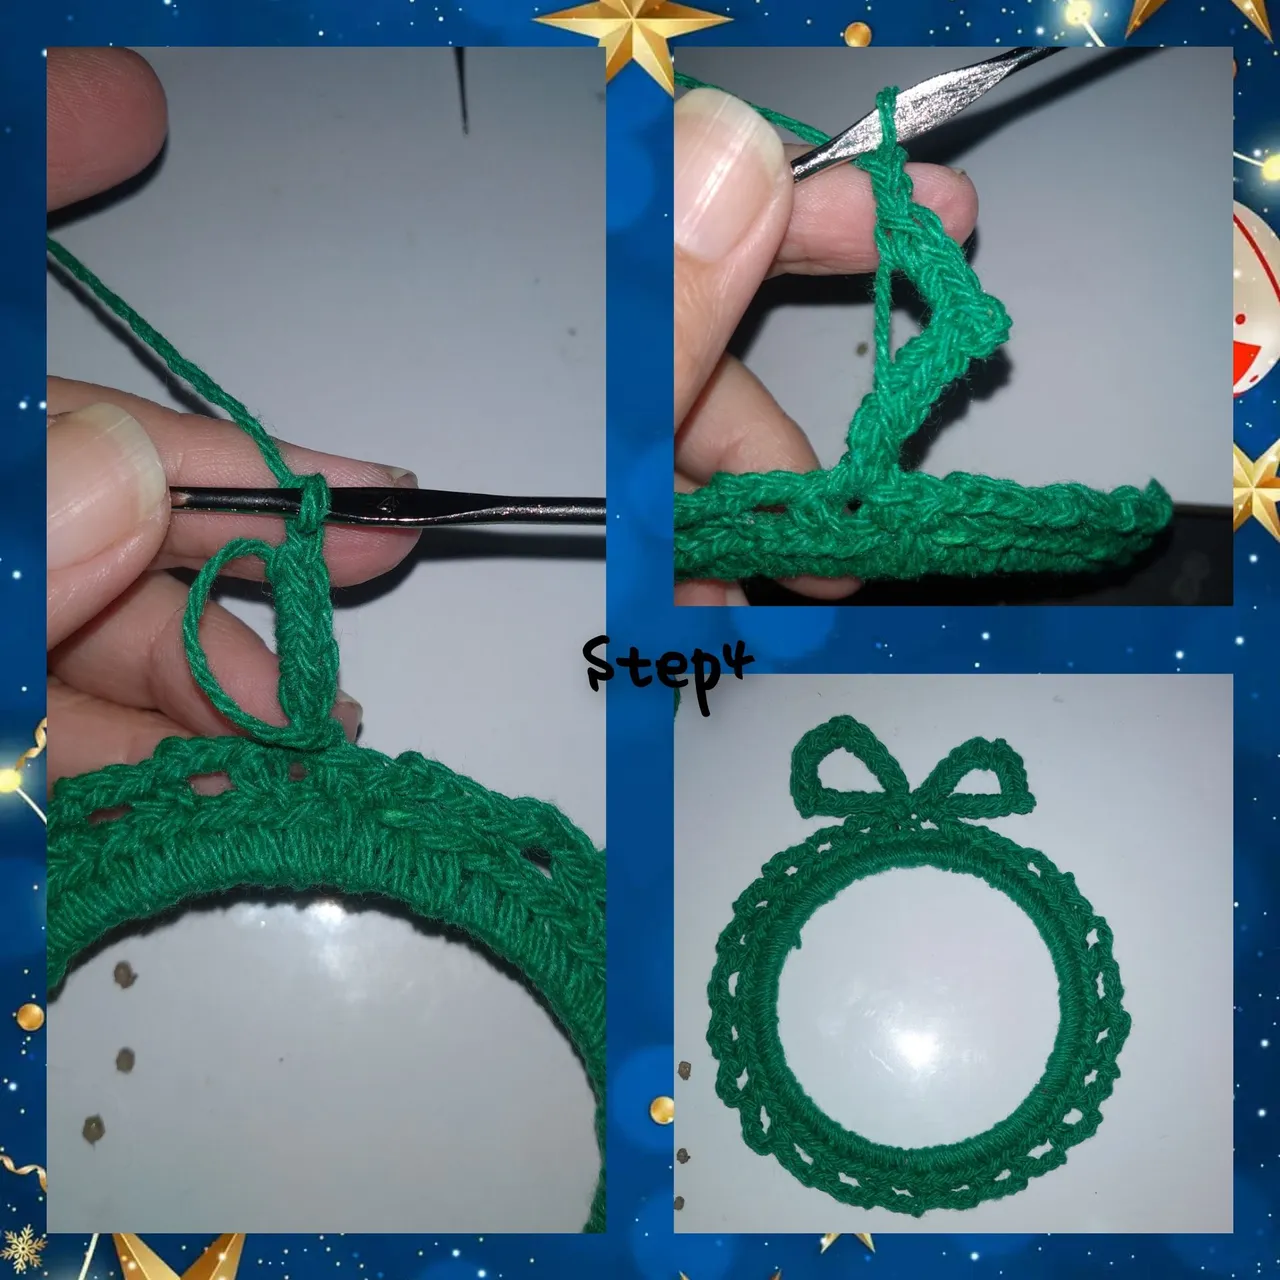
5.) I make a new route, to do this I raise three chain stitches equivalent to a double crochet, and located in the first space of three chain stitches, I knit four more double crochets, go down to the next group of chains and knit a half crochet, two more chain stitches and I repeat the four double crochets. In this way, I finish the route, finish off and cut the green thread.
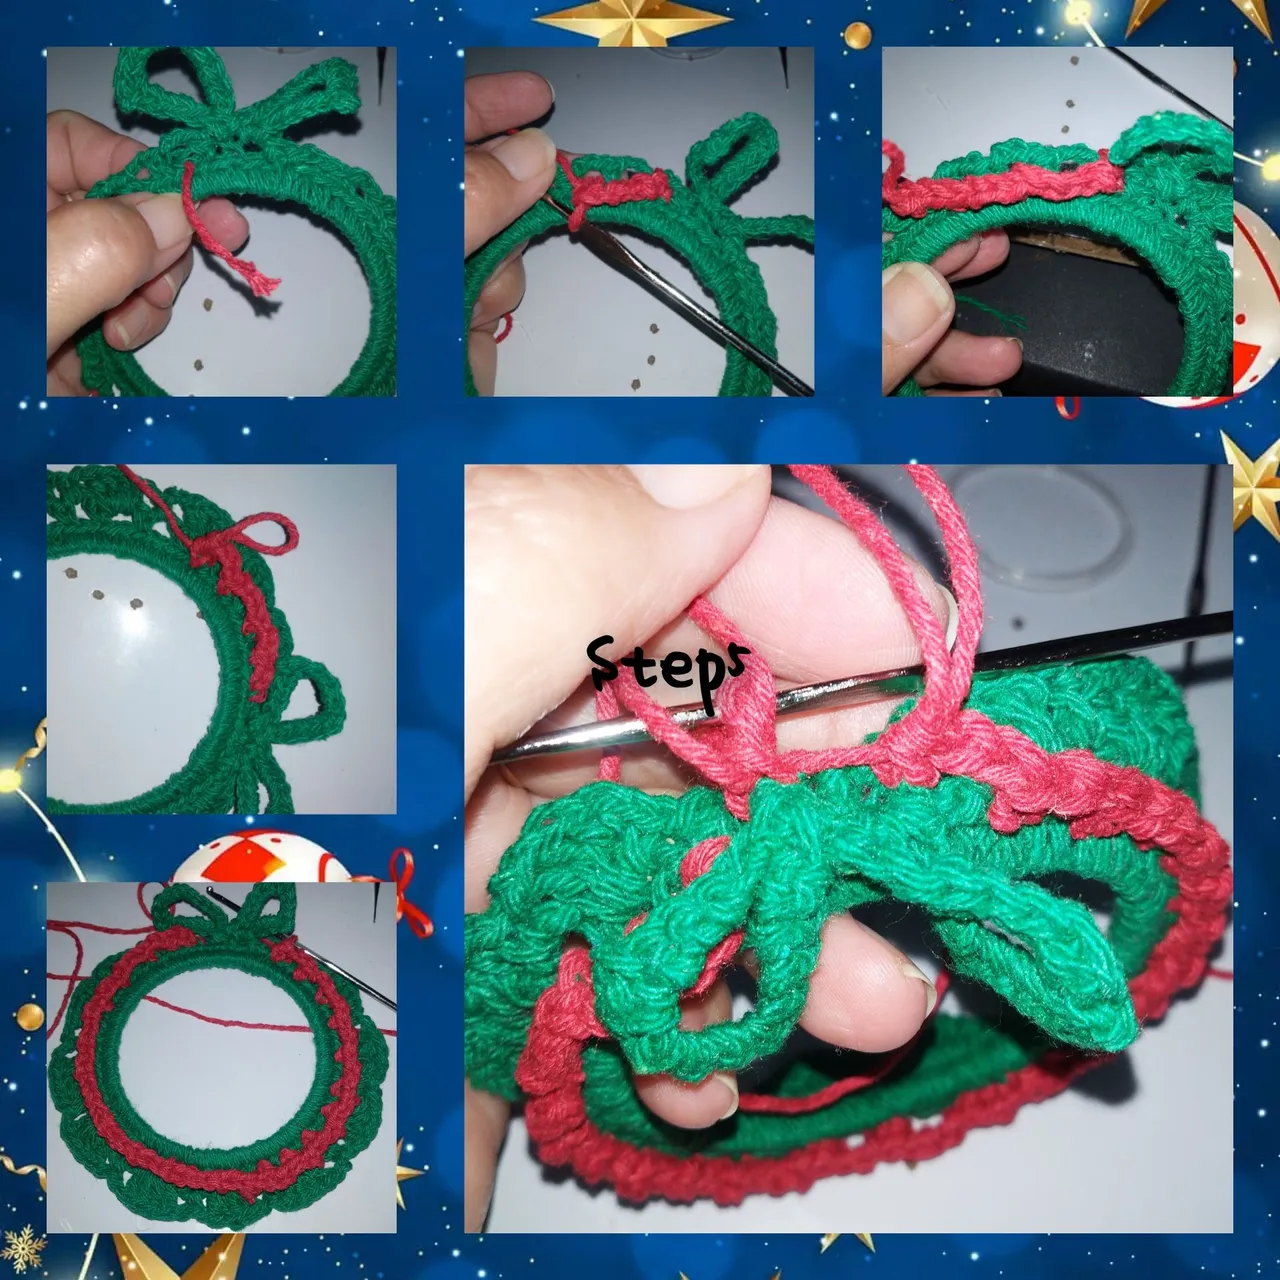
6.) I tie the red thread, pick up three chain stitches, leave two spaces and knit a stitch, go forward and do the entire route. He cut the thread and finished off.
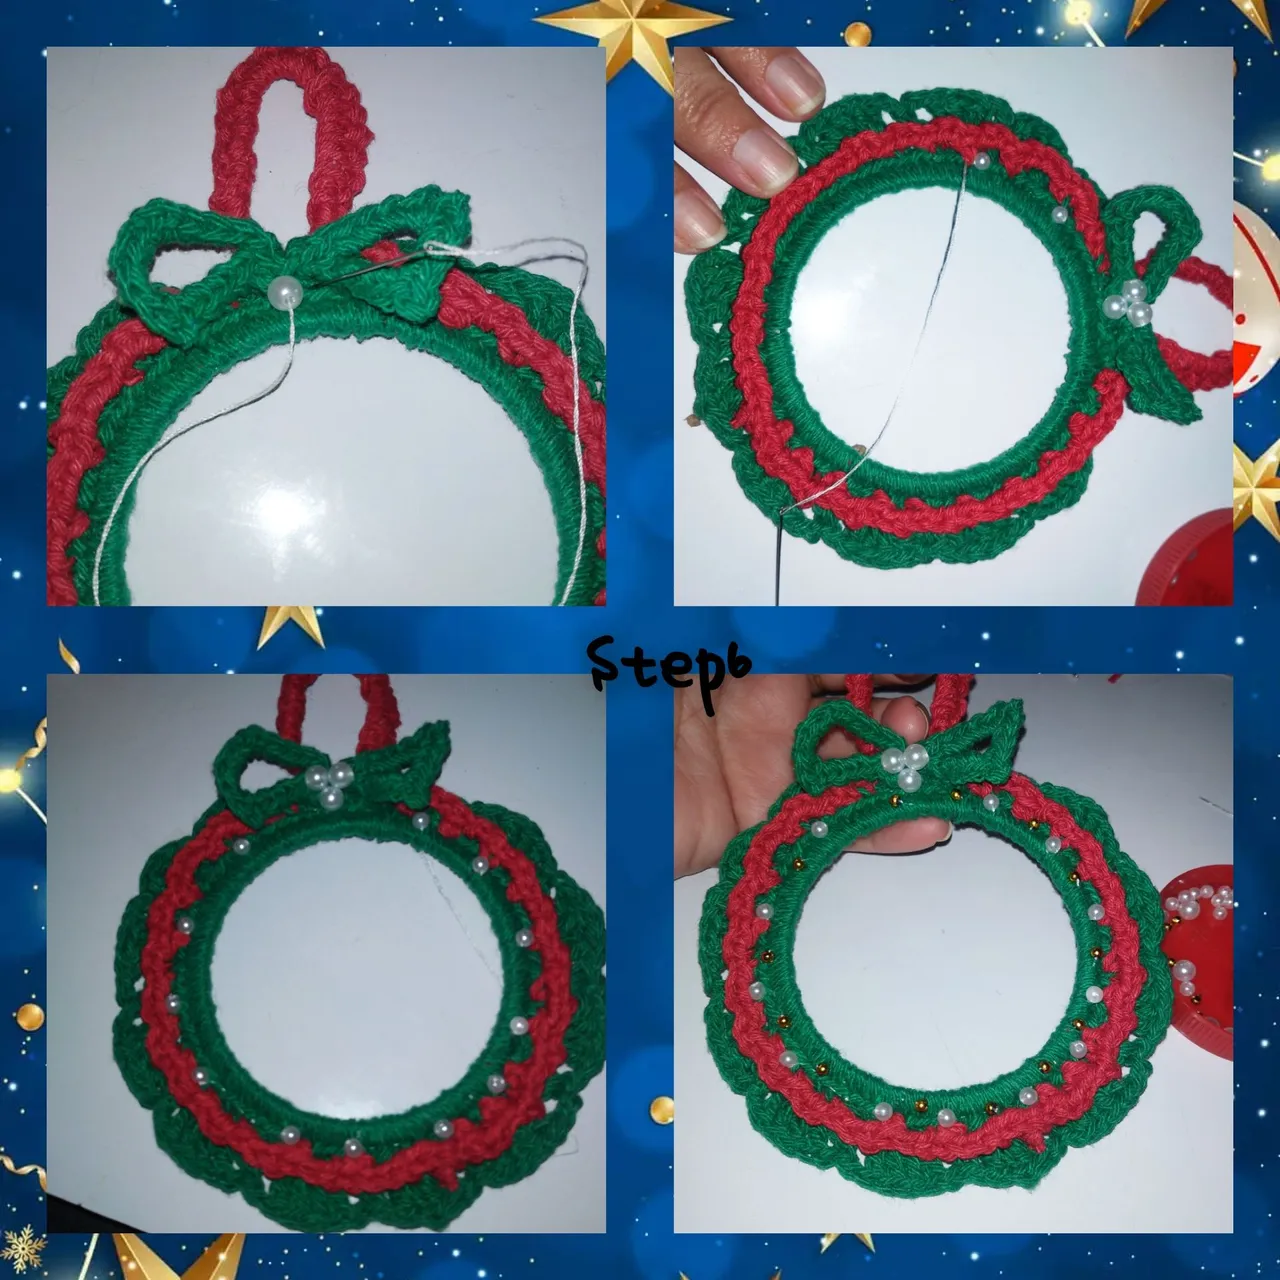
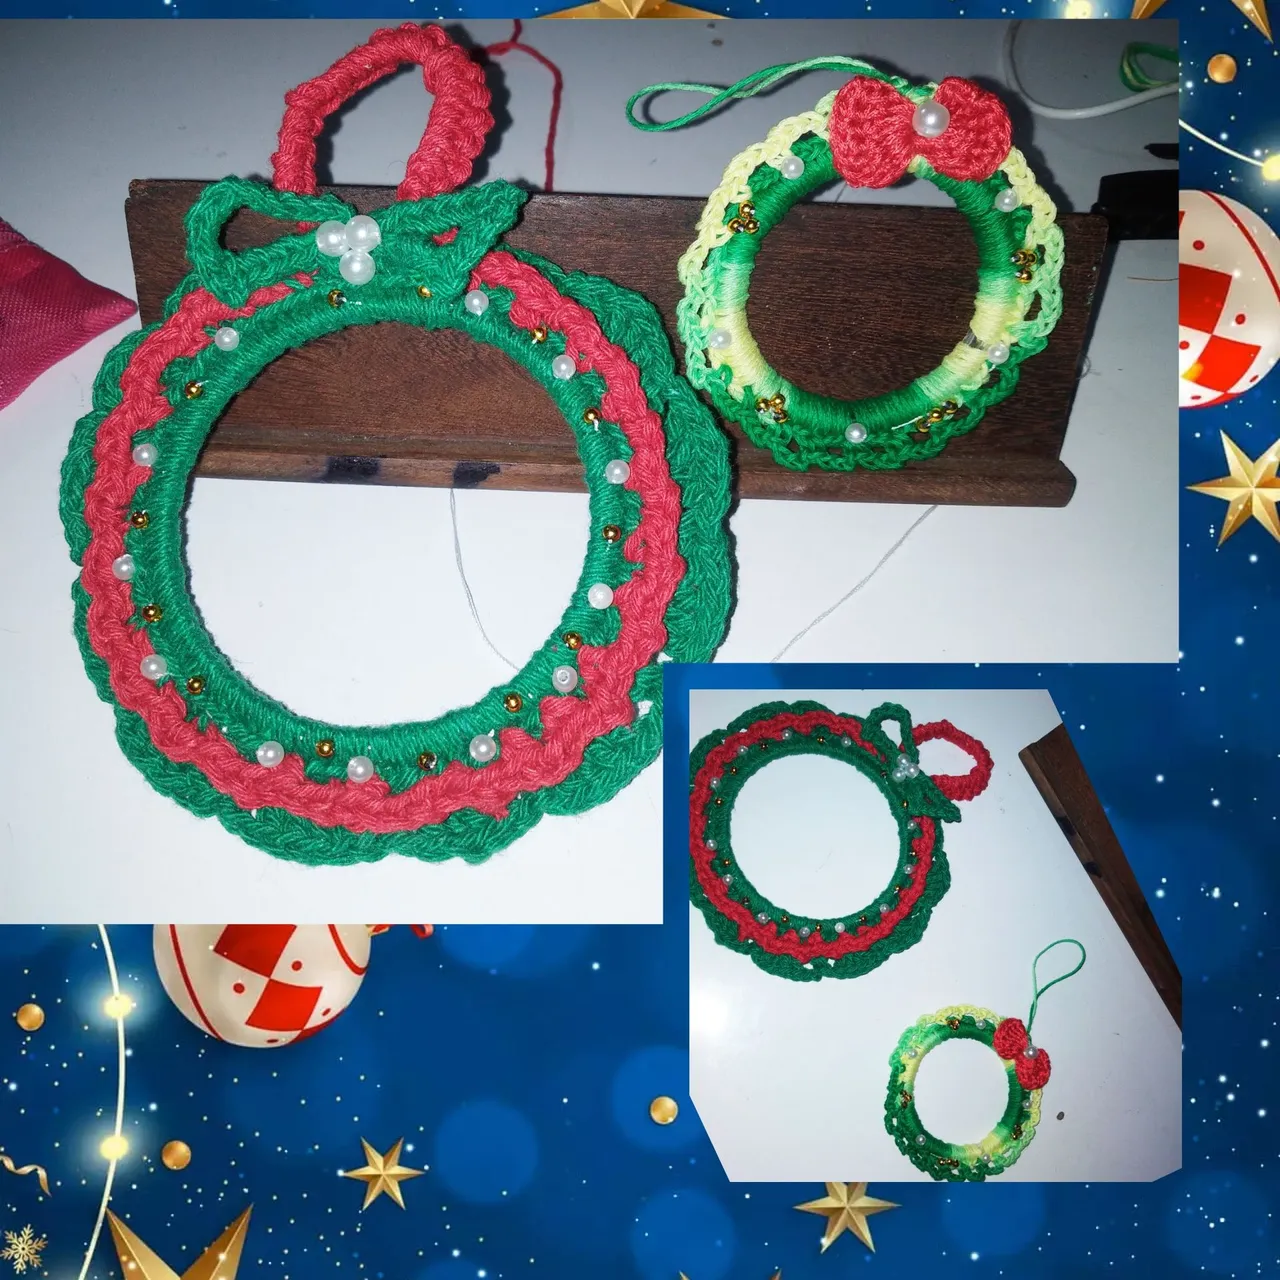
7.) With a needle and thread, I glue three white #6 pearls in the middle of the bow. Then I make the route of the circle with pearl number 4 and in the middle of each one golden pearls. Giving color and lighting to the crown.
8.) Now I will work the smaller hoop, so I tie the shaded green skein, and I go around the entire circle with half stitches, theseThey must stick well to create volume and cover all the plastic. I make a second route, with three chain stitches I leave a space and half a stitch, this is how I make the route, I leave a double strand, and I finish off and cut the thread, leaving it well tied to the skein strand that will serve as a pendant.
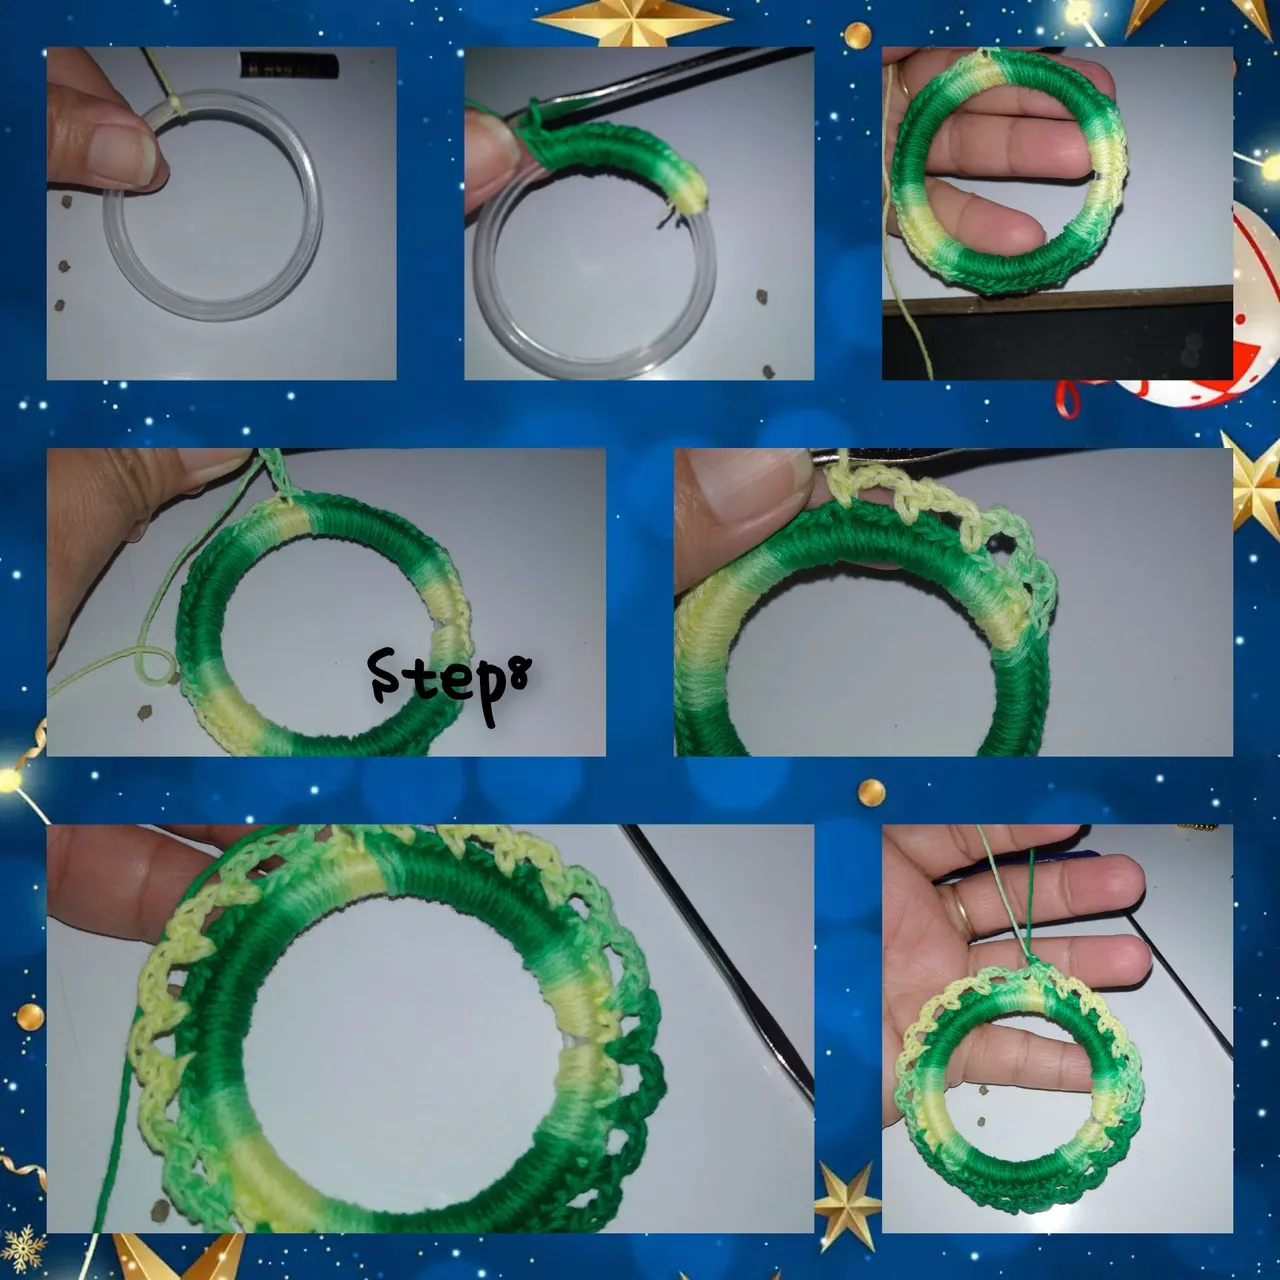
8.) I knit five chain stitches and one with a slip stitch, leaving a small circle, on each of the sides of the circle, I will knit, five double crochets, and a second round of half stitches, one in each double crochet of the round. previous. I move to the next space with four chain stitches, introduced in the circle, with a slipped stitch. With a needle and thread I glue the bow on the double strand of the skein or pendant, I also glue a 6mm pearl on it and continue the journey by gluing 4mm pearls around it and three golden pearls in the middle. And so I conclude, the second model of crowns.
 I am very happy with the final result of today's project.
. All photos are my property. .Use Incollage to show the steps.
. Use Language Translator.
Grateful for your visit to my blog, see you next time.
(ESP)
Hola a todos, es un gusto saludarles atodos ustedes, amnates de el bricolaje y creadores por excelencia que hacen vida en @diyhub. Hoy paso a mostarles un muy sencillo paso a paso, en esta oportunidad, se trata dos, modelos de coronas de navidad, tejidas a crochet y dónde utilice a demás los bordes de vasos plásticos, el resultado es realmente hermoso, estos podrías usarlos como colgantes en árboles de navidad, coronas, en fin dónde desees.
Materiales:
. Vasos plásticos n6 y n2.
. Madeja de color verde claro y oscuro matizado.
. Madeja color rojo
. Hilo para tejer color verde navidad16 y rojo.
. Perlas color blanca, número 4, 6.
. Perlitas doradas pequeñas.
. Aguja para tejer.
. Aguja e hilo para coser.
. Tijeras.
PASOS:
1.) Haciendo pequeños cortes en la parte superior de los vasos de plástico, extraigo los aritos, que forman el borde es estos.
2.) Tomo el arito de el vaso plástico n6, y con el hilo de tejer verde navidad, usando la aguja, comienzo a tejer medios putos, durante todo el recorrido de el aro, al alcanzar el lugar de partida, tejo punto deslizado.
3.) Continuo y tejo tres puntos cadenas, dejo un espacio y en el tercero tejo un medio punto.y de esta manera, repito. Durante todo el recorrido, hasta alcanzar o llegar al punto de partida, ubicado aquí dejo una hebra doble de hilo.
4.) Relleno las hebras doble de hilo, con medio putos, al llegar al punto de salida,dejo una nueva hebra de hilo doble, y relleno. Dando así forma a un lazo, que define la parte superior de la corona Navideña.
5.) Hago un nuevo recorrido, para ello levanto tres puntos cadenas equivalentes a un punto alto, y ubicado en el primer espacio de tres puntos cadenas, tejo cuatro puntos altos más, bajo a el siguiente grupo de cadenas y tejo un medio punto, dos puntos cadenas más y repito los cuatro puntos altos. De esta forma, termino el recorrido, remato y corto el hilo de color verde.
6.) Ato el hilo de color rojo, levanto tres puntos cadenas dejo dos espacios y tejoedio punto, avanzo y hago todo el recorrido. Recortó el hiloy remato.
7.) Con aguja e hilo, pego en medio de el lazo, tres perlas n6 de color blanco. Luego hago el recorrido de el círculo con perla n4 y en medio de cada una perlitas doradas. Dando color e iluminación a la corona.
8.) Ahora trabajaré el aro de menor tamaño, así que ato, la madeja color verde matizado, y recorro todo el círculo con medios puntos, estos deben quedarme bien pegados para hacer volumen y cubrir todo el plástico.
Hago un segundo recorrido, de tres puntos cadenas dejo un espacio y medio punto, así hago el recorrido , dejo una hebra doble, y remato y corto el hilo, dejando bien atada a la hebra de madeja que me servirá de colgante.
8.) Tejo cinco puntos cadenas y uno con punto deslizado, dejando un pequeño círculo, en cada uno de los lados de el círculo, tejere, cinco punto altos, y una segunda vuelta de medios puntos, uno en cada punto alto de la vuelta anteriores. Me traslado al siguiente espacio con cuatro puntos cadenas, introducidos en el círculo, con punto deslizado. Con aguja e hilo pego sobre la hebra doble de madeja o colgante el lazo, pego además sobre el, un aperla de 6mm y continuo el recorrido pegando perlita 4mm al alrededor y en el medio tres perlitas doradas. Y así concluyo, el segundo modelo de coronitas.
Yo muy contenta con el resultado final de el proyecto de el día de hoy
. Todas las fotos son de mí propiedad.
.Use Incollage para mostrar los pasos.
. Use traductor Lenguaje.
Agradecida por su visista a mí blog, será hasta una próxima oportunidad