(ENG)
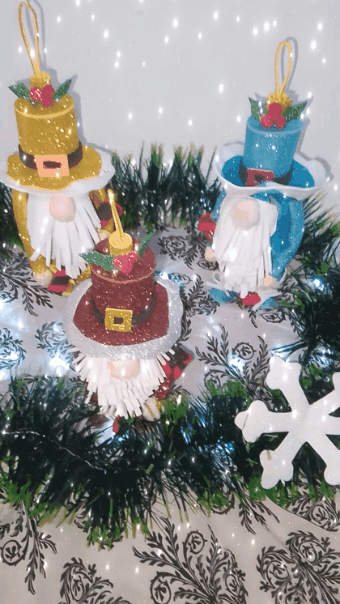
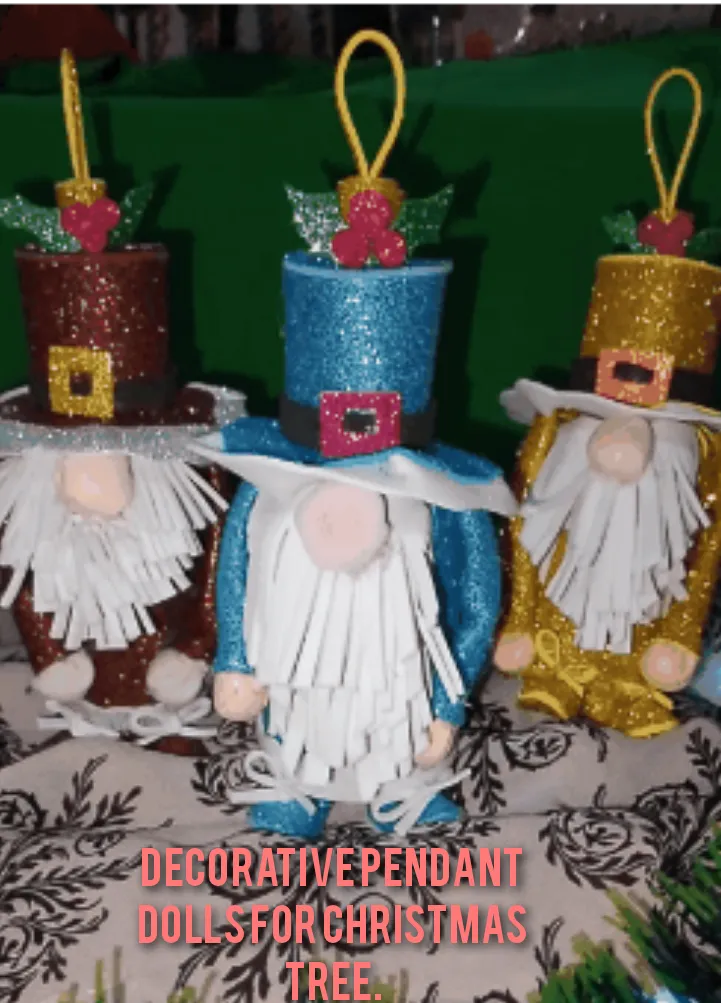
Hello dear and always remembered, family of creators, lovers of @diyhub DIY, I am pleased to be with you, starting this week with a beautiful and very colorful project, regarding Christmas. On this occasion, I have made beautiful hanging dolls, ideal for decorating the Christmas tree, and inspired by Gnomes, great characters that are frequently used in homes to decorate at Christmas. For its preparation, I will use recyclable and useful material.
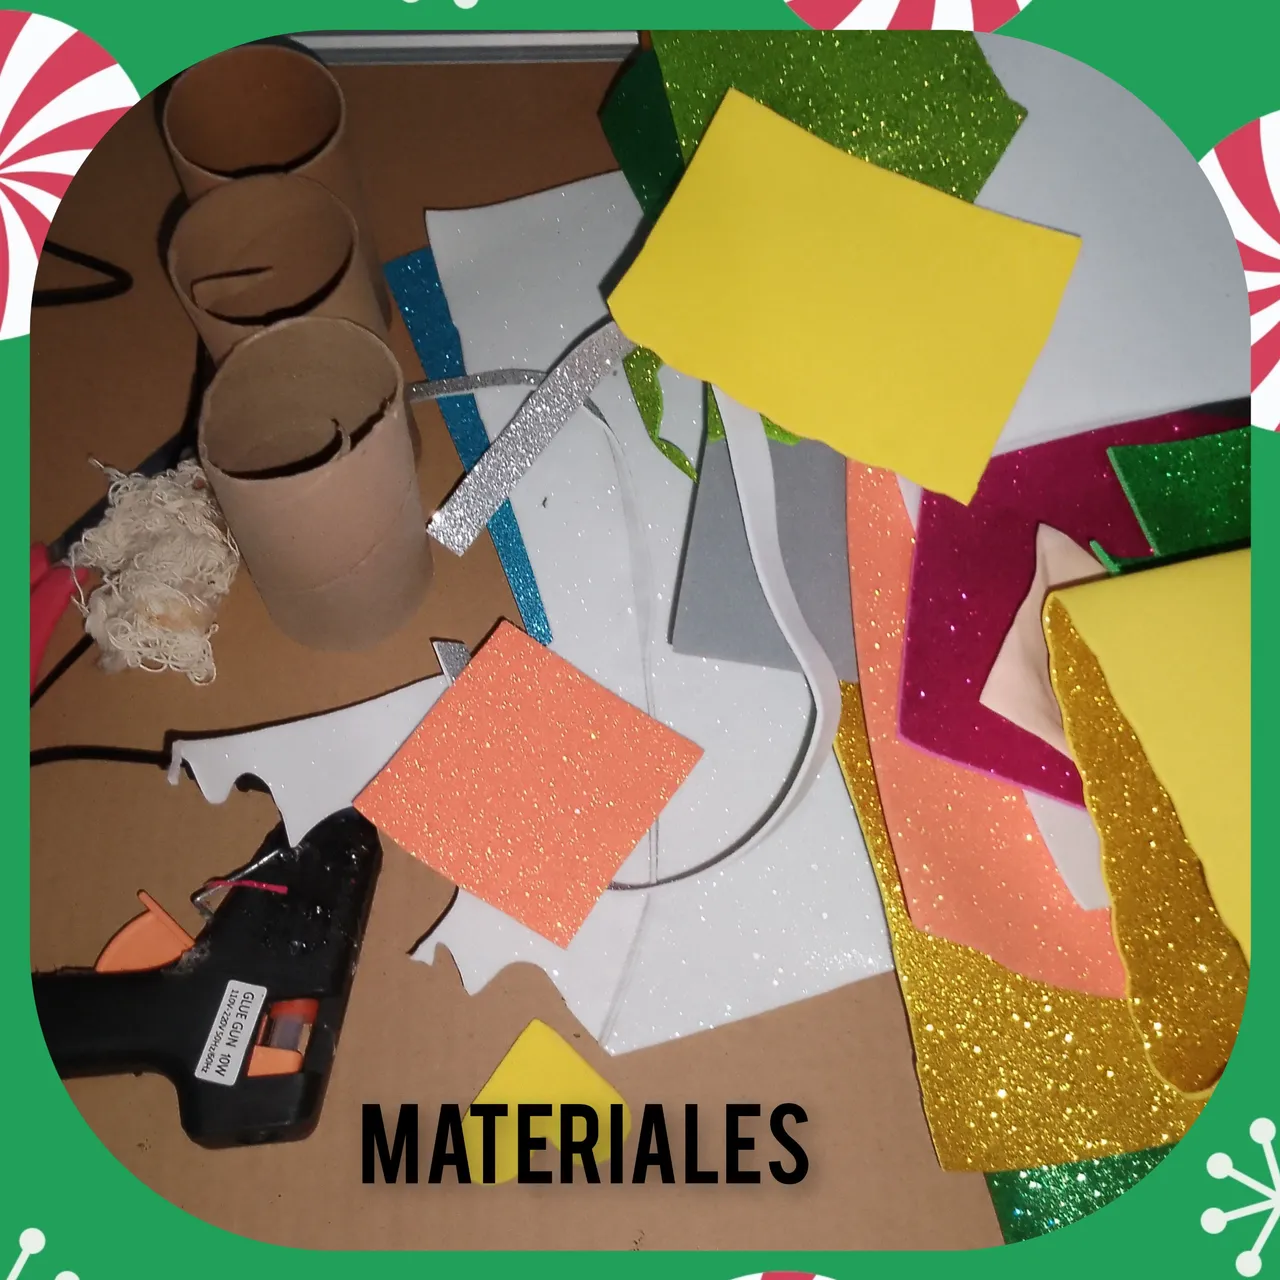
Materials:
. Foami cutouts, various colors (white, gold, brown, blue, black, red, gray, flesh).
. Toilet paper rust.
. Stuffed.
. Hot silicone.
. Scissors.
Steps:
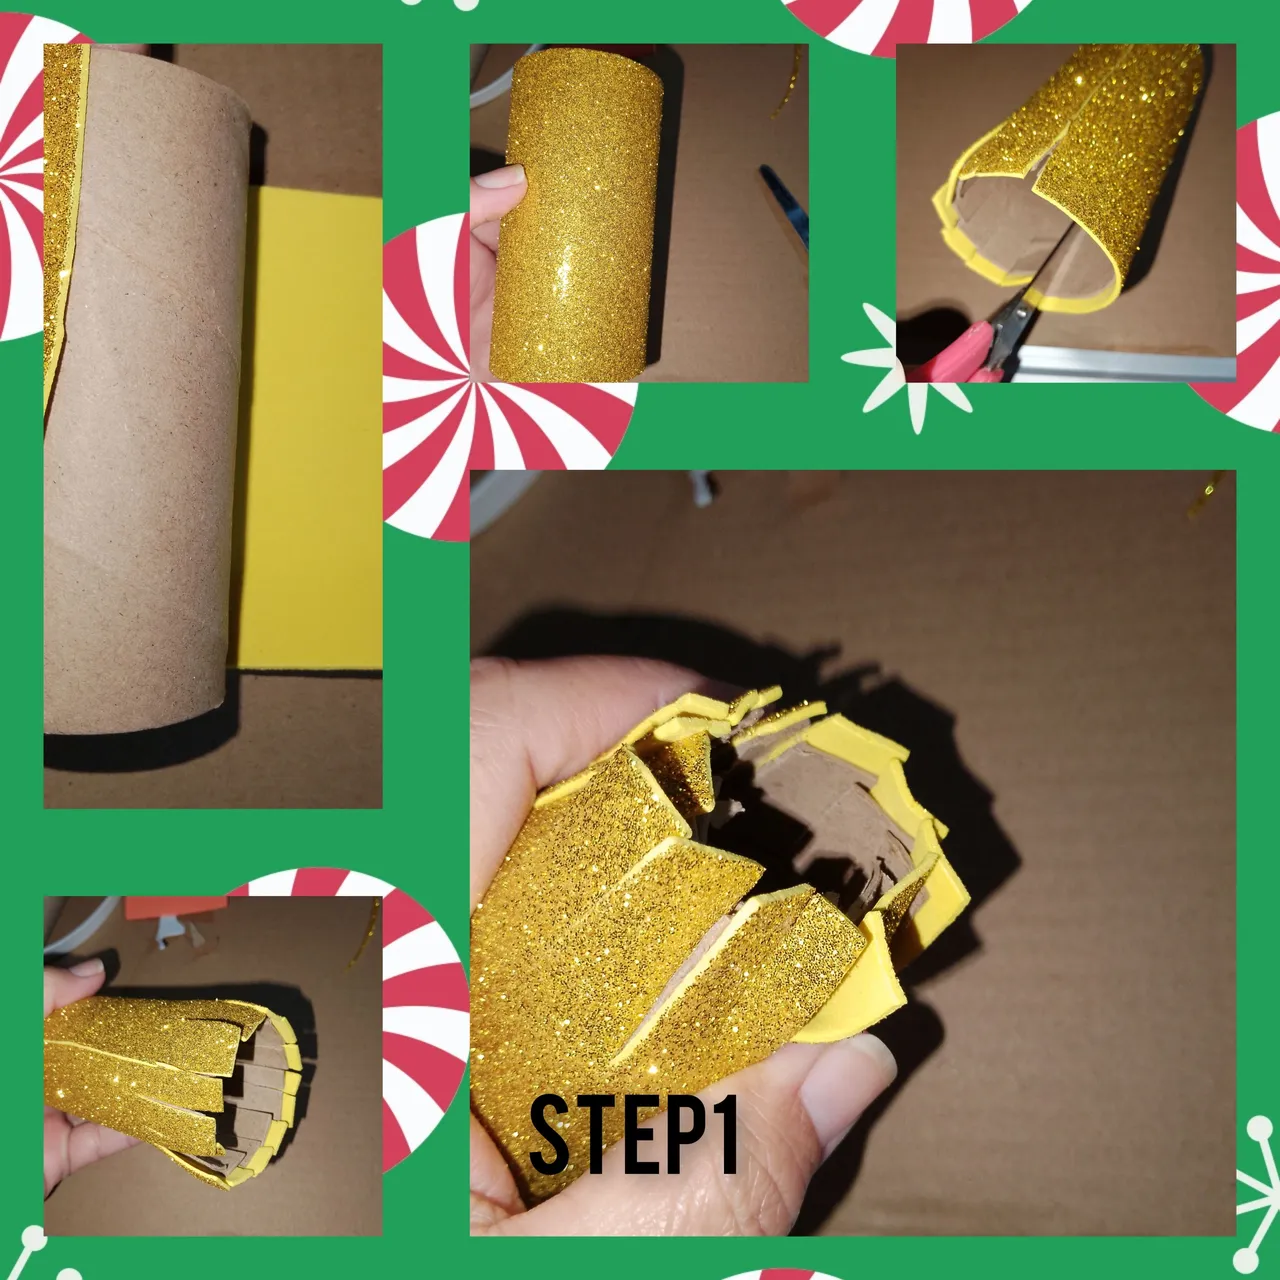
1.) After measuring the cardboard tube in the foam, cut it according to your measurements. For them I will use three different colors of foam (gold, blue, brown). After having the foam pieces, I will cover each of the cardboard tubes using glue. Once this is done, I will make cuts at one of the ends of the tube, these will have an approximate depth of 3cm in the cut. He applied plenty of silicone to the cuts and joined the ends of the tube.
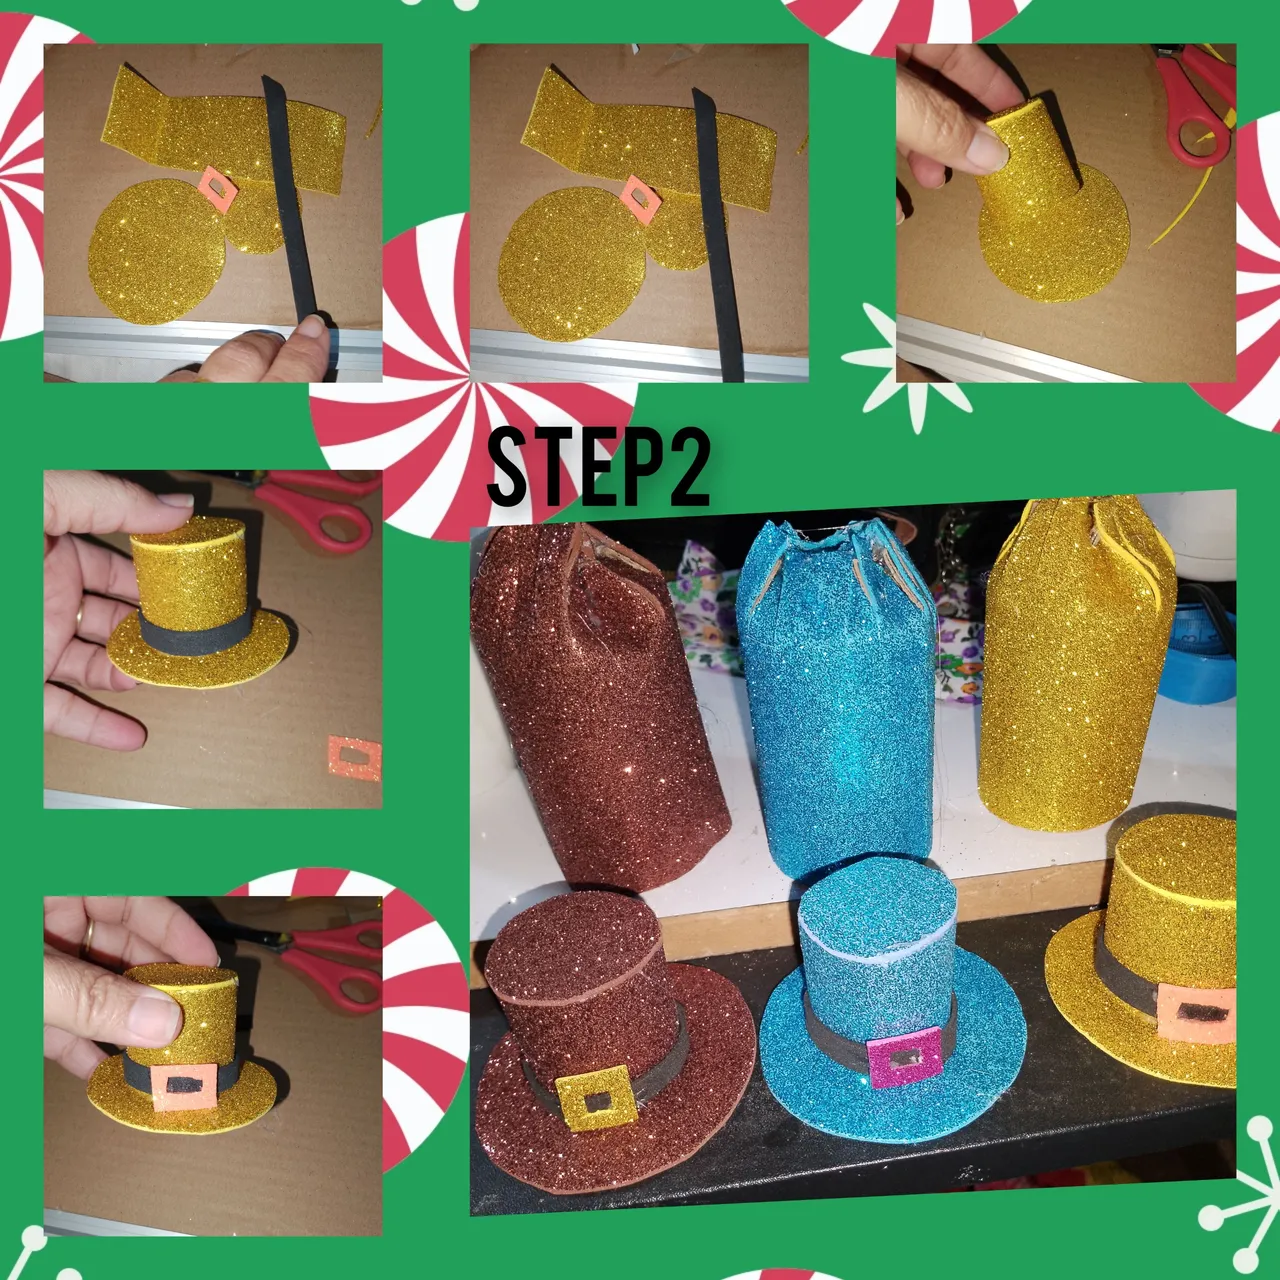
2.) To assemble the hat, I will mark and cut out two circles of different sizes, a small foam tube, a small black ribbon and a small square to simulate the buckle of a strap. So let's get to work, on the foam tube, I place the small circle in what will be the upper part and the larger circle in the lower part. Once this is done on the largest cup or circle, I will place the black ribbon and the buckle.
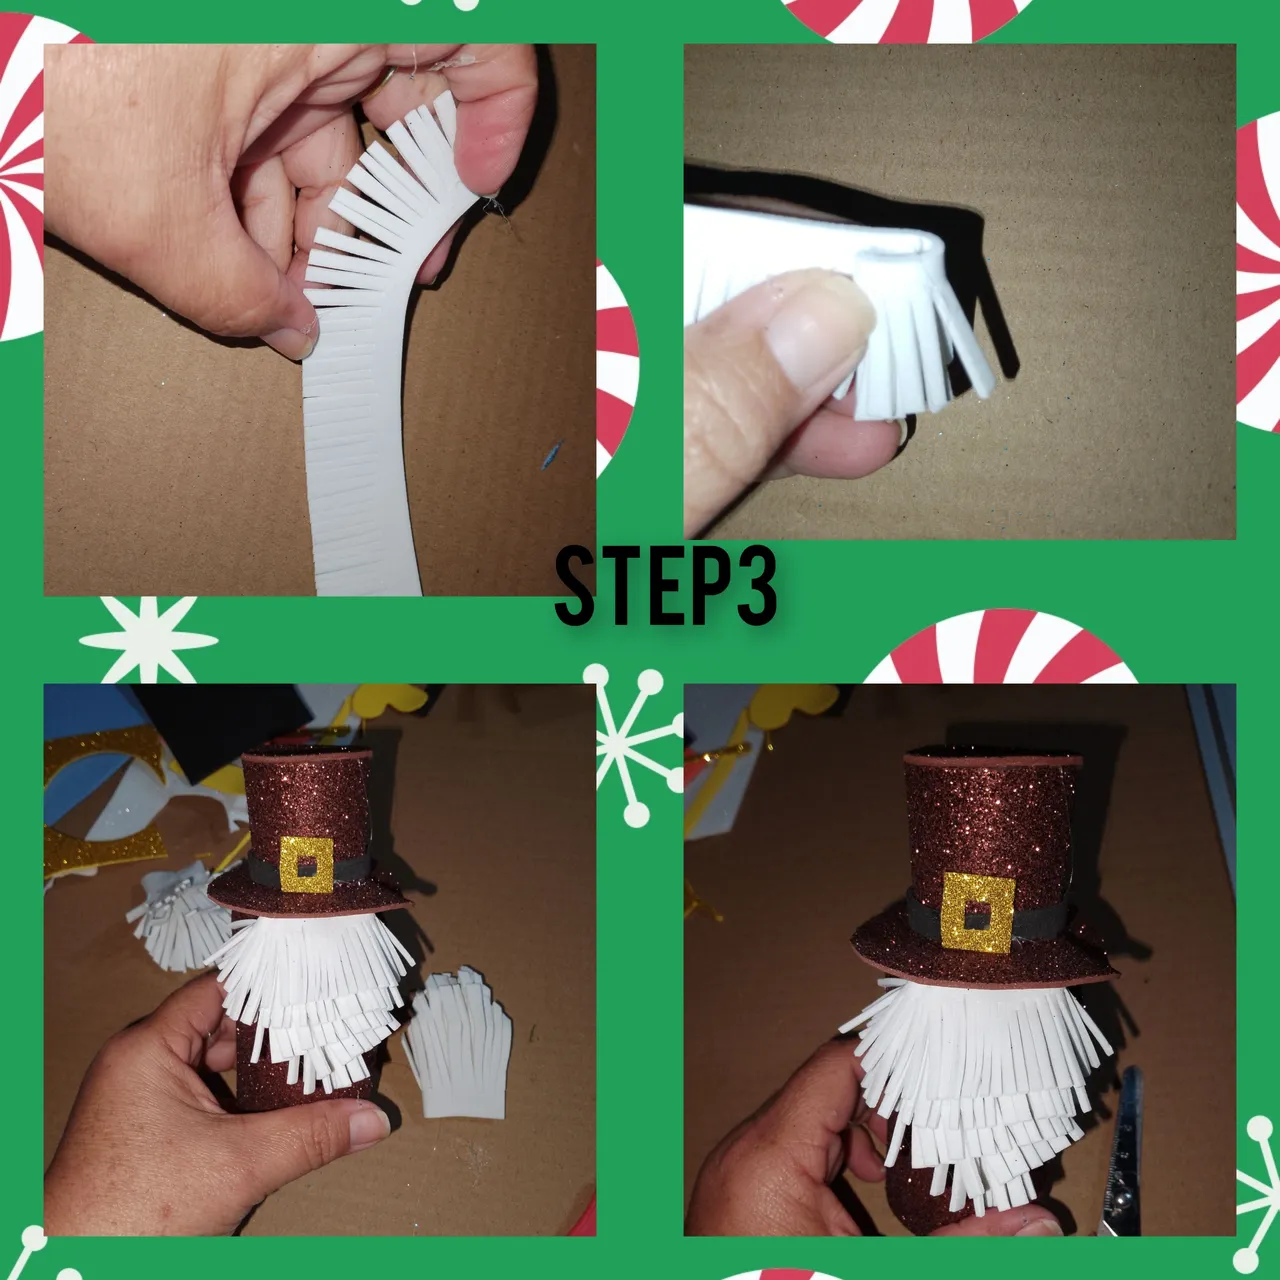
3.) After gluing the hat, I cut a white foam ribbon and formed the gnome beard. And I hit it right on the bottom of the hat, covering his face.
4.) For the arms, I cut pieces of foami and make a thin tube, to simulate the hands, I place a little filling, on the flesh-colored foami, I make a few turns, make a round shape and glue it to the end of it , thin tube.

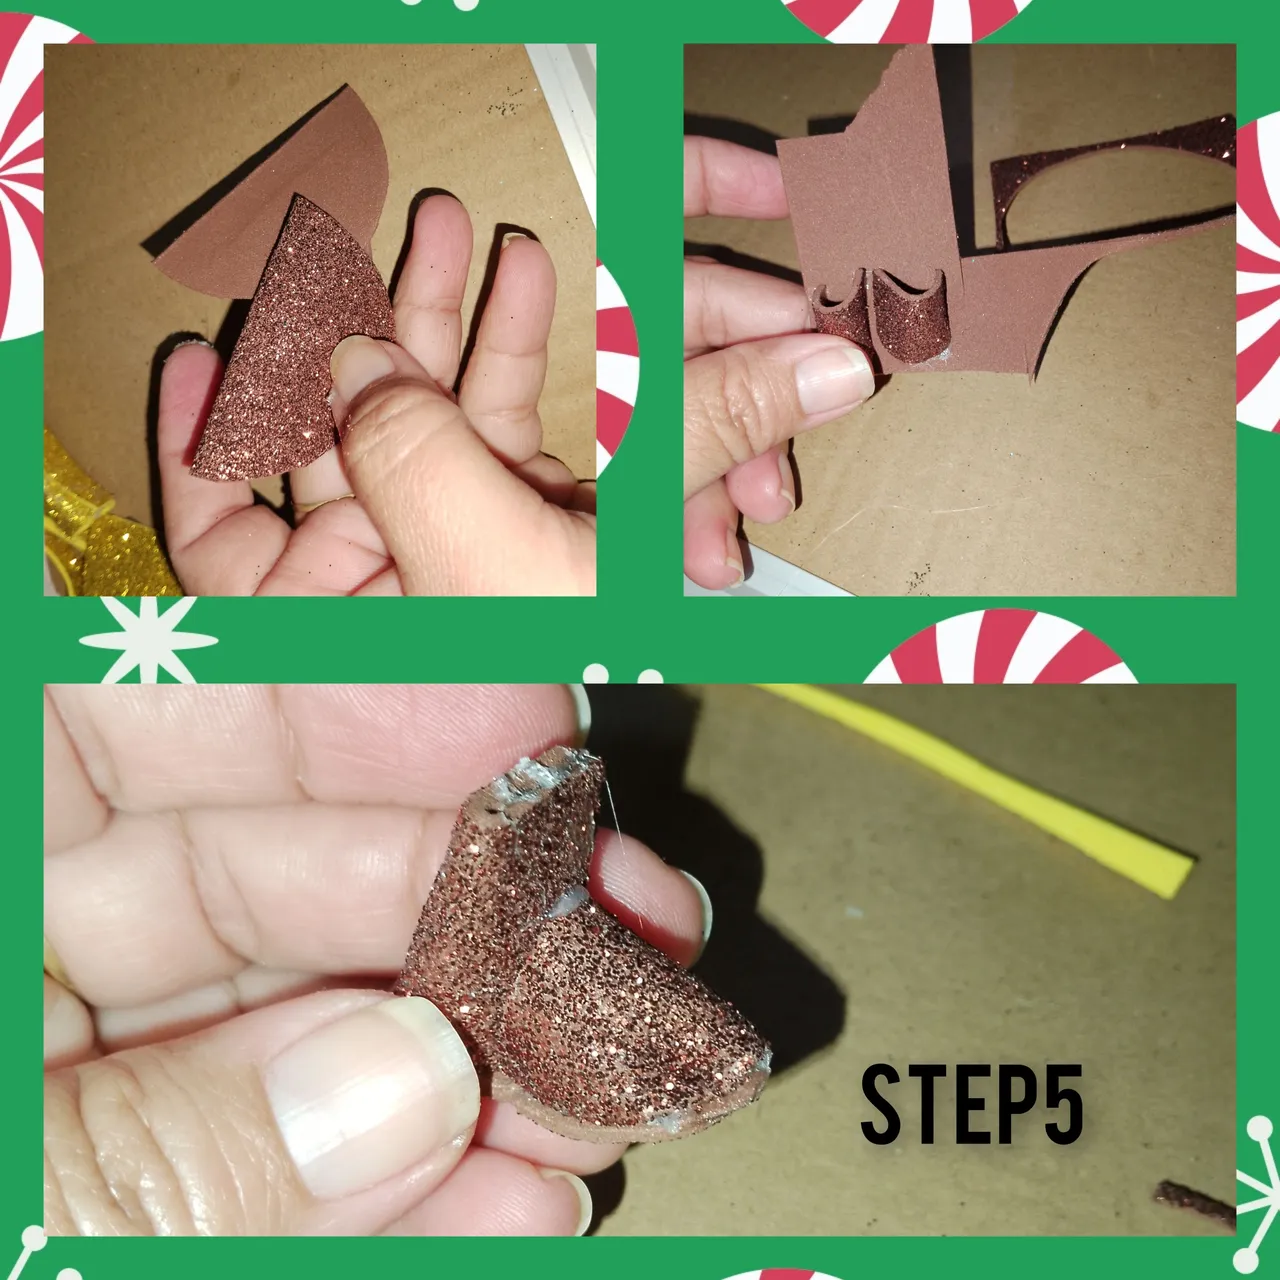
5.) For the boots, I cut a small circle of foam, each with the corresponding color, cut in equal parts, and giving an arched shape, I glue on a small piece of foam of the same color, I shape the back, and With a small foam tube, I filled it and the boot was formed.
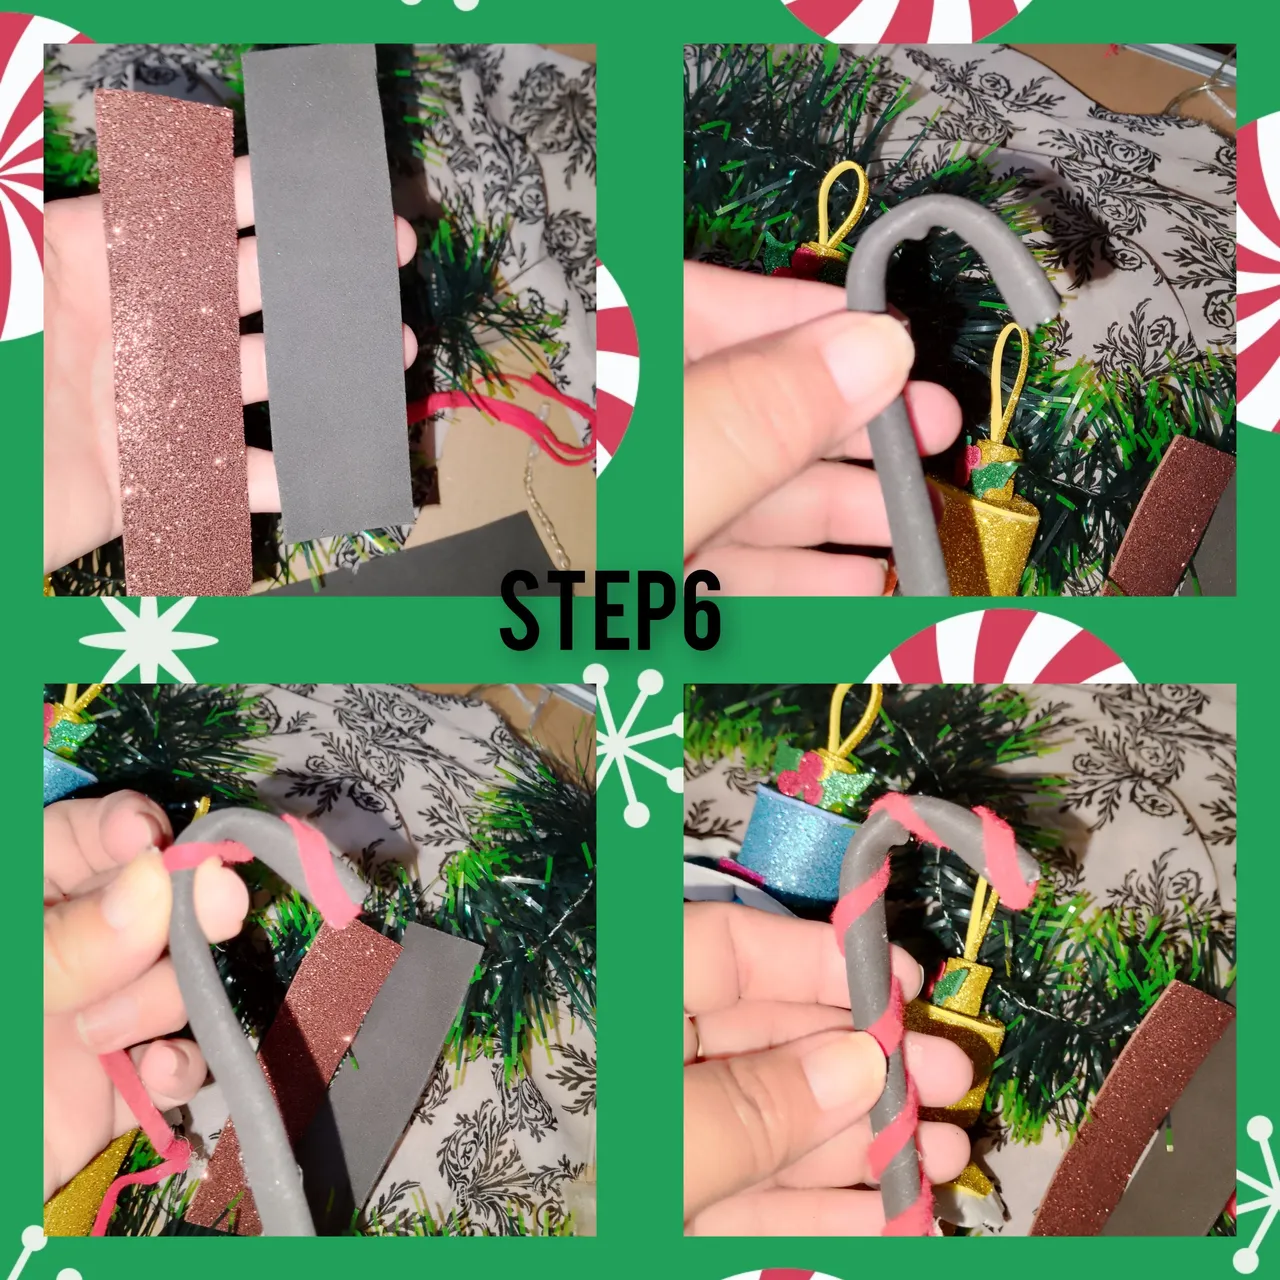
6.) I wanted to make him a cane, and I used gray foam, I made a thin tube, close to the body I placed a piece of wire and I turned it, to simulate the cane, with a foam strip, I made some turns in the shape spiral.
7.) All I have left to do is glue the arms, the boots and the cane, to do thisI will apply silicone. To decorate the hat a little, I cut out small foam circles and some delicate leaves and placed them.
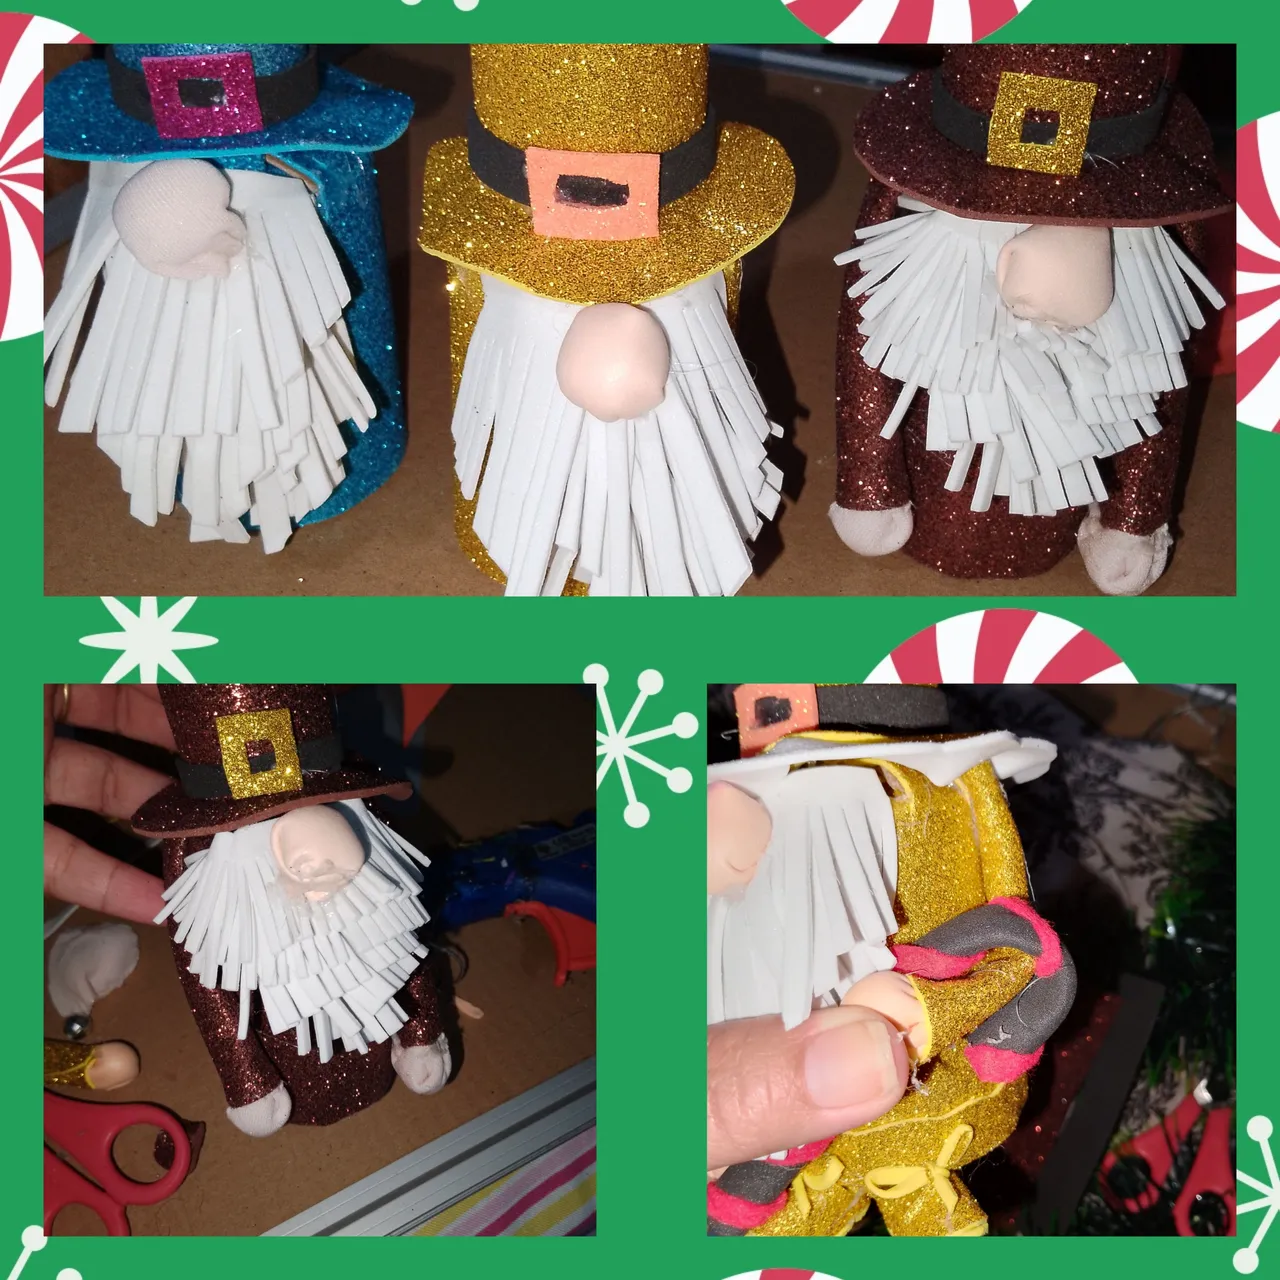
In this way, I conclude today's project, I hope you liked it. It's a pleasure to know you followed me to the end. I am happy with the result.
. All photos are my property, taken with my smartphone.
. Use incollage to demonstrate the steps.
. Use gifs videos for the cover.
. Use language translator.
Grateful you continued until the end. You are always welcome to my blog, until the next opportunity.
(ESP)
Hola querida y siempre recordada, familia de creadores, amantes de el bricolage de @diyhub, me complace estar con ustedes, iniciando, está semana con una hermosos y muy colorido proyecto, a propósito de las navidades. En esta oportunidad, he realizado hermosos muñecos colgantes, ideales para decorar el árbol de navidad, e inspirados en los GNomos, grandes personajes que, se usan con frecuencia en los hogares, par decorar en navidad. Par su elaboración, usaré, material reciclable y de provecho.
Materiales:
. Recortes de foami, varios colores ( blanco, dorado, marrón, azul, negro, Rojo, gris, carne).
. Royos de papel higiénico.
. Relleno.
. Silicón caliente.
. Tijeras.
Pasos:
1.) luego, de medir el tubo de cartón en el foami, recortó, según su medidas. Para ellos usaré tres colores de foami diferente.( Dorado, azul, marrón). Luego de tener las piezas de foami, cubri usando pegamento cada uno de los tubos de cartón. Hecho esto, haré, cortes en uno de los extremos de el tubo, estos tendrás un aproximado de 3cm de profundidad en el corte. Aplicó abundante silicón en los cortes y unire, las puntas de el tubo.
2.) Par armar el sombrero, marcare y recortare, dos círculos de diferentes tamaños, un pequeño tubo de foami, un pequeño liston de color negro y un pequeño cuadro para simular la hebilla de una corre. Así que manos, a la obre, a el tubo, de foami coloco en lo que será la parte superior el círculo pequeño y el la parte inferior el círculo de mayor tamaño. Hecho esto sobre l copa o círculo de mayor tamaño, colocaré el listón de color negro y la hebilla.
3.) Luego de pegar, el sombrero, corto un listón de foami de color blanco y formó la barba de gnomo. Y pego justo en la parte inferior de el sombrero, cubriendo el rostro de el mismo.
4.) Para los brazos, corto trozos de foami y hago un tubo delgado, par simular las manos, coloco un poco de relleno, sobre el foami de color carne, doy algunas vueltas, par dr forma redonda y pego en el extremo de el, delgado tubo.
5.) Para las botas, corto un pequeño circulo de foami, cada cual con el color correspondiente, corto en partes iguales, y dando forma arqueada, pego sobre un pedacito de foami de mismo color, doy forma a la parte de atrás, y con un pequeño tubito de foami, relleno y quedo formada la bota.
6.) Quise hacerle, un bastón, y ppuse foami de color gris, hice un delgado tubo, aproximado a el cuerpo coloco un trozo de alambre y doy vueltas, para simular el bastón, con una tirita de foami, doy algunas vueltas en forma de espiral.
7.) Ya solo me queda, pegar los brazos, las botas y el bastón, para ello aplicaré silicón. Para decorar un poco el sombrero, recortó pequeños círculos de foami y unas delicadas hojas y colocaré.
De esta manera, doy por concluido el proyecto de el día de hoy, espero les haya gustado. Es un gusto, saber me hayas seguido hasta el final. Yo feliz con el resultado.
. Todas las fotos son de mí propiedad, tomadas con mí teléfono inteligente.
. Use incollage para demostrar los paso.
. Use gifs videos para la portada.
. Use traductor lenguaje.
Agradecida hayas seguido hasta el final. Siempre eres bienvenido a mí blog, será hasta un próxima oportunidad.