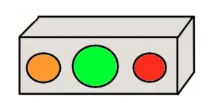
Partiamo prima di tutto con la realizzazione del documento di specializzazione dei requisiti, nel nostro caso il sistema deve permettere di acquisire valutazioni espresse dagli utenti attraverso 3 bottoni...Il primo bottone sarà di colore verde e andrà a significare che il servizio offerto è di tipo sufficiente, il secondo bottone sarà di colore arancione e andrà a significare che il servizio offerto non è al meglio delle aspettative mentre il terzo e ultimo bottone da come potrete dedurre andrà a significare che il servizio offerto non ha soddisfatto l’utente.
Questo metodo permette all’azienda di capire il punto di vista dei clienti che hanno usufruito del servizio offerto per poterne magari migliorare le prestazioni...passiamo ora a vedere quali sono tutti i nostri requisiti specificandone l’utilizzo e il loro significato.
--Come primo componente, ovvero quello fondamentale abbiamo un dispositivo (In questo caso una pulsantiera) che è un componente di tipo HARDWARE.
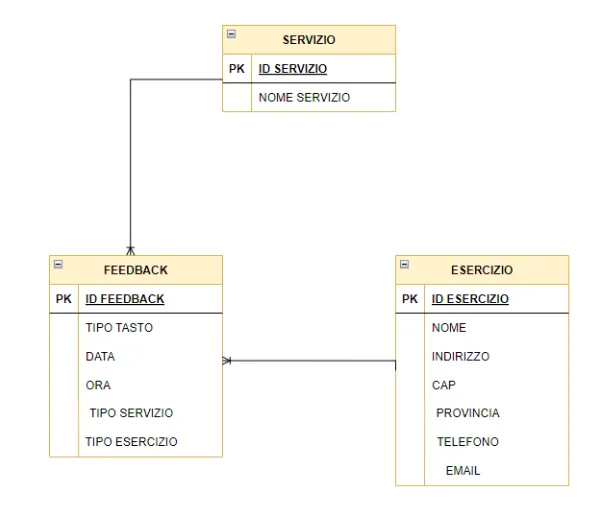
Dopo abbiamo 1 Pc server che è formato a sua volta da un database che ci serve per contenere e indirizzare i nostri dati, da un web server e dal PHP (viene integrato con i database e ci serve per creare pagine web dinamiche).
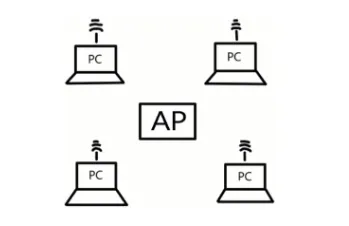
Come ultimo componente abbiamo la rete, può essere di vari tipi...come ad esempio di tipo lan (quindi collegata attraverso dei cavi), di tipo wi-fi, bluetooth e per ultime radiofrequenze...vediamo qui sotto un esempio di rete wi-fi, che è quella che alla fine utilizzeremo per la sua semplicità.
Il nostro dispositivo è formato da 3 parti fondamentali:
-ARDUINO=Che non è altro che una scheda elettrica che ci permette di programmare sia la parte hardware che quella software.
-SHIELD WIFI =Anch'essa è una scheda elettronica compatibile con Arduino...quindi può essere utilizzata insieme ad 'esso.
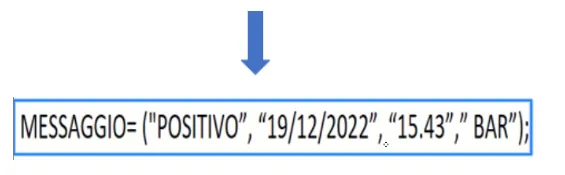
-MESSAGGIO = Il messaggio che è la parte più importante è diciamo il Recup che avviene dopo il click del bottone, infatti in base al bottone premuto ci sono dei sensori che ci permettono di avere più informazioni possibili, come l’ora, il giorno, il tipo di tasto premuto e la data...vediamo un esempio di messaggio!
Che può anche essere letto come:
L’utente ha cliccato il bottone positivo il giorno 19/12/2022 alle ore 15.43 del servizio BAR.
Create database sistema.feedback;

Use sistema.feedback;

Create table feedback (

Id.servizio char(5) not null,

TipoTasto char(10) not null,

Data date not null,

Ora time not null,

TipoServizio char(10) not null,

);
Let's start first of all with the realization of the requirements specialization document, in our case the system must allow to acquire evaluations expressed by the users through 3 buttons...The first button will be green in color and will mean that the service offered is of sufficient type, the second button will be orange in color and will mean that the service offered is not at the best of expectations while the third and last button from how you can deduce will mean that the service offered did not satisfy the user.
This method allows the company to understand the point of view of customers who have used the service offered in order to perhaps improve its performance...Let us now move on to see what all our requirements are by specifying their use and meaning.
--As the first component, i.e. the fundamental one we have a device (In this case a push button panel) which is a HARDWARE type component.
Next we have 1 Pc server which in turn consists of a database which we need to hold and address our data, a web server and PHP (it is integrated with the databases and we need it to create dynamic web pages).
As a last component we have the network, it can be of various types...such as lan type (so connected through cables), wi-fi type, bluetooth and lastly radio frequencies...let's see below an example of wi-fi network, which is the one we will eventually use because of its simplicity.
Our device consists of 3 basic parts:
-HARDWARE=That is nothing but an electrical board that allows us to program both the hardware and software parts.
-SHIELD WIFI =It too is an Arduino-compatible circuit board...so it can be used together with 'it.
-MESSAGE =The message that is the most important part is let's say the Recup that happens after the button is clicked, in fact based on the button pressed there are sensors that allow us to have as much information as possible, such as the time, the day, the type of button pressed and the date...let's see an example of a message!
Which can also be read as:
The user clicked the positive button on 19/12/2022 at 3:43 p.m. BAR service.
Creare il database sistema.feedback;

Utilizzare sistema.feedback;

Creare la tabella feedback (

Id.servizio char(5) not null,

TipoTasto char(10) not null,

Data data non null,

Ora time not null,

TipoServizio char(10) not null,

);