Hey, ¿qué tal? Aquí estoy de nuevo.
Hoy vengo con un post diferente, luego de haber subido una mini serie del Portal, no he grabado aun el capítulo dos del juego, por lo tanto, aprovecho para subir algo de otro estilo, para no centrarme solo en gameplays aquí en la comunidad.
¿No les ha pasado que tienen ganas de jugar esos títulos que de pequeño no te cansaban y tanto té distraían? Pues hace poco recordé todos esos juego que solía jugar en mi Nintendo Wii, así que saque la consola de donde la tenía guardada desde hace muchos años y empece una búsqueda de esos juegos a ver si los tenían en venta en mi ciudad, pero son muy difíciles de conseguir en buen estado.
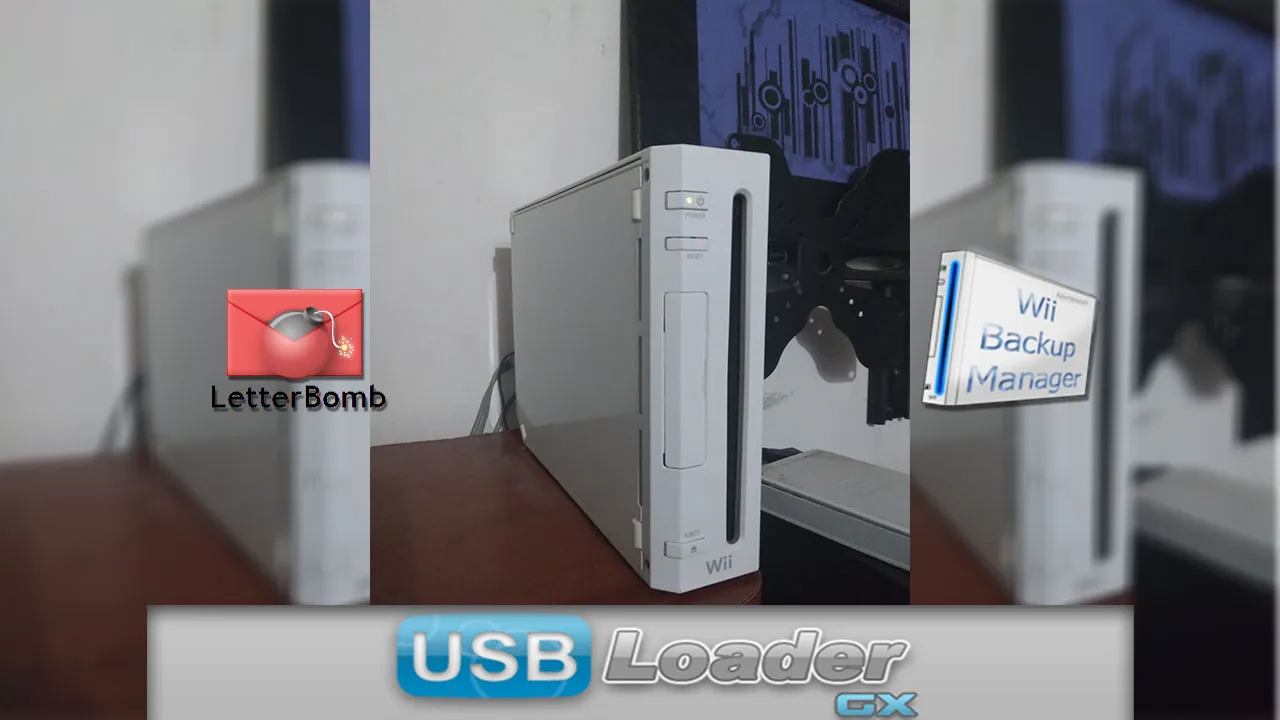
Como no pude encontrar los juego, pensé en modificar la consola para poder jugar a esos y mucho más con solo descargarlos y pasarlos a la Wii.
Les mostraré como lo hice para que ustedes puedan hacerlo también y recordar esos viejos tiempos.
Aquí les dejaré los archivos que son necesarios: https://drive.google.com/drive/folders/14TMKnIwcqwIlqnF7ioFxwloITmJbgLuw?usp=sharing
Les dejo lo que tendremos que usar en la tarjeta SD y él programa que utilizaremos para los juegos
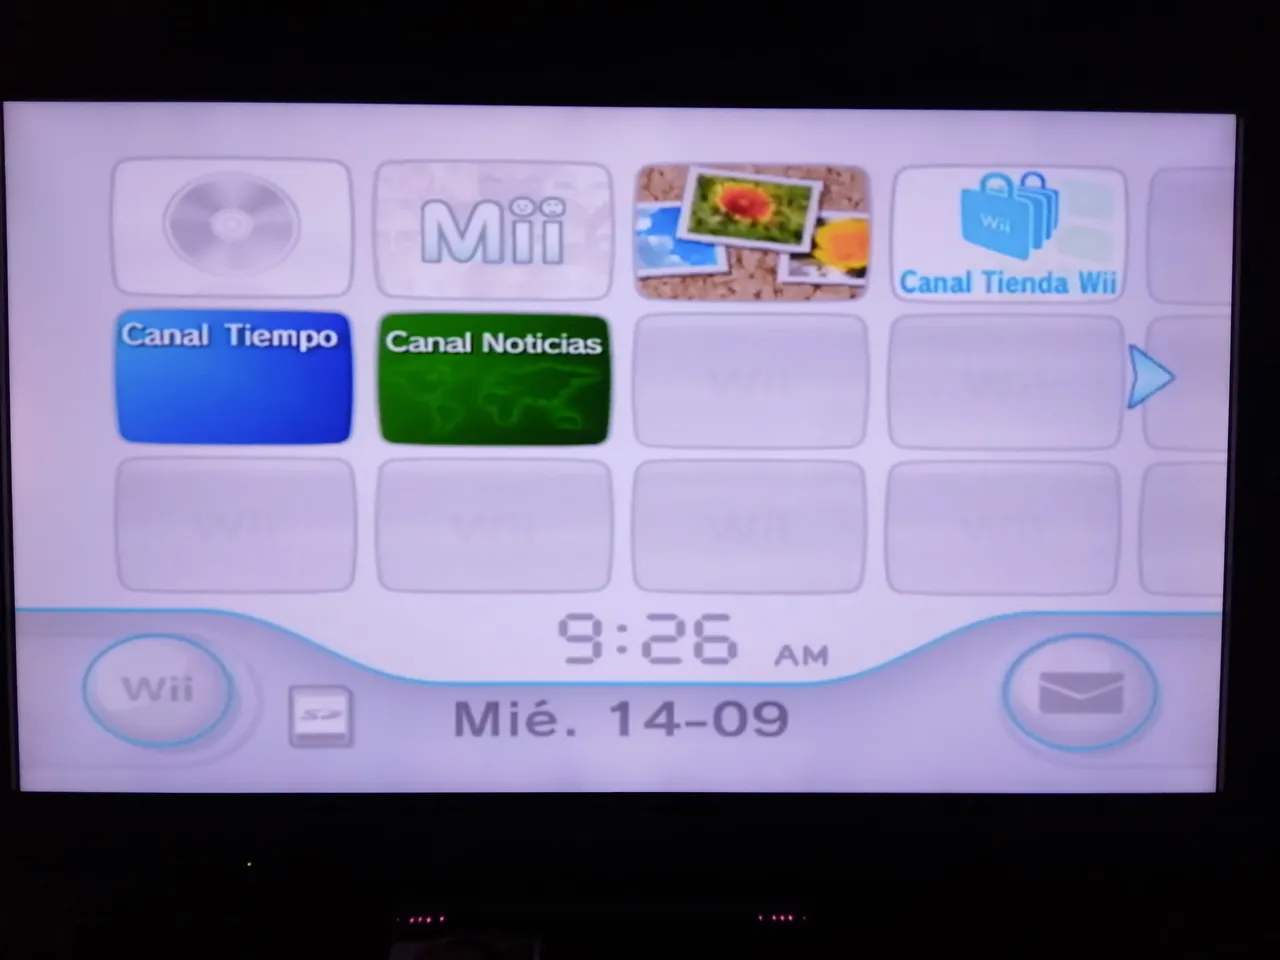
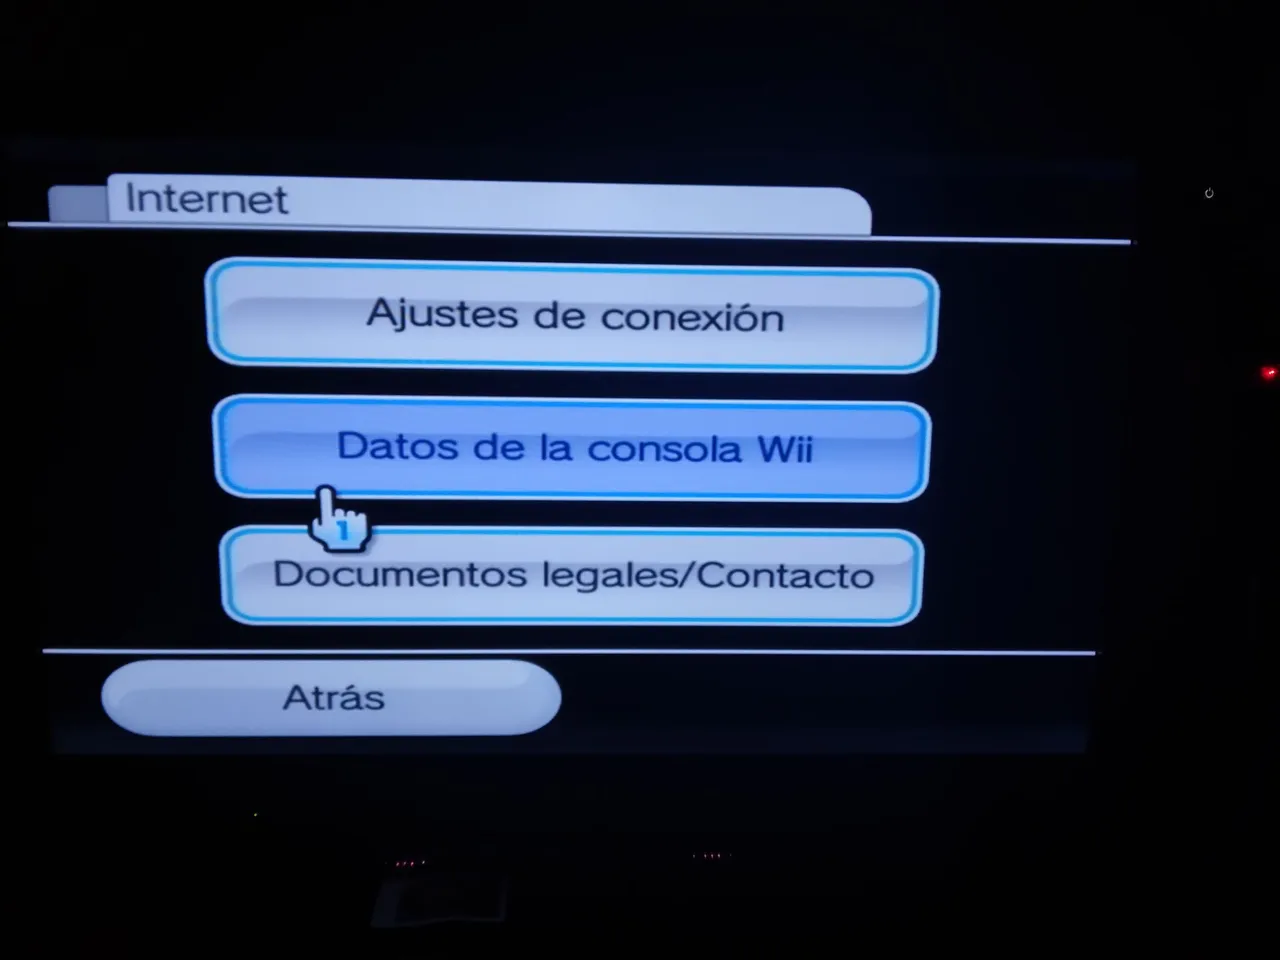
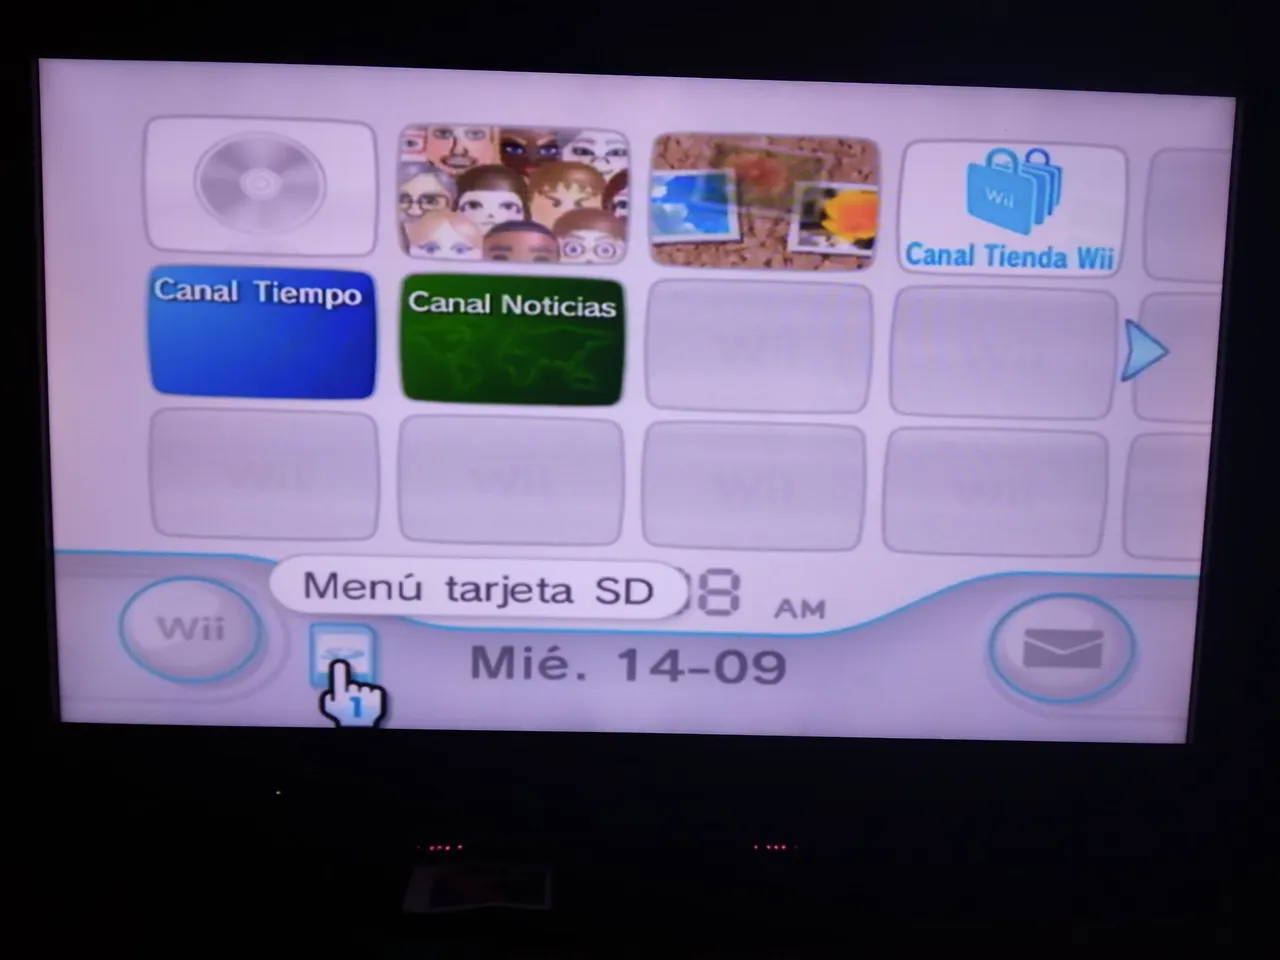
Primero, vamos a tener que buscar información que necesitaremos sobre nuestra consola, por lo tanto, ya con la consola encendida iremos al apartado de configuración, que está en la esquina inferior izquierda del menú principal, este botón dice "Wii".
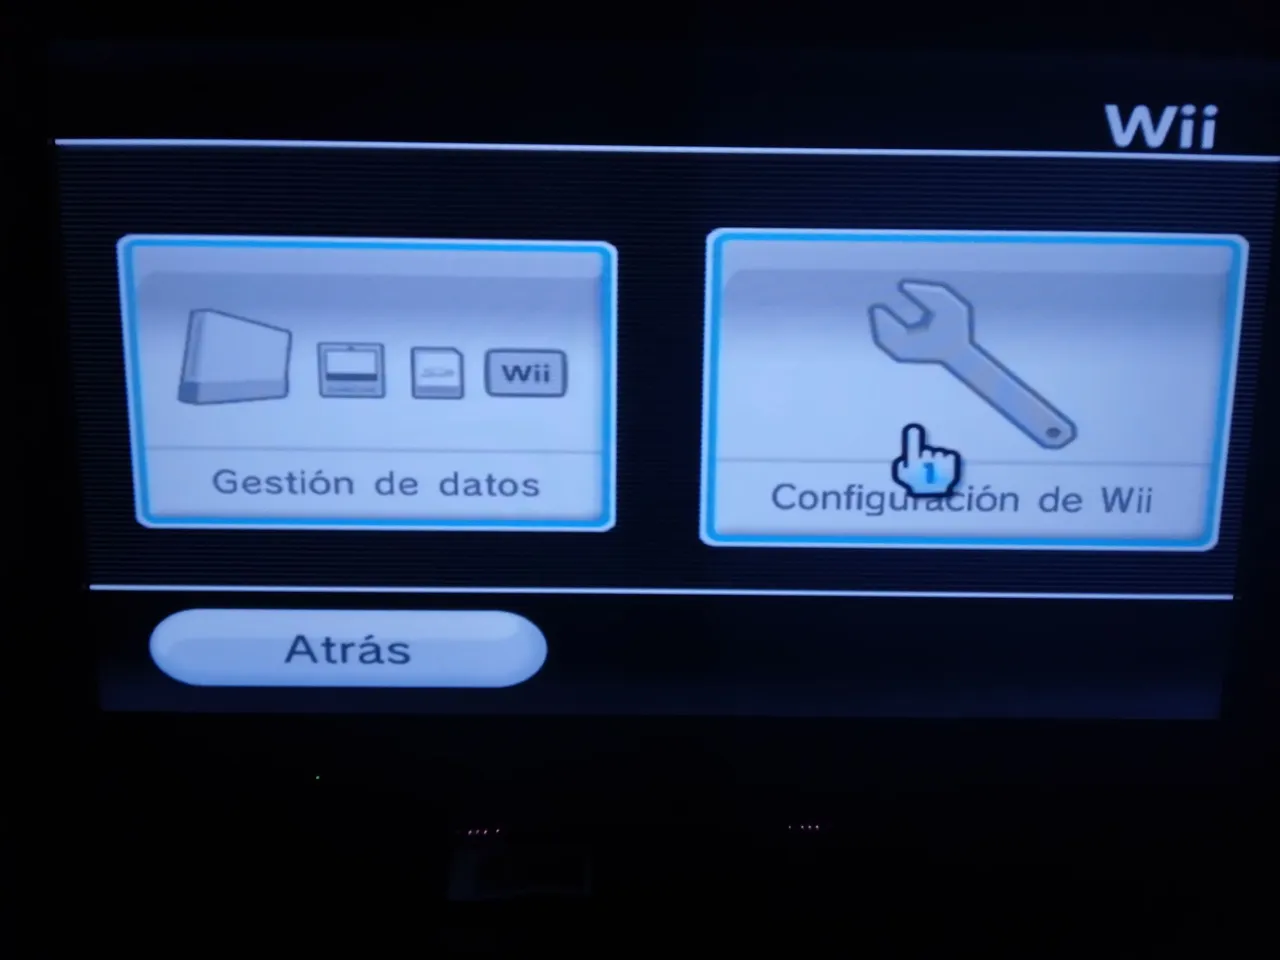
Cuando entremos en las opciones del Wii, seleccionaremos el apartado que dice configuración de Wii, ahí encontraremos el primer dato que tenemos que anotar, en la esquina superior derecha encontraremos la versión de nuestra consola junto con la región de la misma. Por ejemplo, la versión de mi Wii es la 4.3 U, la letra al final te indica la región, E-Europa, U-América, J-Japón.
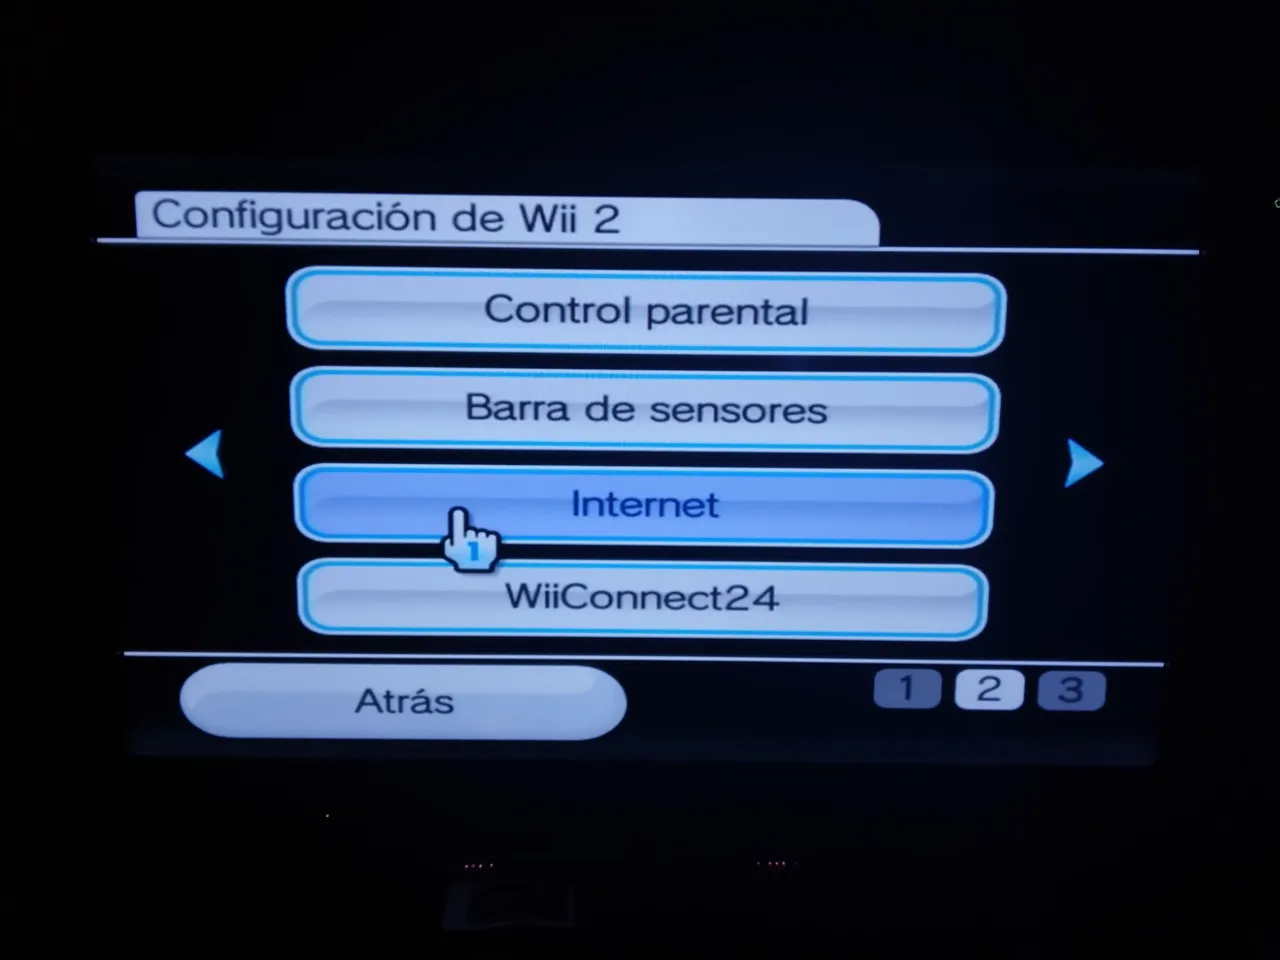
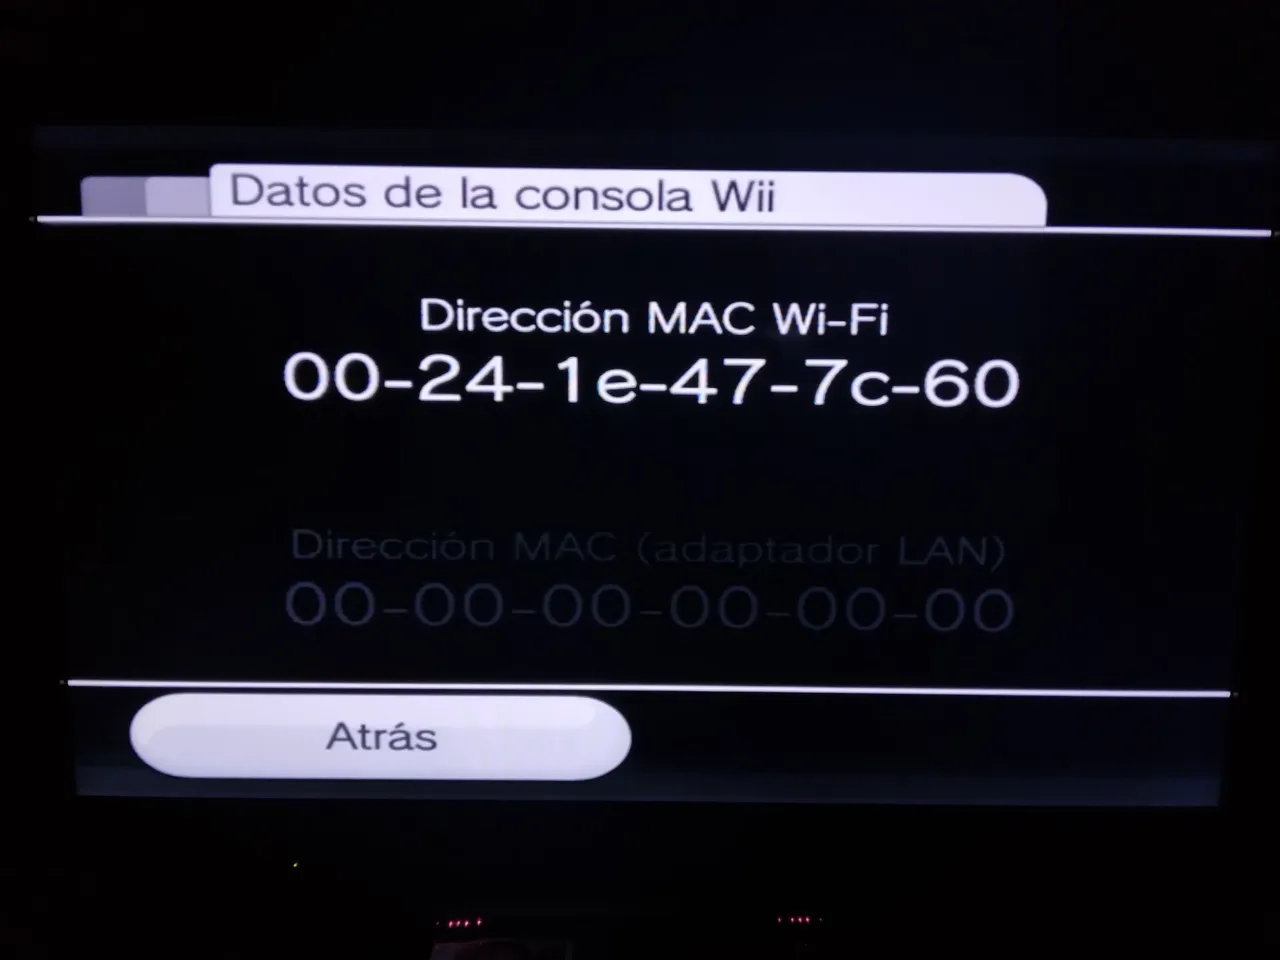
Luego en el mismo menú de configuración de Wii buscaremos el apartado de internet y entraremos datos de la consola Wii, ahí nos saldrá la IP de nuestra consola, es otro dato que tendremos que anotar.

Ojo, si nuestra versión de la consola es inferior a la 4.3 tendrán actualizarla, en el mismo menú de configuración de Wii nos sale el apartado de actualizar Wii.
Luego de actualizar, o si ya tenemos la versión actualizada, nos dirigiremos a nuestra computadora y abriremos la siguiente página:
Ahí seleccionaremos la versión con la región que corresponde, luego pondremos la IP de nuestro Wii, completaremos el captcha y luego pulsaremos el botón que dice Cut the red wire.

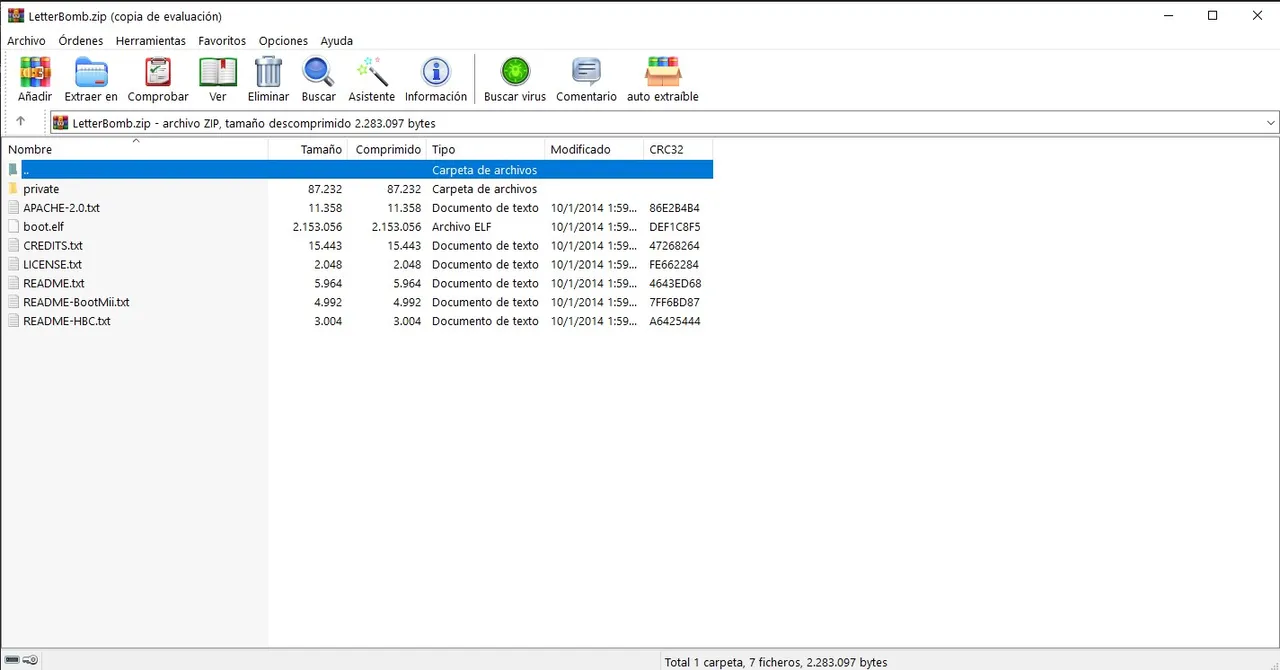
Luego nos empezara la descarga de un archivo .zip el que descomprimiremos.
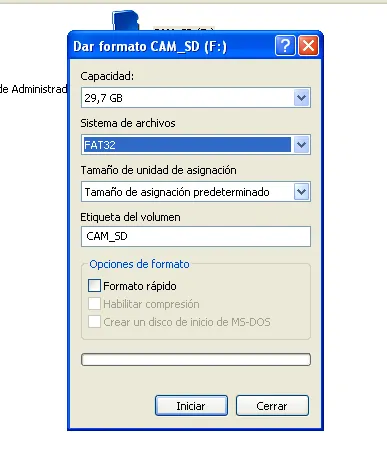
Tendremos que insertar nuestra tarjeta SD para mover algunos archivos de ese archivo que descargamos y descomprimimos, pero antes vamos a formatear nuestra tarjeta SD en el formato Fat32.
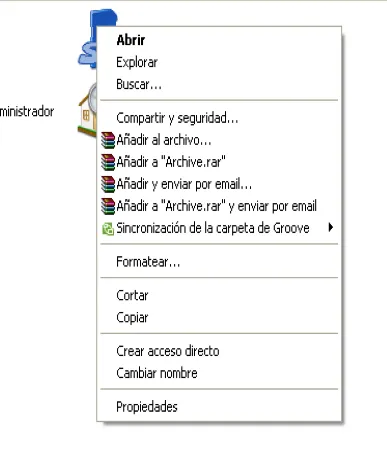
Una vez que insertemos la tarjeta SD iremos a donde tengamos los dispositivos y al dar click derecho sobre la tarjeta SD nos saldrá la opción de formatear, luego nos abrirá el apartado para formatear, en sistema de archivo seleccionaremos Fat32 y luego daremos en iniciar, al final el proceso estará listo para transferirle los archivos.
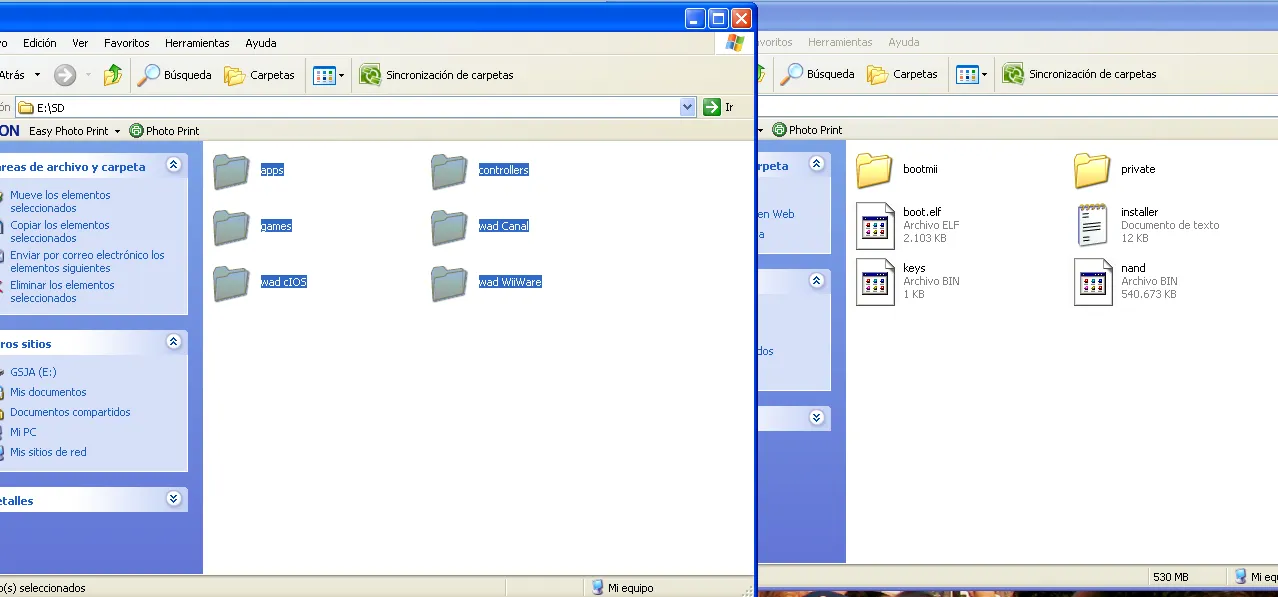
Ya habiendo formateado la tarjeta SD, del archivo que descomprimimos, solo vamos a pasar la carpeta nombrada "private" y el archivo nombrado "boot.elf" a la tarjeta SD.
Antes de llevar nuestra tarjeta SD a la consola tenemos que verificar que la fecha y hora de la misma estén correctas, esto tiene que ser así para poder realizar el siguiente paso, así que tenemos que estar seguro de que tiene la fecha actual.
Luego insertamos la tarjeta SD en nuestra Wii y en el menú principal nos saldrá el icono de la tarjeta en azul que nos indica que la reconoce.
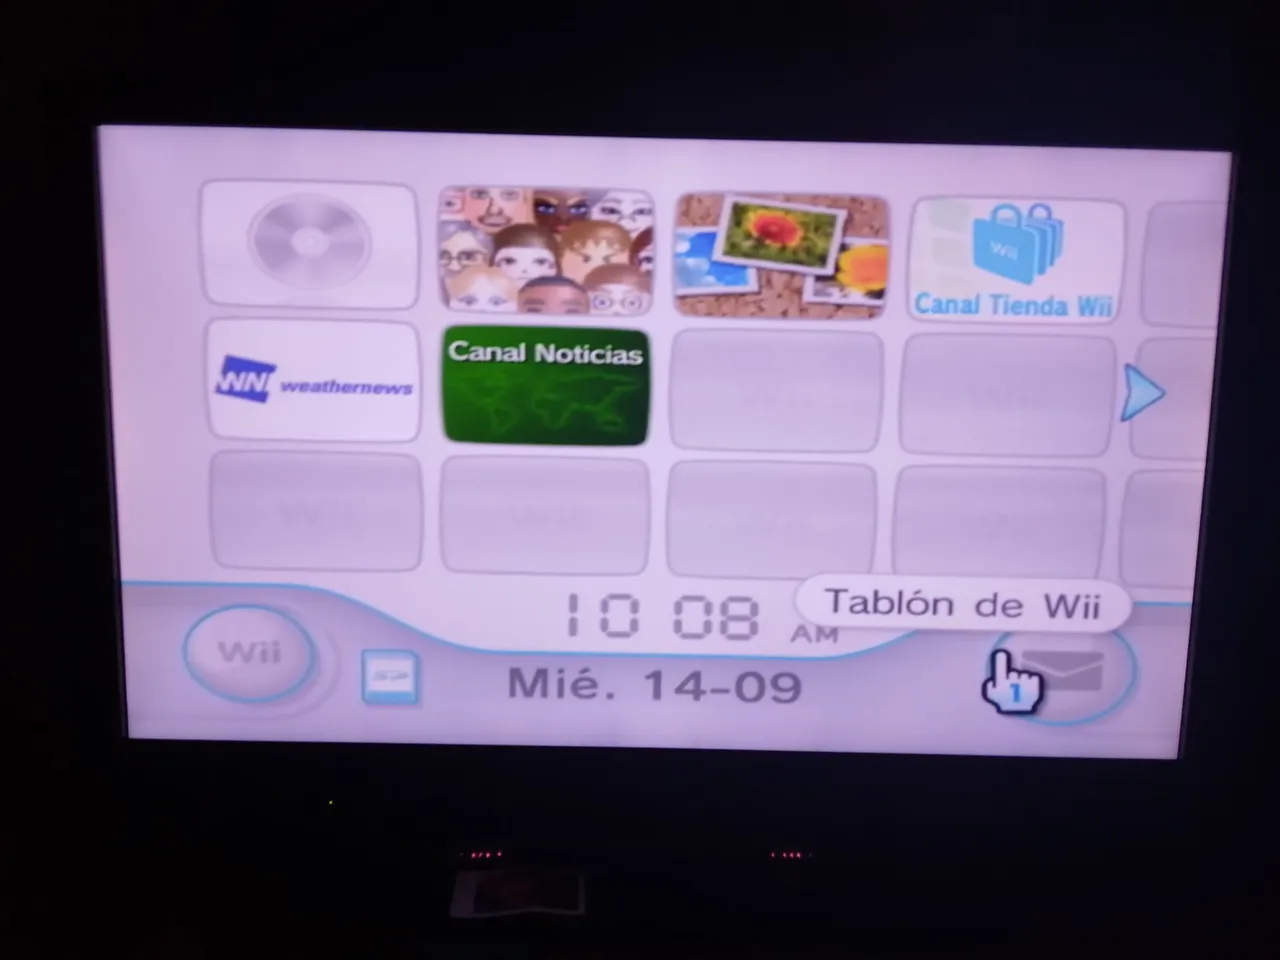
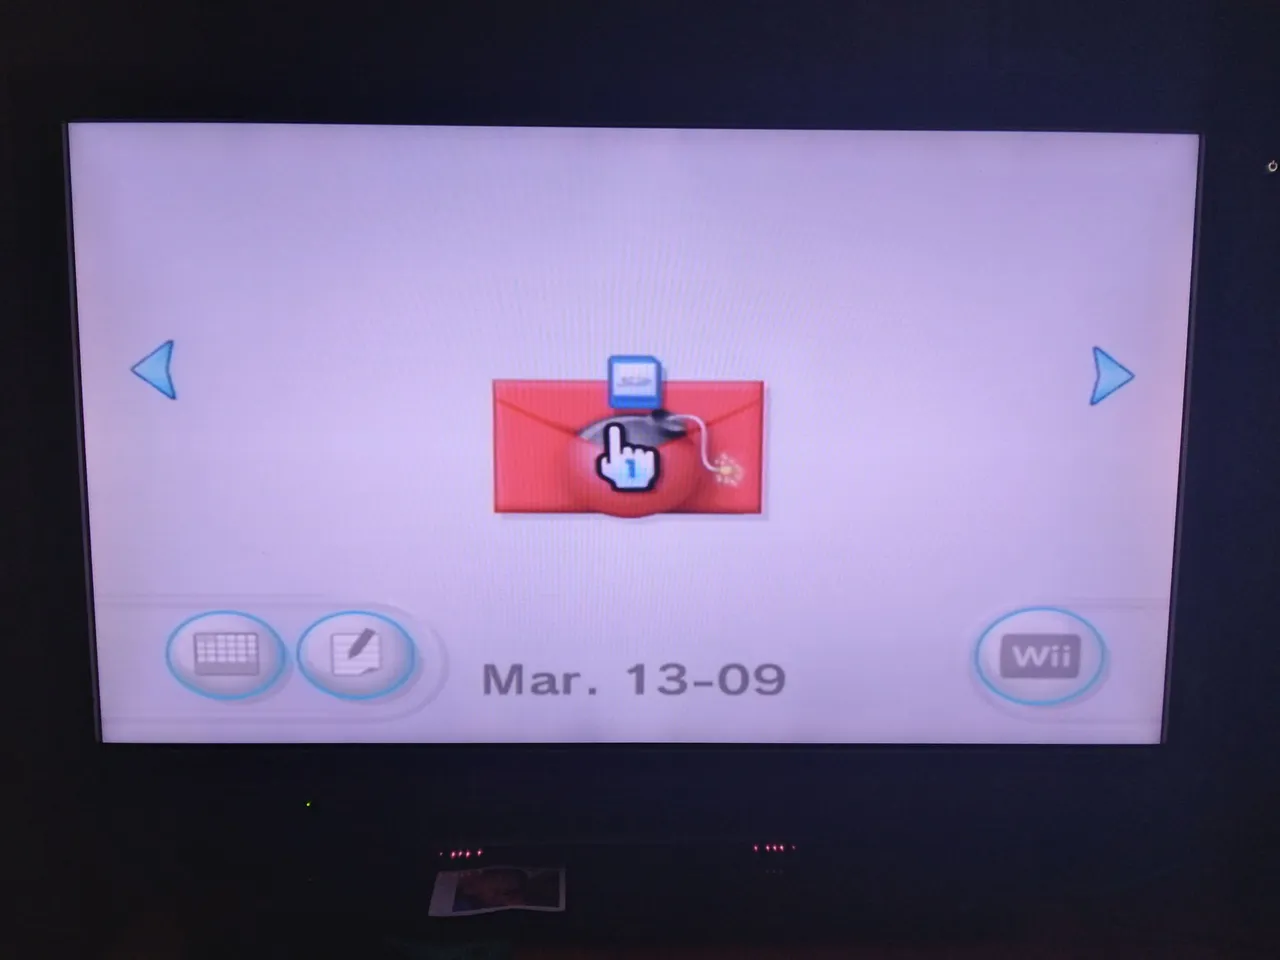
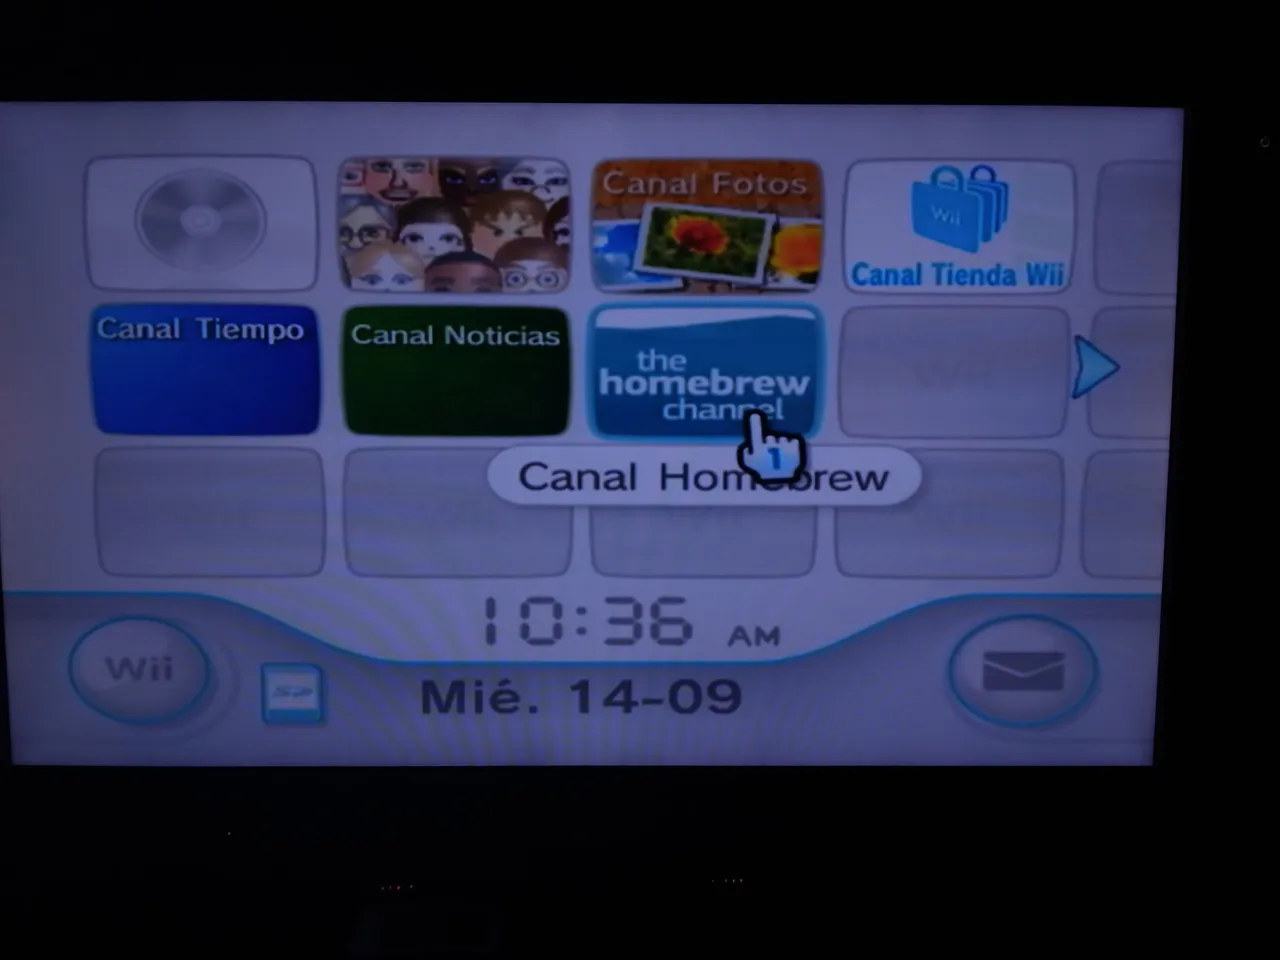
Nos dirigiremos al apartado de mensajes que está en la esquina inferior derecha del menú principal, este tendrá un icono de una carta.
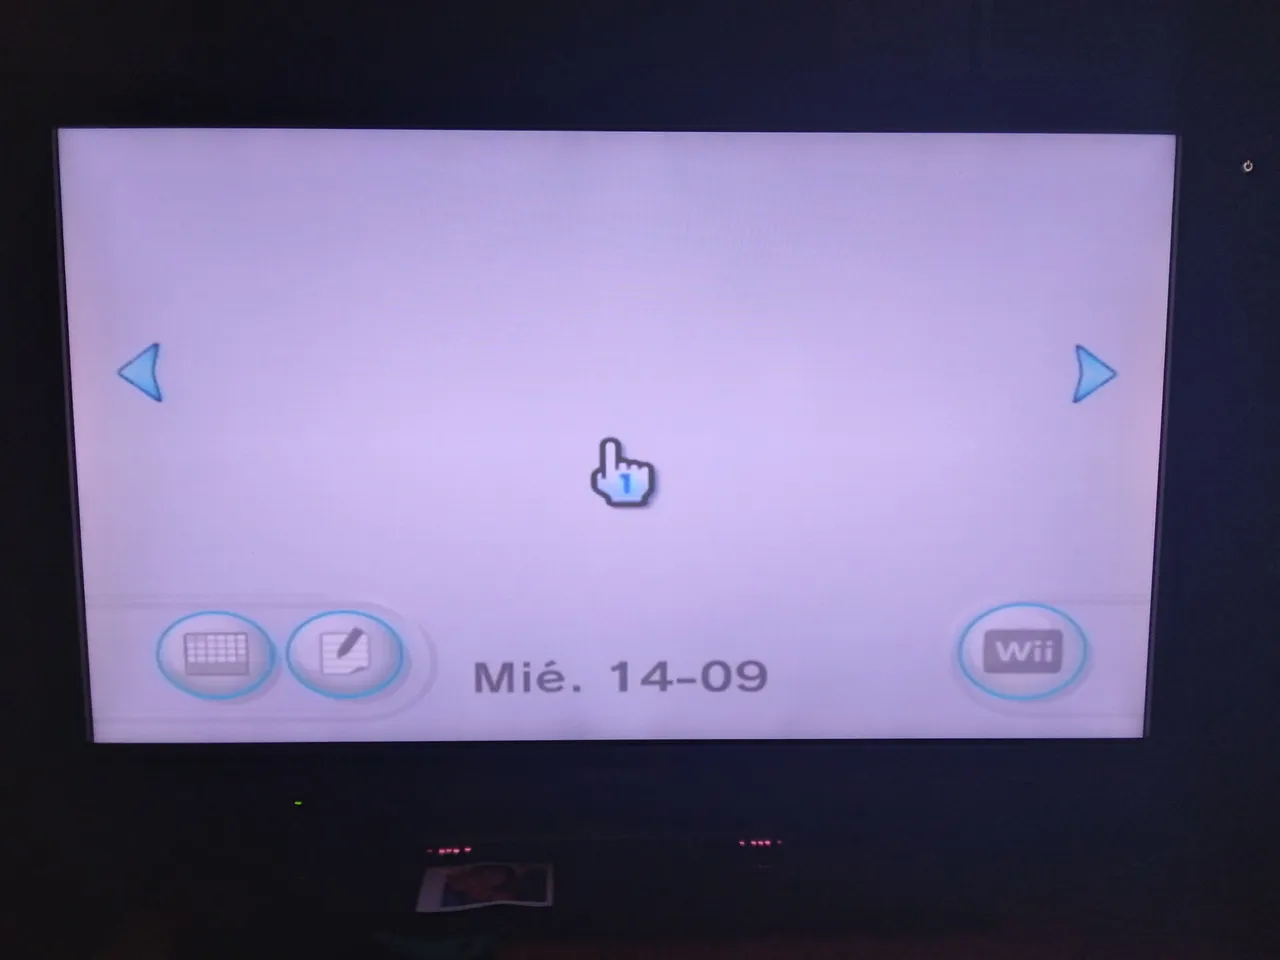
Y estando dentro estaremos en una bandeja en blanco con la fecha actual, ahí tendremos que avanzar una página adelante o una página a atrás con los botones - y +, buscando un mensaje que tendrá el icono de una carta con una bomba dentro.
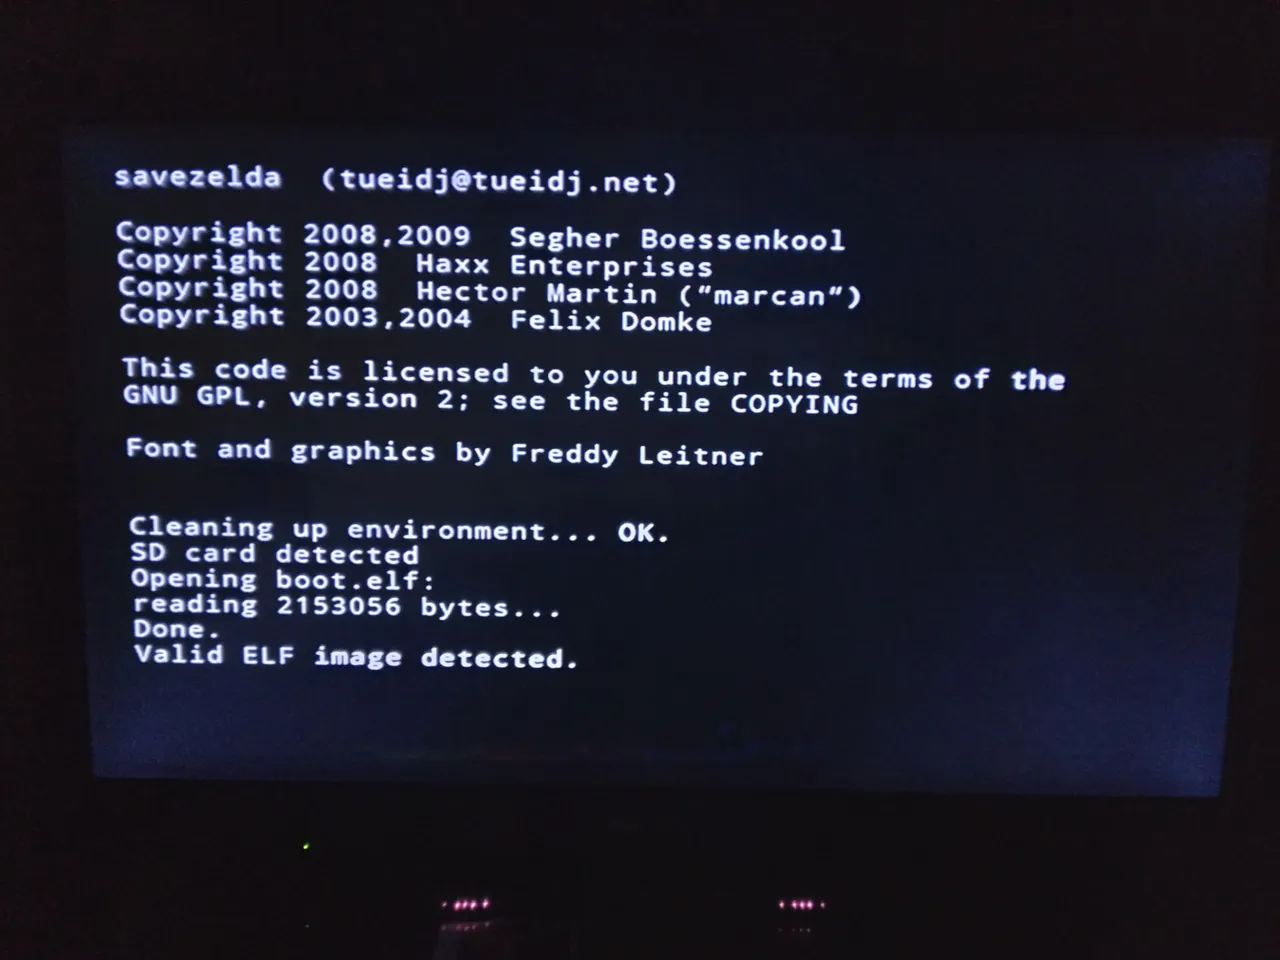
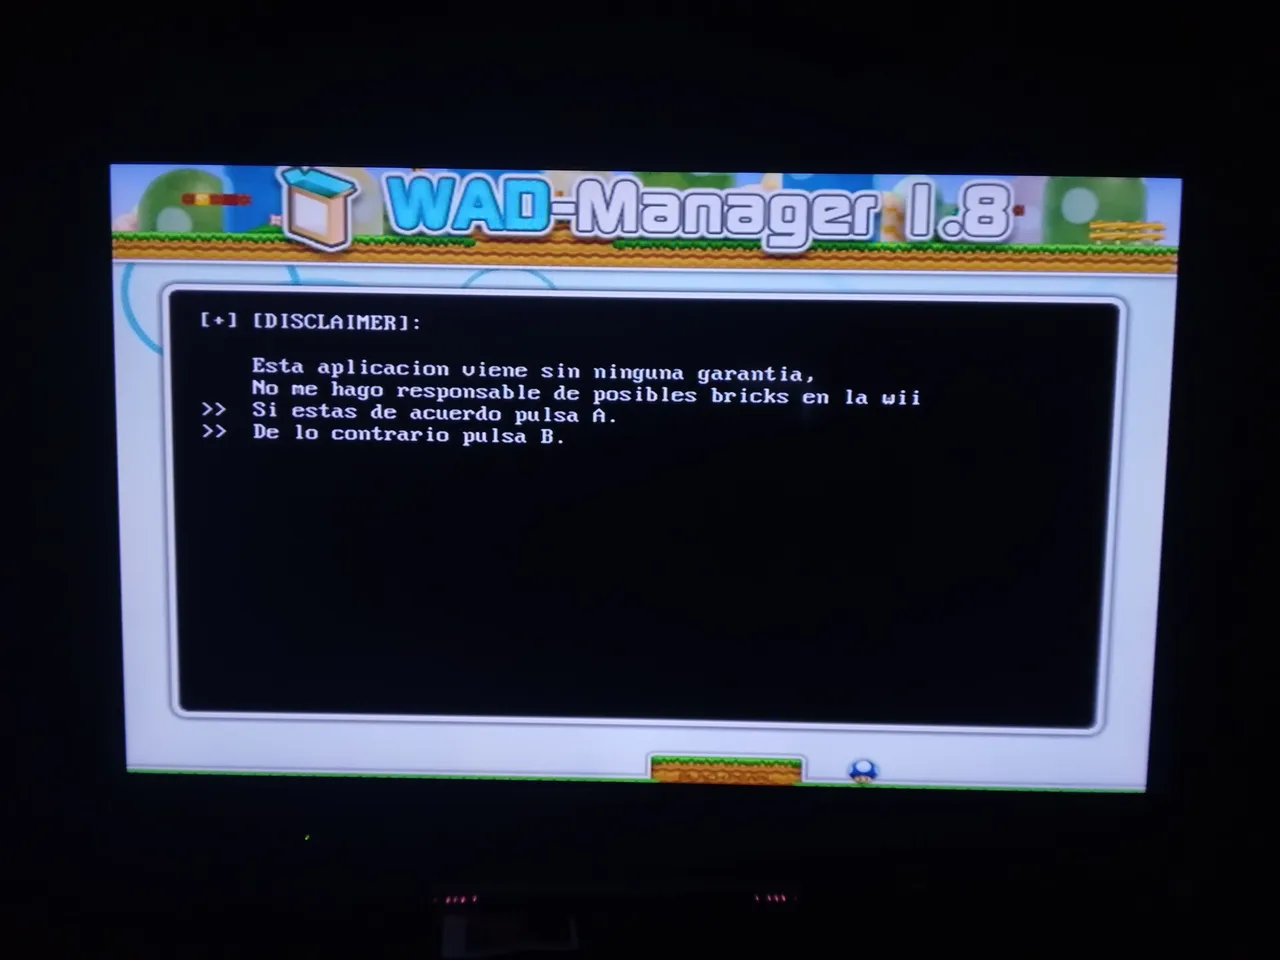
Al entrar pasaremos a una pantalla de carga con fondo negro, y luego nos pasara a una advertencia con fondo negro igual, donde esperaremos a que nos diga que pulsemos A para avanzar.
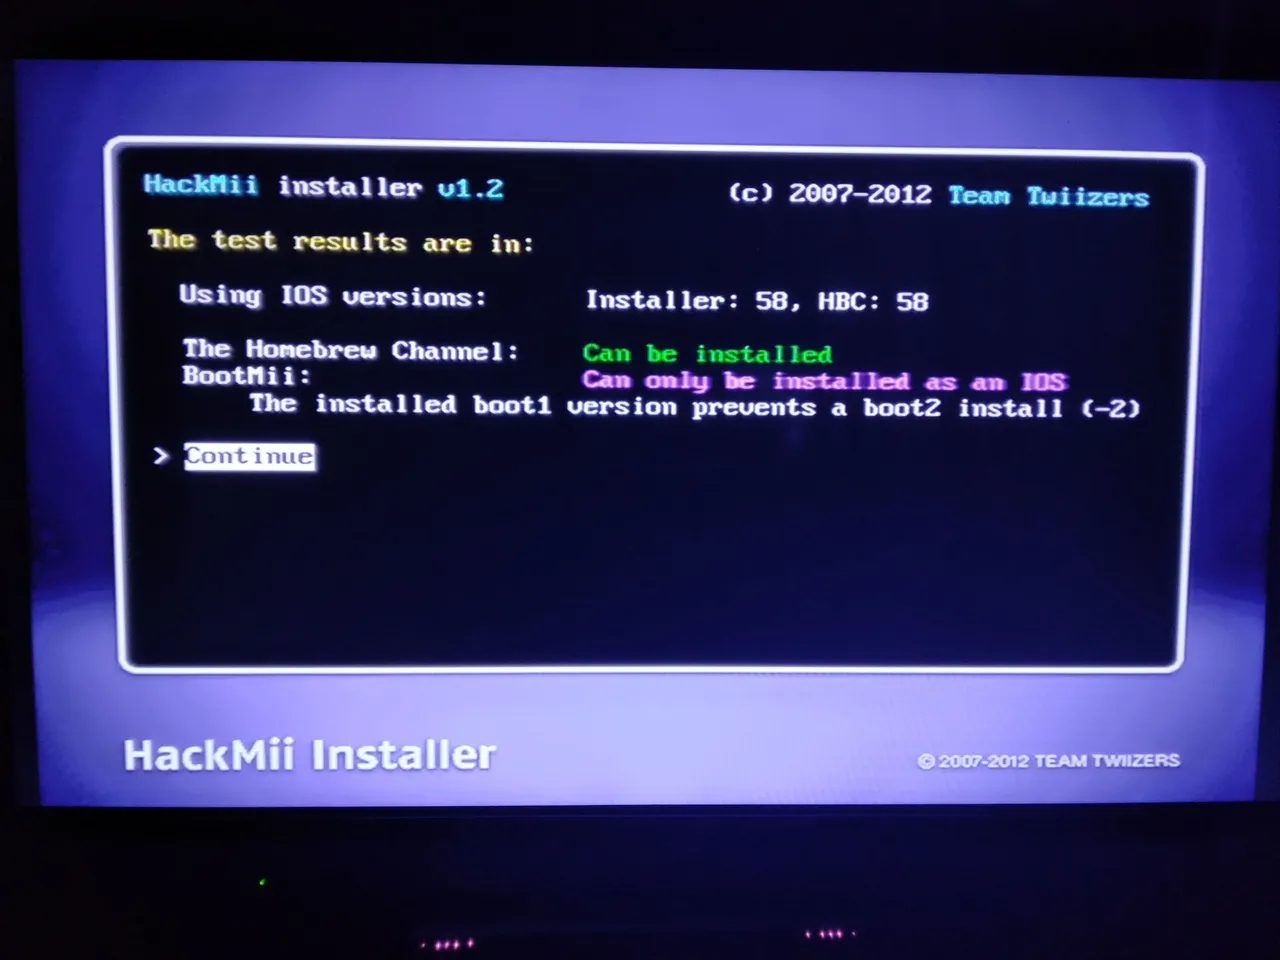
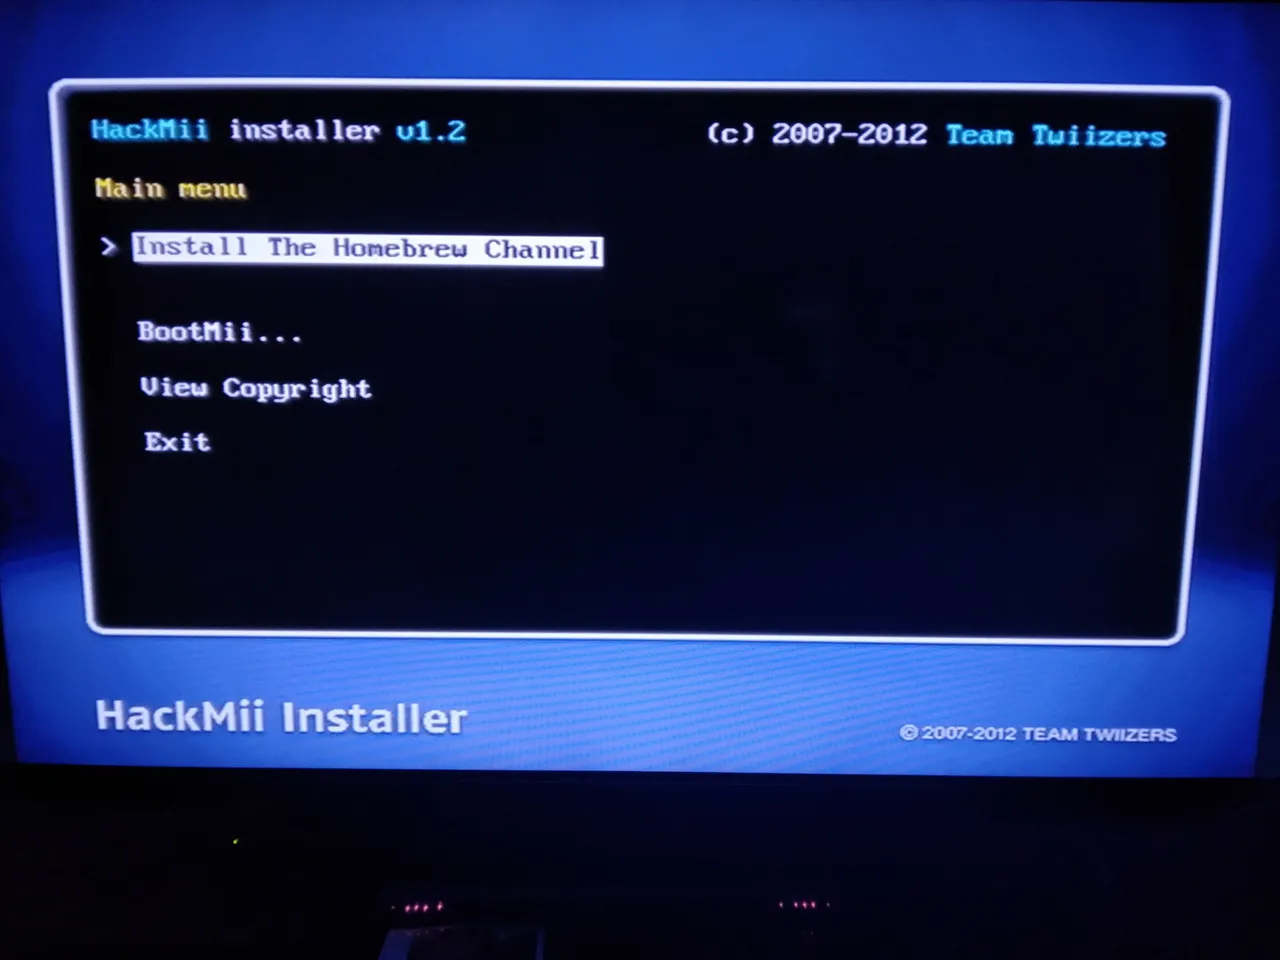
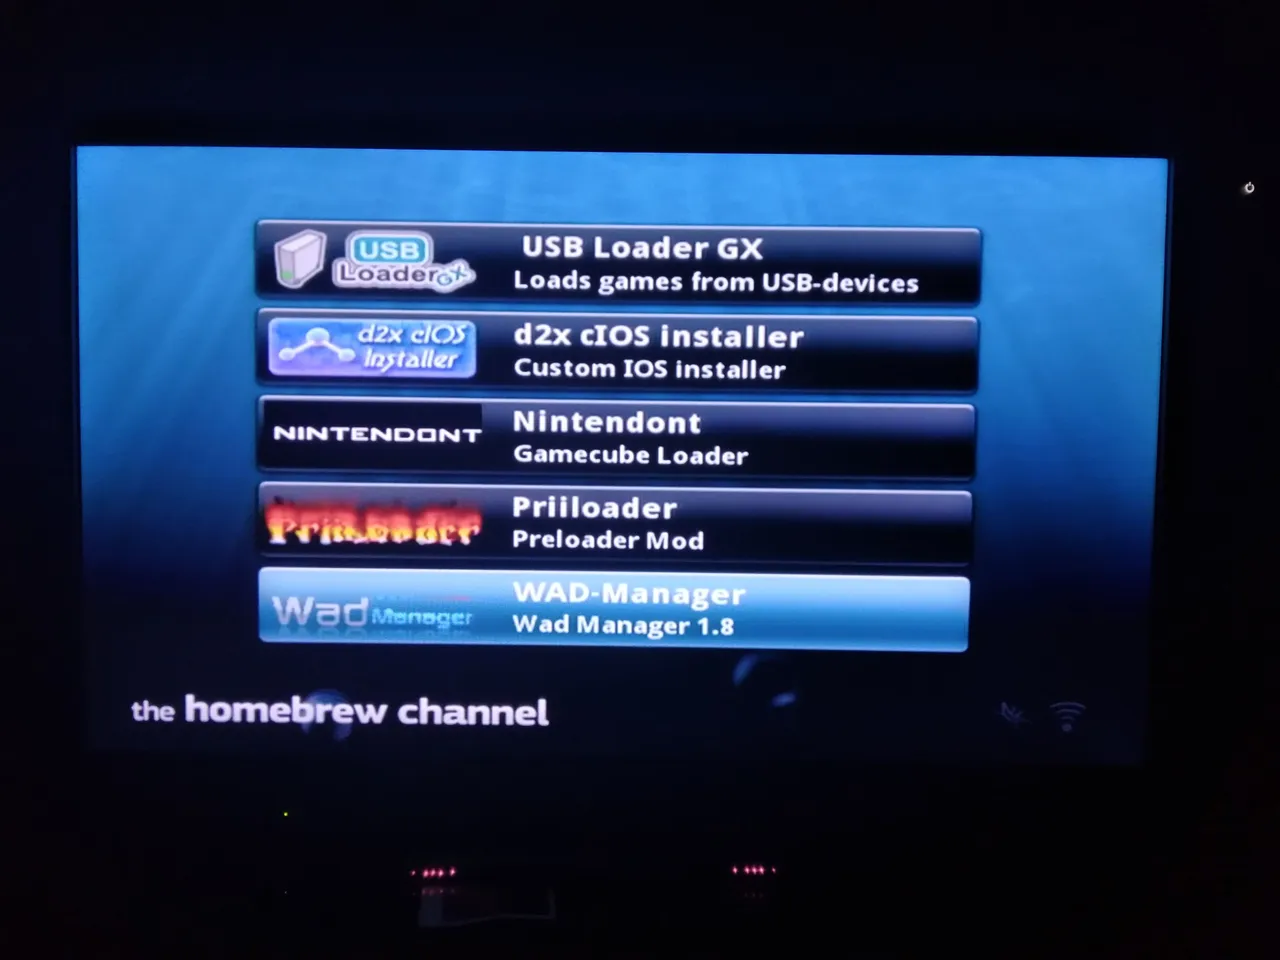
Cuando presionemos A nos llevara a un menú, en el que vamos a instalar alguno programas para modificar nuestra Wii.
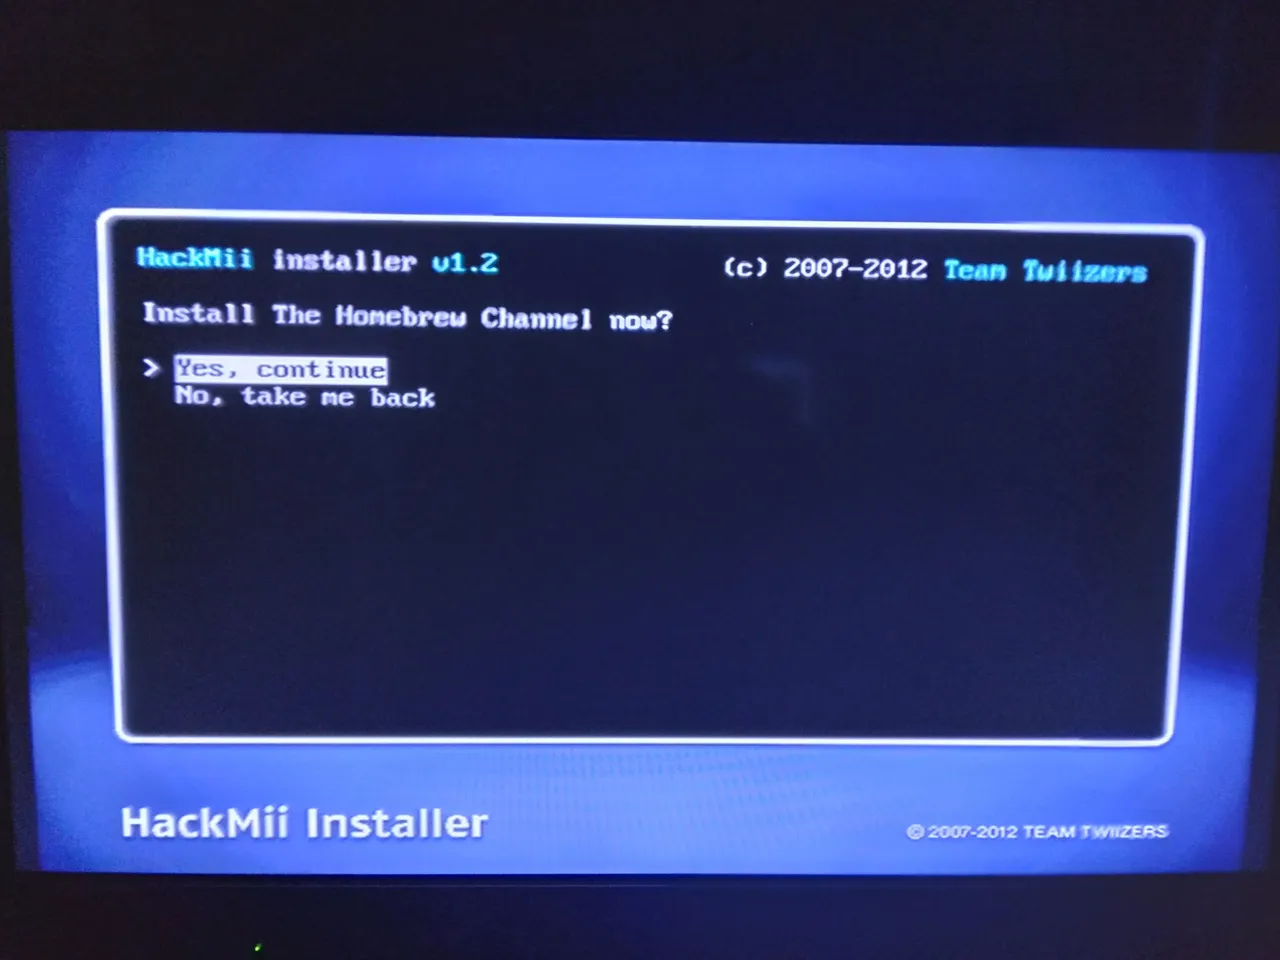
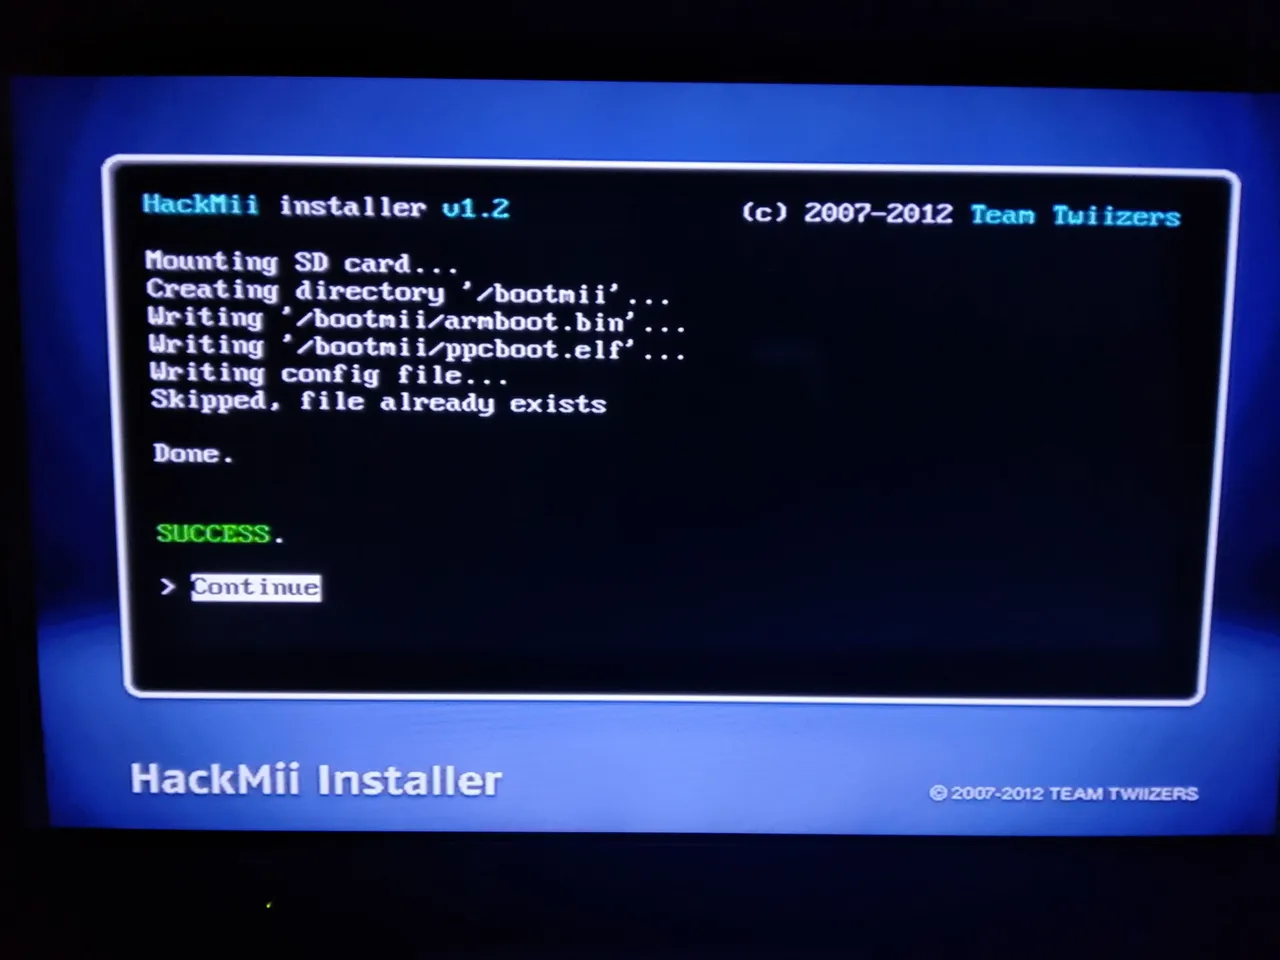
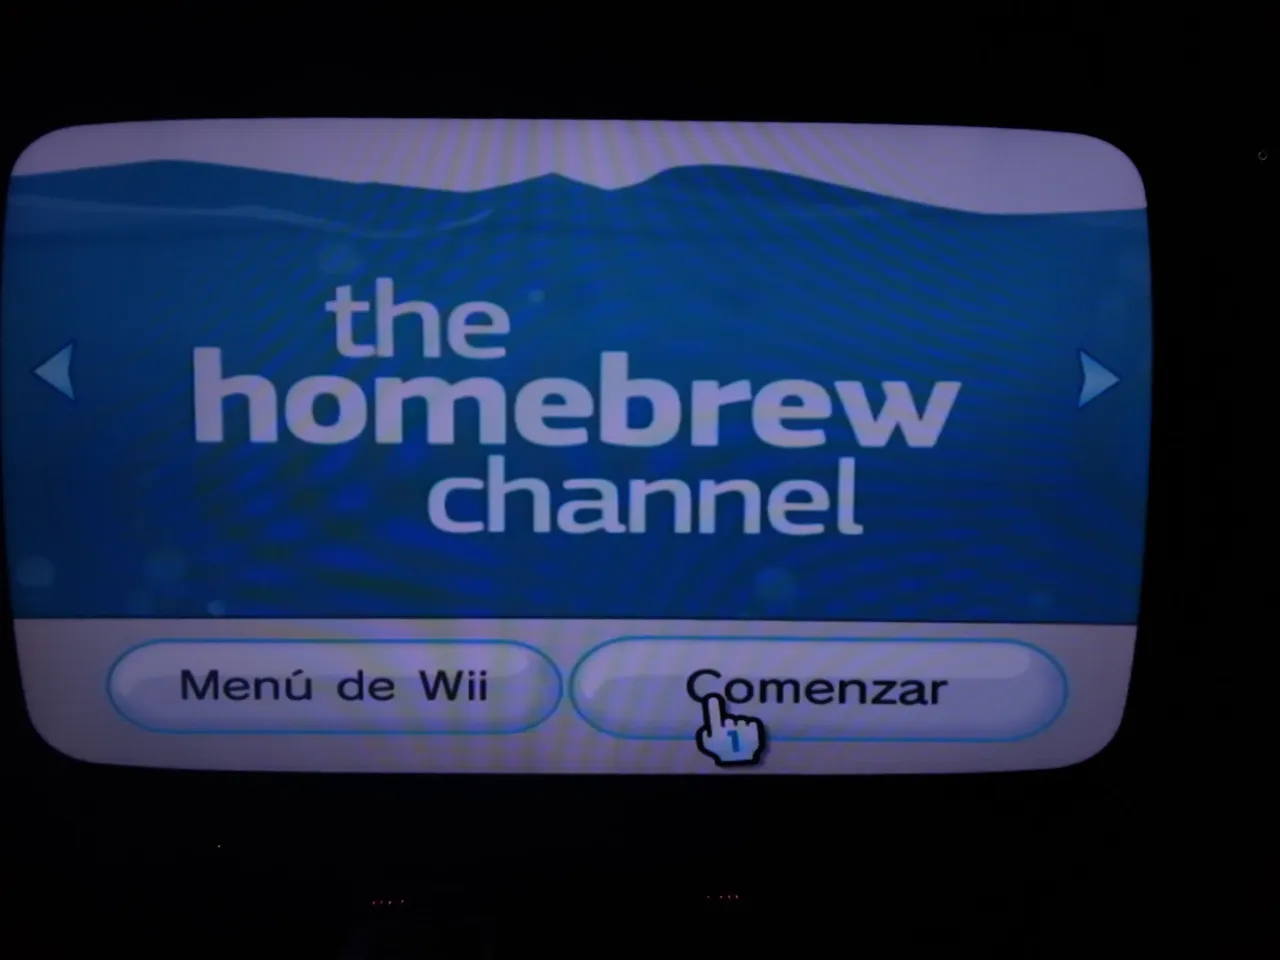
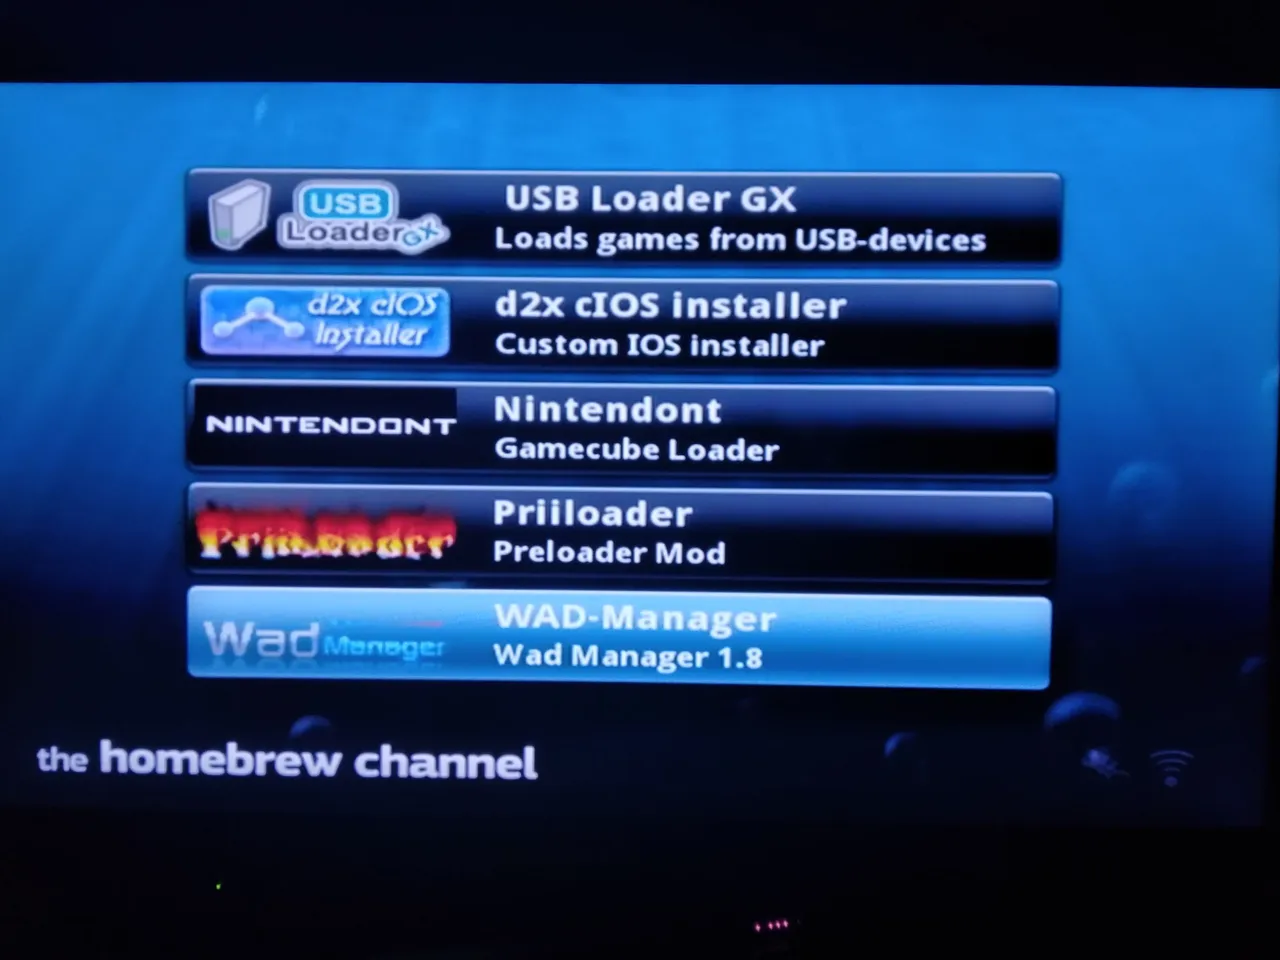
En este menú nos moveremos con las flechas del mando y con el botón A. Daremos en "continue", que nos lleva al menú principal, y la primera cosa que haremos es instalar el Homebrew Channel que será el canal que nos ayudara a instalar los archivos .wad que son los demás canales o incluso podemos instalar emuladores, Para instalarlo seleccionamos la primera opción, dice "Install The Homebrew Channel" al entrar ahí daremos en "Yes, continue" y empezará a instalarse, hasta que termine y salga "Continue".
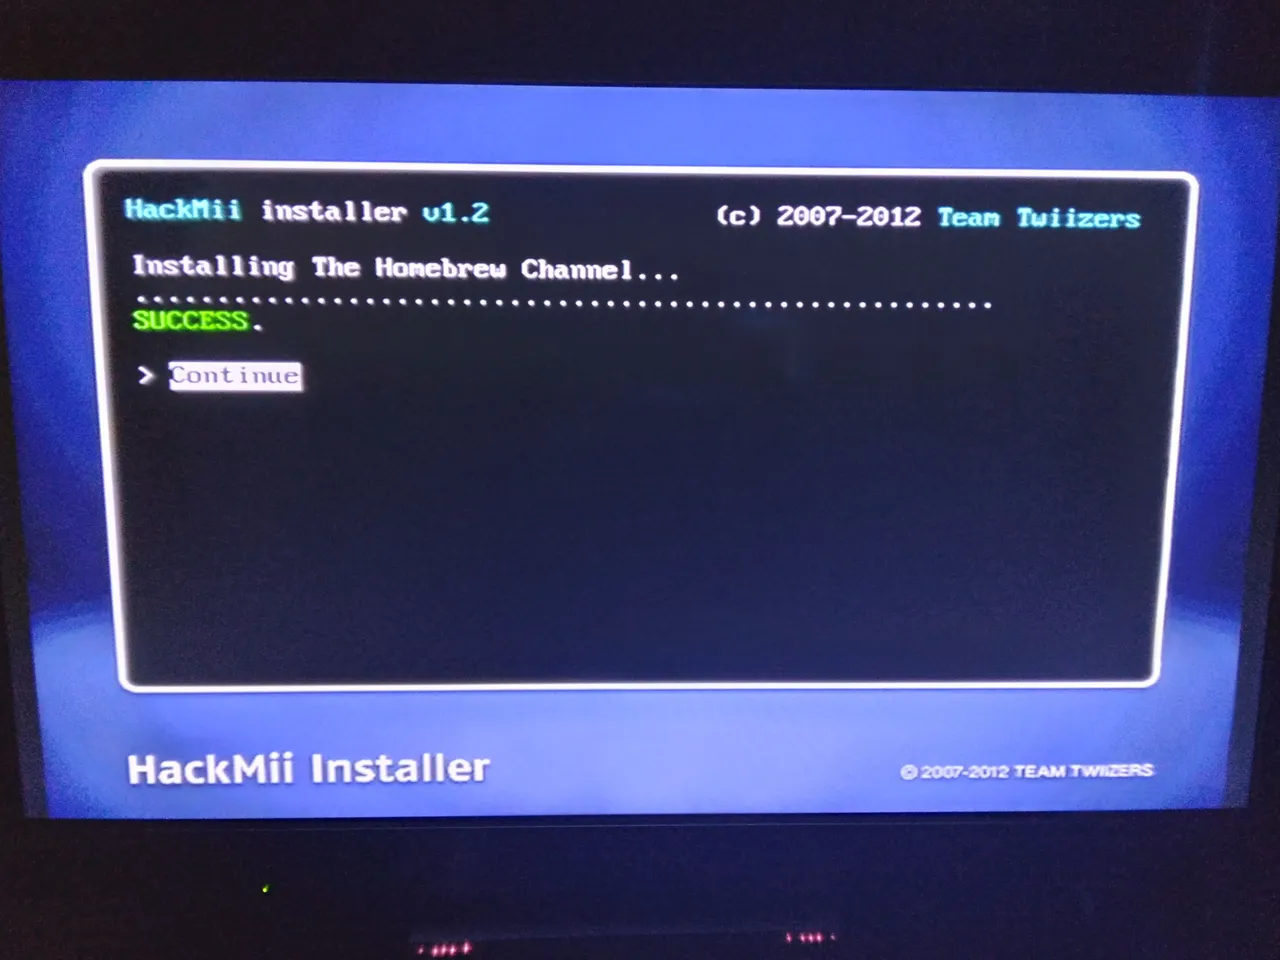
Cuando presionemos "Continue" nos devolvera al menu anterior y ya estara instalado el Homebrew Channel.
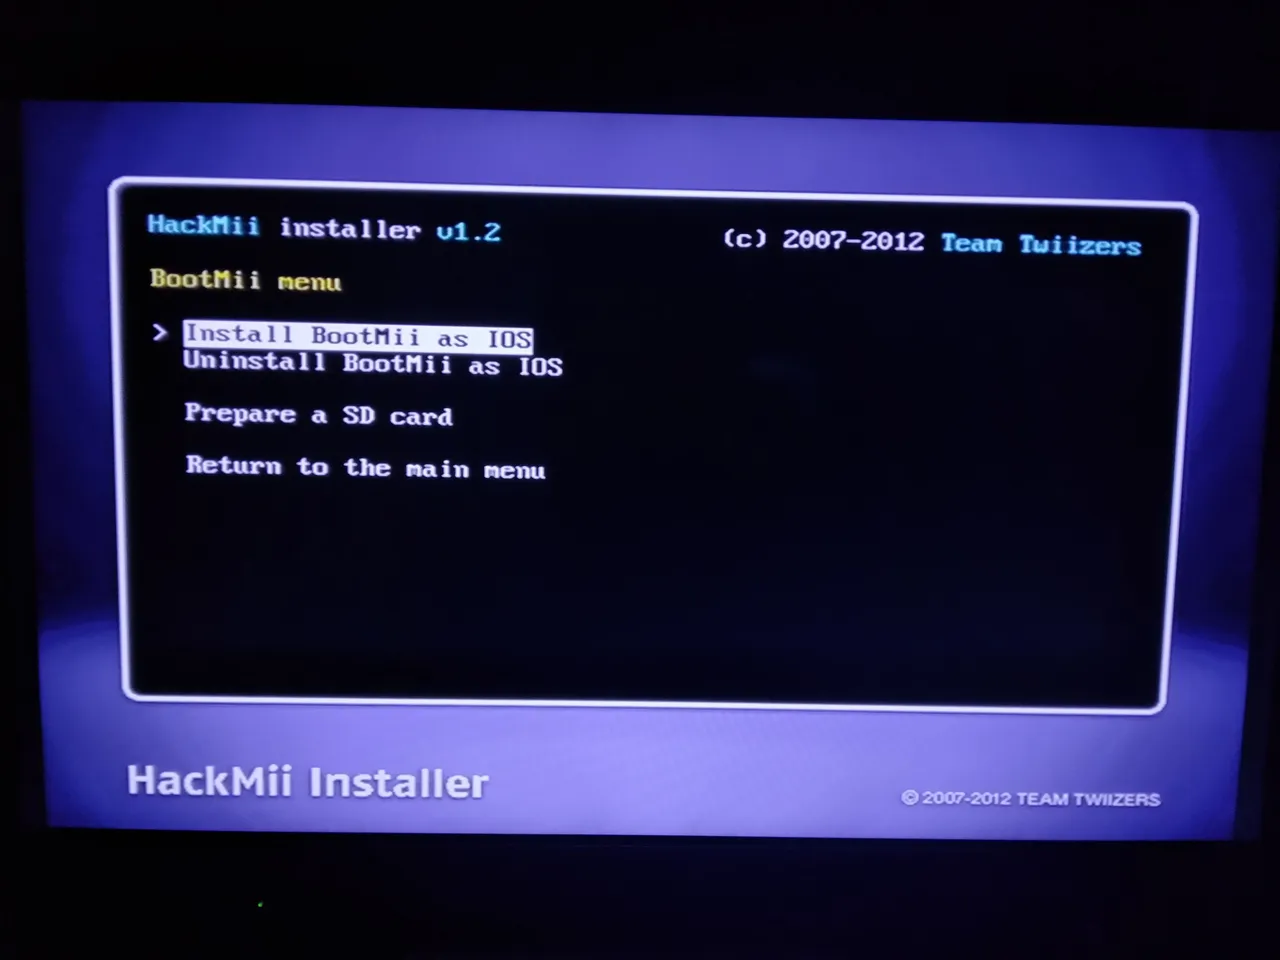
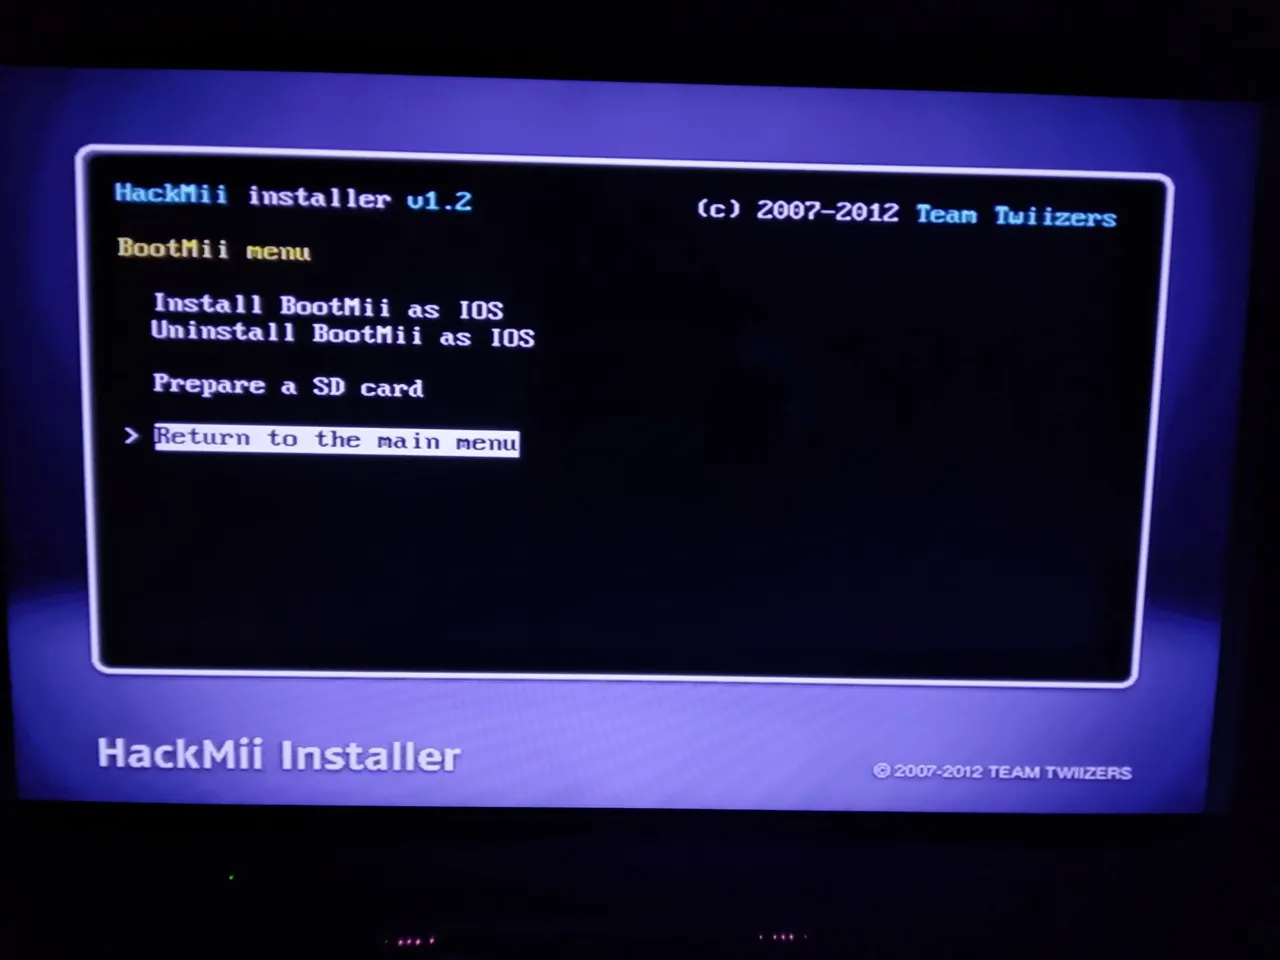
Ahora instalaremos BootMii, este programa nos sirve para reparar errores, como por ejemplo instalaste un .wad (canales o emuladores) de otra región y sufres un error que ya no te deja entrar a la consola desde el menú normal de la Wii, con esta aplicación que arranca antes que la propia Wii, podrías abrir el Homebrew Channel y desinstalarlo, además de un par de utilidades más.
Para instalarlo solo bajaremos hasta el apartado que dice "BootMii..." al entrar seleccionaremos la primera opción de "Install BootMii as IOs" seguido a esto daremos a la opción "Yes, Continue" luego esperamos a que termine de cargar y volveremos a dar en "Yes, continue" volvemos a esperar a que termine la carga de datos hasta que salga la opción de "Continue" la cual seleccionaremos.

Nos devolverá al menú anterior, donde ahora seleccionaremos la opción de "Prepare SD card" nos llevara a otro apartado donde seleccionamos "Yes, continue" donde esperaremos a que termine la carga de datos para luego seleccionar "continue".
Cuando presionemos "Continue" nos llevara de vuelta al menú de BootMii, del cual saldremos seleccionando "Return to the main menu" aquí volveremos al menú principal, en este saldremos seleccionando "Exit".
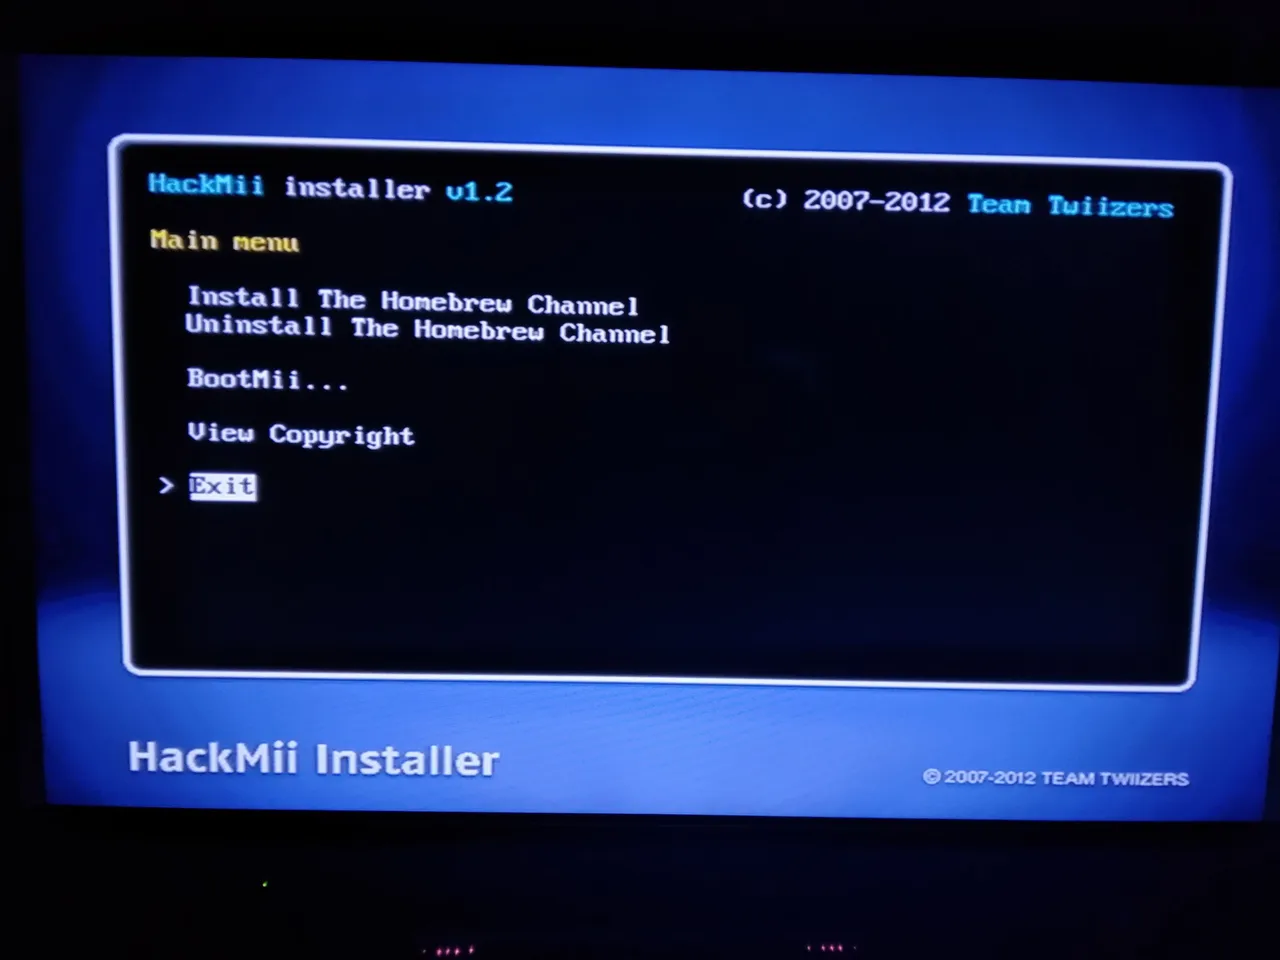
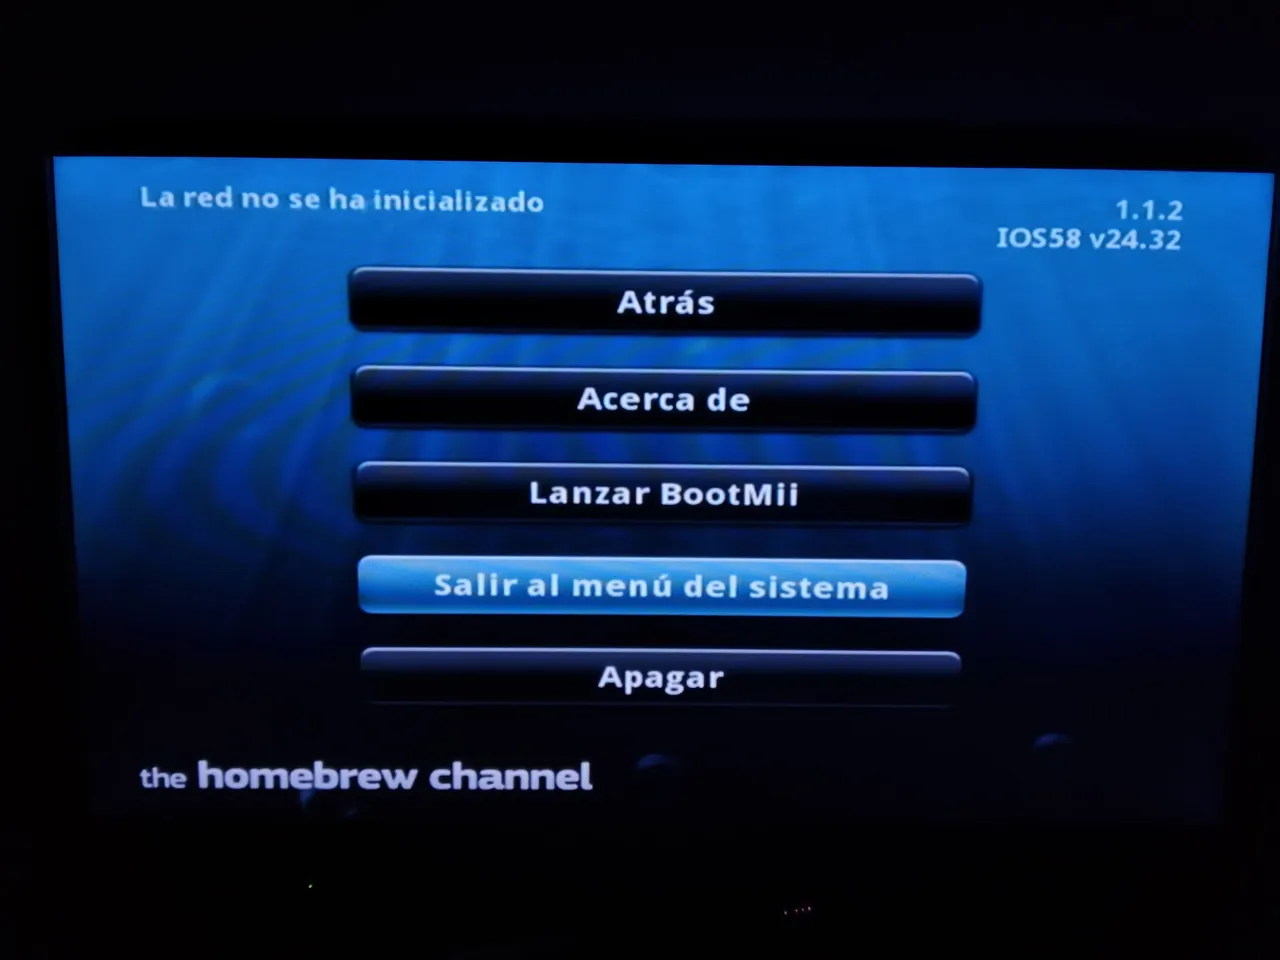
Esto nos llevará al canal que instalamos "The Homebrew Channel" donde continuaremos con los siguientes pasos.
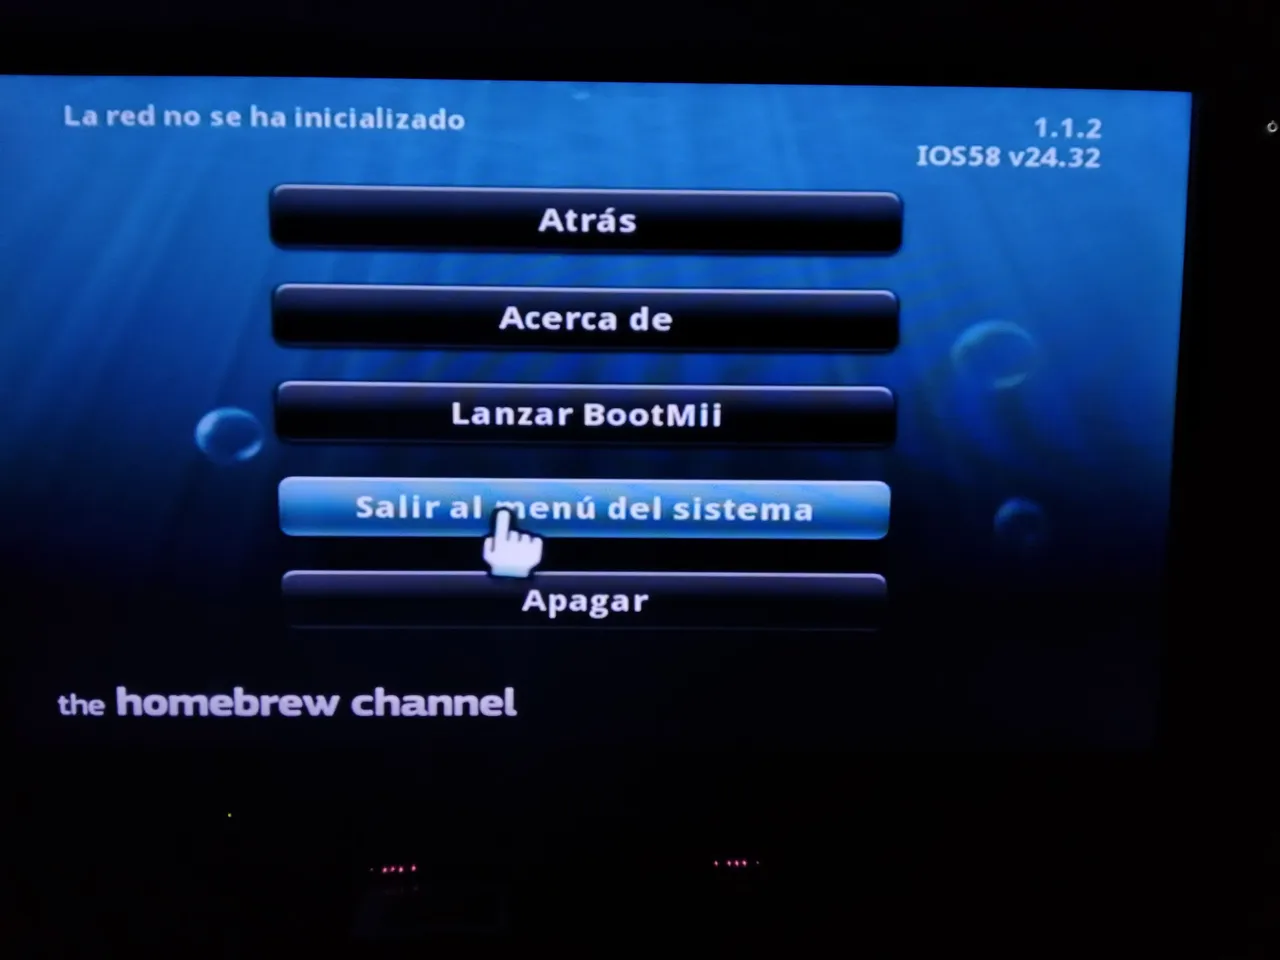
En este apartado presionaremos el boton Home y nos abrira un menu, en el cual podemos salir al menú principal presionando "Salir al menú del sistema" seleccionaremos esa opción para reiniciar la consola e ir al menú principal de la Wii y podremos ver que se nos agregó el nuevo canal "The Homebrew Channel" al que volveremos a entrar.

Estando dentro del canal, presionaremos el botón Home de nuestro mando, nuevamente, cuando nos salga el menu, esta vez seleccionaremos la opcion de "Lanzar BootMii" nos abrira el menu de BootMii, en este menú solo podemos desplazarnos a la derecha, pero con él boten de power de la consola y para seleccionar utilizaremos el botón reset de la consola.

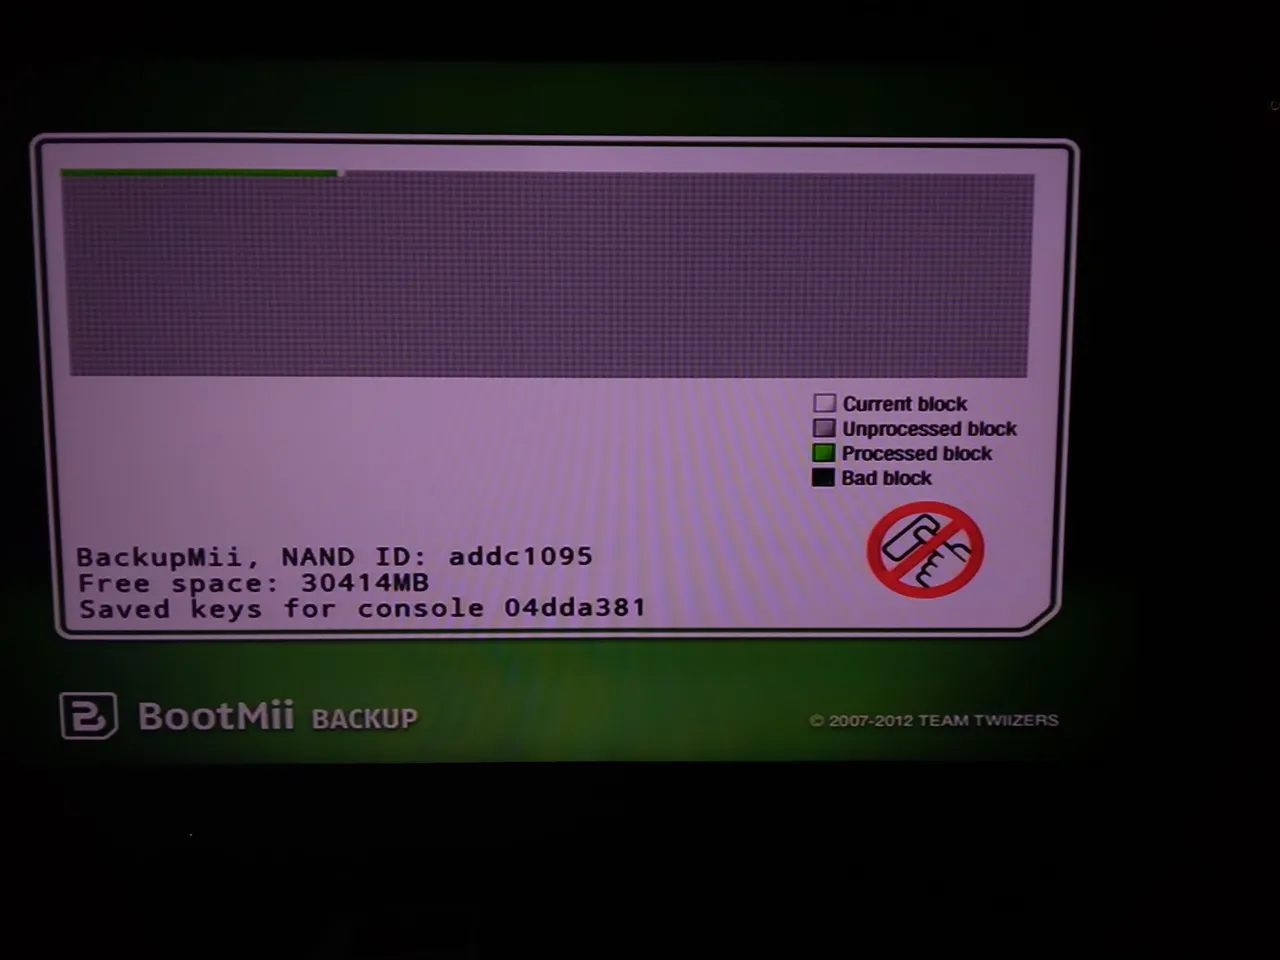
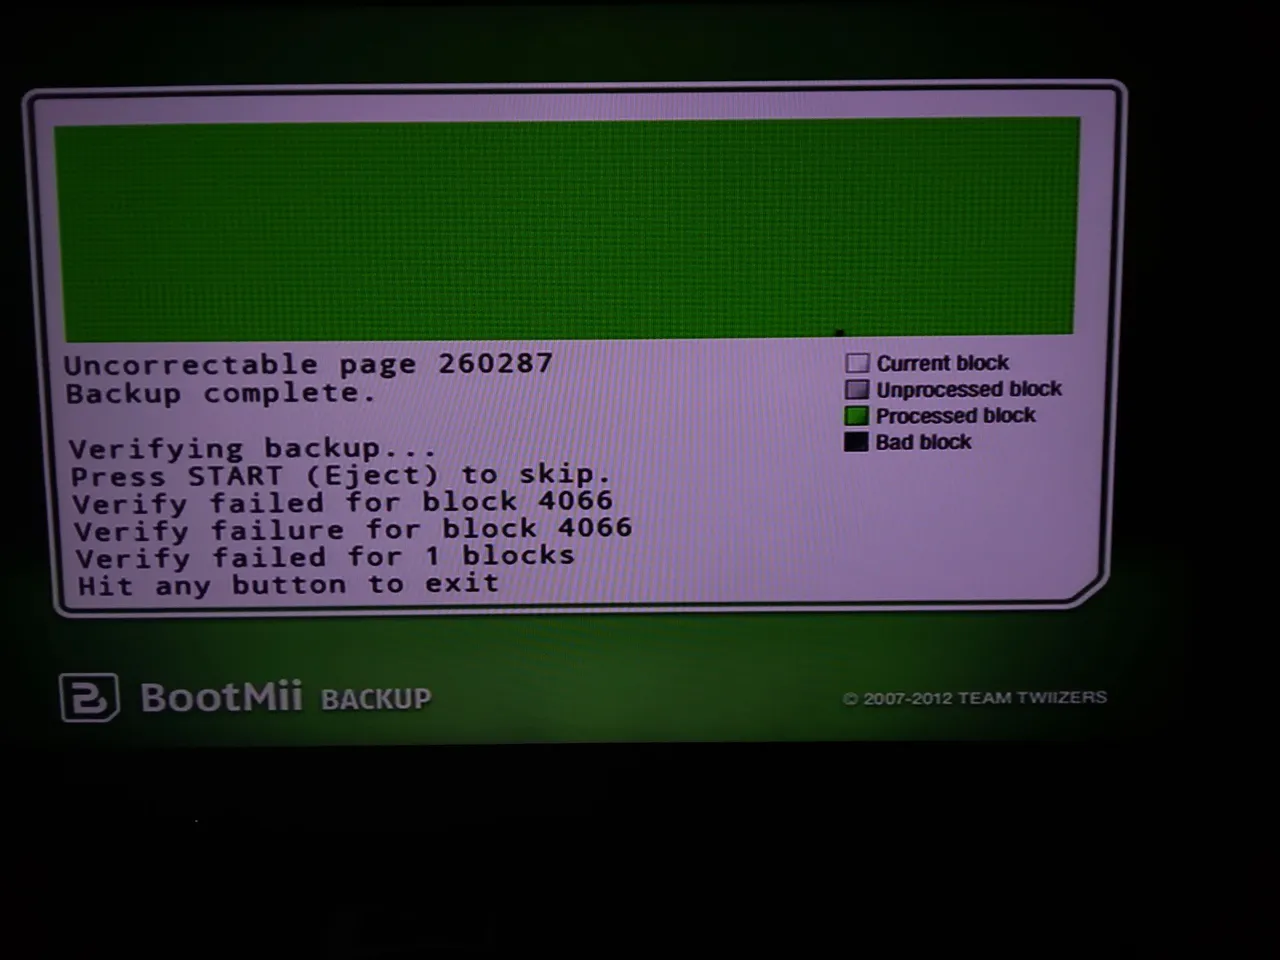
Aquí seleccionaremos la opción que está marcada con unos engranajes, esto nos llevara a otro menú en el que seleccionaremos la primera opción, está marcada con una flecha verde y una tarjeta SD, esto lo que hará es crearnos una copia de seguridad de la tarjeta SD, tendremos que esperar a que termine el proceso.

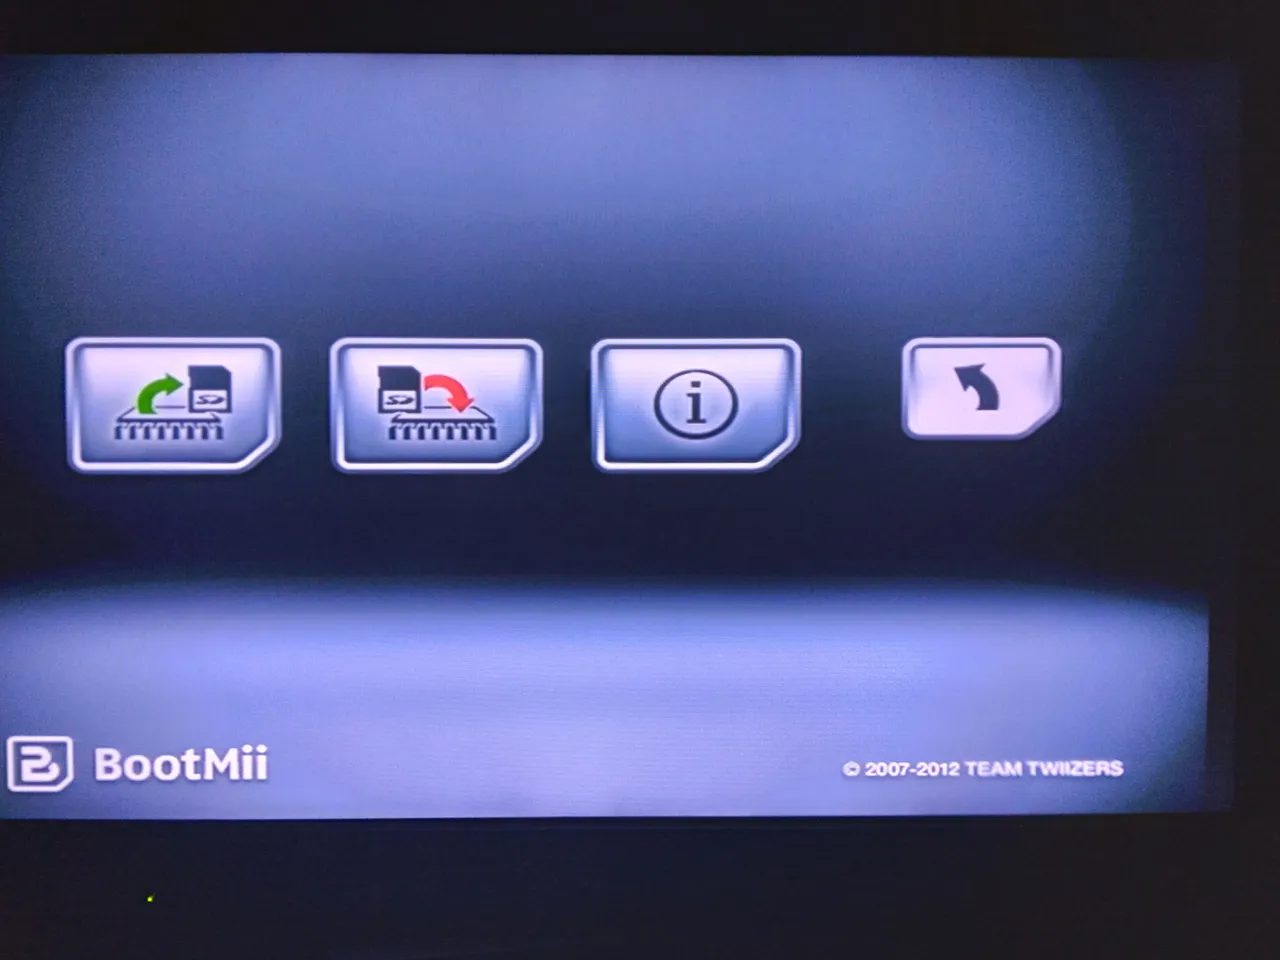
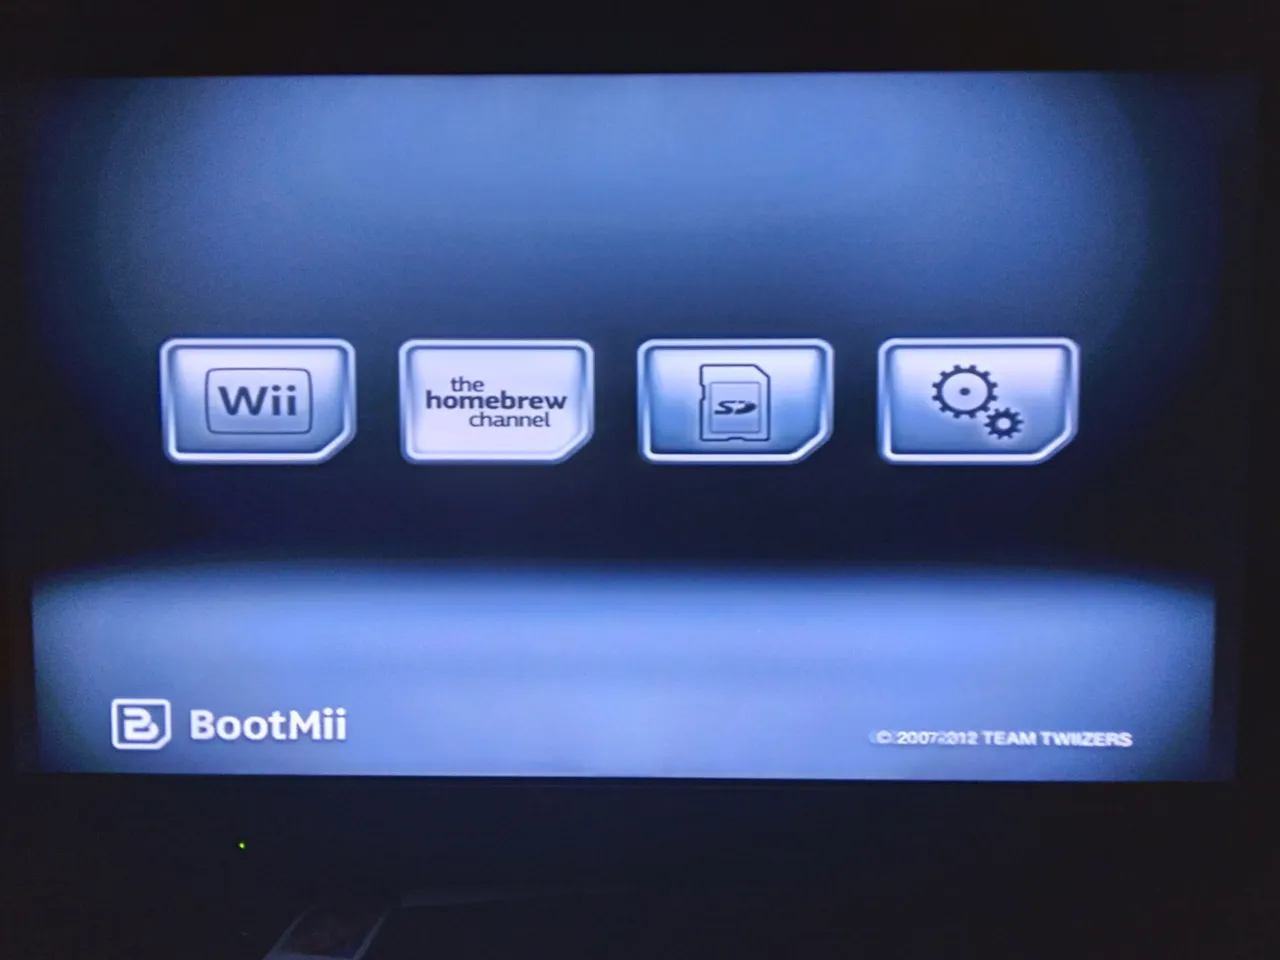
Cuando la carga acabe, presionaremos reset y nos devolverá al menú de bootmii en el cual nos vamos a dirigir a la última opción que está marcada con una flecha, esto nos llevara al menu principal de bootmii y seleccionaremos la opción de Homebrew Channel.
Cuando estemos en el menú de Homebrew ya podremos usar nuestro mando, presionaremos el botón de Home y seleccionaremos la opción de apagar, ya que nos iremos a la computadora o celular nuevamente.

Cuando la consola ya esté apagada, pasaremos nuestra tarjeta SD a la computadora y transferiremos los archivos que les deje en la carpeta nombrada "SD" a la tarjeta SD, estos archivos contienen otros canales y algunos cIOS que tendremos que instalar.
Tendremos que pasar la tarjeta SD de nuevo a nuestra consola, para volver a encenderla. Al iniciar volveremos a entrar nuevamente canal "The Homebre Channel" esta vez cuando entremos en el menú qué salía vacío al iniciar, nos saldrán distintos apartados, que serán los programas que utilizaremos para seguir con la modificación.
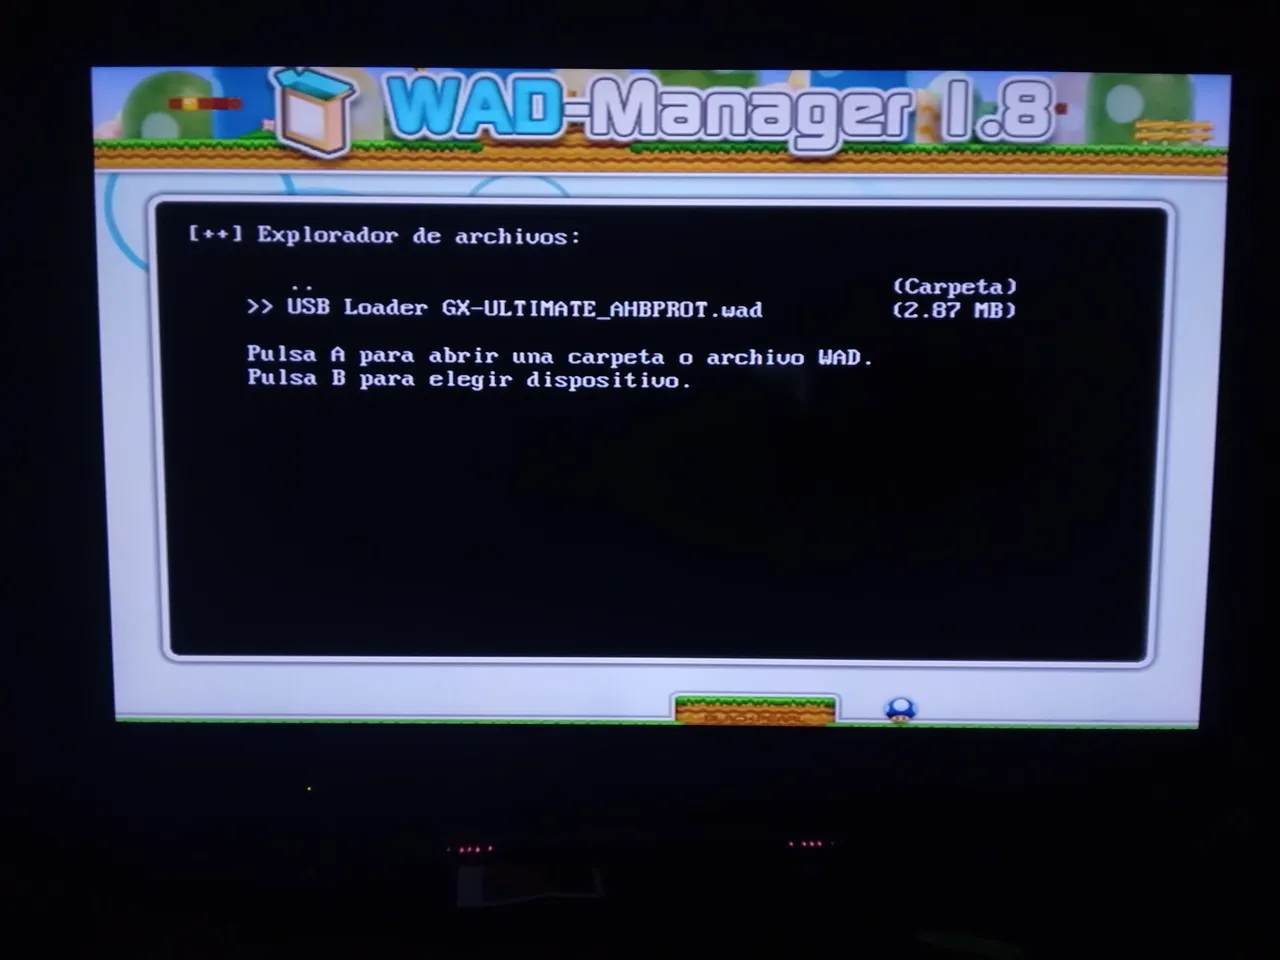
Empezaremos por "WAD-manager", lo seleccionaremos y nos abrirá un menú donde daremos en cargar para abrir la aplicación, esta la utilizaremos para instalar los cIOS necesarios para poder seguir la modificación.

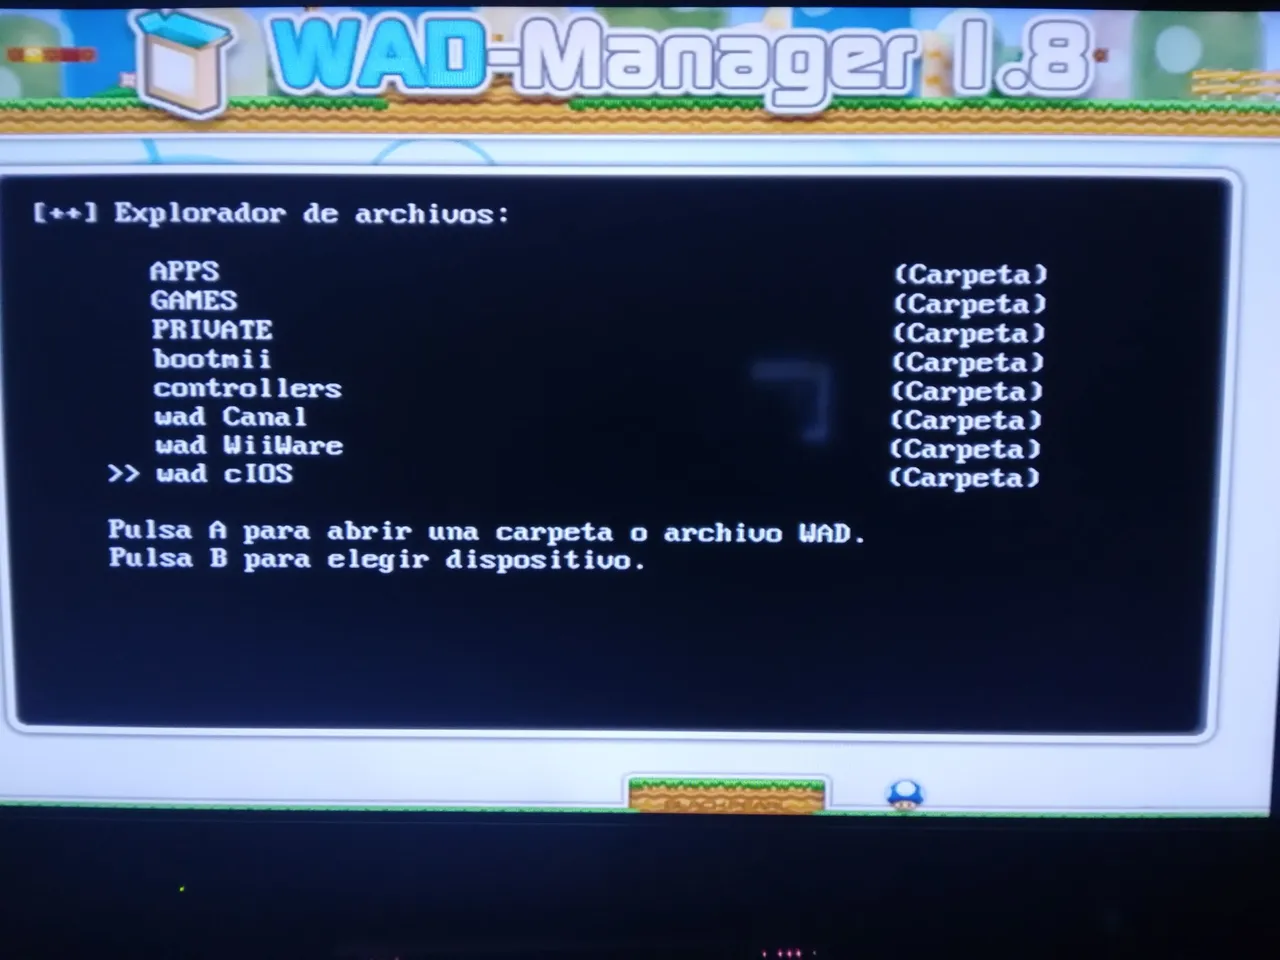
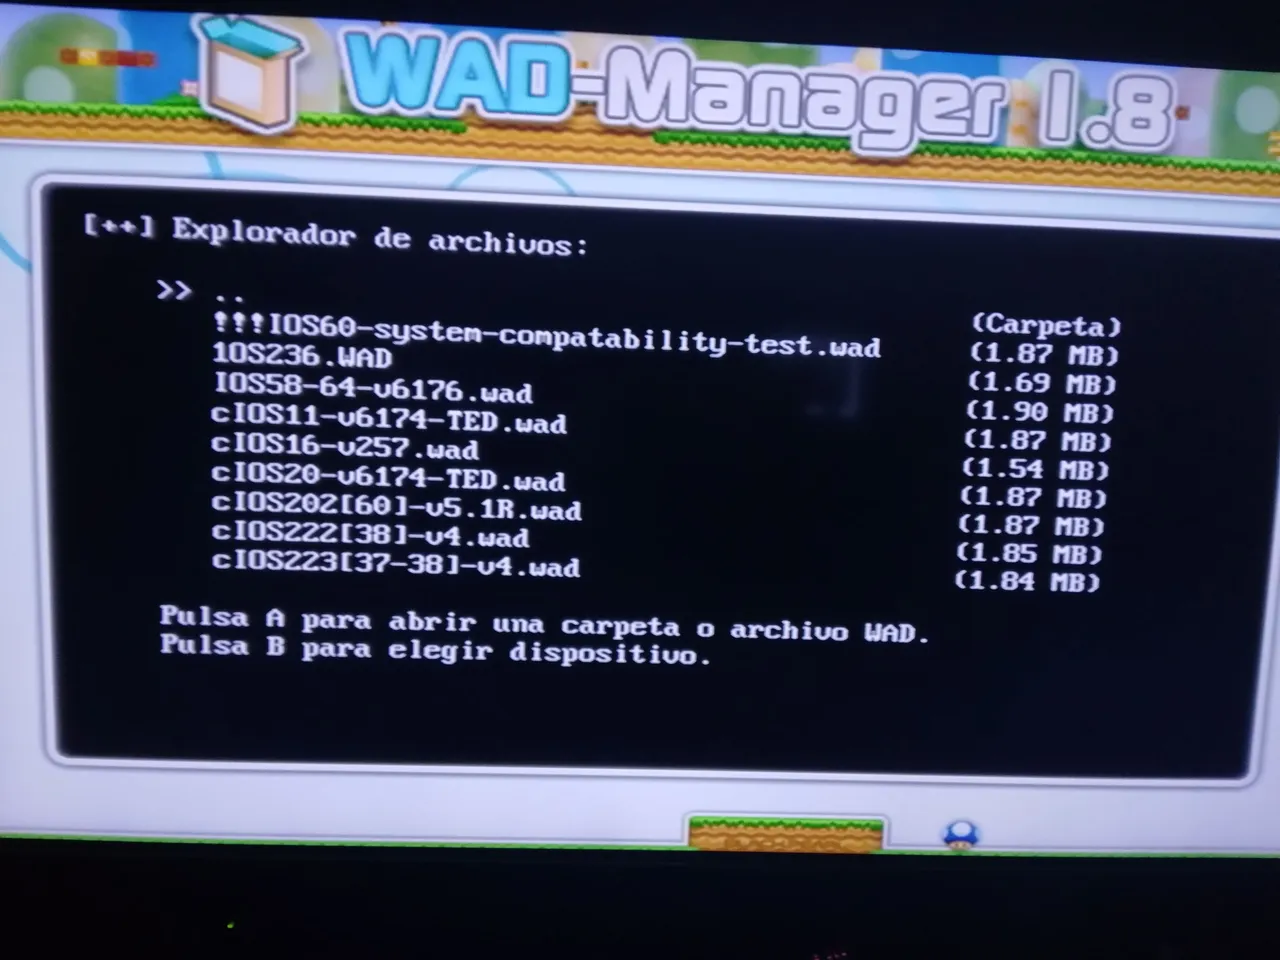
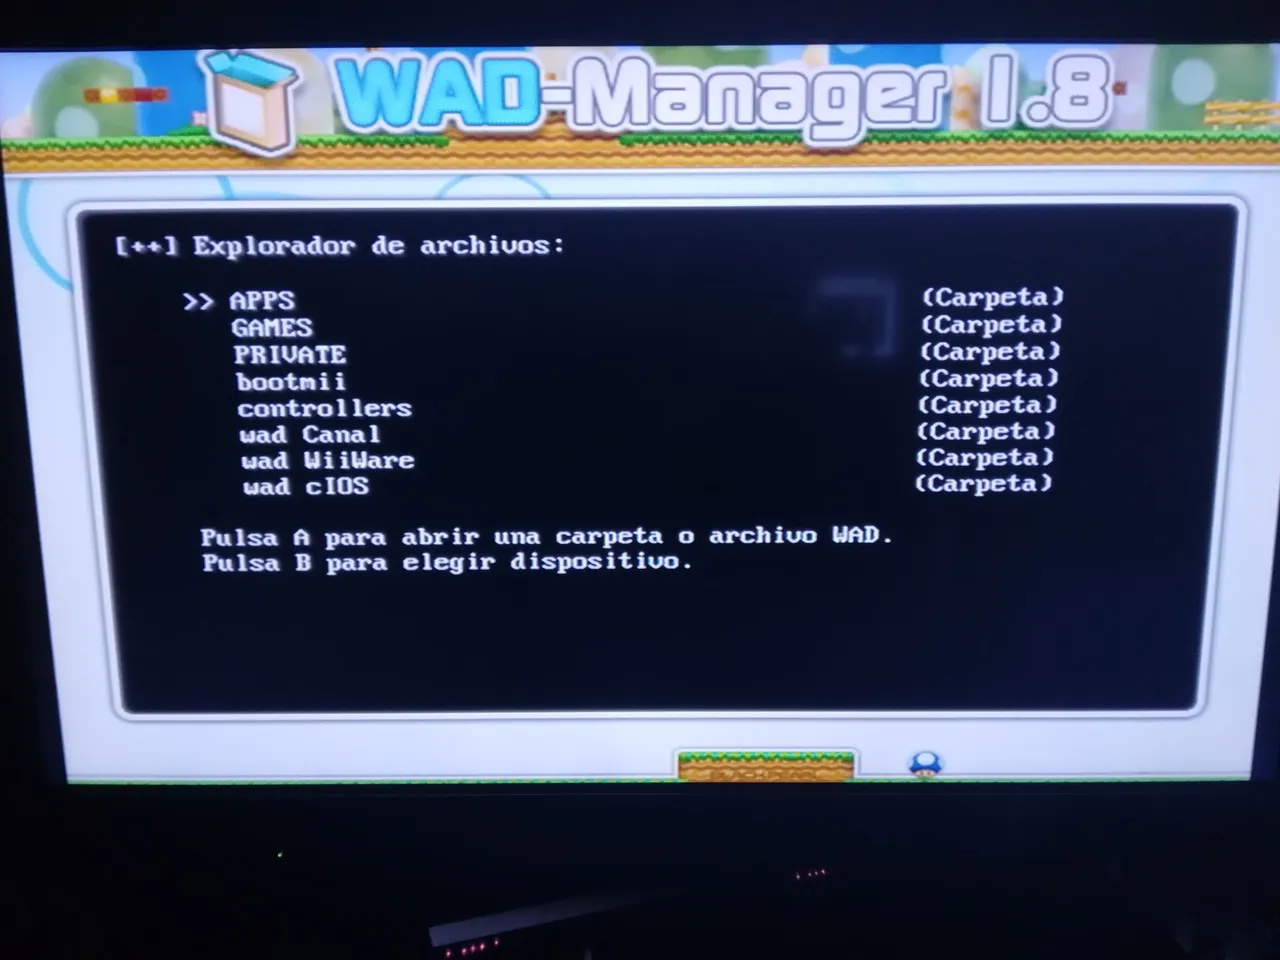
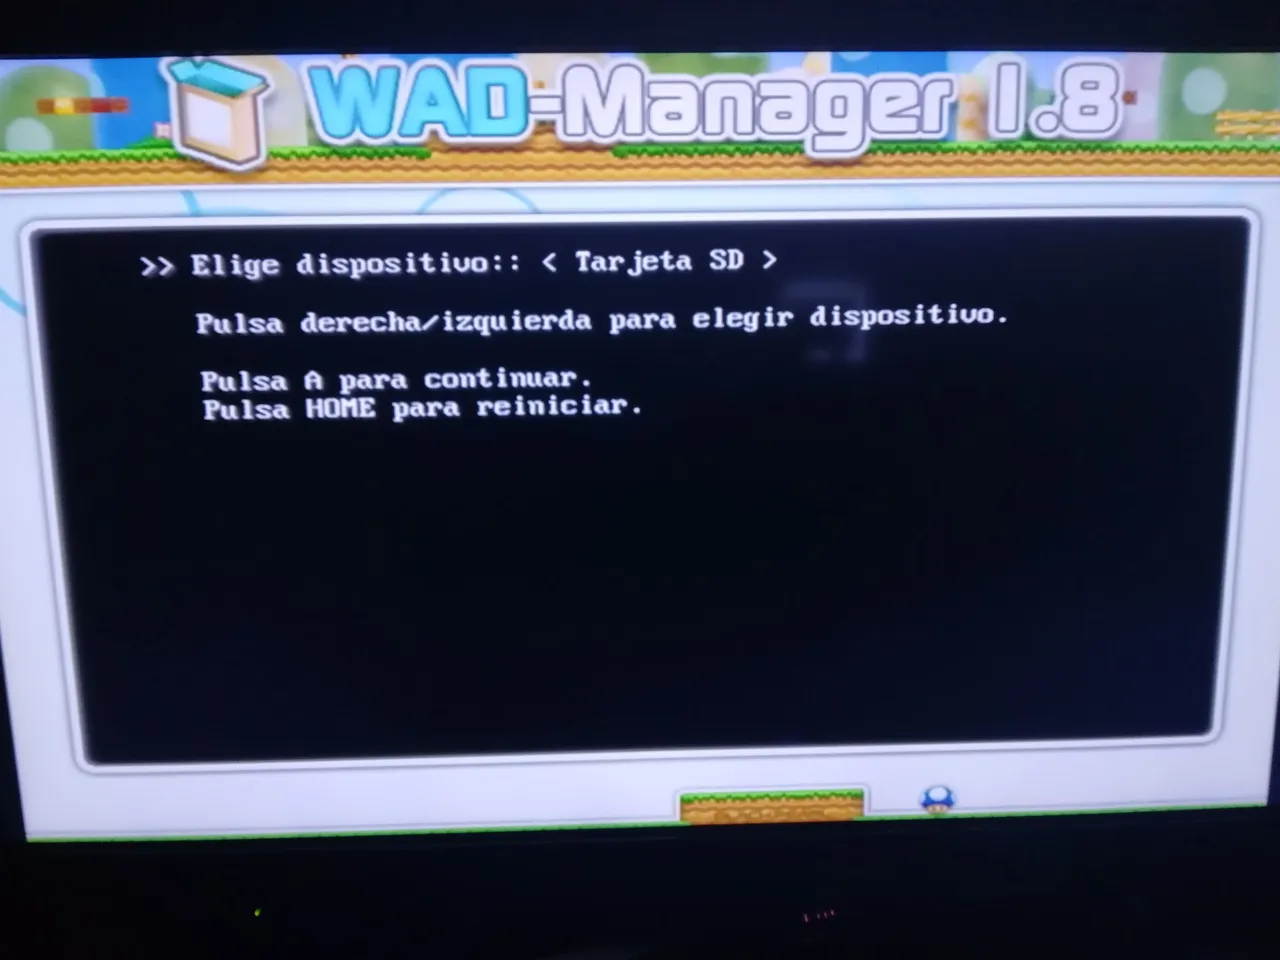
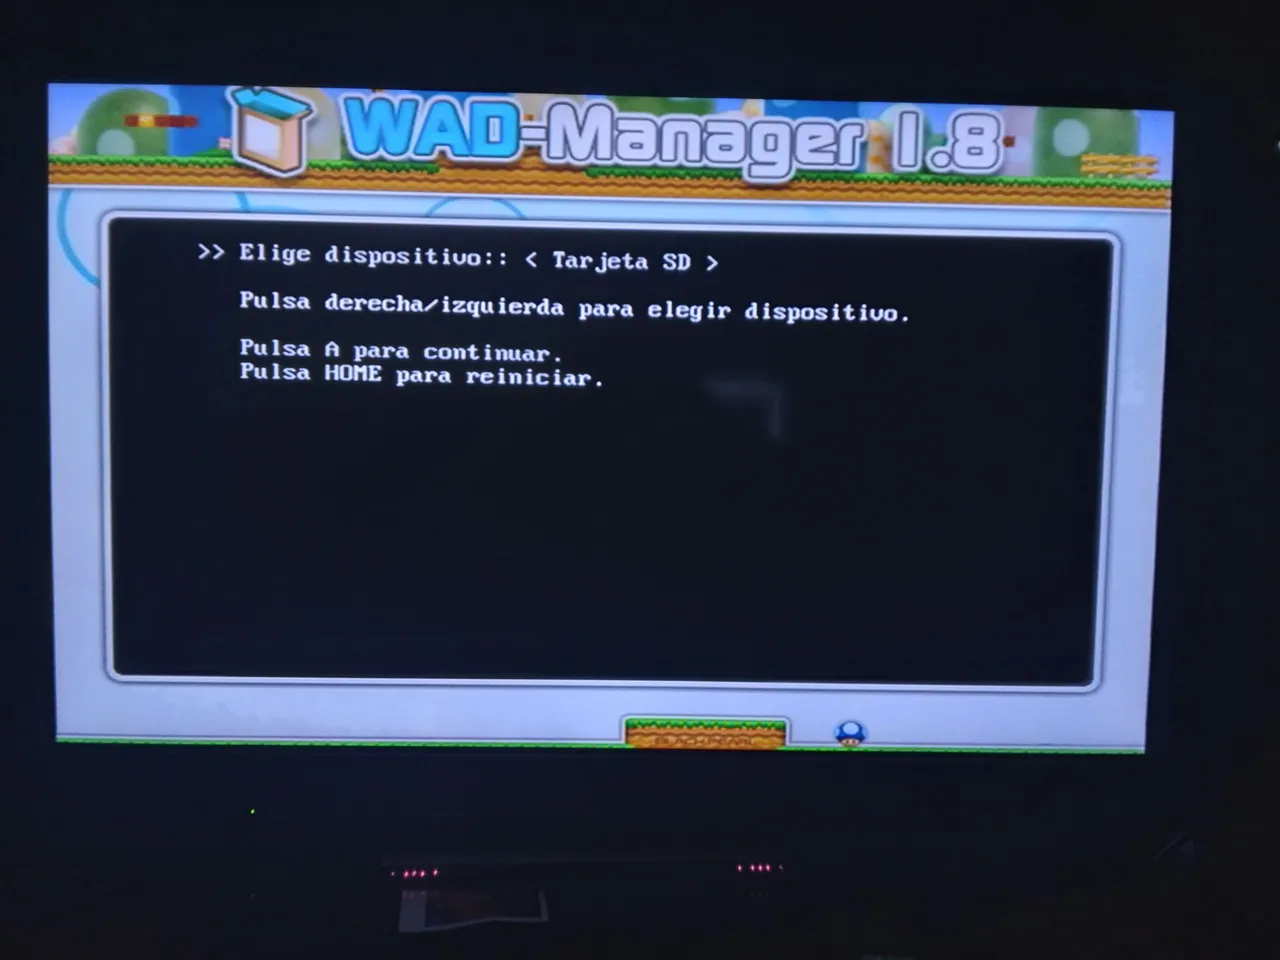
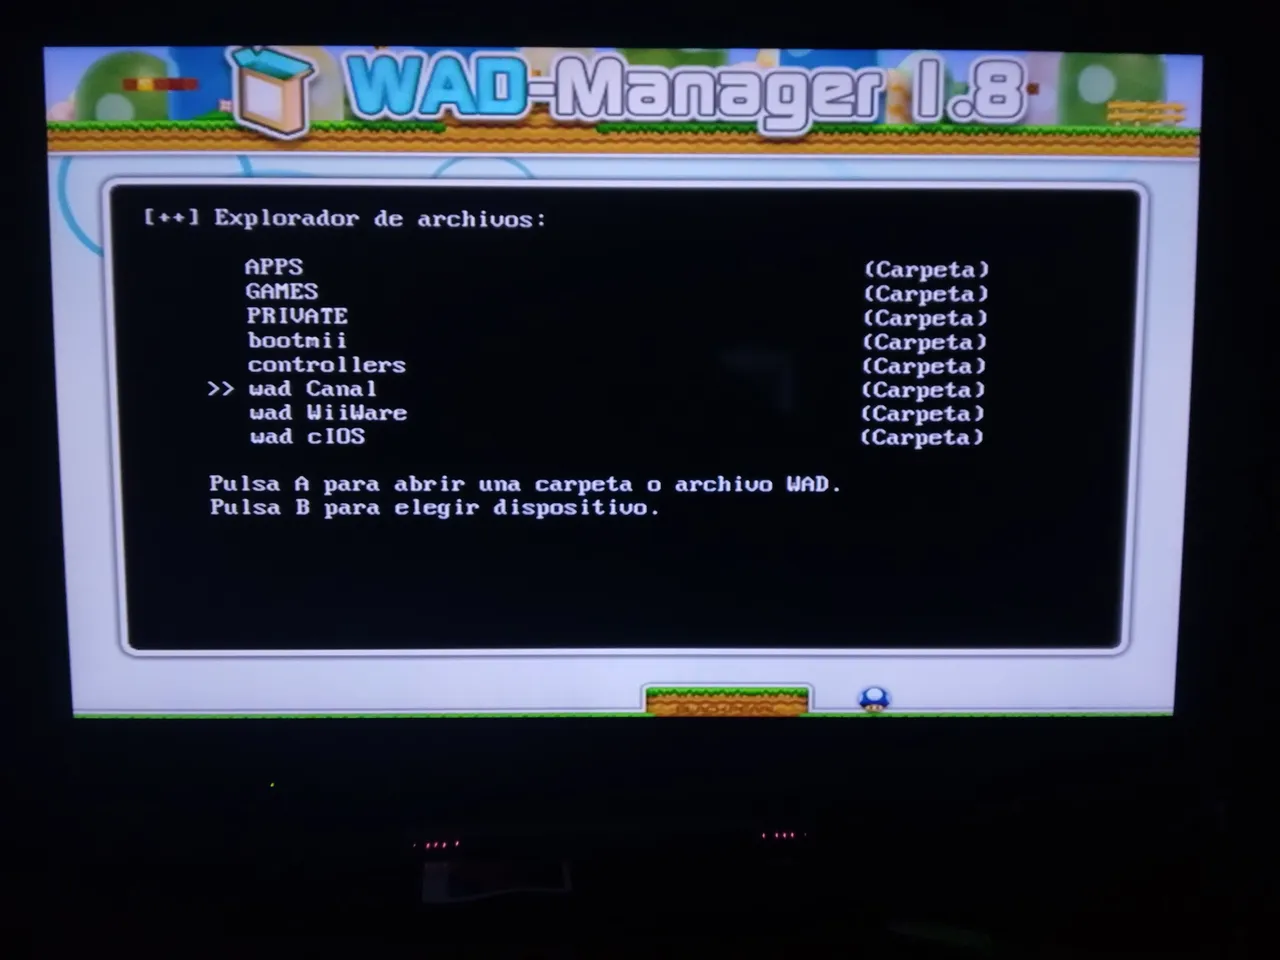
En esta aplicación utilizaremos las flechas y los botones A y B para desplazarnos. Estando en el primer menú, pulsaremos que si estamos de acuerdo con el botón A, luego nos llevara a otro menú donde tenemos que elegir el dispositivo donde tenemos todos los archivos que les deje, en este caso la Tarjeta SD, las buscaremos y presionaremos A, esto nos llevara a un siguiente menú donde nos saldrán las carpetas que pasamos a la Tarjeta SD, aquí bajaremos hasta la nombrada "wad cIOS" y la seleccionaremos con el botón A.
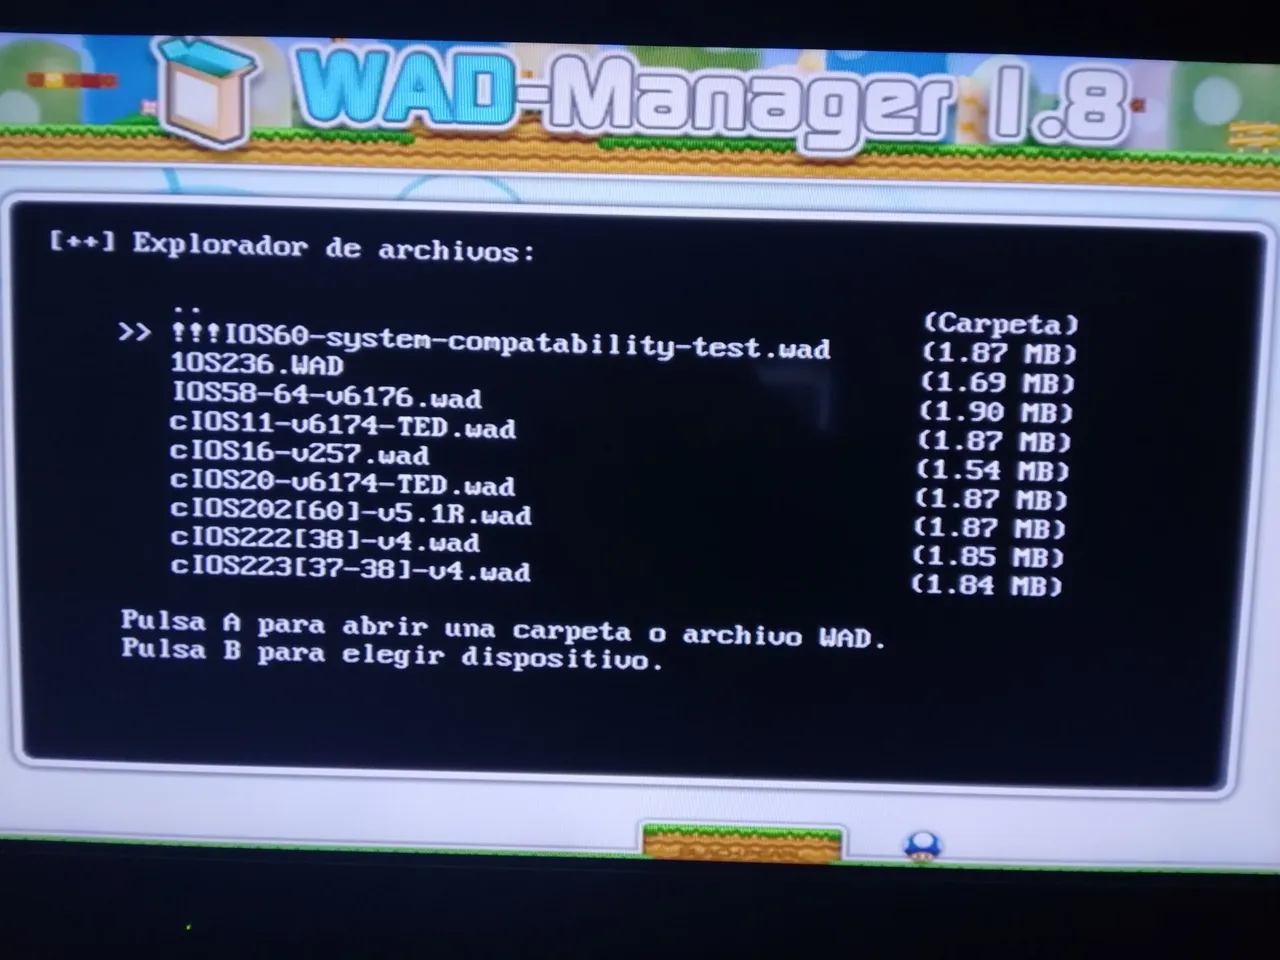
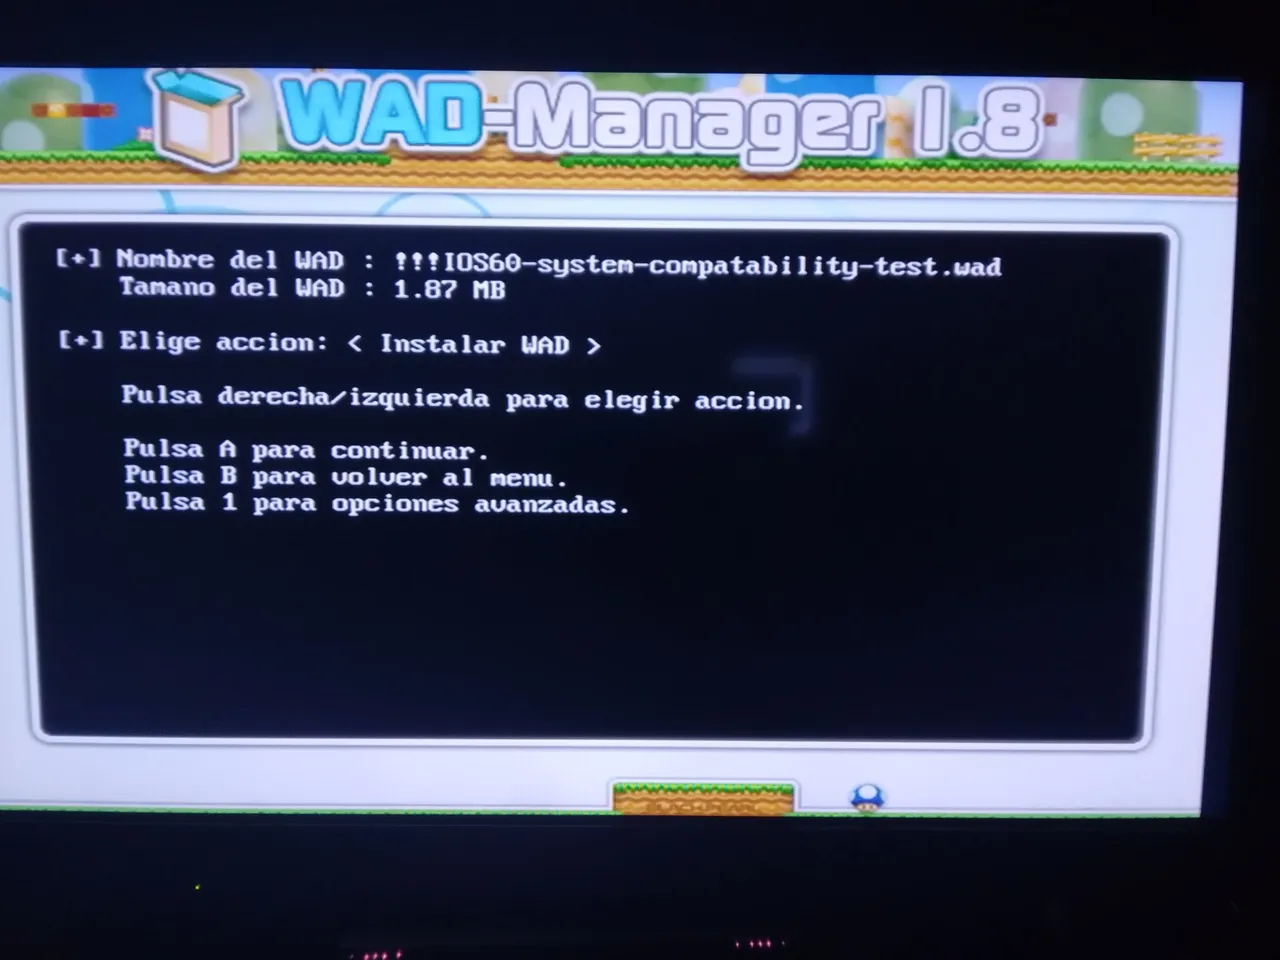
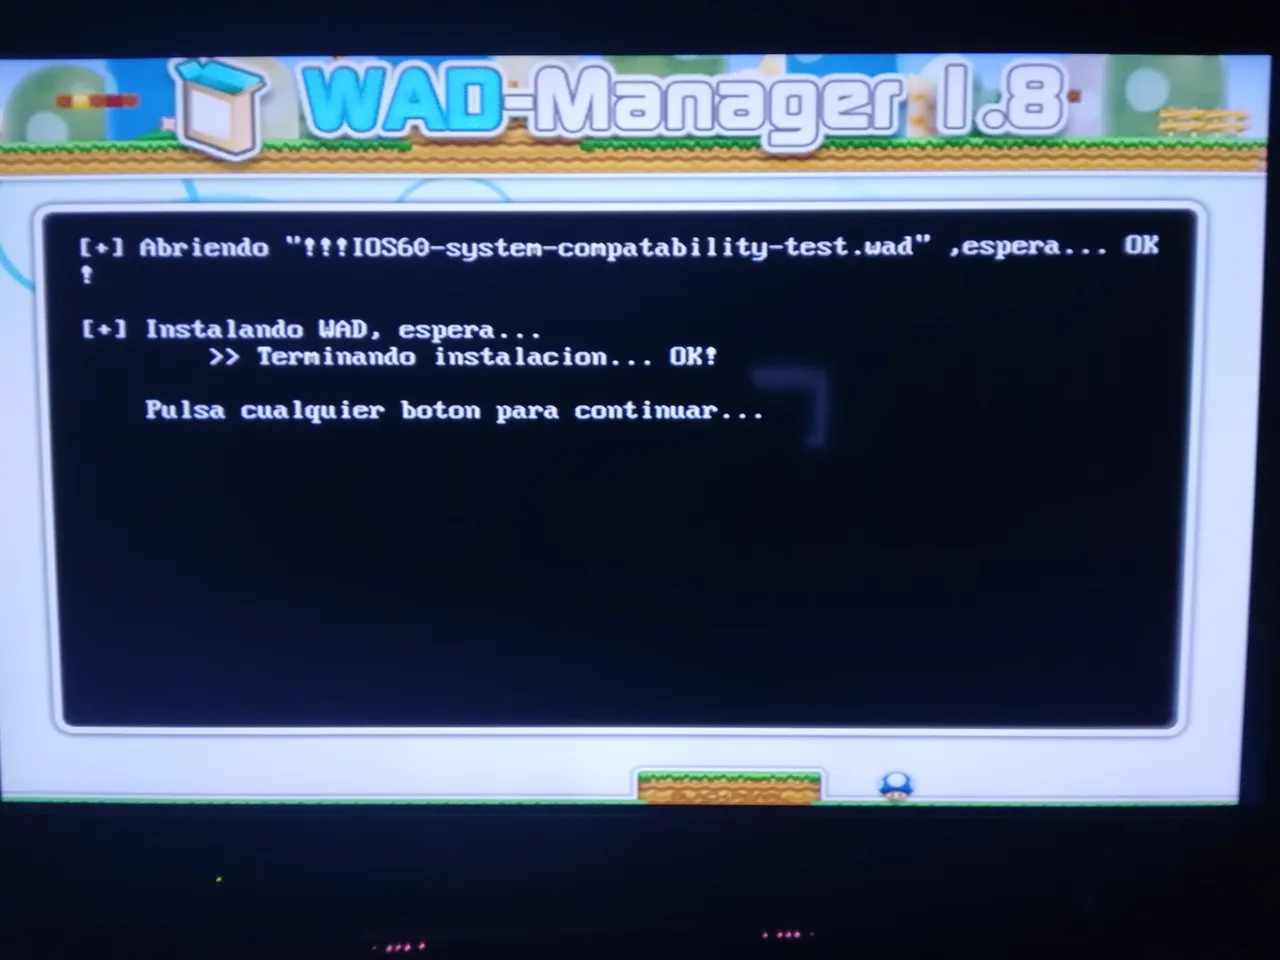
Cuando seleccionemos la carpeta "wad cIOS" nos mostrara todos los archivos que tendremos que instalar, empezaremos por el primero de toda la lista, lo seleccionaremos y luego lo instalaremos solo presionando A, cuando termine la descarga, presionaremos cualquier botón y nos llevara de nuevo a la lista de archivos que tenemos que instalar, esto lo haremos absolutamente con todos los archivos.
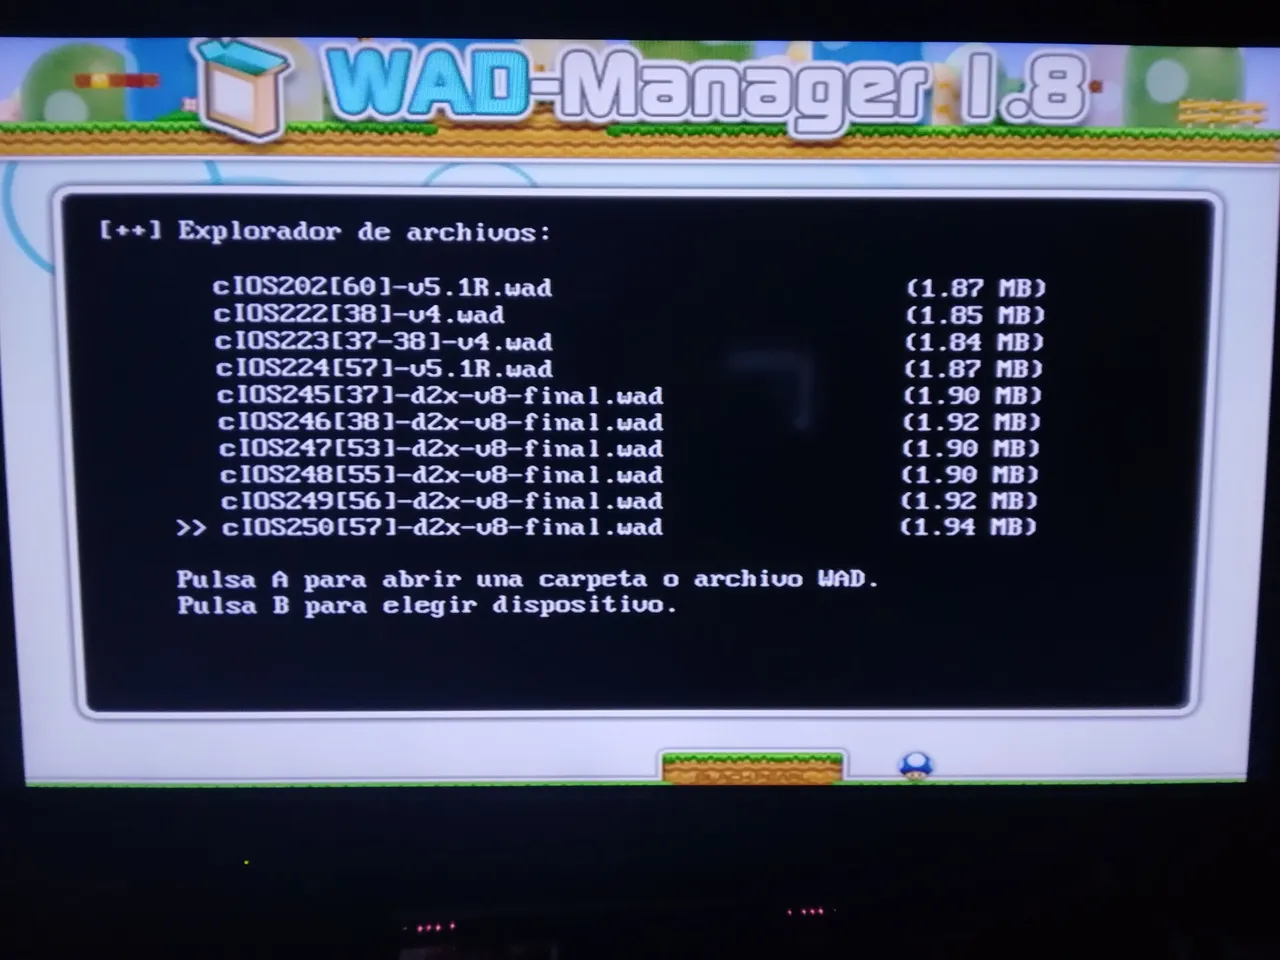
Tenemos que asegurarnos de haber instalado todos los archivos. Cuando terminemos todas las instalaciones subiremos a la primera opción del menú de los archivos, esta opción está marcada con tres puntos, cuando la seleccionemos nos devolverá al menú de las carpetas que pasamos a la tarjeta SD, en este menú presionaremos el botón B y nos llevara a la selección de, y luego en este otro menú presionaremos el botón home para volver a Homebrew Channel.
Antes de continuar con la modificación les hablaré de dos de los programas que están ahí, Primero les hablaré de "d2x cIOS installer" este programa nos servirá para instalar los cIOS que acabamos de instalar, pero con conexión a internet, deberemos conectar nuestra consola a nuestra red wifi, pero esto solo lo utilizaremos en casa de que fallen algunas de las instalaciones de los cIOS en el programa anterior "WAD-Manager", si este es el caso, no duden en escribirme en los comentarios y les explicaré como usarla.
El siguiente programa del cual quería hablarles es "Nintendont" este es un emulador de la GameCube en el que podremos jugar los títulos de dicha consola, pero en nuestra Wii, para este programa les haré otro post, ya que en este quiero centrarme en los juegos de la propia Wii.
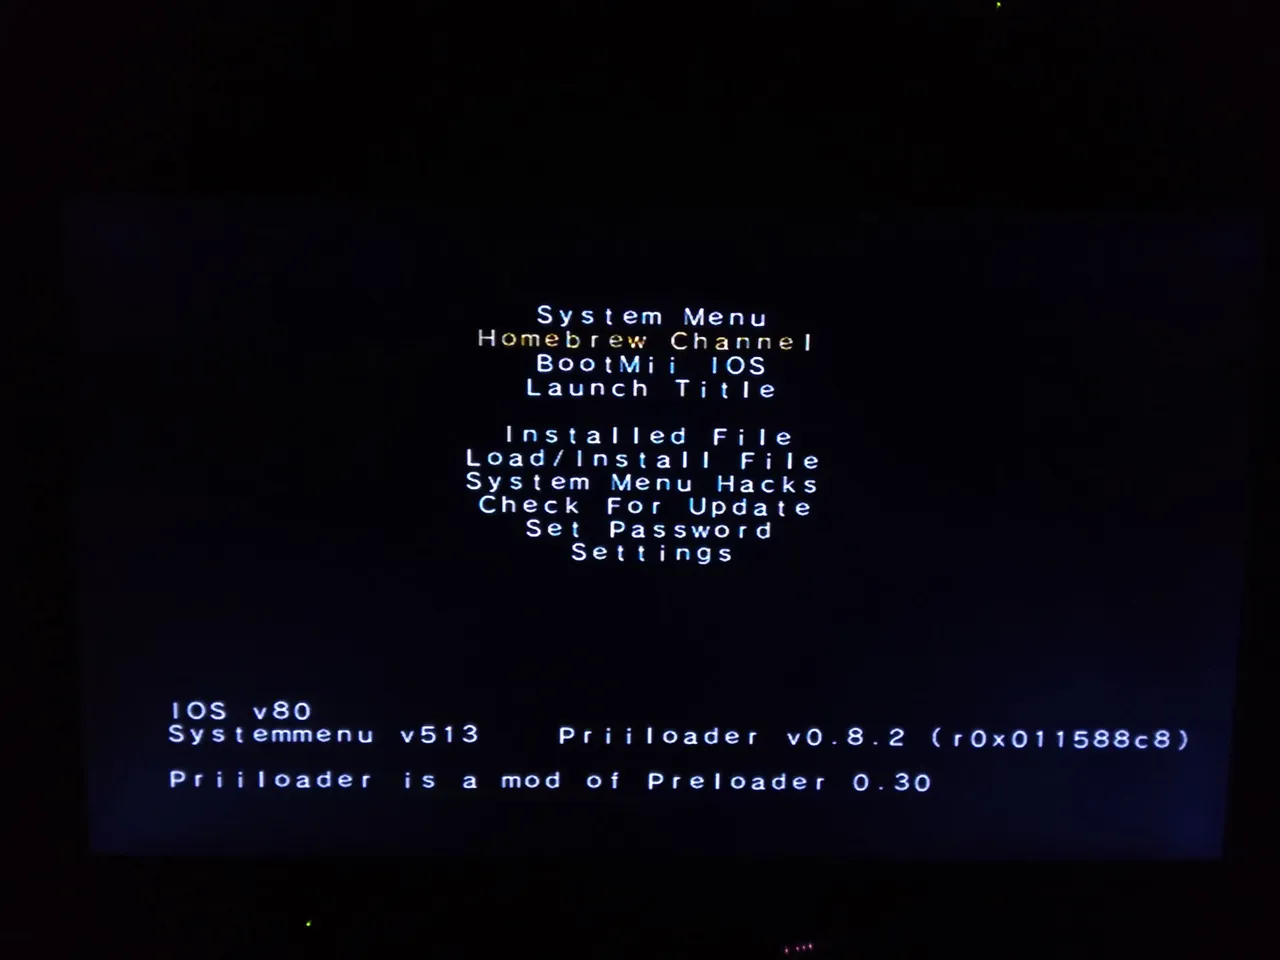
Para continuar con la modificación, iremos a la aplicación "Priiloader" esta nos servirá para modificar algunas opciones de nuestra consola, cuando seleccionemos la aplicación y demos en carga, nos llevara a un menú donde tendremos que esperar un momento a que cargue, para luego presionar el botón + de nuestro mando para iniciar la instalación de Priiloader, ahí esperaremos hasta que termine la instalación y luego presionaremos el botón A que nos devolverá a Homebrew Channel.
Cuando estemos en el menú de Homebrew Channel, presionaremos el botón home y apaguemos la consola, seleccionando opción de apagar claramente.
Cuando nuestra consola ya esté apagada, la volveremos a encender, pero no como siempre, esta vez presionaremos el botón de power de la consola y en seguida mantendremos presionado el botón de reset, haremos esto para poder iniciar el menú de Priiloader, en caso de que no funcione, solo volveremos a apagar la consola y luego lo intentaremos de nuevo.
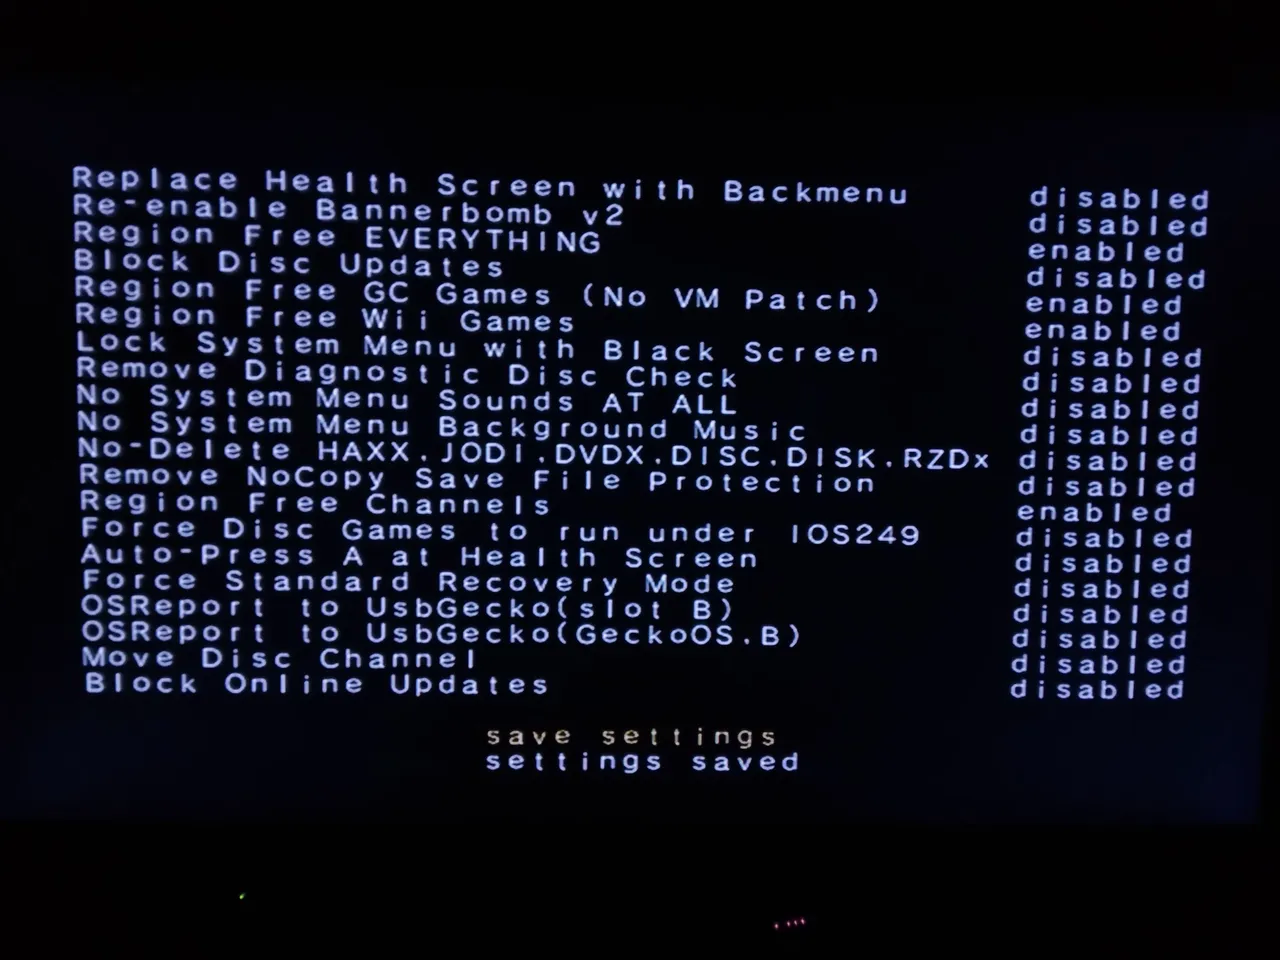
Cuando iniciemos el menú de Priiloader, nos moveremos entra las opciones con el control en vertical, utilizando las fechas y el boto A, bajaremos hasta la séptima opción nombrada System Menu Hacks y la seleccionaremos con el botón A, aquí son saldrá un menú con algunas opciones que tendremos que habilitar para evitar tener errores en nuestra consola y poder jugar juegos de otras regiones.

Podremos ver que todas las opciones están desactivadas, todos están marcadas con "disabled", activaremos solo las que dicen "Region free", solo nos podremos encima de las opciones y pulsaremos el botón A para activarlas, veremos que pasara a estar marcada con "Enabled".
Cuando ya hayamos activado todas las opciones que empiezan con "Region free" bajaremos hasta la última opción para guardas los cambios, esta dice "Save settings", cuando la seleccionemos, tendremos que esperar a que debajo de ella diga "Settings saved", luego presionaremos el botón B para volver al menú principal, donde seleccionaremos la segunda opción que nos llevara a Hombre Channel, donde tendremos que presionar home, para luego salir al menú principal de la Wii, esto hará que se nos reinicie la consola para aplicar los cambios que realizamos, una vez reiniciada, apagaremos la consola para hacer nuestro siguiente paso en nuestra computadora.
Lo siguiente que haremos será pasar los juegos que descarguemos a una memoria USB o disco duro.
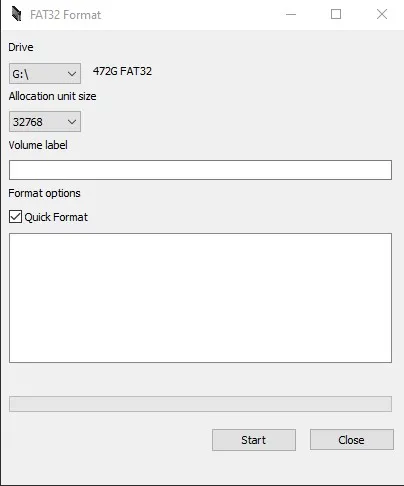
Tendremos que formatear esta memoria en el formato Fat32 como lo hicimos con la tarjeta SD, pero, como normalmente estas memorias USB o discos duros tendrán una memoria mucho más amplia, les deje en los archivos una carpeta llamada Fat32, tendrán un archivo .zip que descomprimiremos y nos dejara un programa para forzar el formato Fat32 para ese tipo de memorias USB o discos duros.
Usar el programa para forzar el Fat32 es muy simple, solo la abriremos y una vez dentro seleccionamos la memoria USB o disco duro, está siempre está marcada con una letra, en mi caso es la G, revisa cuál es la letra de tu memoria USB o disco duro, lo seleccionas, presionar "Start" y cuando termine la carga ya estará formateado en Fat32.
Luego de haber formateado nuestra memoria USB o disco duro, ocuparemos el siguiente en los archivos, este está en la carpeta llamada "WBFS - Wii backup" ahí encontraremos dos archivos .exe, uno para los equipos de 32 bits y otro para los de 64 bits, deben abrir el que concuerde con su computadora.
Primero deberíamos tener un juego descargado, yo usualmente suelo descargarlos en https://akamigames.net/, en esta página encontrarás muchos juegos, cuando descargues uno, este vendrá en uno o más archivos .zip que tenemos que extraer para que nos deje el archivo del juego, este será .Wfbs.
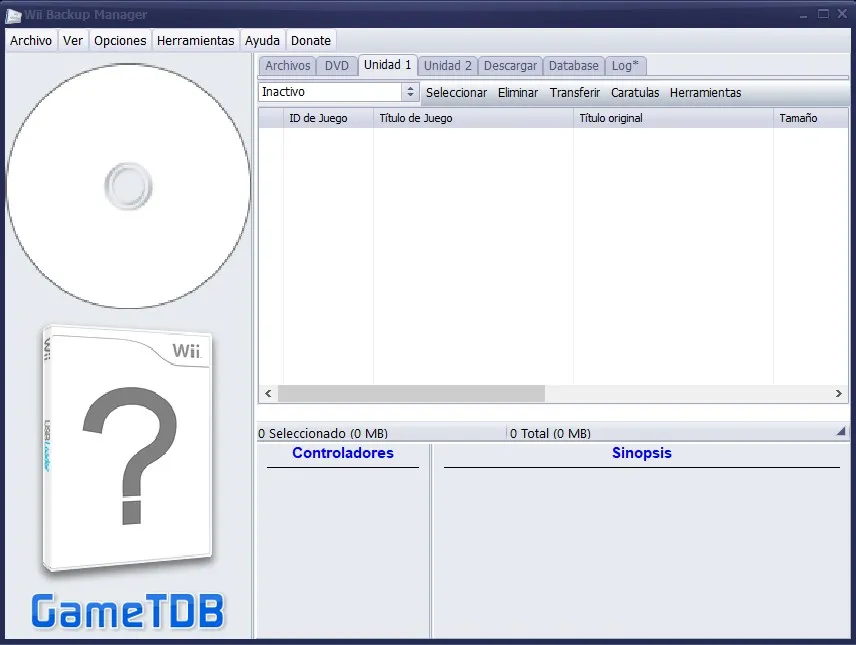
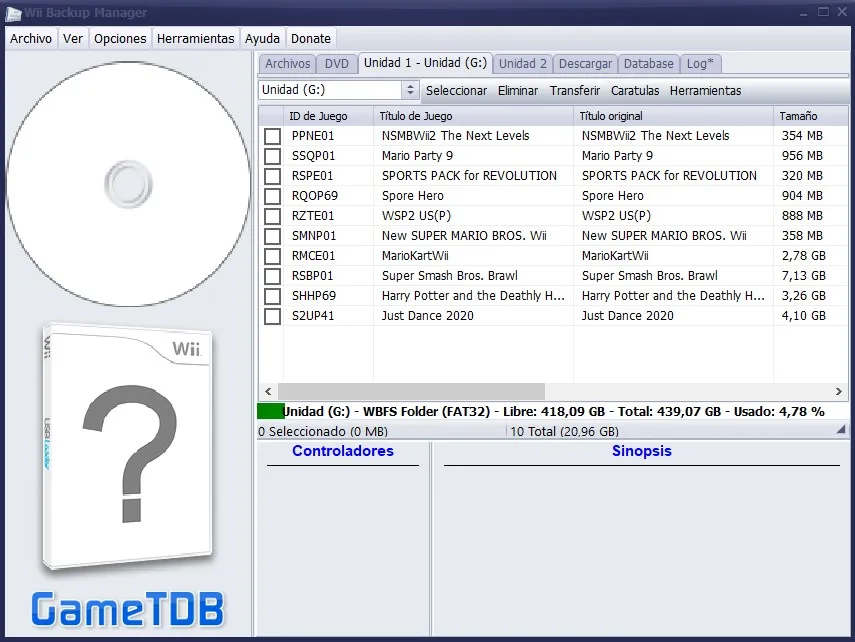
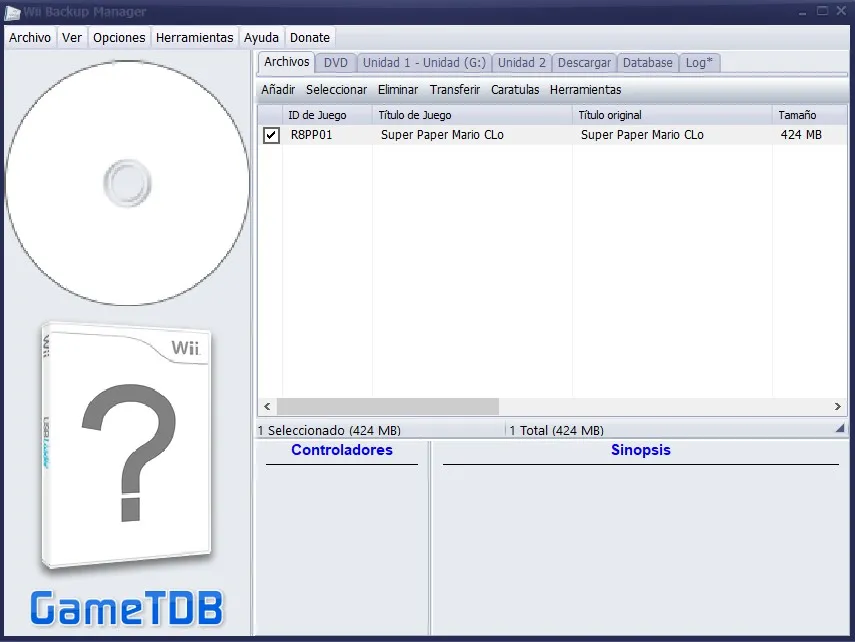
Una vez que ya tengamos el archivo del juego, usaremos la aplicación que abrimos, esta es muy simple, nos ubicaremos en el apartado de "Unidad 1" y ahí seleccionaremos nuestra memoria USB o disco duro en el apartado "inactivo",a ustedes les saldrá un mensaje donde les dirá que la unidad es validad, pero no tiene un directorio Wbfs, solo deberán seleccionar "si", a mí no me sale esto porque ya tenía algunos juegos instalados, una vez ya seleccionado nuestra memoria USB o disco duro, nos iremos al apartado de "Archivos", estando ahí seleccionaremos en "Añadir" y buscaremos el archivo .Wbfs del juego que descargamos, cuando nos cargue, el siguiente paso será, seleccionar el apartado de "transferir" y seleccionaremos la unidad 1 donde está seleccionada nuestra memoria USB o disco duro, cuando termine la carga, ya habremos pasado el juego y la memoria USB o disco duro ya estará listo y con el juego para conectarla a nuestra Wii.


Encenderemos nuevamente nuestra consola, lo que haremos ahora será instalar el canal que nos dejara iniciar los juegos que tenemos en la memoria USB o disco duro de Wii.
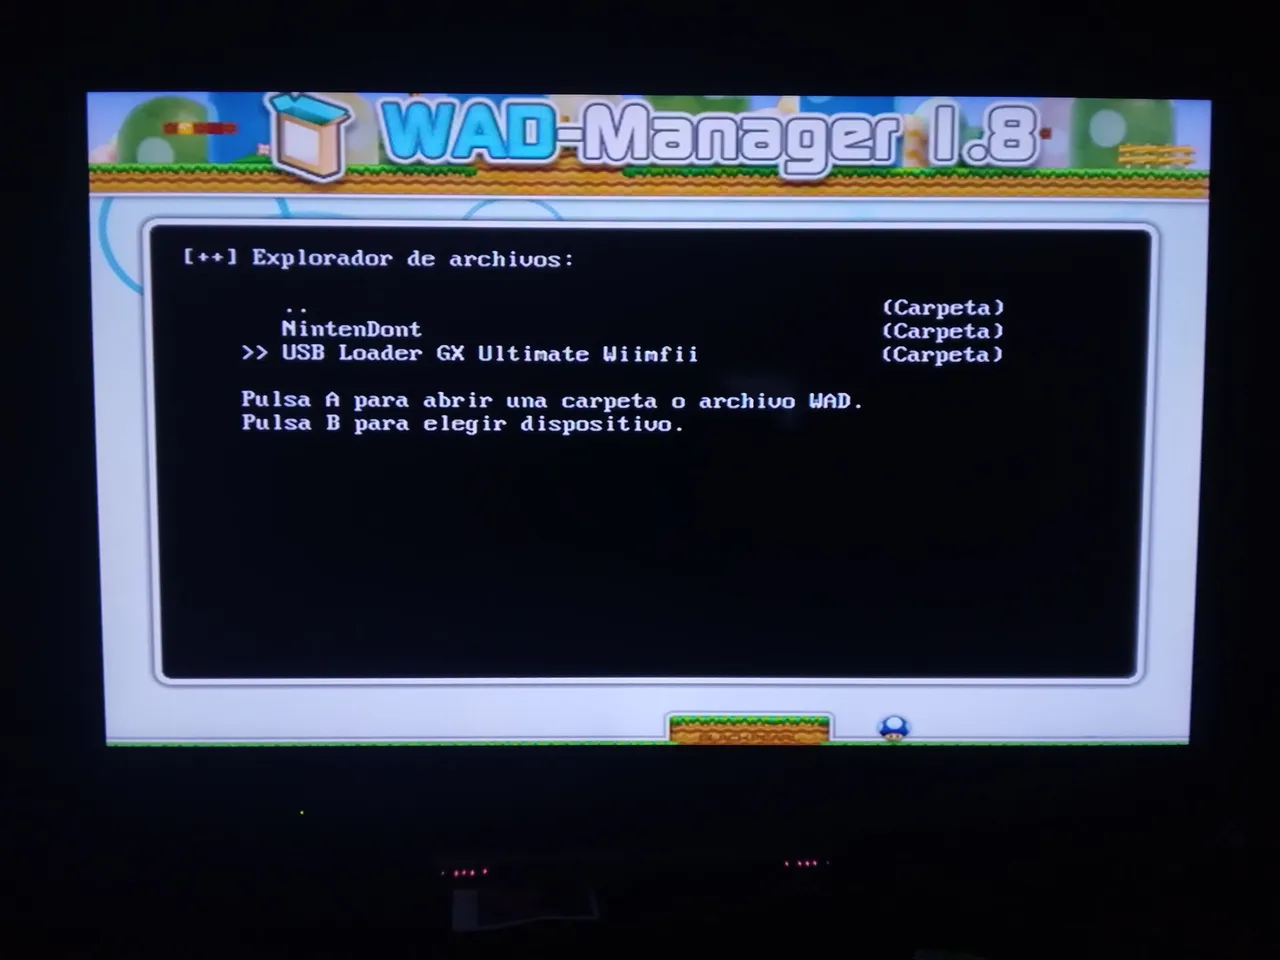
Al iniciar la consola, entraremos en Homebrew Channel y usaremos el programa "WAD-manager" una vez más, al iniciar Wad-manager, haremos el mismo proceso que la anterior vez que lo utilizamos, en el primer menú presionamos A, luego seleccionamos la tarjeta SD y cuando nos salgan las carpetas, esta vez entraremos en la cual dice "wad Canal", al entrar a esta carpeta, nos saldrán dos carpetas más, una de ellas es "Nintendont" que es el programa del cual le hablaré en otro post, y la segunda carpeta llamada "USB Loader Gx Ultimate Wiimfii" este es el canal que debemos instalar para empezar a jugar nuestros juegos de la Wii, lo seleccionaremos y nos saldrá el archivo que debemos instalar con el mismo proceso de la anterior vez que usamos Wad-manager, solo lo seleccionaremos y luego presionaremos el botón A y empezara la instalación.

Al finalizar la instalación, pulsaremos cualquier botón, luego pulsaremos B para que nos lleve a elegir dispositivo y estando ahí pulsaremos home.
Estaremos de vuelta en el menú de Homebrew, aquí lo que haremos será presionar home y luego salir al menú del sistema.
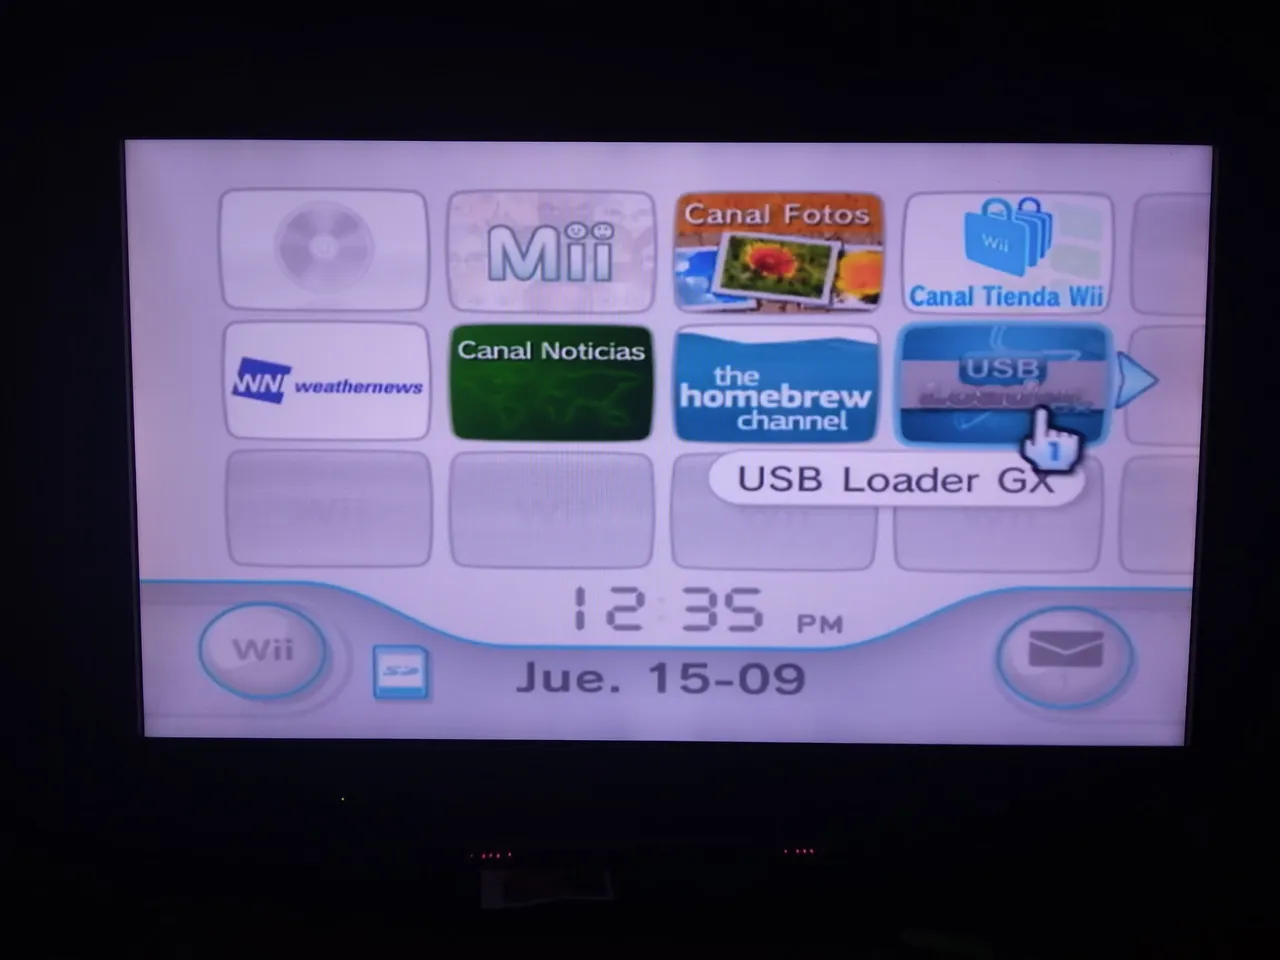
Cuando estemos en el menú del sistema, podremos ver que tenemos un nuevo canal, este será en el que tendremos que entrar cada vez que queramos jugar a los videojuegos de la Wii.
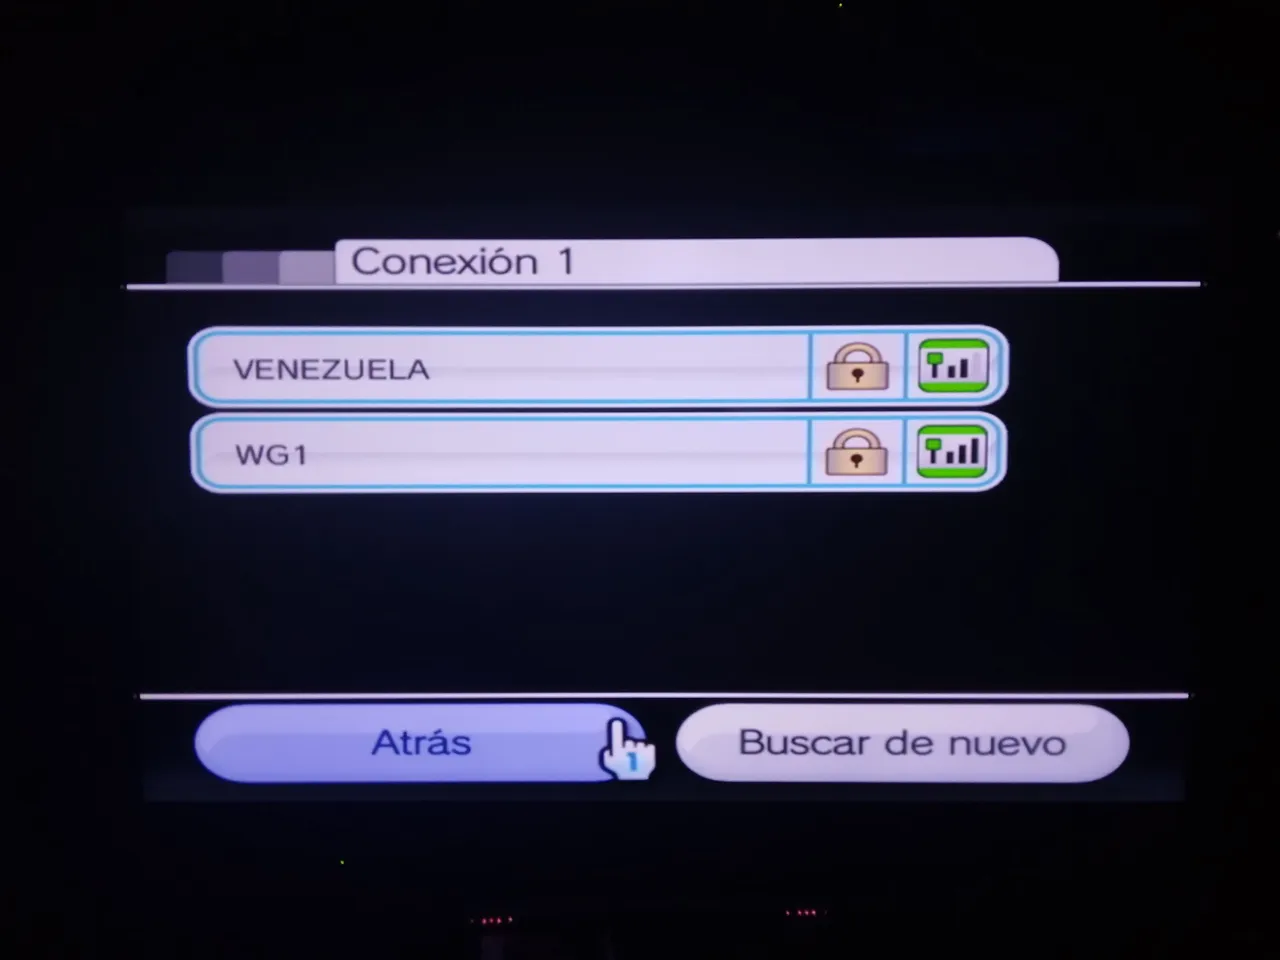
Falta poco para poder empezar a disfrutar de esos viejos y muy nostálgicos juegos de la Wii, pero antes de entrar en el canal nuevo, tendremos que ir a las configuraciones de nuestra Wii y conectarnos a nuestra red de internet, esto no será obligatorio, solo nos servirá para descargar las carátulas de los juegos en el nuevo canal, aunque de igual manera puedes poner los juegos de una forma en la que no necesites descargar la carátula para que se vean lindos, más adelante te mostraré como.
Si quieres saltarte este paso, puedes hacerlo.
Antes de iniciar el canal, verificaremos que nuestra memoria USB o disco duro este bien conectado a la consola para no tener ningún inconveniente.
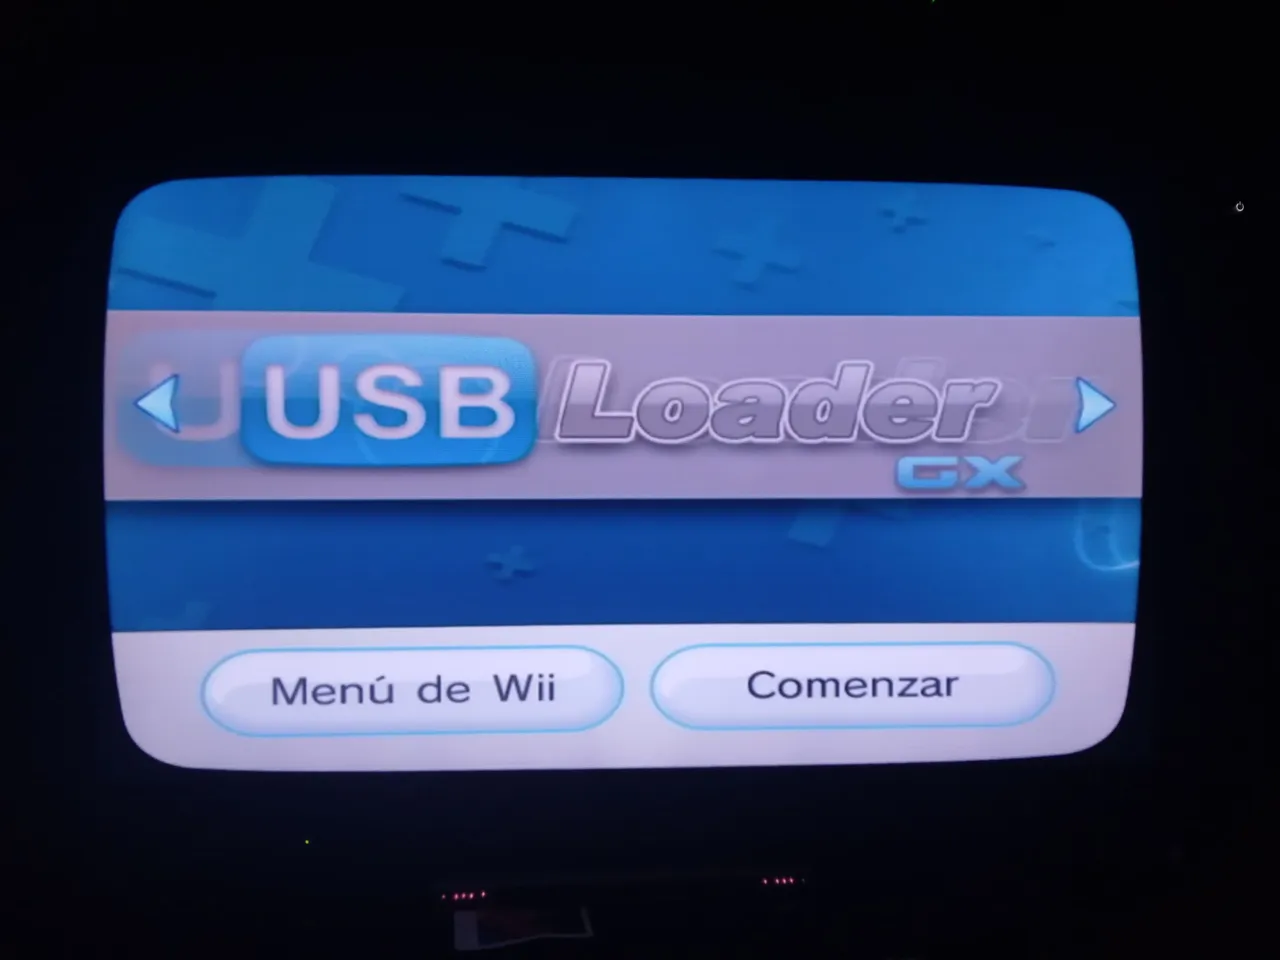
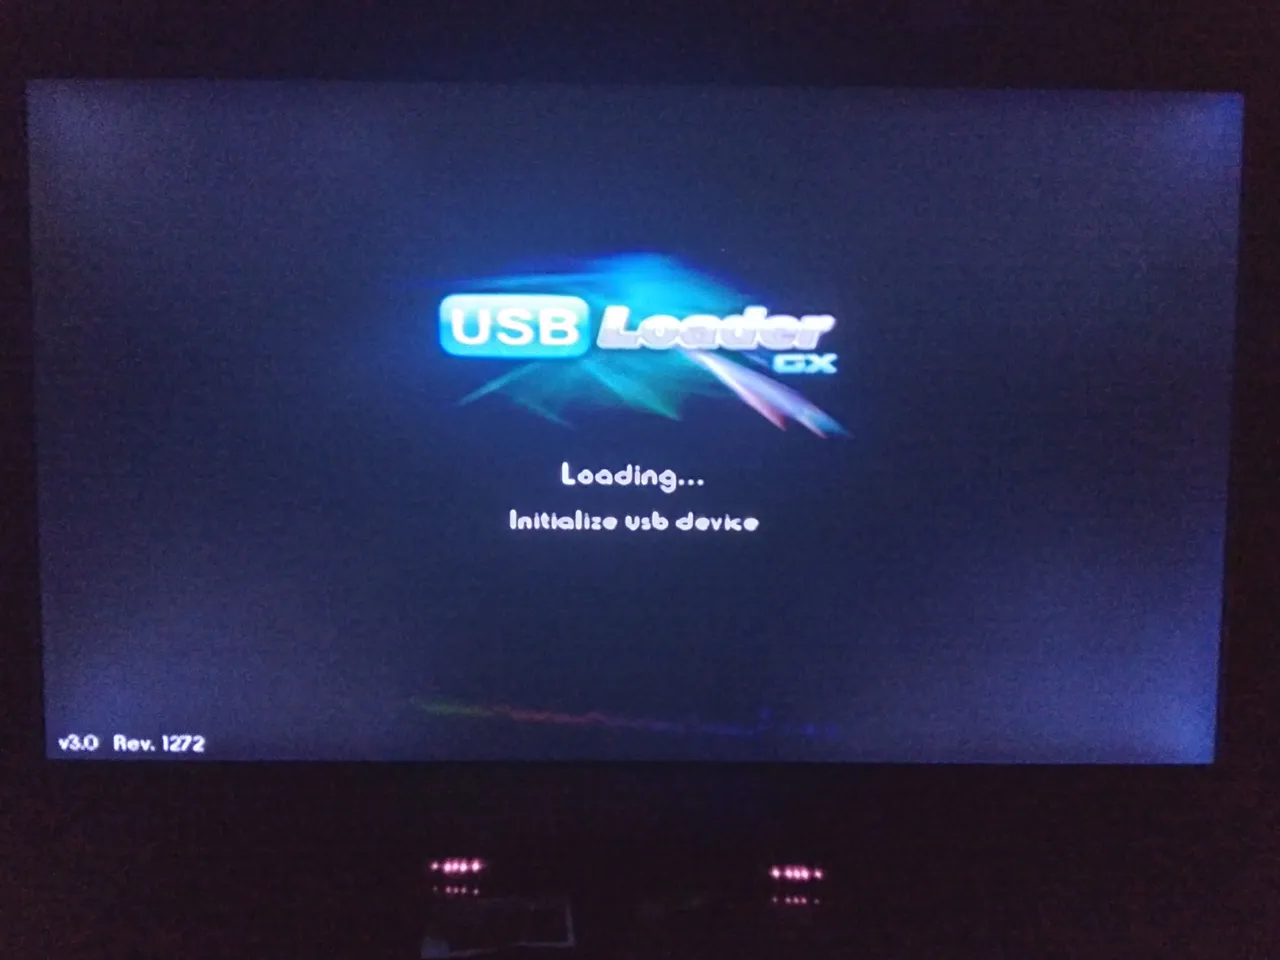
Ahora si tocara iniciar nuestro nuevo canal Usb Loader Gx, al iniciar el canal, empezara un reconocimiento de nuestra memoria USB o disco duro y una carga de archivos, luego nos iniciara el programa.
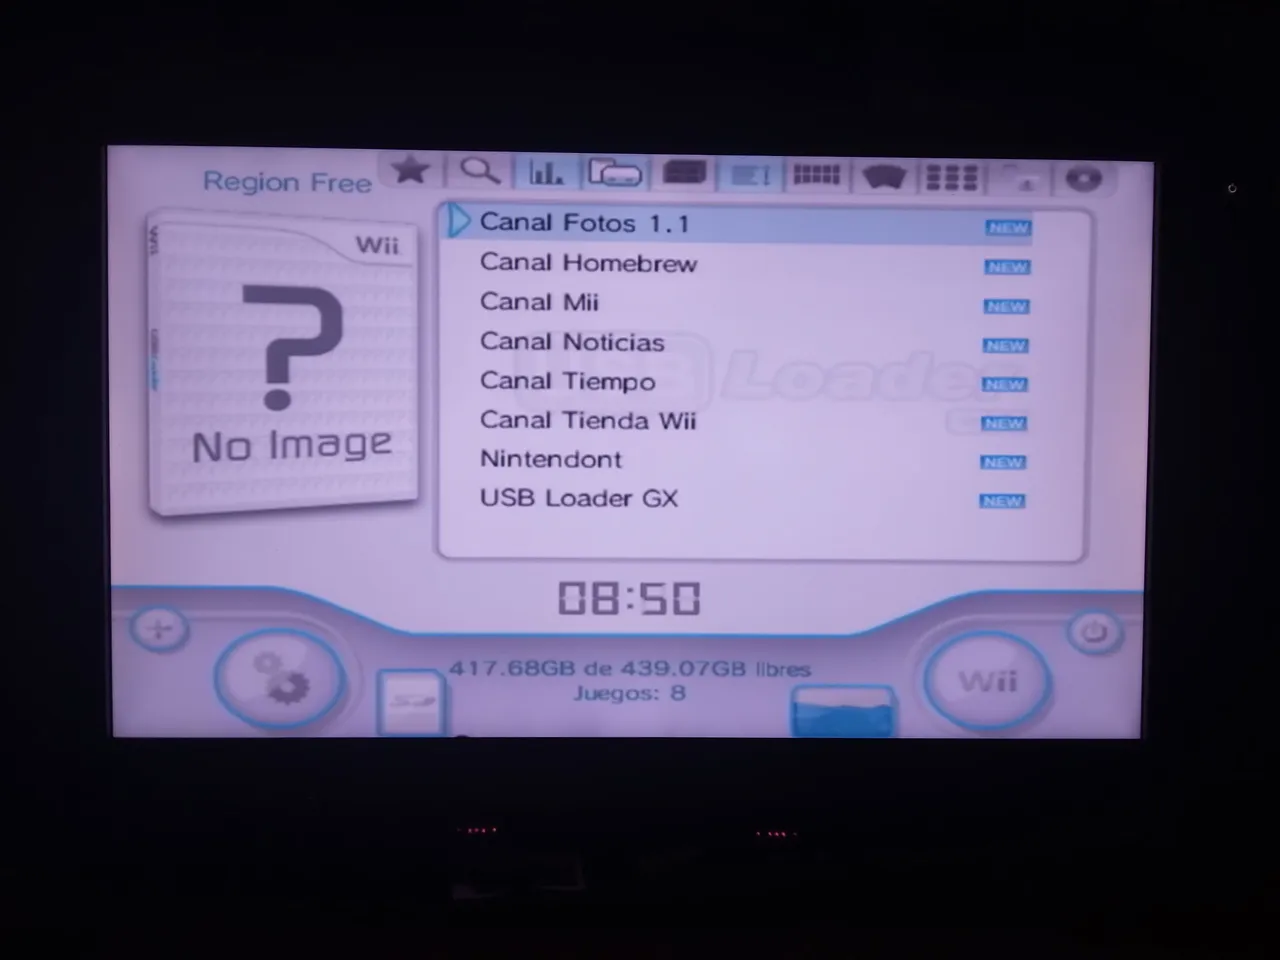
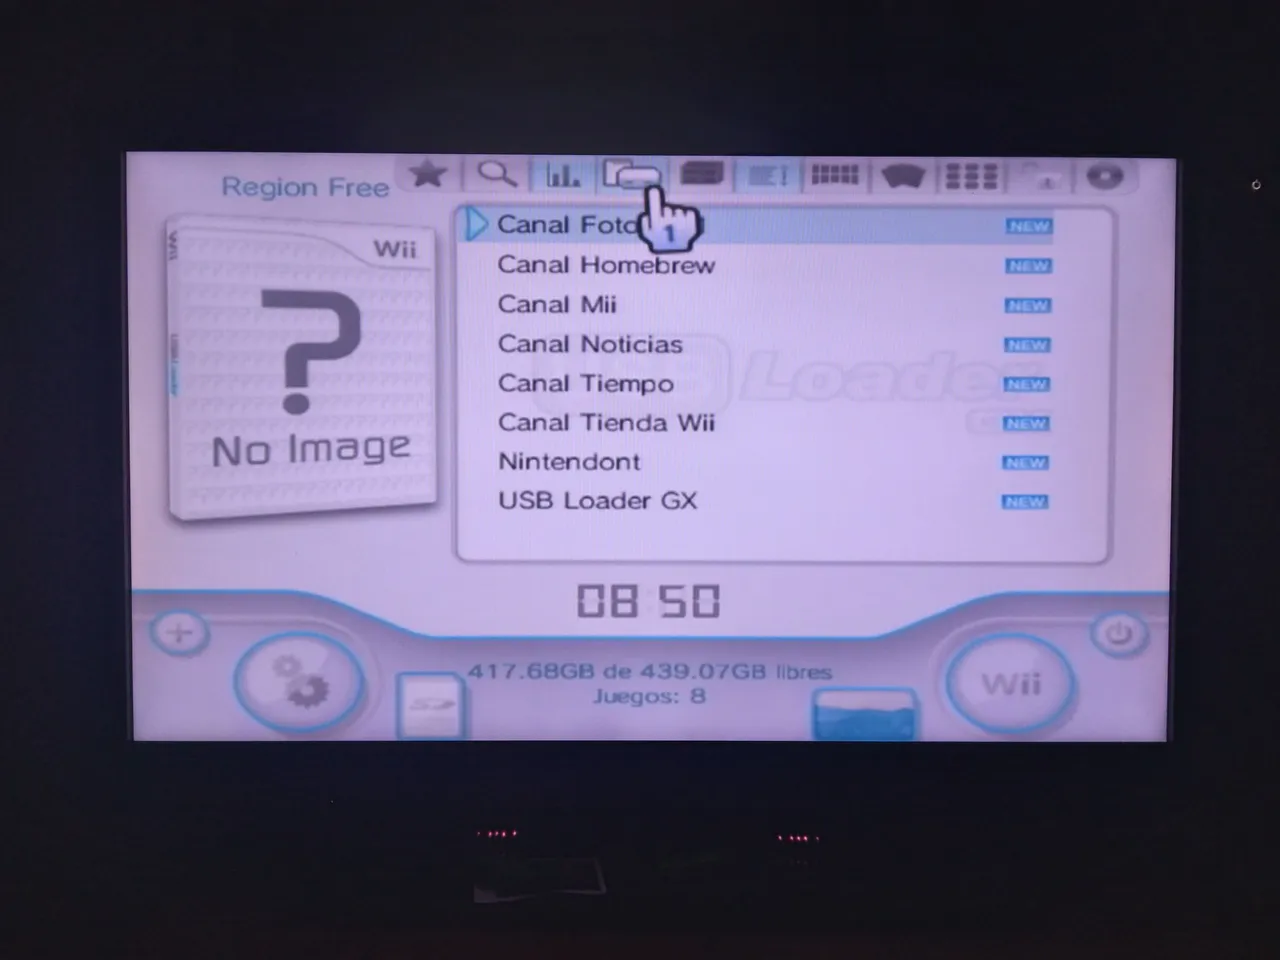
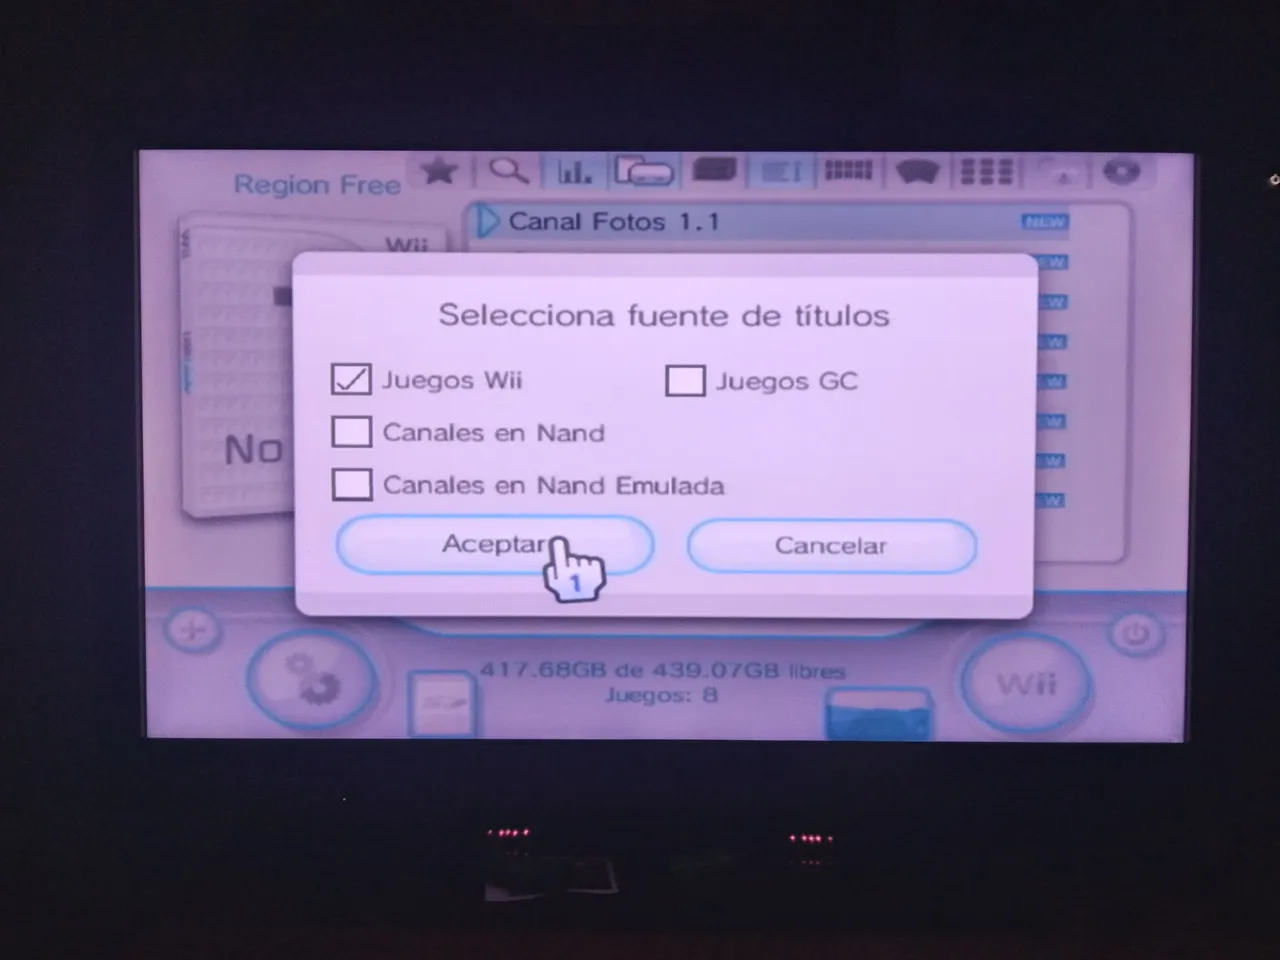
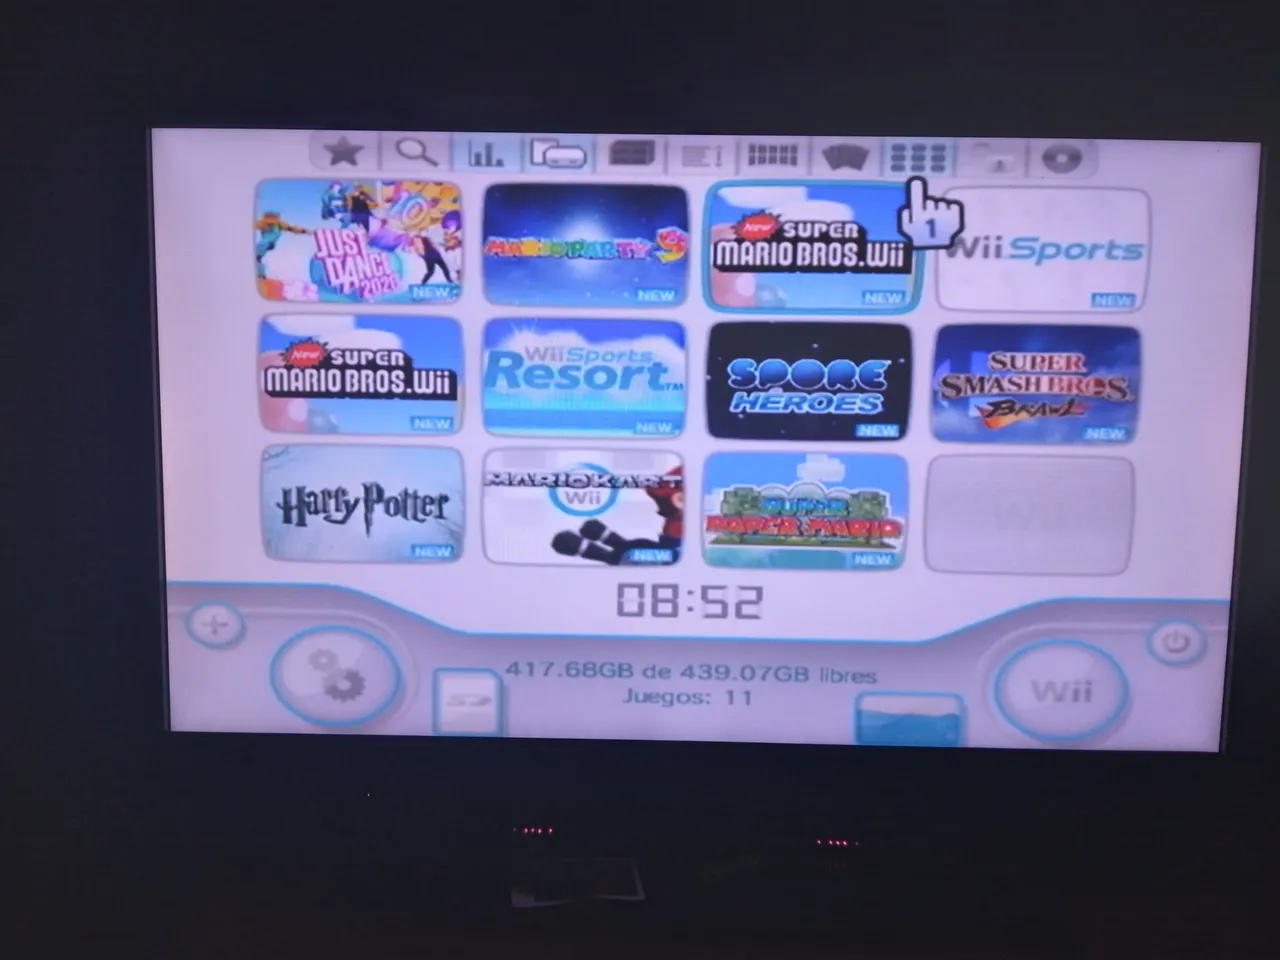
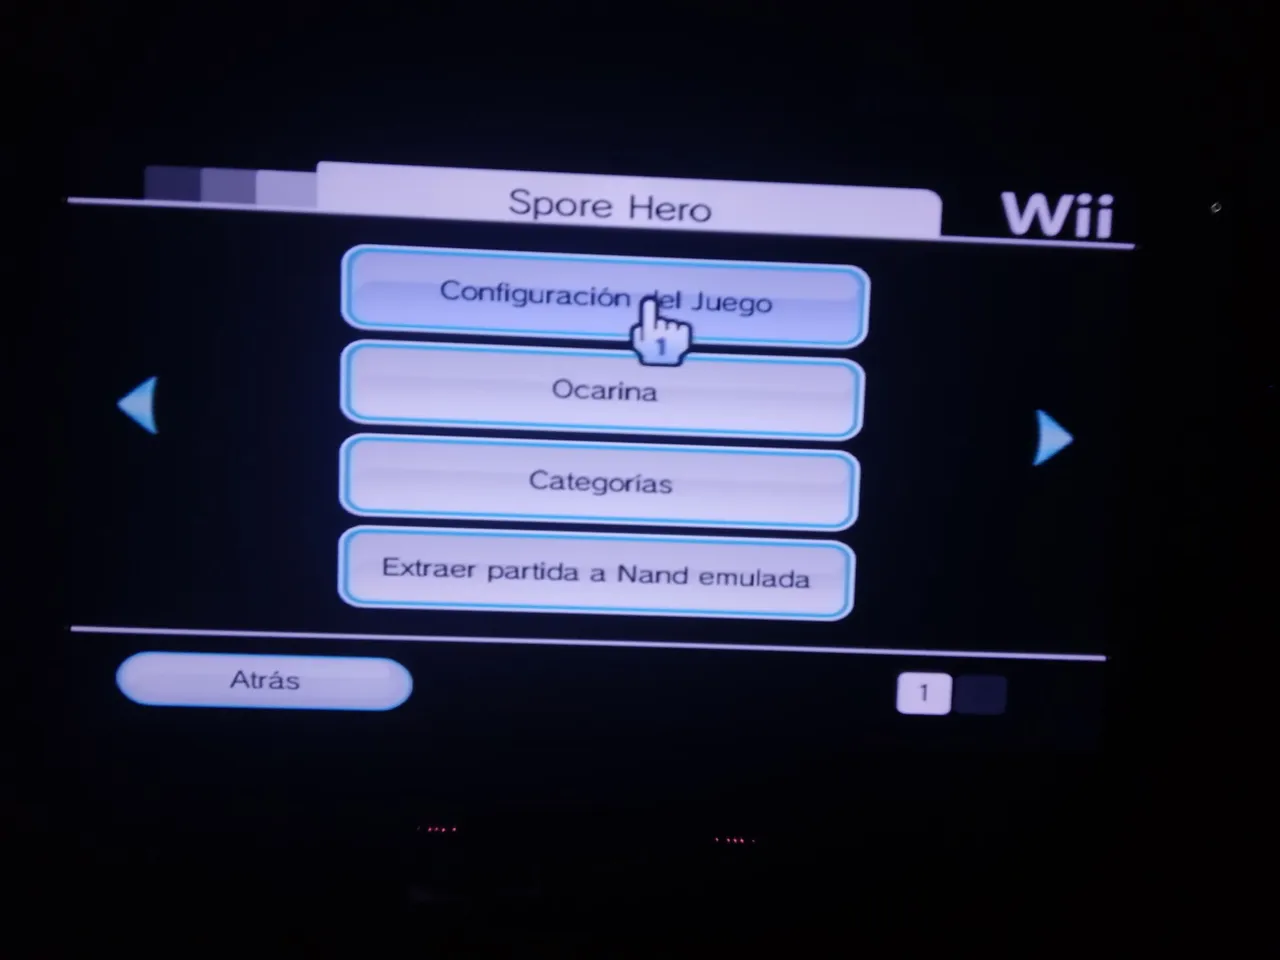
En el menú principal de usb loadre gx, puede que nos les salga nada o nos saldrán varias aplicaciones, pero solo queremos que nos salgan los juegos de Wii, por lo tanto, presionaremos el icono de la barra superior que está marcado con la silueta de los canales de la Wii, cuando la seleccionemos, solo dejaremos marcada la casilla de "Wii Games" y nos saldrán nuestros juegos.
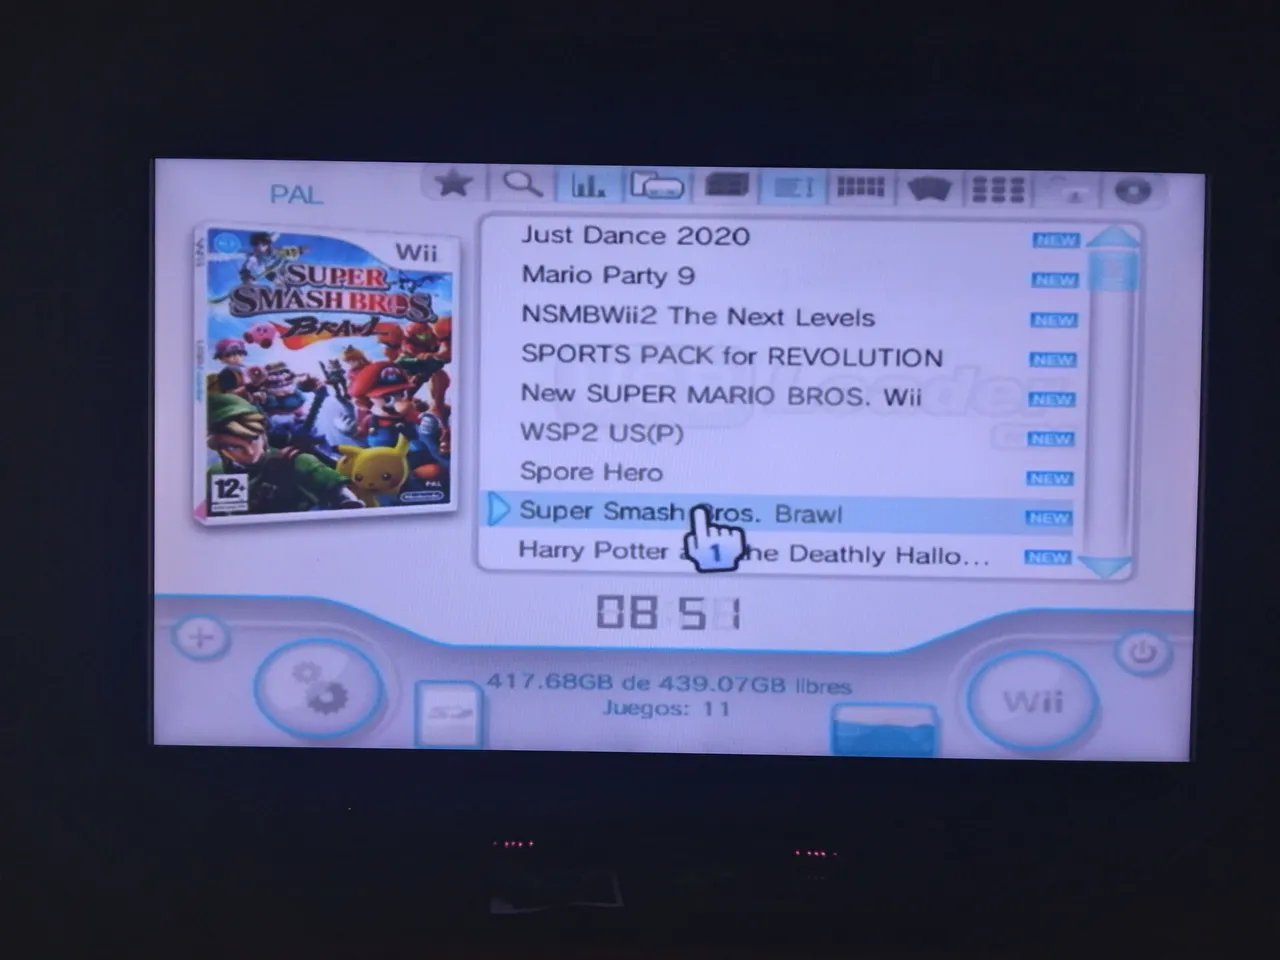
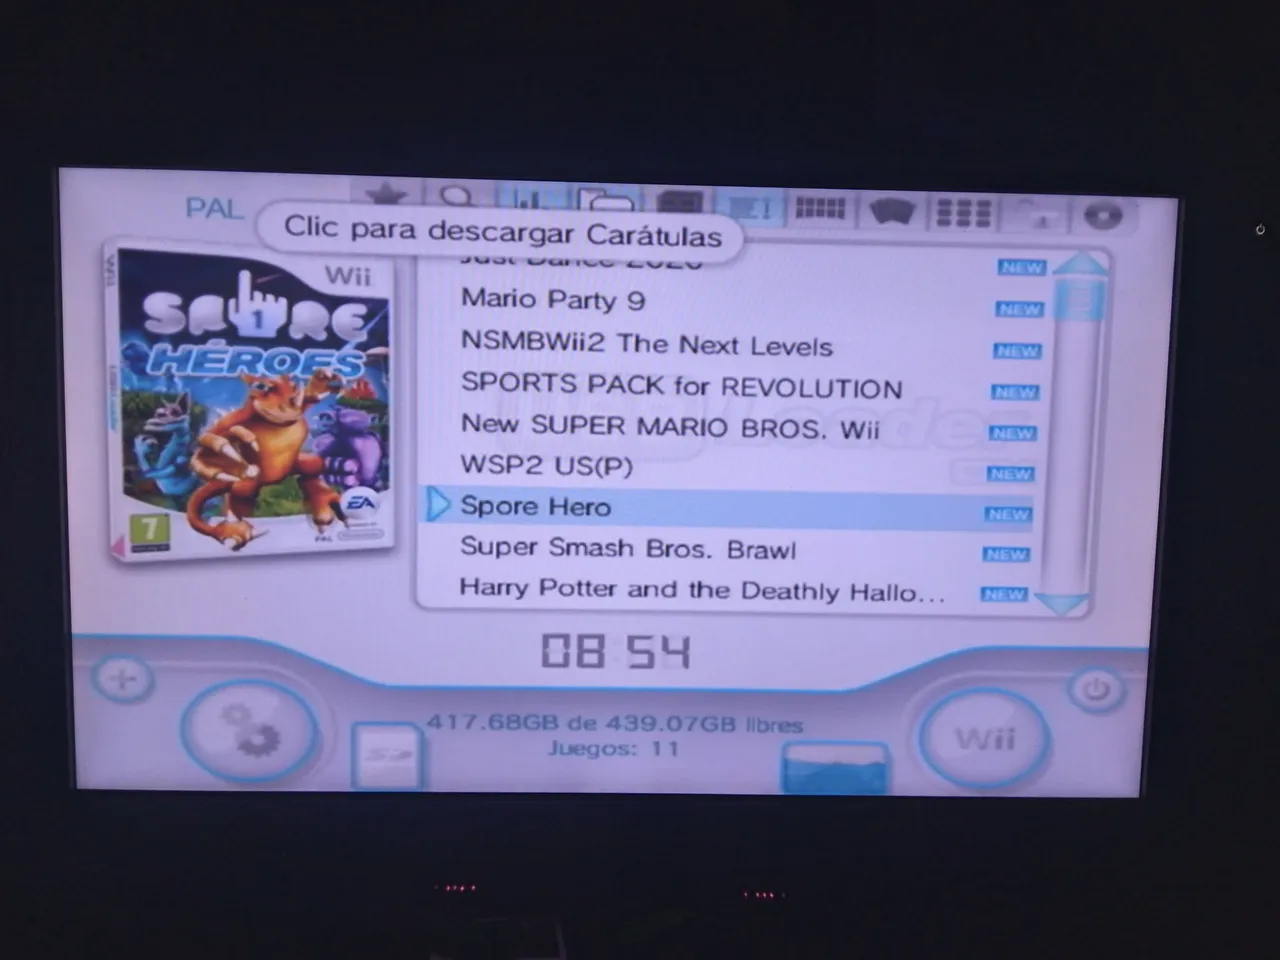
Cuando ya nos salgan los juegos, podremos descargar sus carátulas colocando el puntero encima del juego que quieran y luego presionando A en la carátula vacía del juego.
Pero para los que no activaron el internet en la consola, solo seleccionaremos en el icono que tiene varios canales de Wii, este está en la barra superior, al seleccionarlos nos pondrá otro tipo de visualización de los juegos y los veremos con los GIF que traen de por sí.
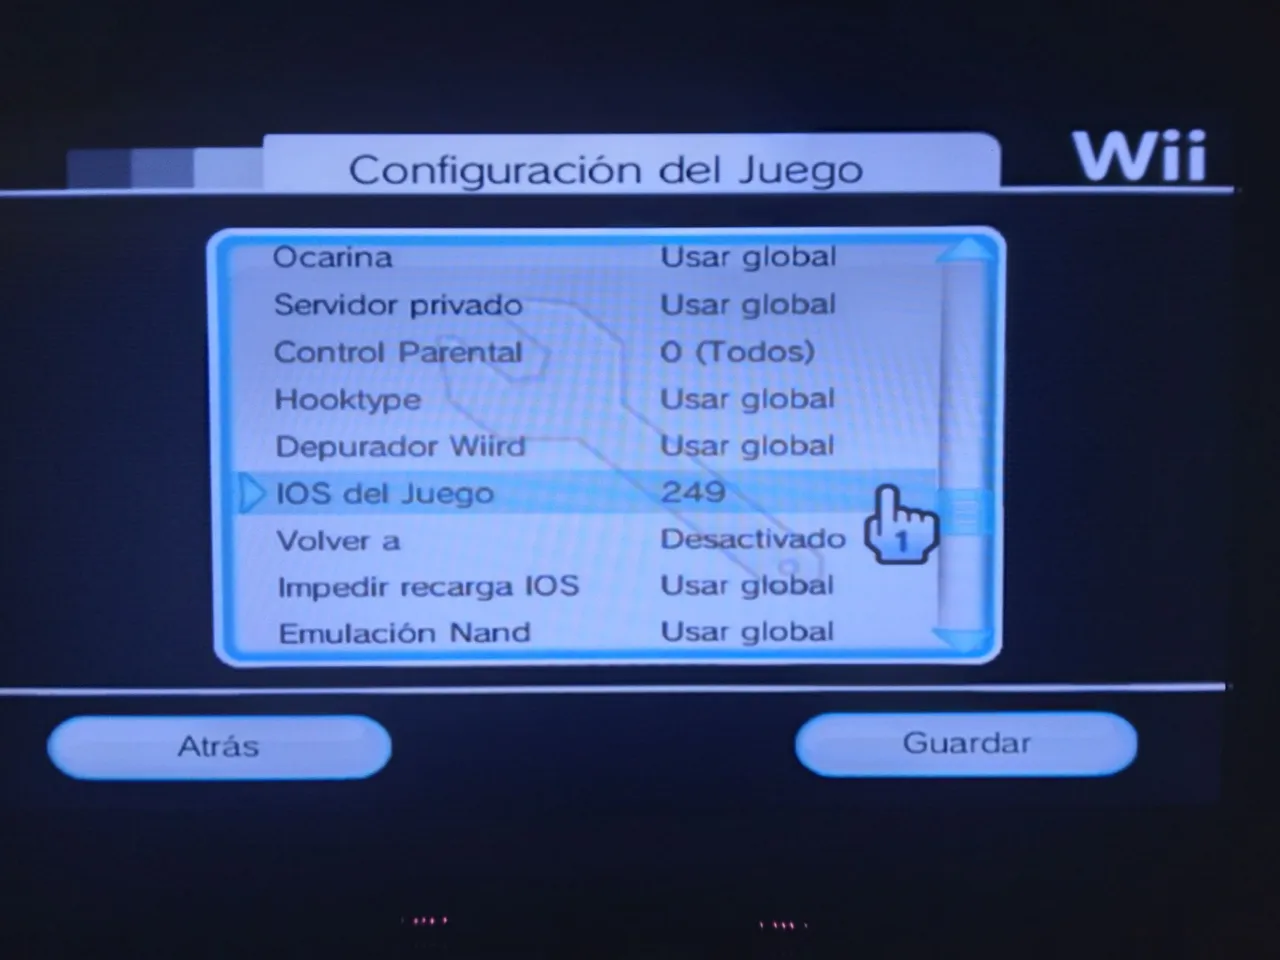
Antes de iniciar algún juego, debemos configurarlo. Esto es muy importante, arriba de cada carátula de los juegos, nos saldrá la región del juego, los juegos que digan "PAL" son juegos europeos y los juego que digan "NTSC" son juegos americanos, sabiendo esto, cuando nos metamos en algún juego que diga "PAL" nos iremos a configuración, luego a configuración del juego ahí buscaremos primero la opción que dice "Modo video" y la cambiaremos a Forzar Ntsc, esto lo haremos para evitar algunos problemas visuales que se producen al iniciar un juego europeo en una Wii americana, seguido a esto bajaremos hasta la opción que dice "IOS del juego" y cuando las seleccionemos, nos abrirá un panel numérico, aquí colocaremos el número 249, esto será para evitar problemas que suelen suceder cuando iniciamos el juego.
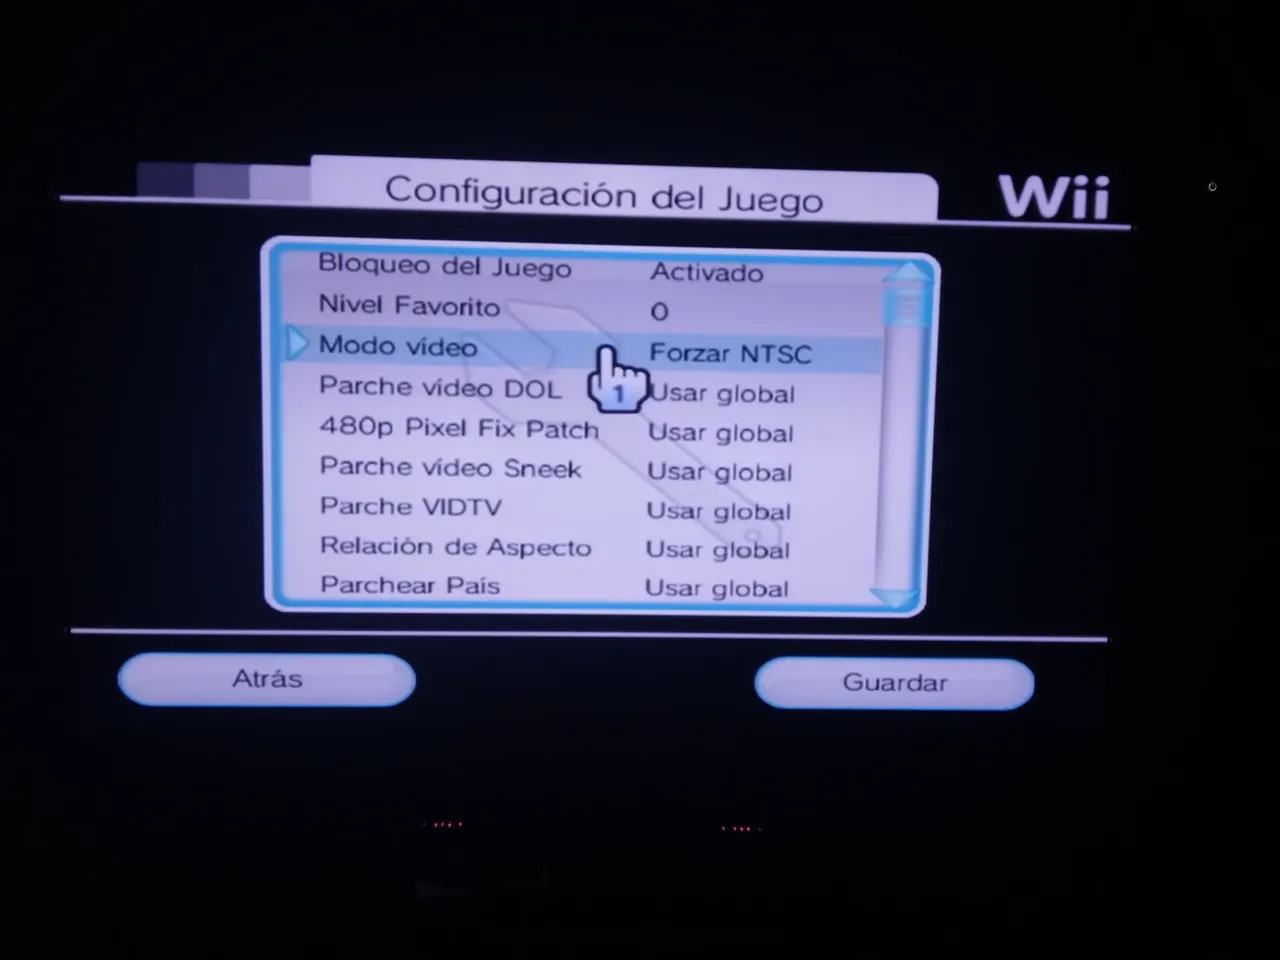
Para los juegos "PAl" podremos usar el número que ya les indique, pero si aun así tuvieron un problema, deberán volver a cambiar ese número, e intentar con el 250 y 251, uno de esos debería funcionarles.
Para los juegos "NTSC" tendremos que configurarlos también, exceptuando la parte del "Modo video", pero para el apartado de "IOS del juego" tendremos que colocar los números 224, 225 o 226.
Y listo podremos jugar todos los juegos que queramos en nuestra Wii, como pueden ver yo ya me habia adelantado y descargue unos cuantos juego que queria recordar y otros que queria probar.
Para el próximo post de la Wii, les estaré mostrando como jugar a los juegos de GameCube y puede que haga un top de los juegos de esta consola luego de que pueda probar unos cuantos juegos mas.
Así que, espero que les haya gustado y esto fue todo por este post.
English
Today I come with a different post, after having uploaded a mini series of Portal, I have not yet recorded chapter two of the game, therefore, I take the opportunity to upload something of another style, not to focus only on gameplays here in the community.
Haven't you ever felt like playing those games that when you were a kid didn't tire you and distracted you so much? Well, recently I remembered all those games I used to play on my Nintendo Wii, so I took the console from where I had it stored for many years and started a search for those games to see if they had them for sale in my city, but they are very difficult to get in good condition.
Since I couldn't find the games, I thought of modifying the console to be able to play those games and much more by just downloading them and transferring them to the Wii.
I will show you how I did it so you can do it too and remember those old times.
Here I will leave you the files that are necessary: https://drive.google.com/drive/folders/14TMKnIwcqwIlqnF7ioFxwloITmJbgLuw?usp=sharing
I leave you what we will have to use in the SD card and the program that we will use for the games.
First, we are going to have to look for information that we will need about our console, therefore, already with the console turned on we will go to the configuration section, which is in the lower left corner of the main menu, this button says "Wii".
When we enter in the Wii options, we will select the section that says Wii configuration, there we will find the first data that we have to write down, in the upper right corner we will find the version of our console together with the region of the same one. For example, the version of my Wii is 4.3 U, the letter at the end indicates the region, E-Europe, U-America, J-Japan.
Then in the same Wii configuration menu look for the internet section and enter data from the Wii console, there we will get the IP of our console, is another piece of information that we will have to write down.
Note, if your console version is lower than 4.3 you will have to update it, in the same Wii configuration menu you will find the section to update Wii.
After updating, or if we already have the updated version, we will go to our computer and we will open the following page:
There we will select the version with the region that corresponds, then we will put the IP of our Wii, we will complete the captcha and then we will press the button that says Cut the red wire.
Then we will start downloading a .zip file which we will unzip.
We will have to insert our SD card to move some files from that file that we downloaded and unzipped, but first we are going to format our SD card in Fat32 format.
Once we insert the SD card we will go to where we have the devices and when we right click on the SD card we will get the option to format, then we will open the section to format, in file system we will select Fat32 and then click on start, at the end the process will be ready to transfer the files.
Having already formatted the SD card, from the file we unzipped, we are only going to move the folder named "private" and the file named "boot.elf" to the SD card.
Before taking our SD card to the console we have to verify that the date and time of the same are correct, this has to be so to be able to perform the next step, so we have to be sure that it has the current date.
Then we insert the SD card in our Wii and in the main menu we will see the icon of the card in blue that indicates that it recognizes it.
We will go to the section of messages that is in the lower right corner of the main menu, this will have an icon of a letter.
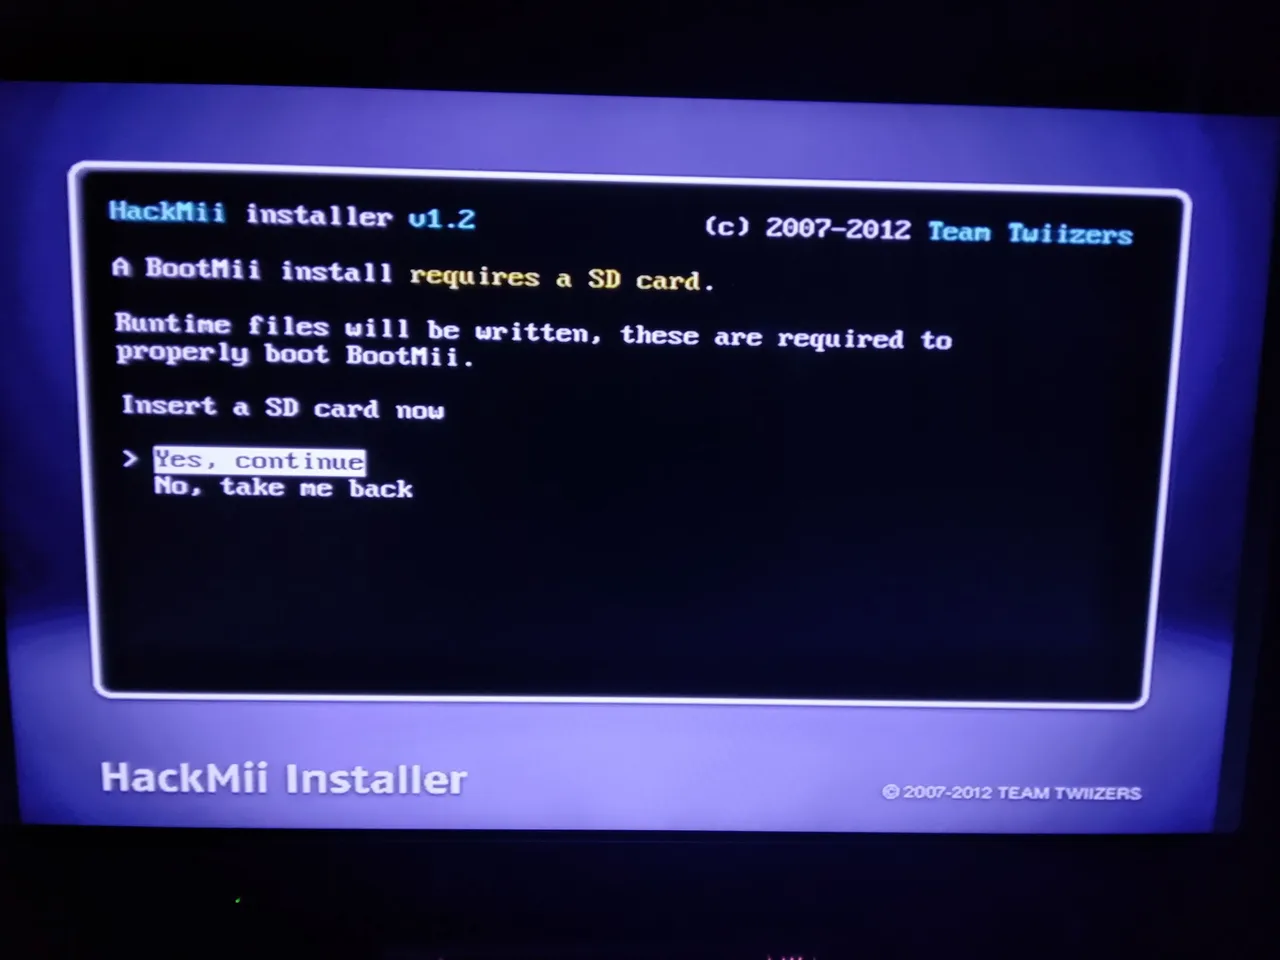
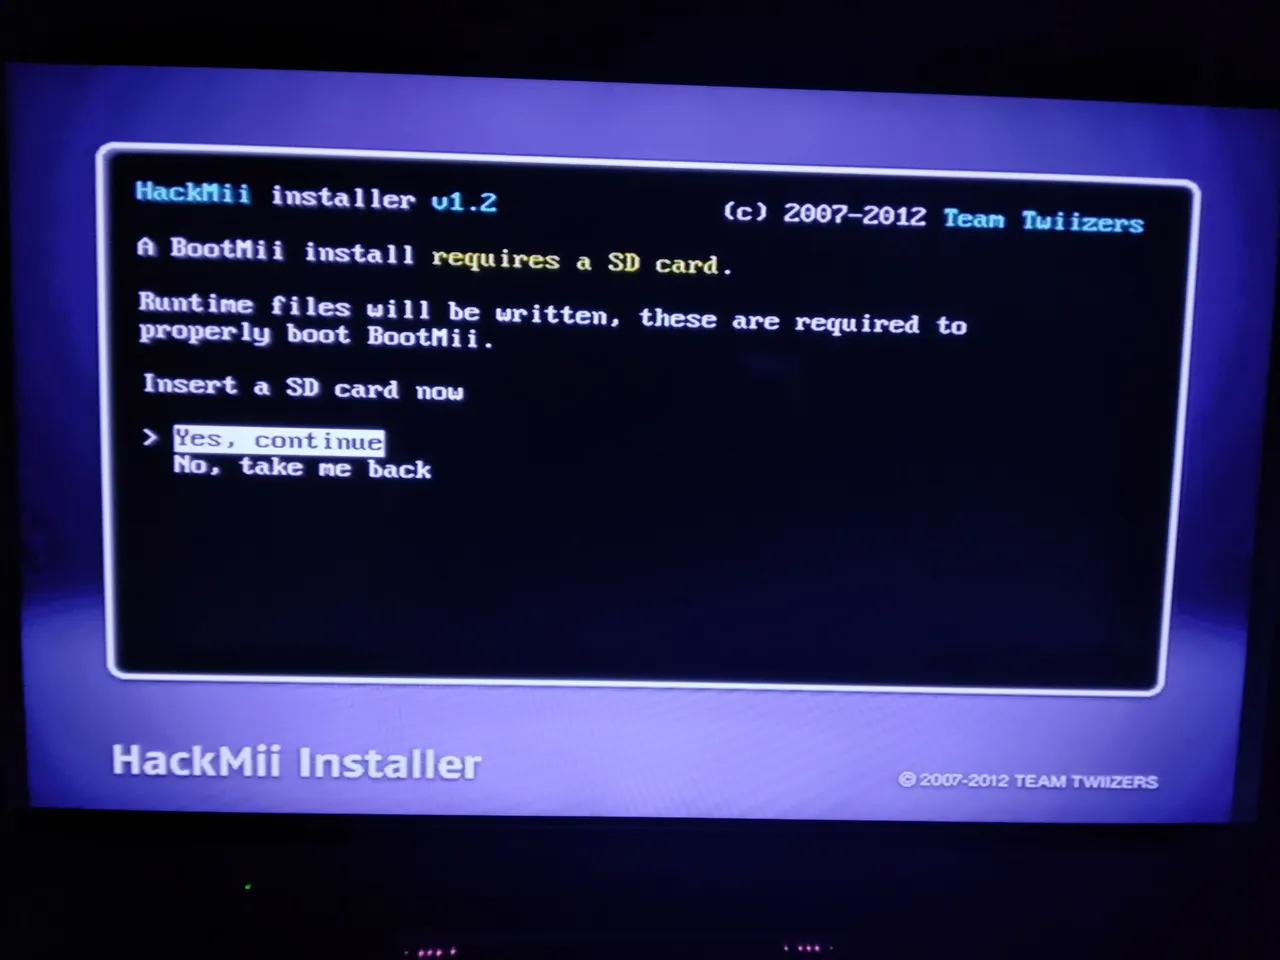
And being inside we will be in a blank tray with the current date, there we will have to advance one page forward or one page back with the - and + buttons, looking for a message that will have the icon of a letter with a bomb inside.
When entering we will pass to a loading screen with a black background, and then we will pass to a warning with the same black background, where we will wait for it to tell us to press A to advance.
When we press A it will take us to a menu, in which we will install some programs to modify our Wii.
In this menu we will move with the arrows of the controller and the A button. We will give in "continue", that takes us to the main menu, and the first thing that we will do is to install the Homebrew Channel that will be the channel that will help us to install the files .wad that are the other channels or even we can install emulators, To install it we select the first option, it says "Install The Homebrew Channel" when entering there we will give in "Yes, continue" and it will begin to install, until it finishes and it leaves "Continue".
When we press "Continue" it will return us to the previous menu and the Homebrew Channel will be installed.
Now we will install BootMii, this program serves us to repair errors, as for example you installed a .wad (channels or emulators) from another region and you suffer an error that no longer lets you enter the console from the normal menu of the Wii, with this application that starts before the Wii itself, you could open the Homebrew Channel and uninstall it, plus a couple of utilities more.
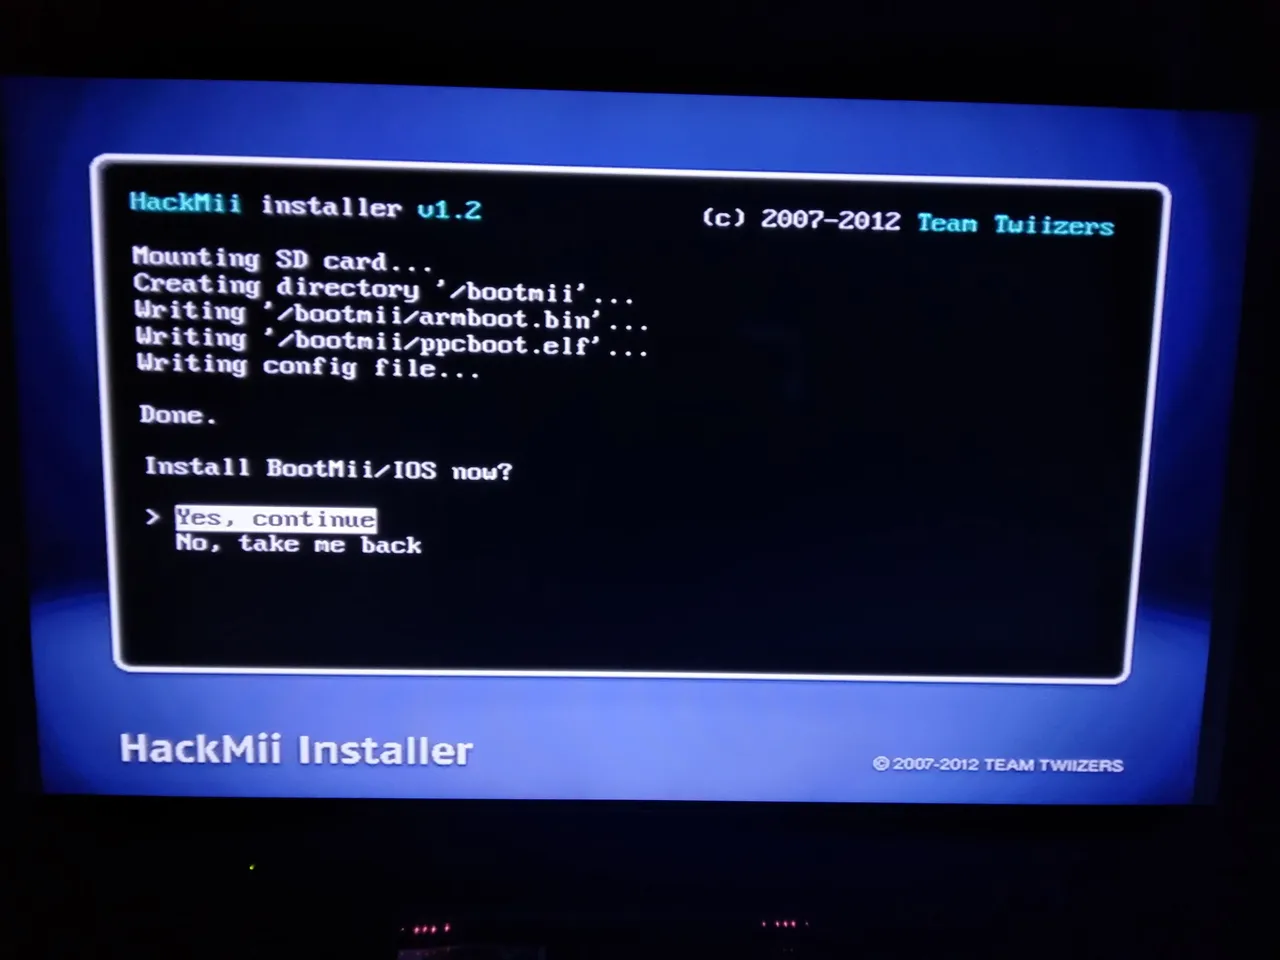
To install it we will only go down to the section that says "BootMii..." when entering we will select the first option of "Install BootMii as IOs" followed to this we will give to the option "Yes, Continue" then we wait until it finishes loading and we will return to give in "Yes, continue" we return to wait until it finishes the load of data until the option of "Continue" which we will select.
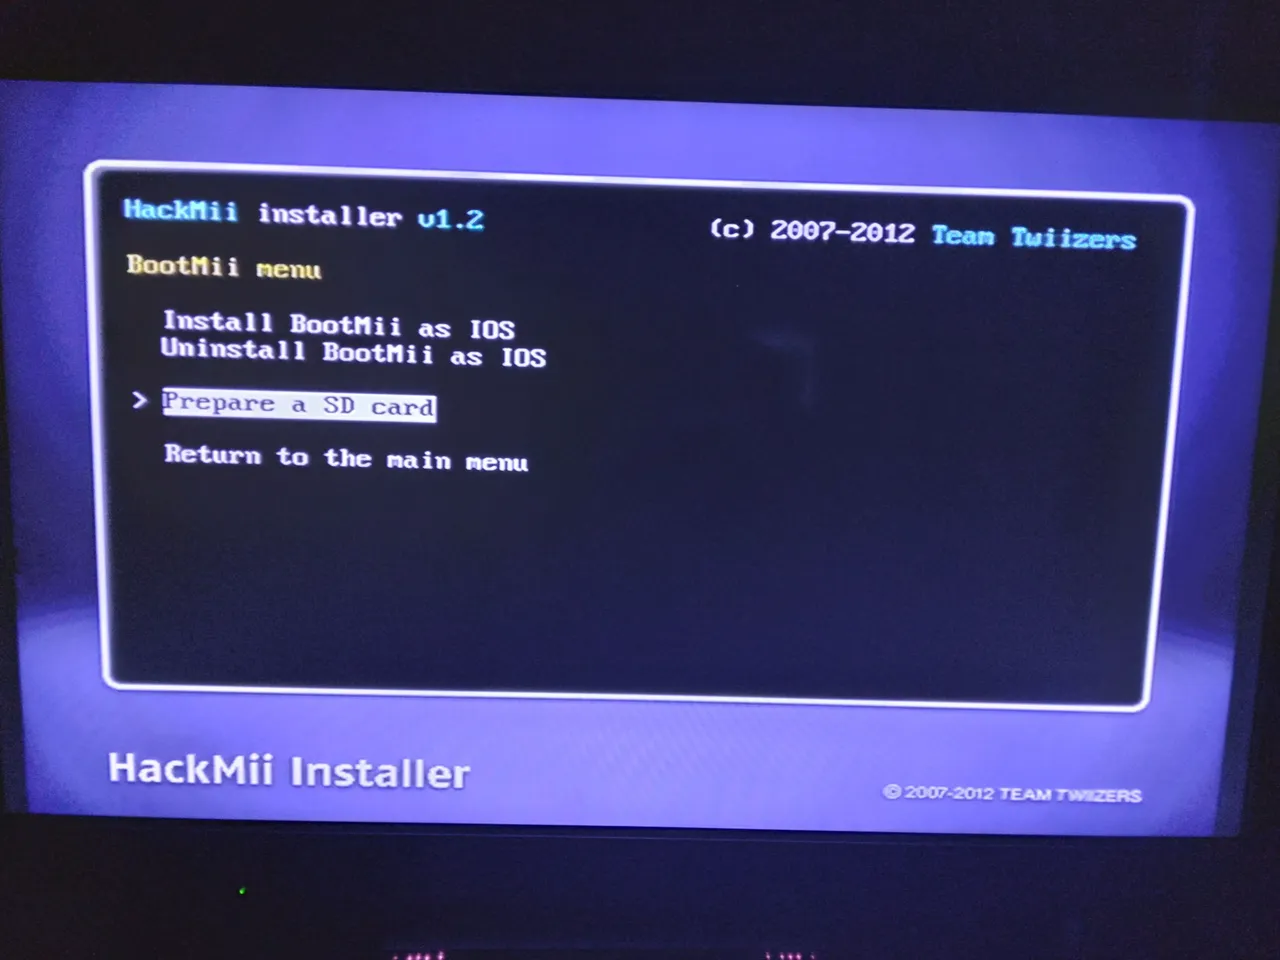
It will take us back to the previous menu, where we will now select the "Prepare SD card" option and it will take us to another section where we will select "Yes, continue" where we will wait for the data loading to finish and then select "continue".
When we press "Continue" it will take us back to the BootMii menu, from which we will exit by selecting "Return to the main menu" here we will return to the main menu, in this one we will exit by selecting "Exit".
This will take us to the channel that we installed "The Homebrew Channel" where we will continue with the following steps.
In this section we will press the Home button and it will open a menu, in which we can exit to the main menu by pressing "Exit to system menu" we will select that option to restart the console and go to the main menu of the Wii and we will be able to see that the new channel "The Homebrew Channel" was added to us and we will enter again.
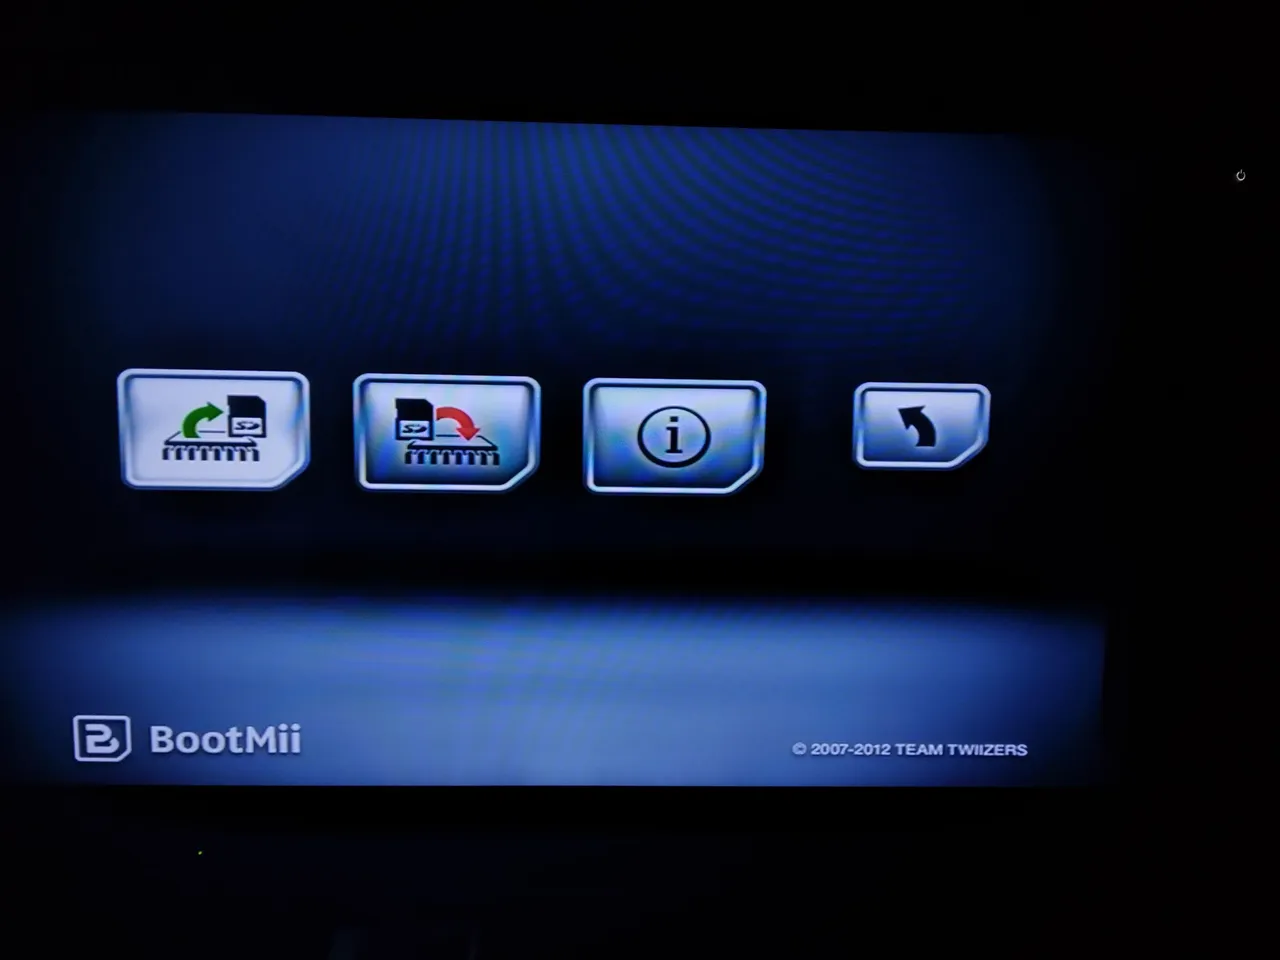
Being inside the channel, we will press the Home button of our controller, again, when we get the menu, this time we will select the option "Launch BootMii" will open the BootMii menu, in this menu we can only move to the right, but with the power button of the console and to select we will use the reset button of the console.
Here we will select the option that is marked with gears, this will take us to another menu in which we will select the first option, it is marked with a green arrow and an SD card, this will create a backup copy of the SD card, we will have to wait for the process to finish.
When the load finishes, we will press reset and it will return us to the bootmii menu in which we will go to the last option that is marked with an arrow, this will take us to the bootmii main menu and we will select the Homebrew Channel option.
When we are in the Homebrew menu we will be able to use our controller, we will press the Home button and select the option to turn off, since we will go to the computer or cell phone again.
When the console is already turned off, we will move our SD card to the computer and transfer the files that I left in the folder named "SD" to the SD card, these files contain other channels and some cIOS that we will have to install.
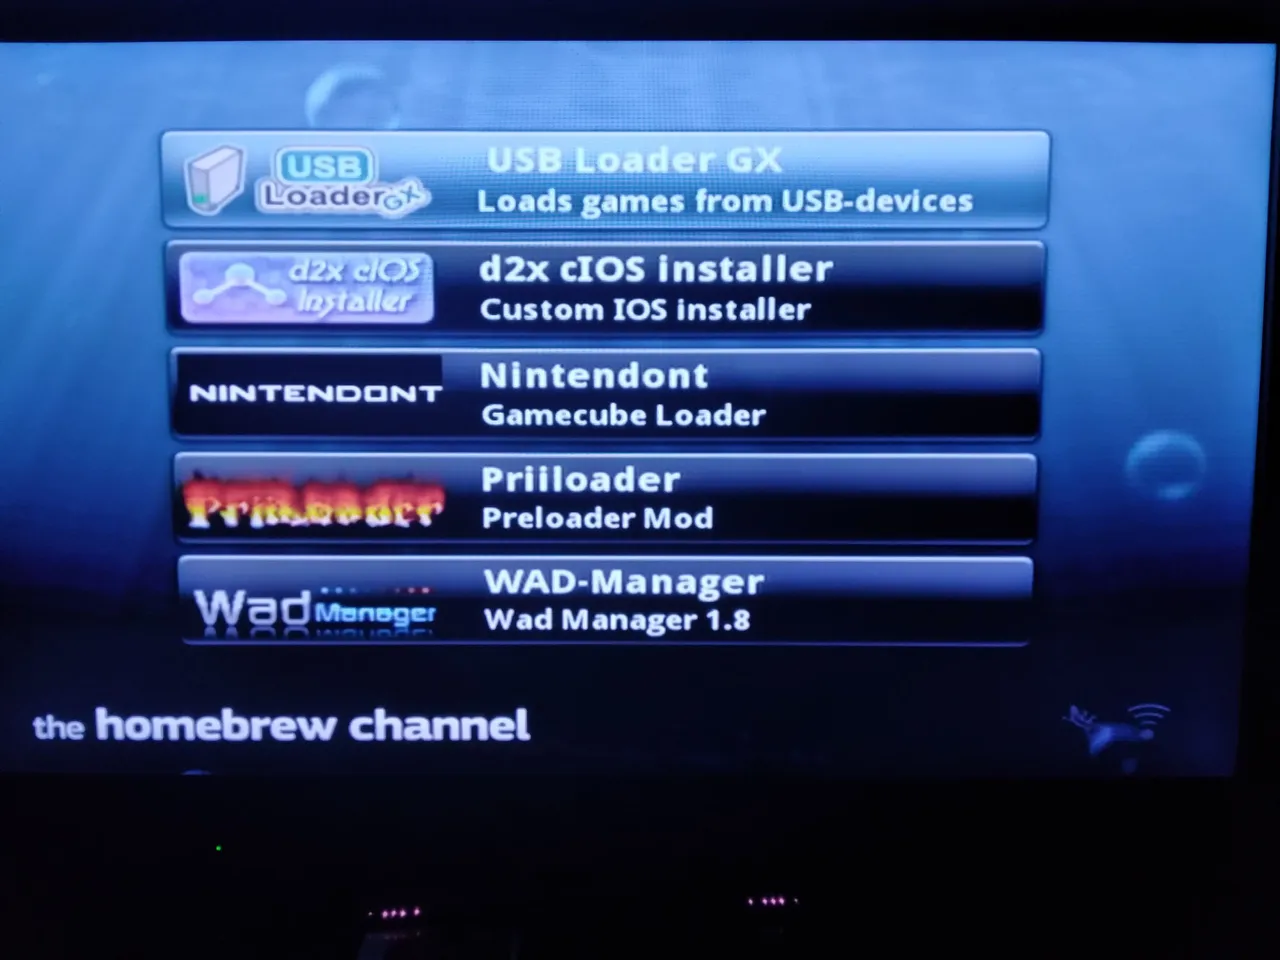
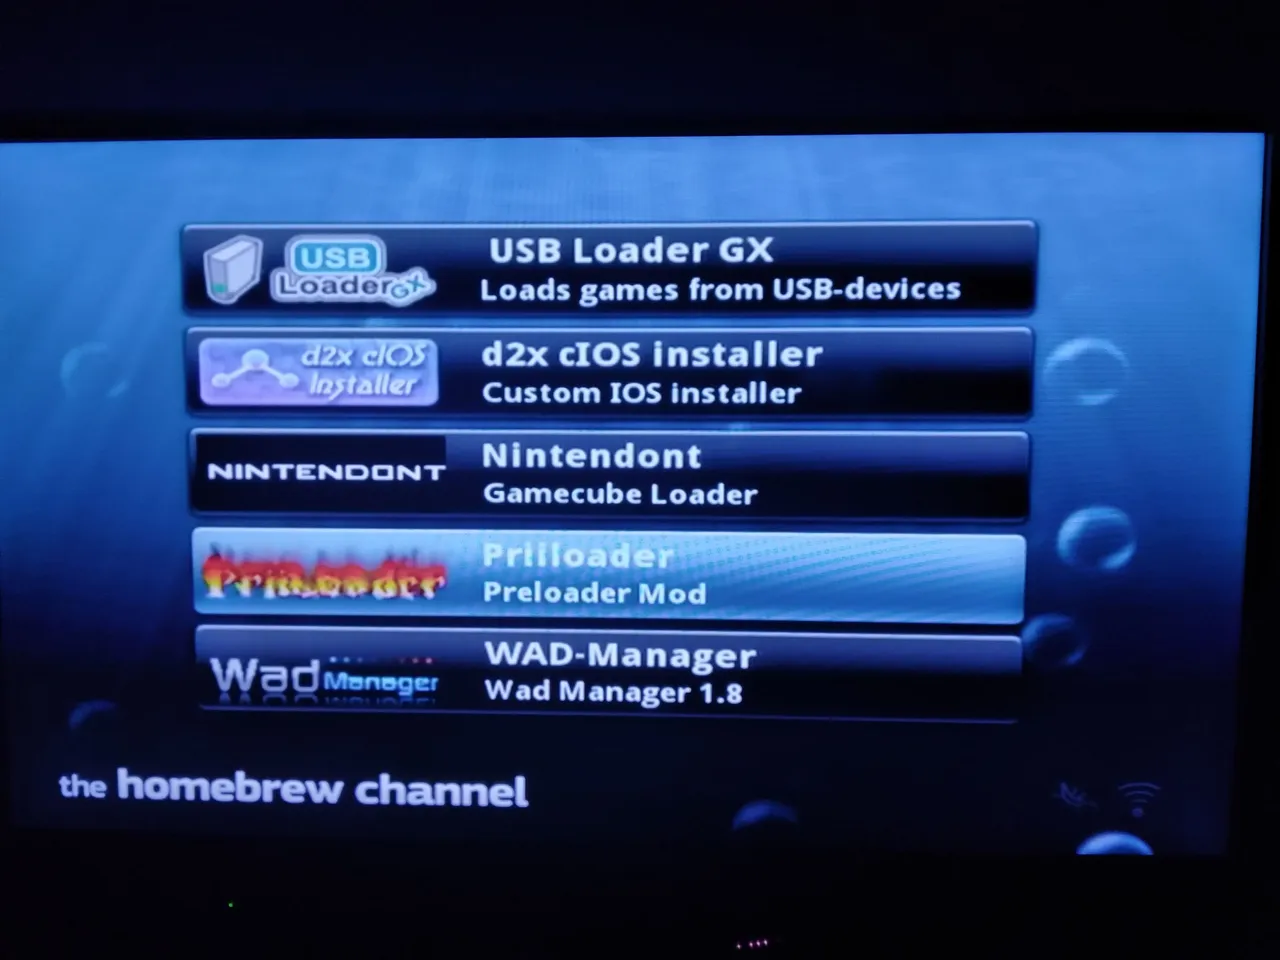
We will have to pass the SD card back to our console, to turn it on again. At startup we will enter again "The Homebrew Channel" channel, this time when we enter the menu that came out empty at startup, we will see different sections, which will be the programs that we will use to continue with the modification.
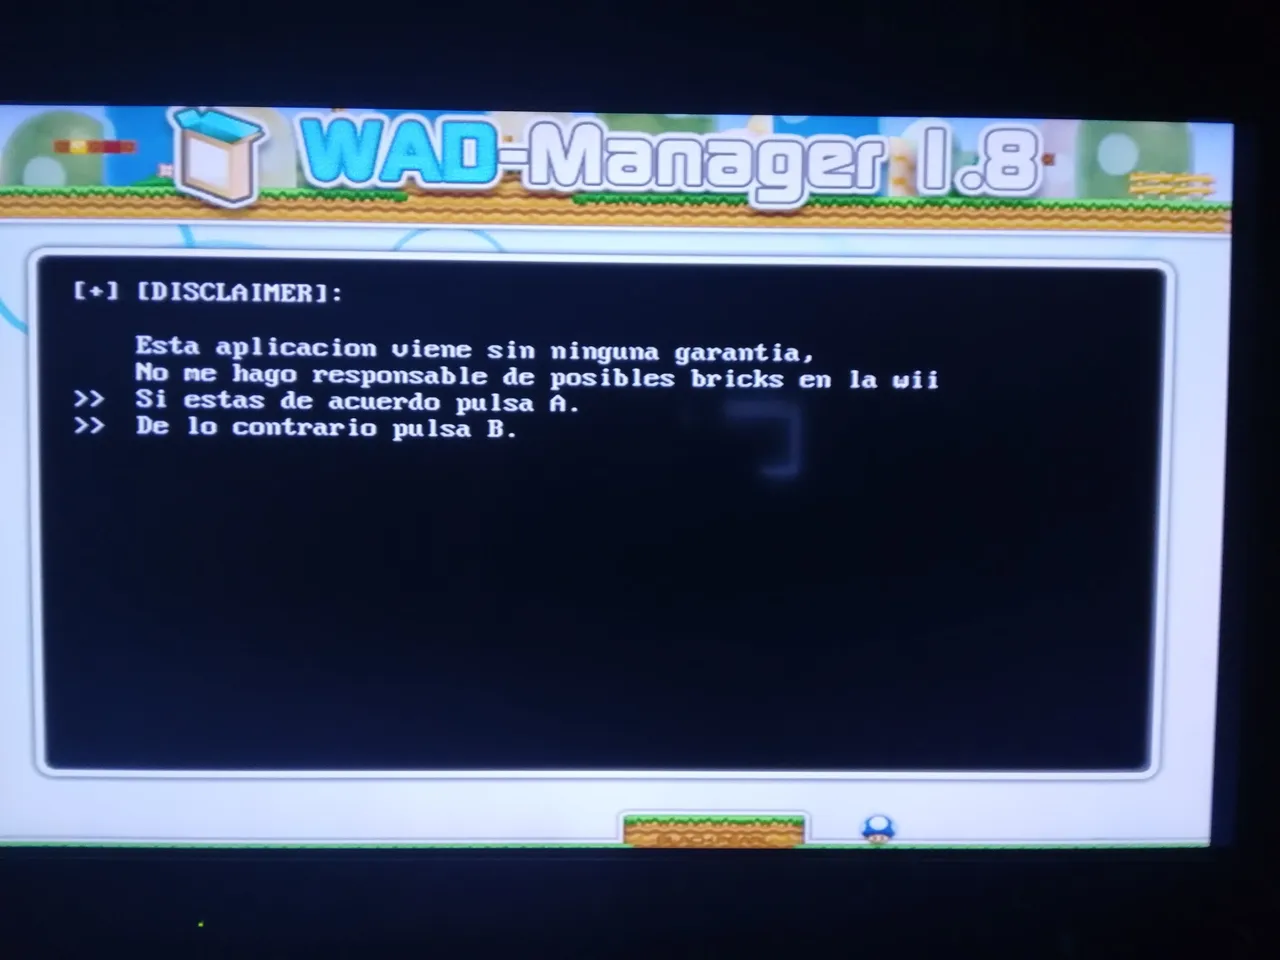
We will start with "WAD-manager", select it and it will open a menu where we will click on load to open the application, we will use it to install the necessary cIOS to be able to continue the modification.
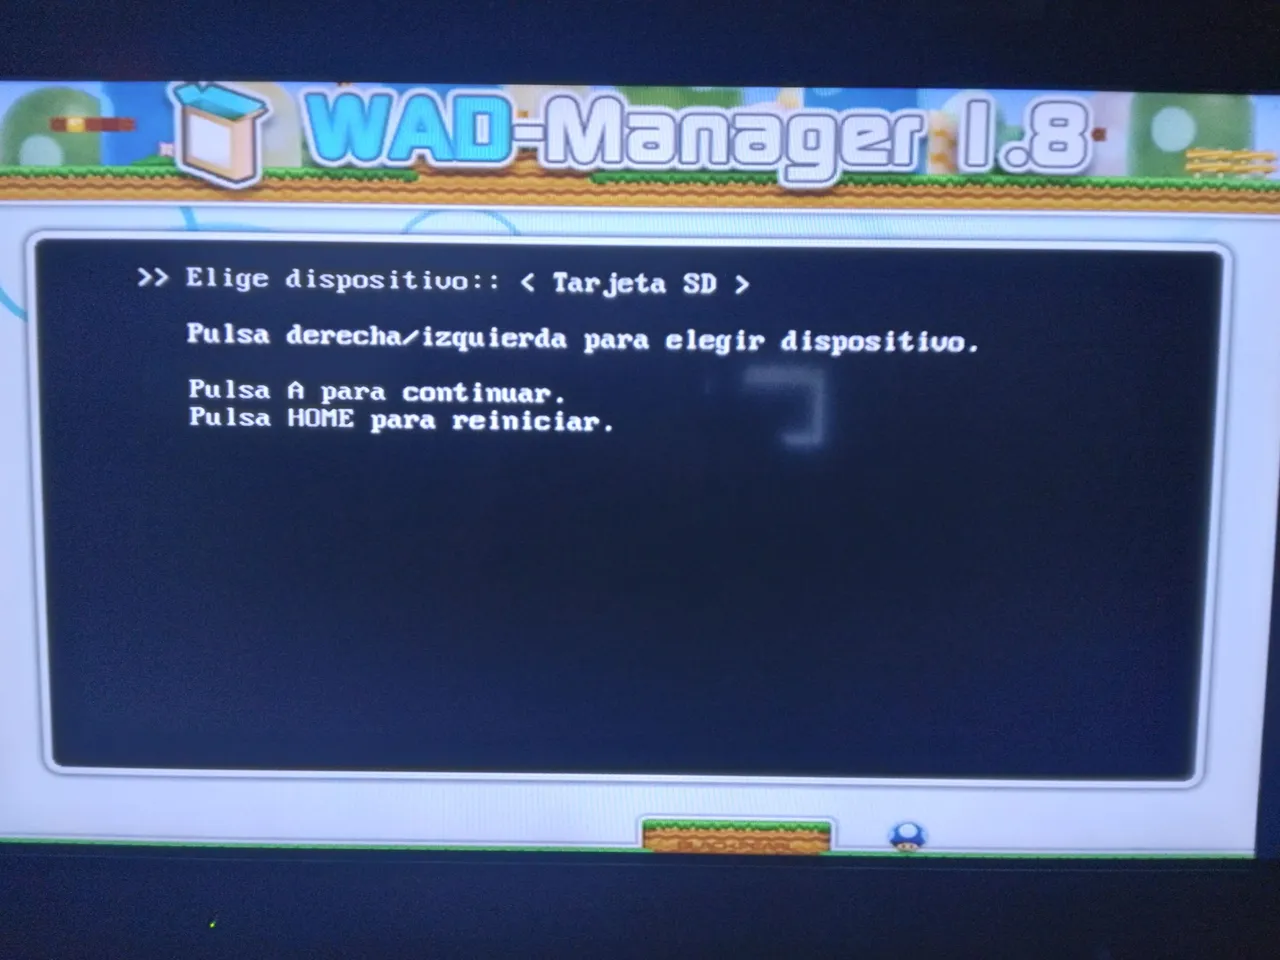
In this application we will use the arrows and buttons A and B to move. Being in the first menu, we will press that if we agree with the A button, then it will take us to another menu where we have to choose the device where we have all the files that we leave them, in this case the SD Card, we will look for them and press A, this will take us to a next menu where we will see the folders that we pass to the SD Card, here we will go down to the one named "wad cIOS" and we will select it with the A button.
When we select the folder "wad cIOS" it will show us all the files that we will have to install, we will start with the first of all the list, we will select it and then we will install it just pressing A, when the download finishes, we will press any button and it will take us again to the list of files that we have to install, this we will do it absolutely with all the files.
We have to make sure that we have installed all the files. When we finish all the installations we will go up to the first option of the menu of the files, this option is marked with three dots, when we select it we will return to the menu of the folders that we passed to the SD card, in this menu we will press the B button and it will take us to the selection of, and then in this other menu we will press the home button to return to Homebrew Channel.
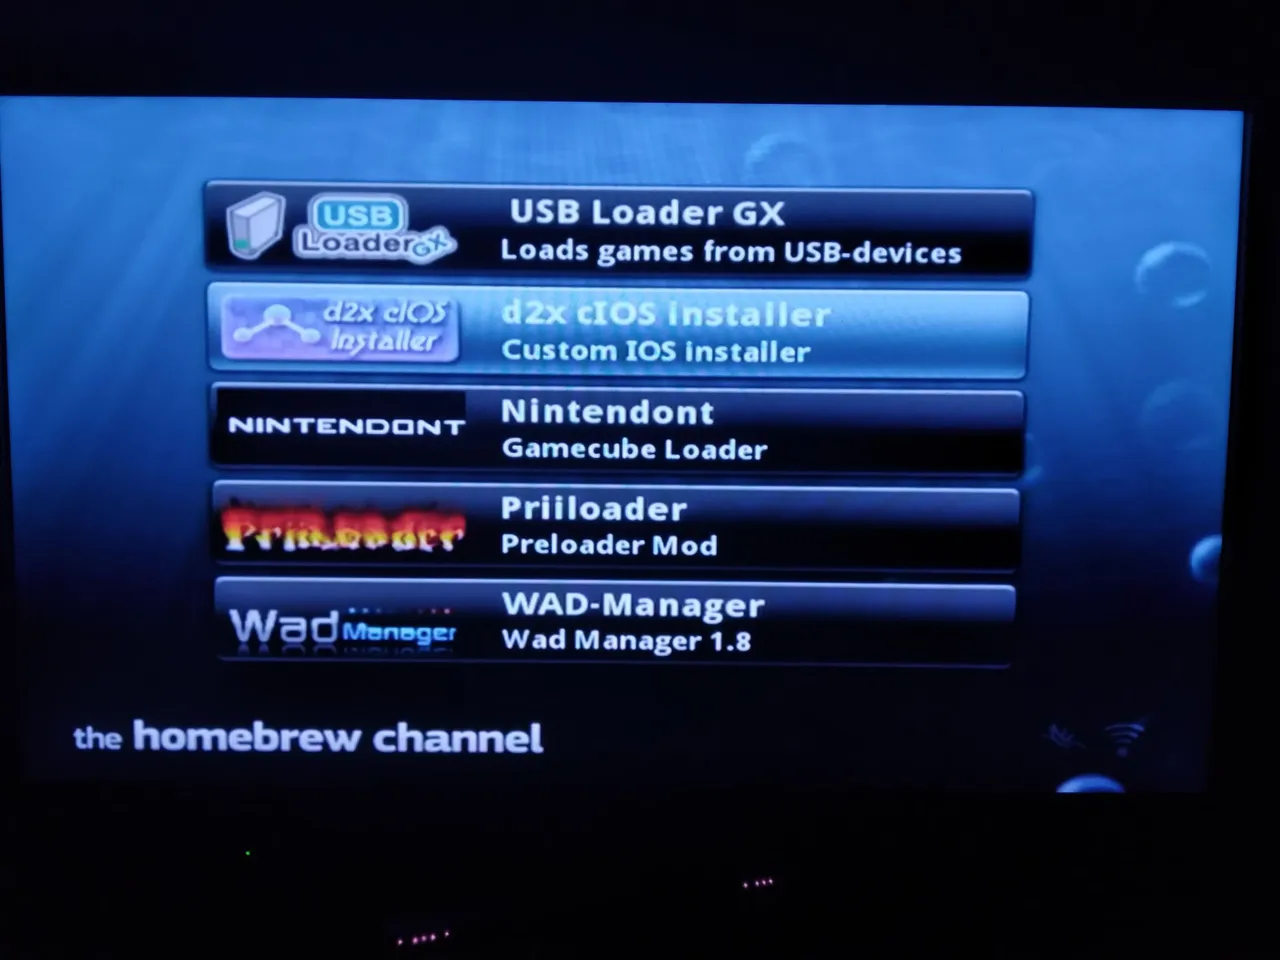
Before continuing with the modification I will talk about two of the programs that are there, First I will talk about "d2x cIOS installer" this program will serve us to install the cIOS that we just installed, but with internet connection, we must connect our console to our wifi network, but this will only use it in case of failure of some of the cIOS installations in the previous program "WAD-Manager", if this is the case, do not hesitate to write me in the comments and I will explain how to use it.
The following program of which I wanted to speak to them is "Nintendont" this is an emulator of the GameCube in which we will be able to play the titles of this console, but in our Wii, for this program I will make another post, since in this one I want to focus on the games of the own Wii.
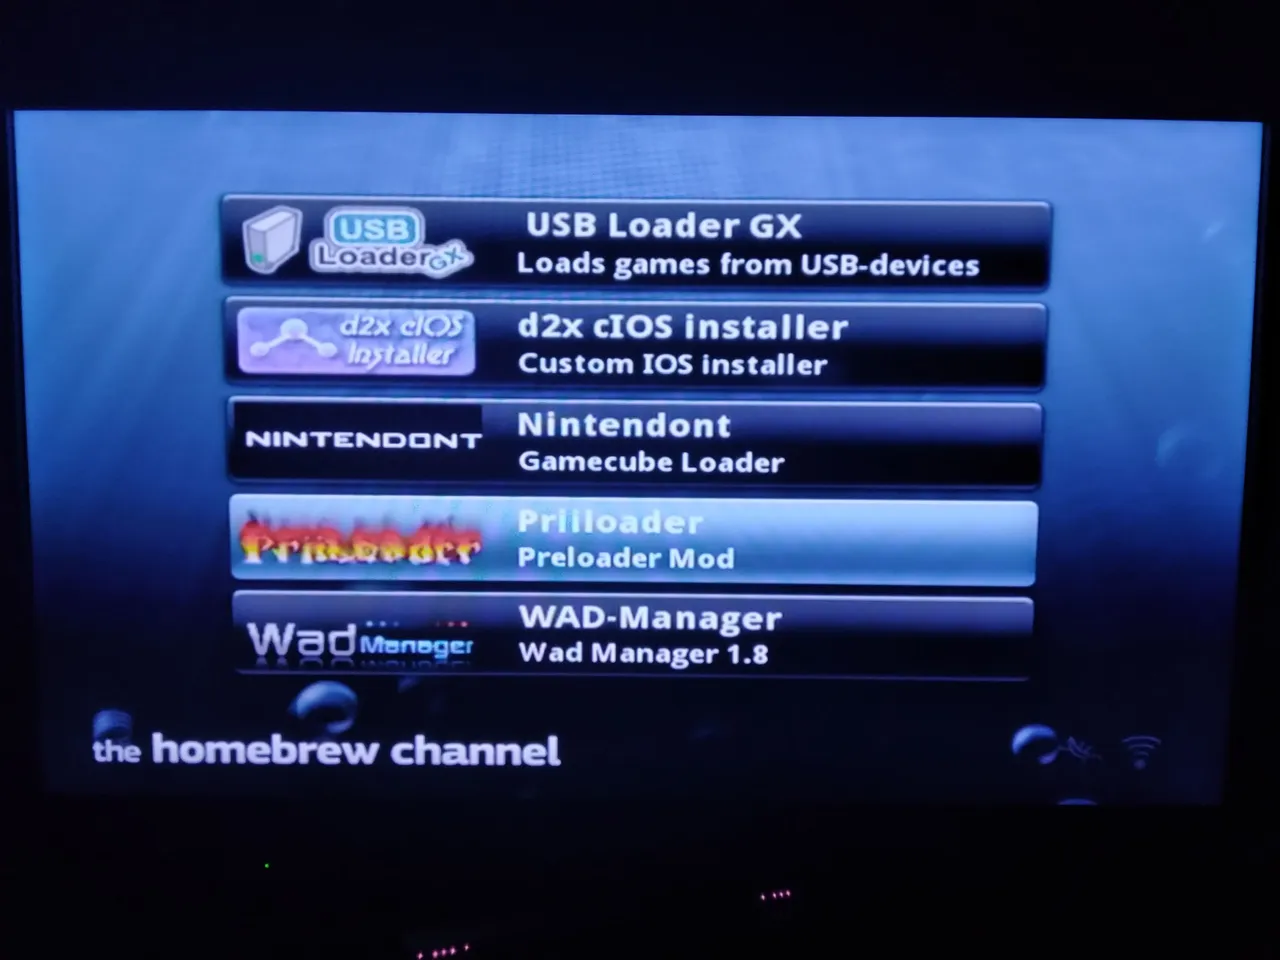
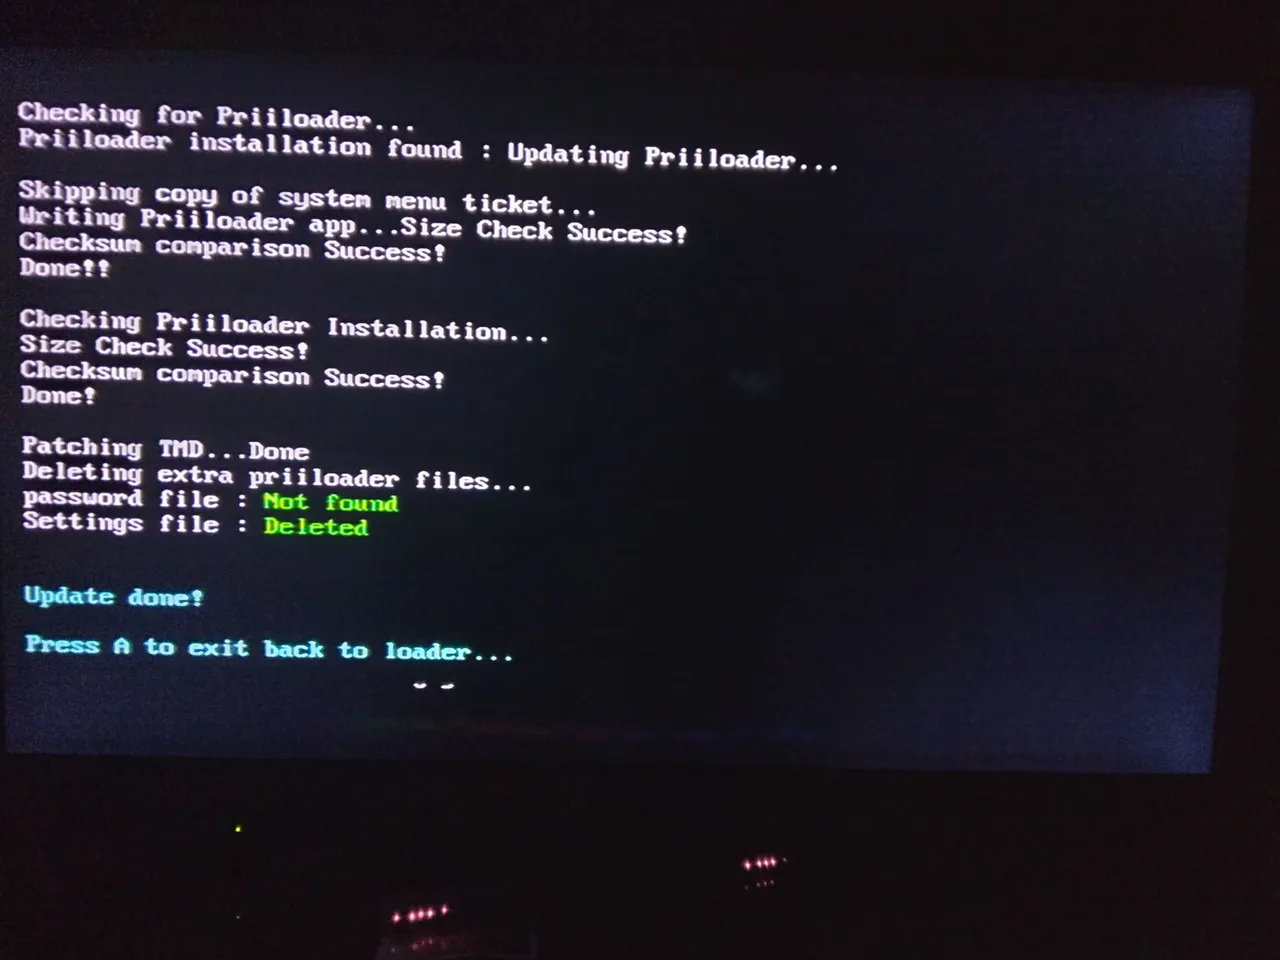
To continue with the modification, we will go to the application "Priiloader" this will serve us to modify some options of our console, when we select the application and give in load, it will take us to a menu where we will have to wait a moment to load, and then press the + button of our controller to start the installation of Priiloader, there we will wait until the installation finishes and then we will press the A button that will return us to Homebrew Channel.
When we are in the Homebrew Channel menu, we will press the home button and turn off the console, selecting the power off option clearly.
When our console is already off, we will turn it on again, but not as usual, this time we will press the power button of the console and then we will keep pressed the reset button, we will do this to be able to start the Priiloader menu, in case it doesn't work, we will only turn off the console again and then we will try it again.
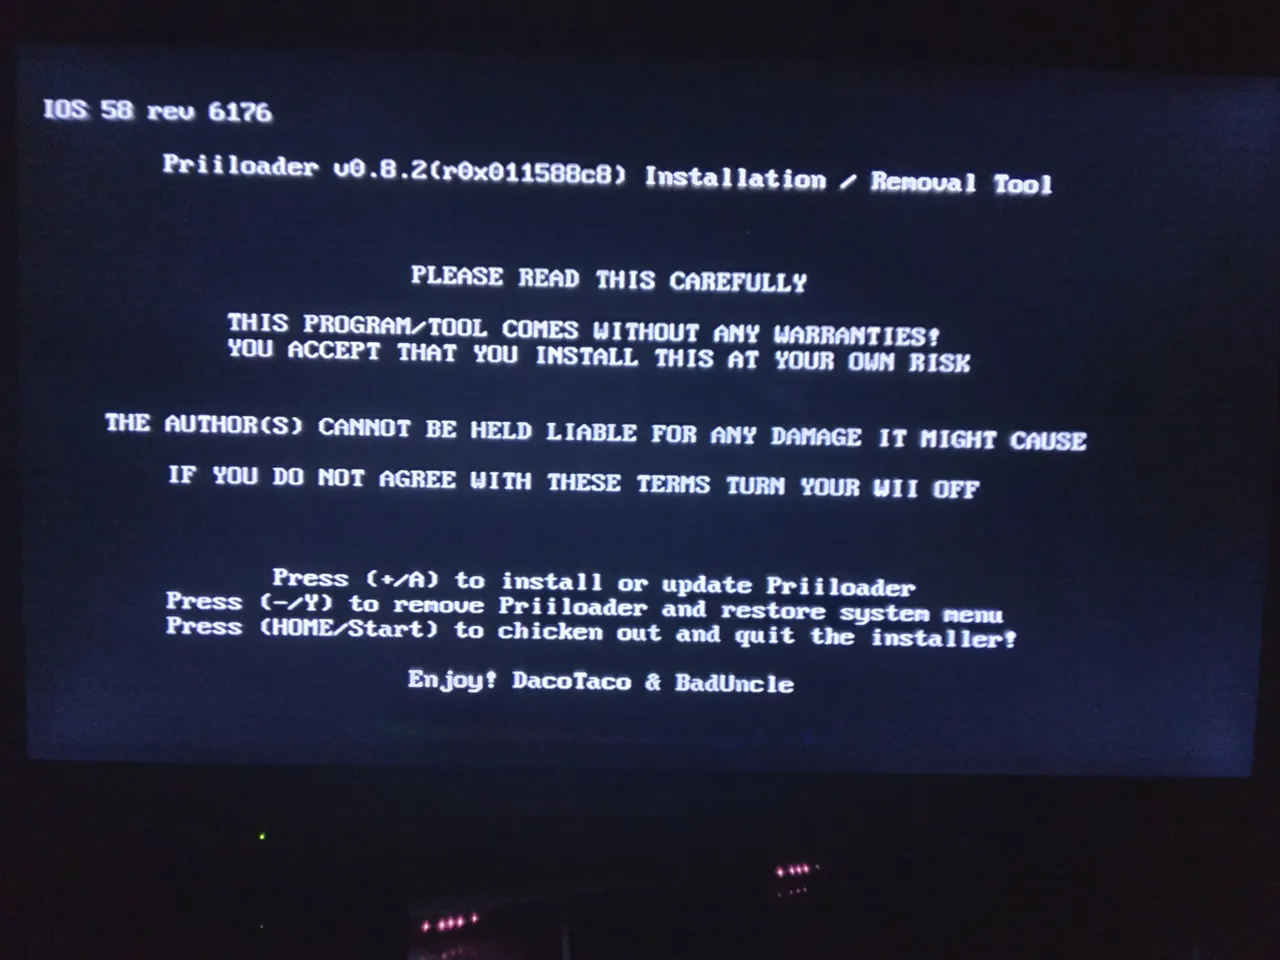
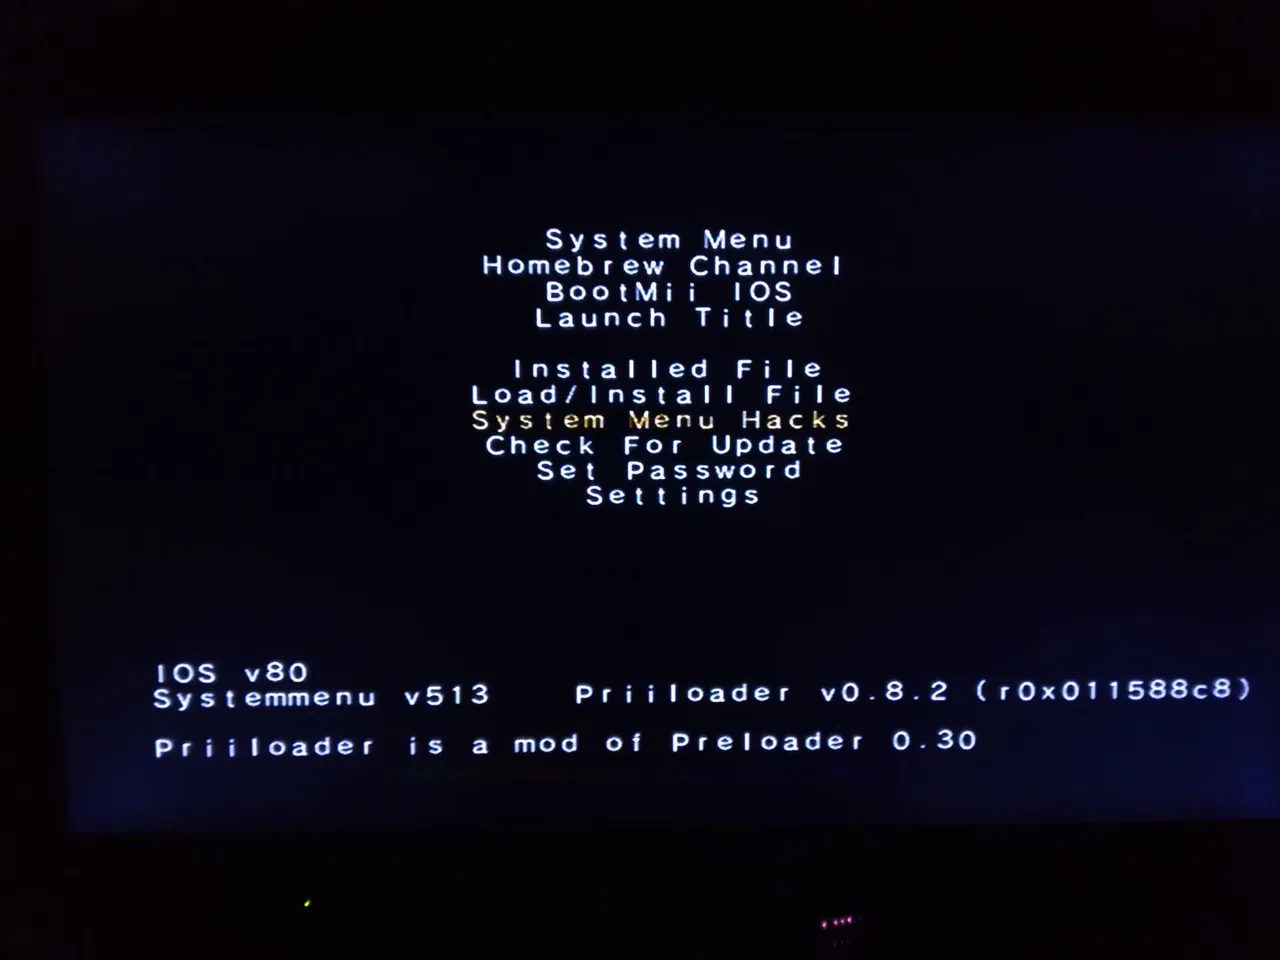
When we start the Priiloader menu, we will move between the options with the control in vertical, using the dates and the A button, we will go down until the seventh option named System Menu Hacks and we will select it with the A button, here we will see a menu with some options that we will have to enable to avoid having errors in our console and to be able to play games of other regions.
We will be able to see that all the options are deactivated, all are marked with "disabled", we will activate only those that say "Region free", we will only be able to go over the options and we will press the button A to activate them, we will see that it will be marked with "Enabled".
When we have already activated all the options that begin with "Region free" we will go down to the last option to save the changes, this one says "Save settings", when we select it, we will have to wait until it says "Settings saved", then we will press the button B to return to the main menu, where we will select the second option that will take us to Man Channel, where we will have to press home, to then leave to the main menu of the Wii, this will make that the console restarts to us to apply the changes that we made, once restarted, we will turn off the console to make our following step in our computer.
The next thing we will do will be to move the games that we download to a USB memory or hard disk.
We will have to format this memory in the Fat32 format as we did with the SD card, but, as normally these USB memories or hard disks will have a much larger memory, leave them in the files a folder called Fat32, they will have a .zip file that we will unzip and it will leave us a program to force the Fat32 format for that type of USB memories or hard disks.
To use the program to force the Fat32 is very simple, we will only open it and once inside we select the USB memory or hard disk, it is always marked with a letter, in my case it is the letter G, checks which is the letter of your USB memory or hard disk, you select it, press "Start" and when it finishes the load it will already be formatted in Fat32.
After having formatted our USB memory or hard disk, we will occupy the following in the files, this is in the folder called "WBFS - Wii backup" there we will find two .exe files, one for 32 bits computers and another for 64 bits computers, you must open the one that matches your computer.
First we should have a downloaded game, I usually download them in https://akamigames.net/, in this page you will find many games, when you download one, this will come in one or more .zip files that we have to extract to leave us the game file, this will be .Wfbs.
Once we already have the game file, we will use the application that we open, this is very simple, we will locate in the section of "Unit 1" and there we will select our USB memory or hard disk in the "inactive" section, you will get a message where it will tell you that the unit is valid, but it does not have a Wbfs directory, you will only have to select "yes", I do not get this because I already had some games installed, once selected our USB memory or hard disk, we will go to the section of "Files", being there we will select in "Add" and we will look for the file . Wbfs file of the game that we downloaded, when we load, the following step will be, to select the section of "to transfer" and we will select the unit 1 where our USB memory or hard disk is selected, when it finishes the load, we will have already passed the game and the USB memory or hard disk will already be ready and with the game to connect it to our Wii.
We will turn on again our console, what we will do now will be to install the channel that will let us to start the games that we have in the USB memory or hard disk of Wii.
When starting the console, we will enter in Homebrew Channel and we will use the program "WAD-manager" once again, when starting Wad-manager, we will make the same process that the previous time that we used it, in the first menu we press A, then we select the SD card and when the folders appear, this time we will enter in which says "wad Channel", when entering to this folder, two more folders will appear, one of them is "Nintendont" which is the program that I will talk about in another post, and the second folder called "USB Loader Gx Ultimate Wiimfii" this is the channel that we must install to start playing our Wii games, select it and we will get the file to install with the same process as the previous time we used Wad-manager, just select it and then press the A button and start the installation.
When the installation is finished, we will press any button, then we will press B so that it takes us to choose device and being there we will press home.
We will be back in the Homebrew menu, here what we will do is to press home and then exit to the system menu.
When we are in the menu of the system, we will be able to see that we have a new channel, this will be the one in which we will have to enter every time that we want to play to the video games of the Wii.
It is not long to be able to begin to enjoy those old and very nostalgic games of the Wii, but before entering the new channel, we will have to go to the configurations of our Wii and to connect to our network of Internet, this will not be obligatory, it will only serve us to unload the covers of the games in the new channel, although in the same way you can put the games of a form in which you do not need to unload the cover so that they are pretty, later I will show you like.
If you want to skip this step, you can.
Before starting the channel, we will verify that our USB memory or hard disk is well connected to the console to avoid any inconvenience.
Now it is time to start our new Usb Loader Gx channel, when we start the channel, it will start a recognition of our USB memory or hard disk and a file load, then the program will start.
In the main menu of usb loadre gx, it is possible that nothing or several applications will appear, but we only want to see the Wii games, therefore, we will press the icon of the superior bar that is marked with the silhouette of the channels of the Wii, when we select it, we will only leave checked the box of "Wii Games" and our games will appear.
When the games already appear to us, we will be able to unload their covers placing the pointer on the game that you want and then pressing A in the empty cover of the game.
But for those that did not activate the Internet in the console, we will only select in the icon that has several channels of Wii, this is in the superior bar, when selecting them it will put us another type of visualization of the games and we will see them with the GIFs that they bring by themselves.
Before starting any game, we must configure it. This is very important, above each game cover, we will see the region of the game, the games that say "PAL" are European games and the games that say "NTSC" are American games, knowing this, when we get into a game that says "PAL" we will go to configuration, then to game configuration there we will look for first the option that says "Video Mode" and we will change it to Force NTSC, this we will do it to avoid some visual problems that are produced when starting a European game in an American Wii, followed to this we will lower until the option that says "IOS of the game" and when we select them, it will open a numerical panel, here we will place the number 249, this will be to avoid problems that usually happen when we started the game.
For the "PAl" games we can use the number I already indicated, but if you still have a problem, you will have to change that number again, and try with 250 and 251, one of those should work for you.
For the "NTSC" games we will also have to configure them, except for the "Video Mode" part, but for the "Game IOS" section we will have to set the numbers 224, 225 or 226.
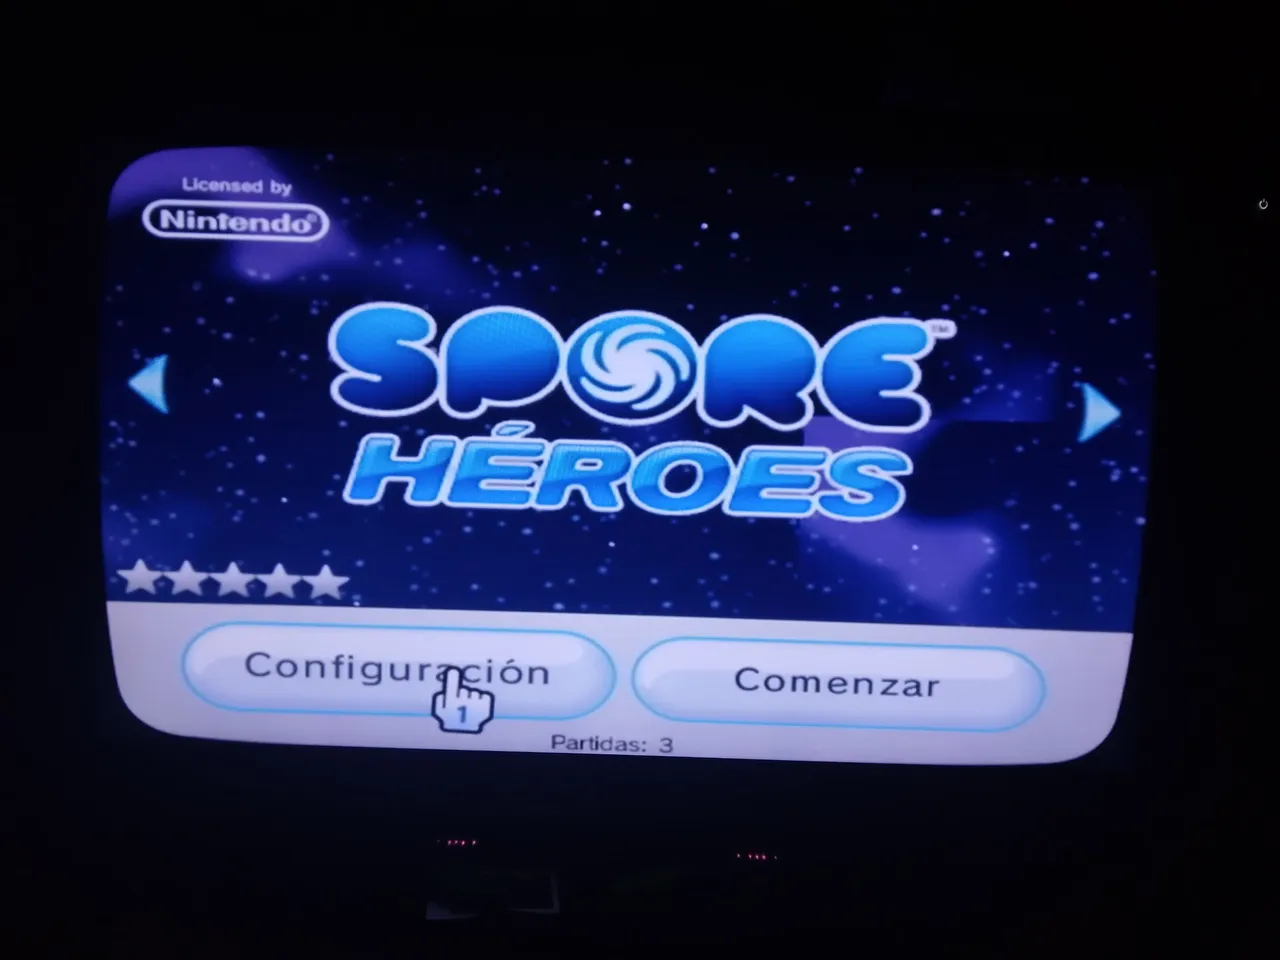
And ready we will be able to play all the games that we want in our Wii, as you can see I had already gone ahead and downloaded a few games that I wanted to remember and others that I wanted to try.
For the next Wii post, I will be showing you how to play GameCube games and maybe I will make a top of the games of this console after I can try a few more games.
So, I hope you liked it and that's it for this post.