La Barbie de Miranda
Buenos días mis apreciados amigos tejedores, crocheteros, creativos, manualistas y a toda esta hermosa comunidad que ama las cosas lindas.
Después de un fin de semana intenso, he decidido relajarme un poco y no hay una mejor terapia para relajarme que agarrar mi cesta de hilos y agujas e iniciar un nuevo proyecto. Desde hace días he mirado las muñecas de mis amiguitas Miranda y Amanda, son unas barbies preciosas pero ya su ropa estaba muy deteriorada, así que he pensado en que le podía tal vez coser algo en la maquina con algunos de los retazos que tengo por ahí guardados.
Pero resulta y acontece que buscando en internet he conseguido unos modelos de vestidos bellísimos para las muñecas tejidos en crochet, no saben la cantidad de cosas lindas que existen, tal vez siempre han estado ahí, pero es hasta ahora que me he percatado de ello.

La muñeca preparada para servir de modelo
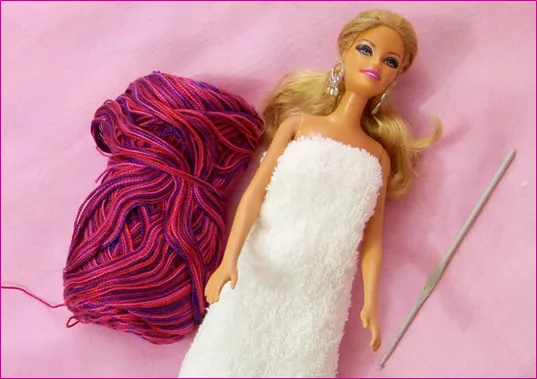
No saben cómo me ha hecho reír mi hijo Israel cuando me vio pidiendo prestada la muñeca y acomodándola para que quedara linda para la foto, me ha dicho "Mamá, y a usted ahora le dio por jugar a las muñecas tan vieja" de verdad que me causó mucha gracias la manera como lo dijo, ellos poco se meten en mis cosas pero le tuvo que llamar demasiado la atención lo que yo estaba haciendo que no se aguantó.

Instrucciones
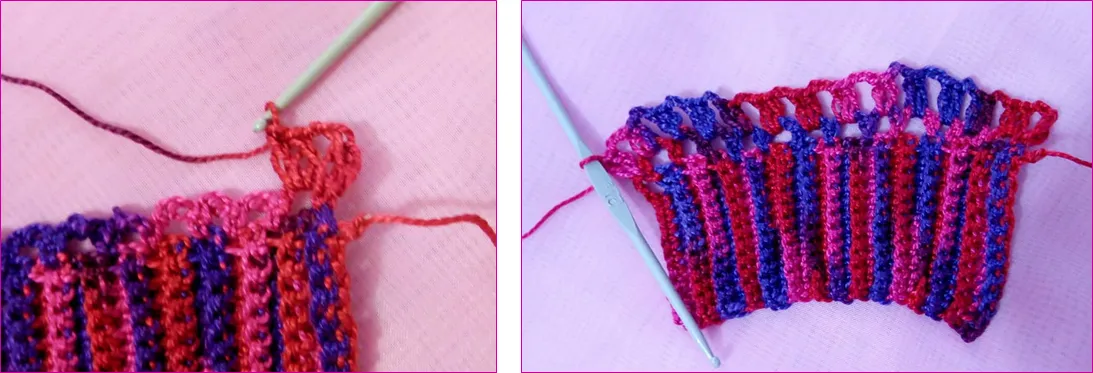
Lo primero que vamos a elaborar es el corsé del vestido, para ello vamos a tejer 12+1 cadenetas, luego nos metemos con un punto bajo en la cadeneta número 12 y a partir de allí elaboramos solo puntos bajos hasta terminar esa vuelta, solo que vamos a meternos siempre en la hebra de atrás. Seguimos cada vuelta levantando una cadeneta y continuando con puntos bajos, así hasta obtener 26 vueltas en total. Para la vuelta numero 27 tejemos 3 cadenetas y ensartamos con punto bajo normal saltando un punto de base. Continuamos con puntos bajos normales, es decir tomando las dos hebras, así hasta llegar al antepenúltimo punto donde tejemos 3 cadenetas y ensartamos en el último punto de base. Con este proceso estaríamos elaborando los ojales al vestido.
Continuamos ahora para elaborar la falda, para eso tejemos 4 cadenetas y vamos a ensartar sobre los puntos que se notan abultados o que sobresalen. Repetimos este paso hasta terminar la vuelta.
Tejemos dos puntos altos en toda la orilla del vestido, luego dos cadenetas y dos puntos altos dentro del aro de la vuelta anterior, nuevamente dos cadenetas y dos puntos altos dentro del aro, repetimos hasta terminar la vuelta, en la orilla debes realizar los dos puntos altos tal cual como lo hicimos al inicio.
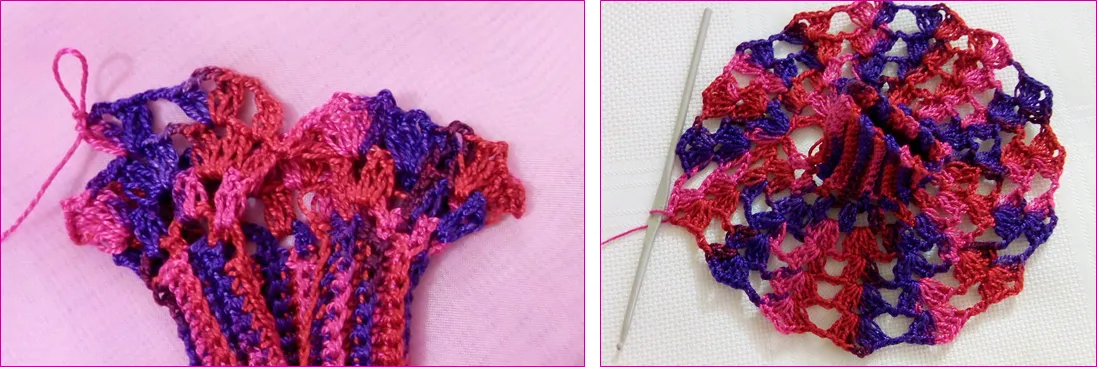
- Levantamos dos puntos altos dos cadenetas y un abanico (dos puntos altos, dos cadenetas y dos puntos altos) dentro del espacio de la vuelta anterior, repetimos dos cadenetas y nuevamente un abanico en el espacio del vuelta anterior, así continuamos hasta llegar a la orilla donde vamos a tejer dos puntos altos que vamos a unir con un punto deslizado con la otra orilla del vestido, a partir de allí vamos a trabajar en círculo. Repetimos 3 vueltas más de abanicos.

Ahora le vamos aumentar a los abanicos, es decir 3 puntos altos dos cadenetas y 3 puntos altos, lo demás sigue igual. Hacemos esto por 6 vueltas más.
En las siguientes vueltas aumentamos un punto más a los abanicos es decir 4 puntos altos, dos cadenetas y dos puntos altos. hacemos esto hasta que obtenemos el largo deseado del vestido. En la orilla para terminar puedes hacerle un punto decorativo.
Yo hice un fondo armador estilo tu-tu con diopobelo, pero ustedes lo pueden hacer como mejor les guste.

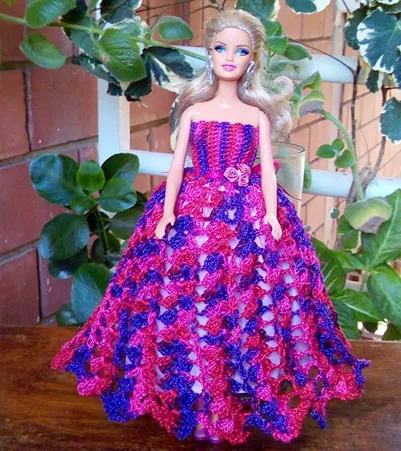
Resultado final

En internet puedes conseguir muchos modelos y en YouTube te dan muchos tutoriales, la idea es alegrar el corazón de las niñas en esta cuarentena y que tengan cosas nuevas en que entretenerse y divertirse.
Ahora que tenemos mucho tiempo libre podemos ocupar un rato en incentivar en las niñas la creatividad.
Espero que les haya gustado y prometo que pronto les estaré regalando otro tutorial donde les mostraré el vestido de la muñeca de Amanda.
QUÉDATE EN CASA


Miranda's Barbie
Good morning my dear weaver, crochet maker, creative, handcrafting friends and to all this beautiful community that loves beautiful things.
After an intense weekend, I have decided to relax a little bit and there is no better therapy to relax than grabbing my basket of threads and needles and starting a new project. For days now I've been looking at the dolls of my friends Miranda and Amanda, they are beautiful barbies but their clothes were already very deteriorated, so I thought that maybe I could sew something on the machine with some of the pieces I have in store.
But it turns out that searching on the internet I have found some beautiful dresses for the dolls crocheted, they do not know the amount of beautiful things that exist, maybe they have always been there, but it is until now that I have noticed it.

Doll ready to model

You know how my son Israel made me laugh when he saw me borrowing the doll and arranging it so that it would look nice for the picture, he said to me "Mom, and now you're playing with dolls so old".

Instructions

The first thing we are going to elaborate is the corset of the dress, for it we are going to knit 12+1 chains, then we get in with a low stitch in the chain number 12 and from there we elaborate only low stitches until finishing that turn, only that we are going to get in always in the back thread. We continue each lap lifting a chain and continuing with low points, so we get 26 laps in total. For lap number 27 we weave 3 chains and thread with normal low stitch jumping a base stitch. We continue with normal low stitches, taking both strands, until we get to the second last stitch where we weave 3 chains and stitch on the last base stitch. With this process we would be making the buttonholes to the dress.
We continue now to elaborate the skirt, for that we weave 4 chains and we are going to thread on the stitches that are noticed bulging or that stand out. We repeat this step until we finish the turn.
Let's knit two high stitches along the edge of the dress, then two chains and two high stitches inside the hoop of the previous lap, again two chains and two high stitches inside the hoop, we repeat until finishing the lap, on the edge you must make the two high stitches as we did at the beginning.

- We raise two high stitches, two chains and a fan (two high stitches, two chains and two high stitches) within the space of the previous turn, we repeat two chains and again a fan in the space of the previous turn, so we continue until we reach the edge where we are going to knit two high stitches that we are going to join with a slipped stitch with the other edge of the dress, from there we are going to work in a circle. We repeat 3 more turns of fans.

Now we are going to increase the fans, that is 3 high points two chains and 3 high points, the rest remains the same. We do this for 6 more laps.
In the following rounds we increase the number of fans by one more point, that is to say 4 high points, two chains and two high points. We do this until we get the desired length of the dress. At the end you can make a decorative stitch.
I made a tu-tu style backdrop with a diopopelo, but you can do it however you like.

Final result

On the internet you can get many models and on YouTube they give you many tutorials, the idea is to cheer up the hearts of the girls in this quarantine and that they have new things to entertain and have fun.
Now that we have a lot of free time we can spend some time encouraging the girls to be creative.
I hope you liked it and I promise that soon I will be giving you another tutorial where I will show you Amanda's doll dress.
Stay at home
