Ruleset Focus

In this edition of Battle Mage Secrets, I will dive into the intricacies of the TARGET PRACTICE ruleset. This ruleset equips all Ranged and Magic attack Monsters with the SNIPE ability, enabling them to target enemy Monsters with Ranged, Magic, or no attack that are not in the first position. Personally, I find this ruleset particularly engaging, as it introduces dynamic gameplay with a variety of strategies coming into play! 😉

Abilities Focus
TARGET PRACTICE ruleset, allowing you to create chaos in your opponent's backline using the SNIPE ability. Alternatively, you can strategically counter the SNIPE ability of your opponent by incorporating some "traps" into your lineup!


(using the same hit/miss calculation as for Melee and Ranged attacks)

The Battle
In my alt account, jimbei, I was able to engage in a battle that involves the TARGET PRACTICE ruleset. To get right into the action, the battle link can be found here. Otherwise, do read on as I go into more detail regarding the lineup and fight.

Let's begin by by examining the rulesets dictating this battle. To kick things off, we have the Return Fire ruleset, enabling Monsters to counter with reduced damage when struck by a Ranged attack. Following closely is the main highlight of this week's challenge, the TARGET PRACTICE ruleset, which we've thoroughly discussed in the preceding section. Lastly, there's the Weak Magic ruleset, where Magic attacks hit the Armor before affecting a Monster's Health. With a mana cap set at 48, this battle also enforces restrictions on the use of the Death and Dragon Splinters.

Summoner, Kelya Frendul
Choosing the Water Splinter in light of the available Splinter options and the current rulesets governing the battle is a practical and strategic decision. The Water Splinter offers a versatile lineup of Monsters that are well-suited for success in this particular battle compared to other Splinters. The added benefits of +1 Speed and Armor buffs from Kelya Frendul are sure to significantly impact the dynamics of the battle! 😄
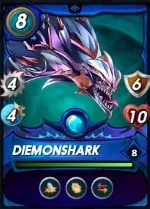
First Position, Diemonshark
Diemonshark proves to be an excellent choice as a tank within the Water Splinter, especially given the dynamics of the TARGET PRACTICE ruleset. With this ruleset in play, concerns about early-game destruction by Magic Monsters, which can bypass heavily armored units like Diemonshark, are alleviated. Additionally, Diemonshark's possession of the Retaliate ability allows it the opportunity to counter-attack when faced with Melee assaults, empowering it to strike back at its assailant with strength 💪
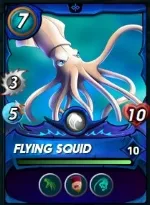
Second Position, Flying Squid
I strategically positioned the Flying Squid in the second slot to optimize its Reach ability, allowing it to launch effective attacks from that position. Even if the Diemonshark were to be eliminated, the Flying Squid could then move to the first position and serve as a dependable tank. Furthermore, its Backfire ability inflicts 2 damage on attackers who miss the Flying Squid, and the Blind ability increases the likelihood of enemies missing their intended targets 😝
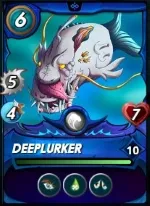
Third Position, Deeplurker
Integrating the Deeplurker into my roster when utilizing the Water Splinter is almost a brainless choice. This creature boasts significant power, thanks to its Opportunity ability, swiftly eliminating the opponent's most vulnerable target. Additionally, the Deeplurker can apply Poison to its target. Alongside its impressive offensive capabilities, it also features the Demoralize ability, imposing a -1 Melee attack debuff on the opposing team 😎
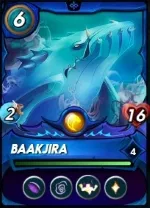
Fourth Position, Baakjira
Baakjira stands out as the optimal choice for the tanking role, and in this specific battle, I've strategically positioned it as my primary tank to counter all the SNIPING Monsters, taking advantage of the TARGET PRACTICE ruleset. This sets the stage for a favorable scenario for my Melee-focused attackers in the lineup. Additionally, Baakjira's Void ability proves crucial in mitigating incoming Magic damages which are more prevalent in this battle with the Return Fire ruleset, and its Healing capability further solidifies its resilience! 😇
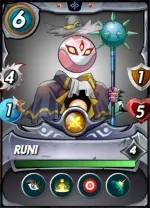
Fifth Position, Runi
As previously highlighted, the Blast ability synergizes well with the TARGET PRACTICE ruleset, prompting me to strategically position Runi alongside Baakjira in anticipation of potential exploitation of this synergy by the opponent. With Runi's Reflective Shield ability, any Blast damages spilling after hitting Baakjira would be nullified. Additionally, Runi's Opportunity ability allows it to efficiently launch attacks from the backline! ✌️
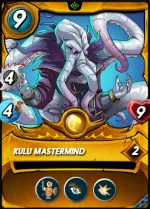
Last Position, Kulu Mastermind
Kulu Mastermind stands out as one of my favorite Soulbound Reward Cards, significantly enhancing the capabilities of the Water Splinter. This Water Monster boasts a balanced set of statistics that is typical of a Water Splinter's Monster. Strategically placing Kulu Mastermind in the last position enables me to capitalize on its Shield ability, reducing the impact of Sneaking Melee Monsters. Simultaneously, its Opportunity ability provides an outlet to bypass enemy tanks and target the more vulnerable rear positions! 😏
The Analysis
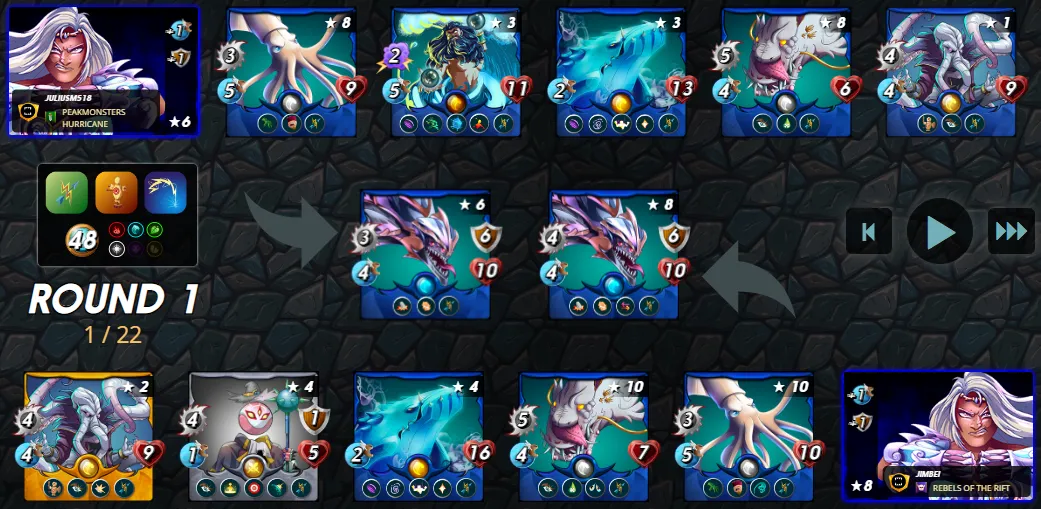
Despite the abundance of Splinters to choose from in this battle, my opponent also decided to go with the Water Splinter, a choice that I mentioned earlier on that aligns with the versatile and well-balanced lineup it offers.
Our lineups shared similarities, featuring Diemonshark and Flying Squid in the initial positions, followed by "tankers" tailored to resist SNIPING Monsters in the middle, and concluding with Opportunistic Monsters like Deeplurker and Kulu Mastermind in the backline 🤙
The primary distinction lay in the inclusion of Djinn Oshannus in my opponent's lineup compared to my Runi. In this context, Djinn Oshannus couldn't pose a threat to my Baakjira with its Magic attack. Furthermore, the level disparity between our Monsters provided me with a clear advantage, securing a swift victory! 😅
Do you guys have any better recommendations for setting up the team in this particular ruleset? Do share them with me in the below comments 😜

If you made it this far, I sincerely appreciate your time and value your encouragement. Please feel free to leave any comments or suggestions so that we can discuss about other strategies. Thinking about giving Splinterlands a try but haven't signed up yet? Feel free to use my referral link: https://splinterlands.com?ref=ak08, and be sure to reach out to me if you have any questions!
Are you interested in reading some of my future writings? Don't forget to follow me! In the meantime, here are some of my most recent blogs if you'd like to view them:
 |  |
 |  |
All banners, dividers card and battle images used in this article are open source and obtained from the Splinterlands team or made by flauwy. Do check out his link for other amazing designs.