En Español
Hola Hola¡¡
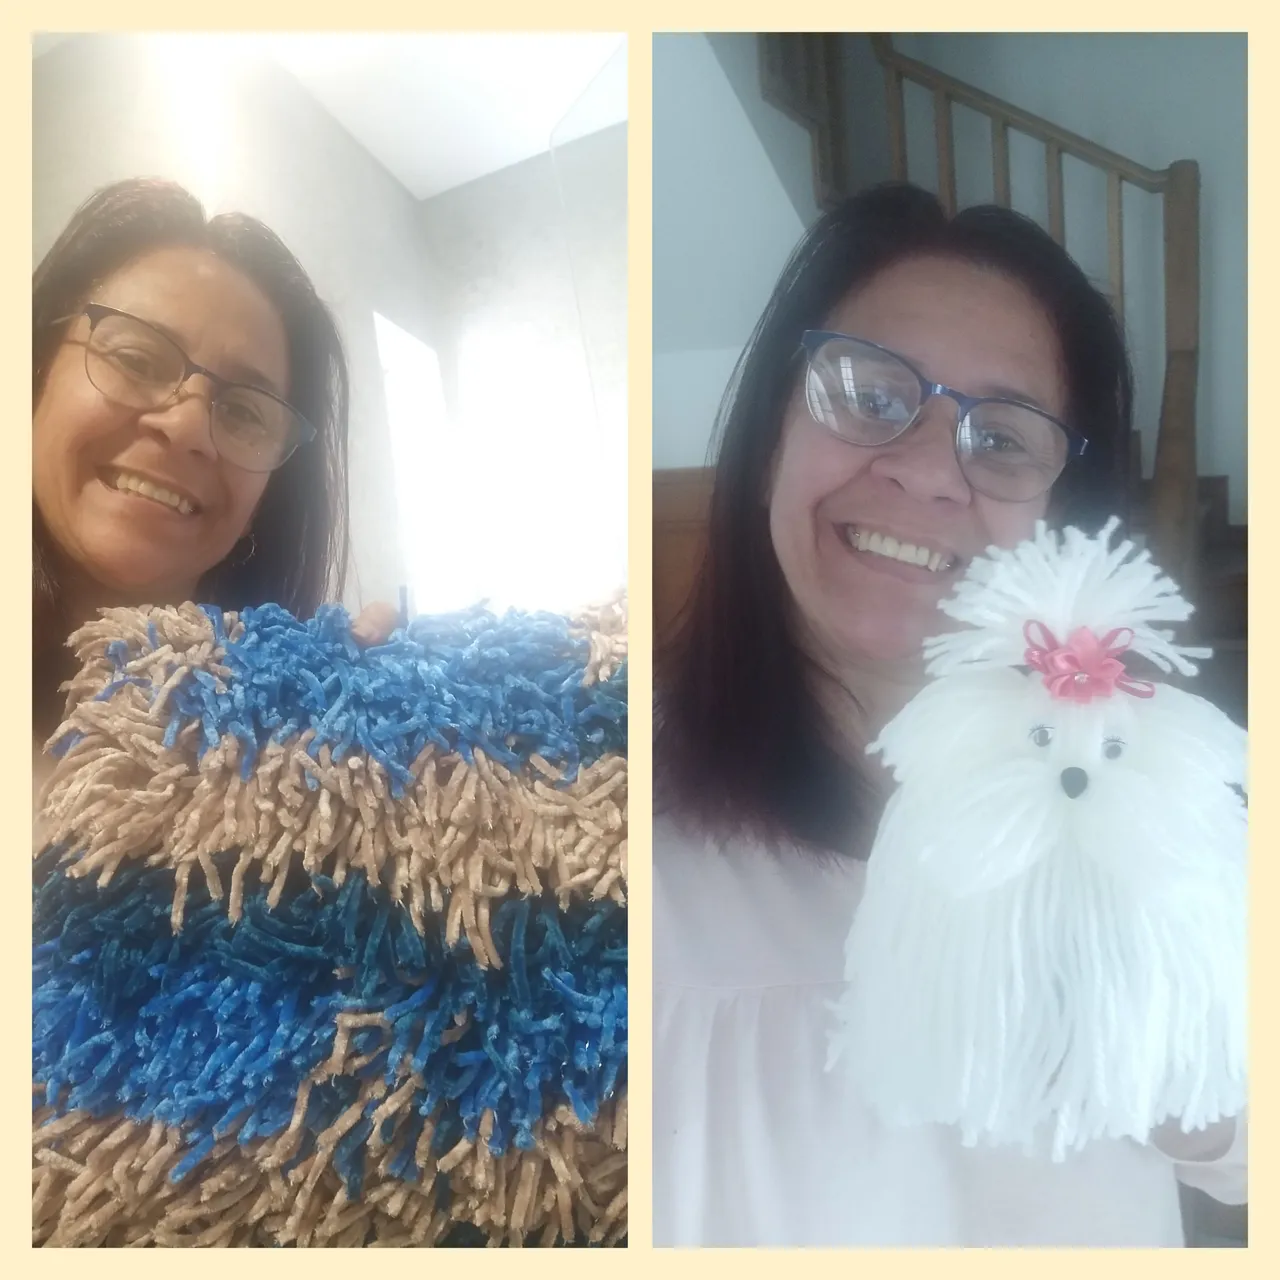
Como están los miembros de ésta gran y hermosa colmena; que tengan una semana con mucho éxitos y principalmente salud. Yo muy feliz al estar en contacto con la naturaleza y realizando mi caminata por la playa. Miles de bendiciones a cada uno de los miembros de las diferentes comunidades.

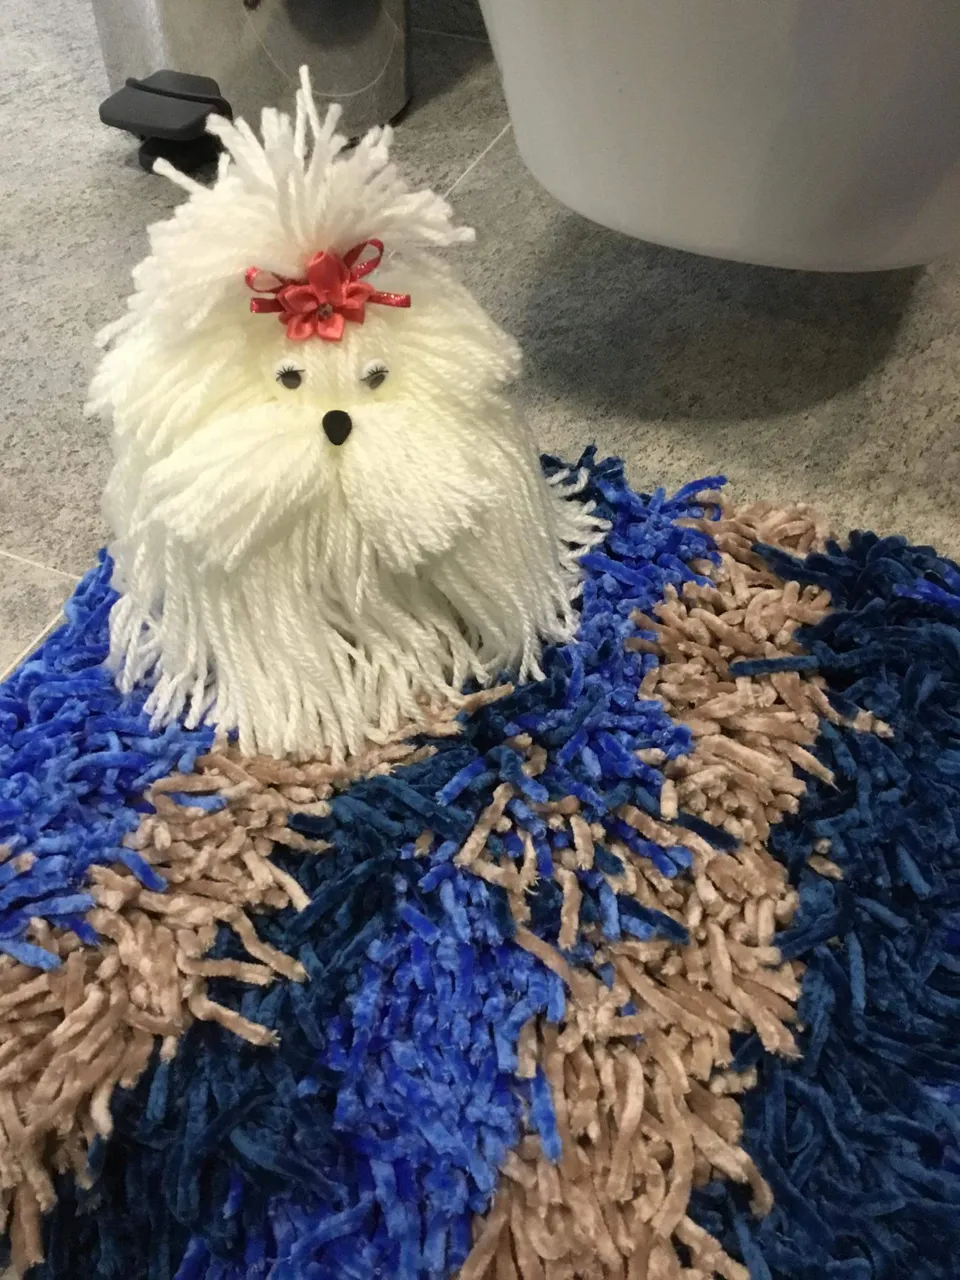
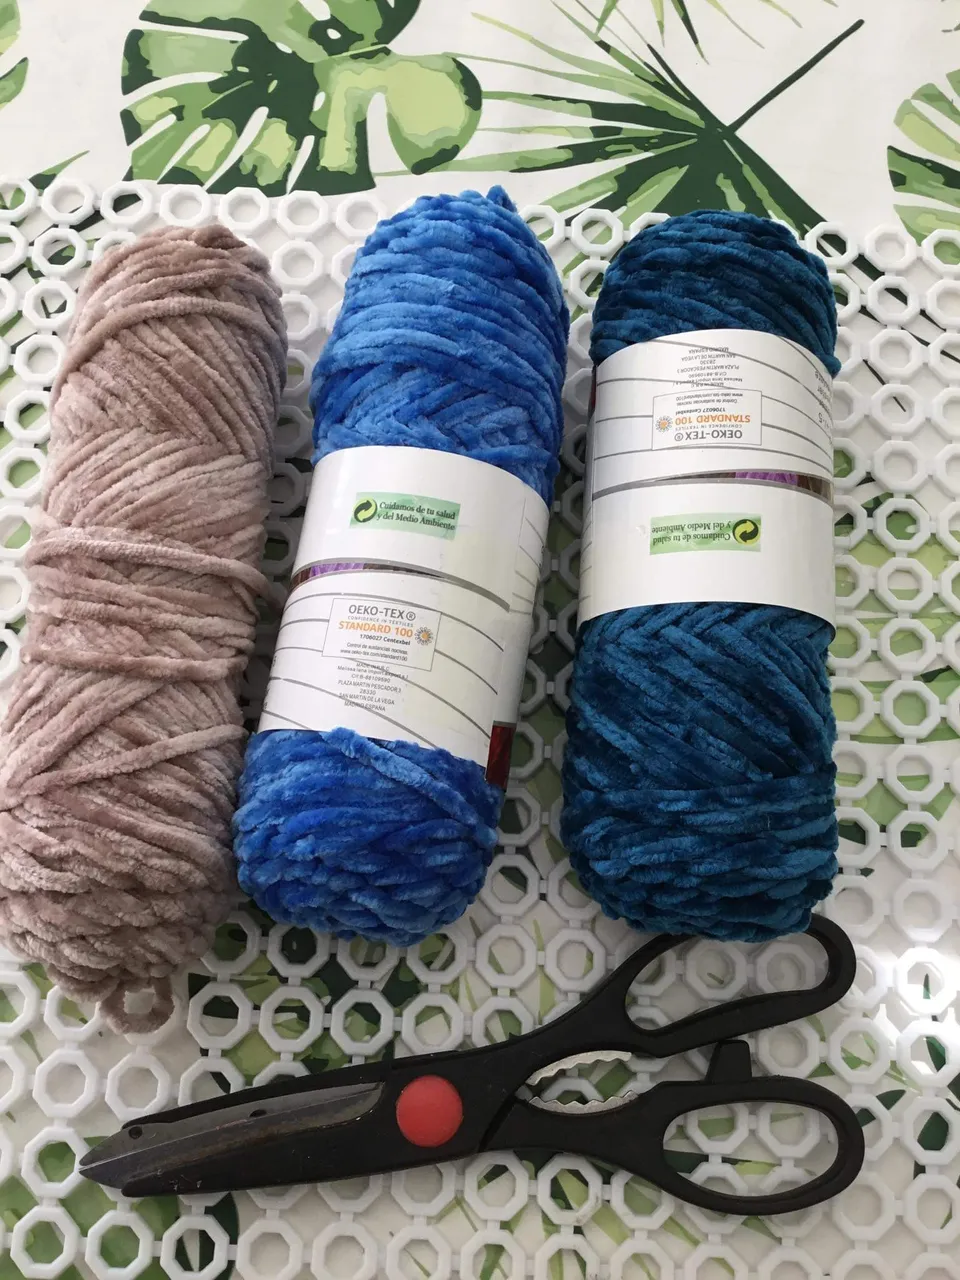
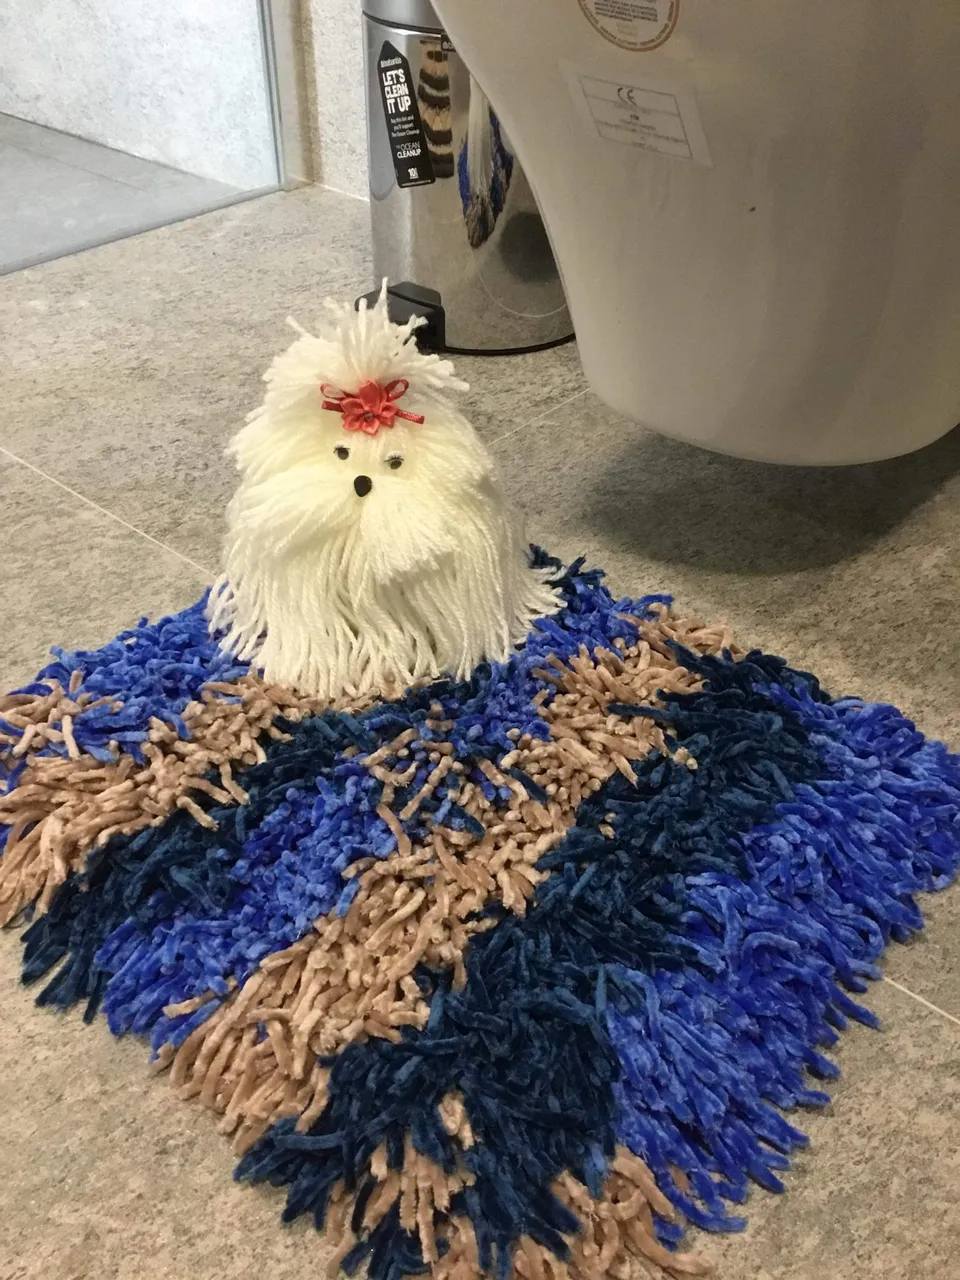
En ésta oportunidad les traigo dos alternativas de como podemos utilizar la lana escolar o de tapicería. Hoy día tenemos la ventaja de conseguir en el mercado infinidades materiales para la decoración o manualidades.Este fin de semana tuve que ir para un comercio chino y vi estás dos diferentes tipo de lanas; las cuales las conseguimos de diferentes colores😍👍. Decidí comprarlas porque las vi muy económicas; y me dije que después decido como usarlas. Hace tiempo estuve viendo un programa en la tv que utilizaron unas tiras de tela y realizaron una alfombra y entonces decidí hacer una y un perrito. Amigos acompañenme en el paso a paso para que vean que hice con los dos tipos de lana.
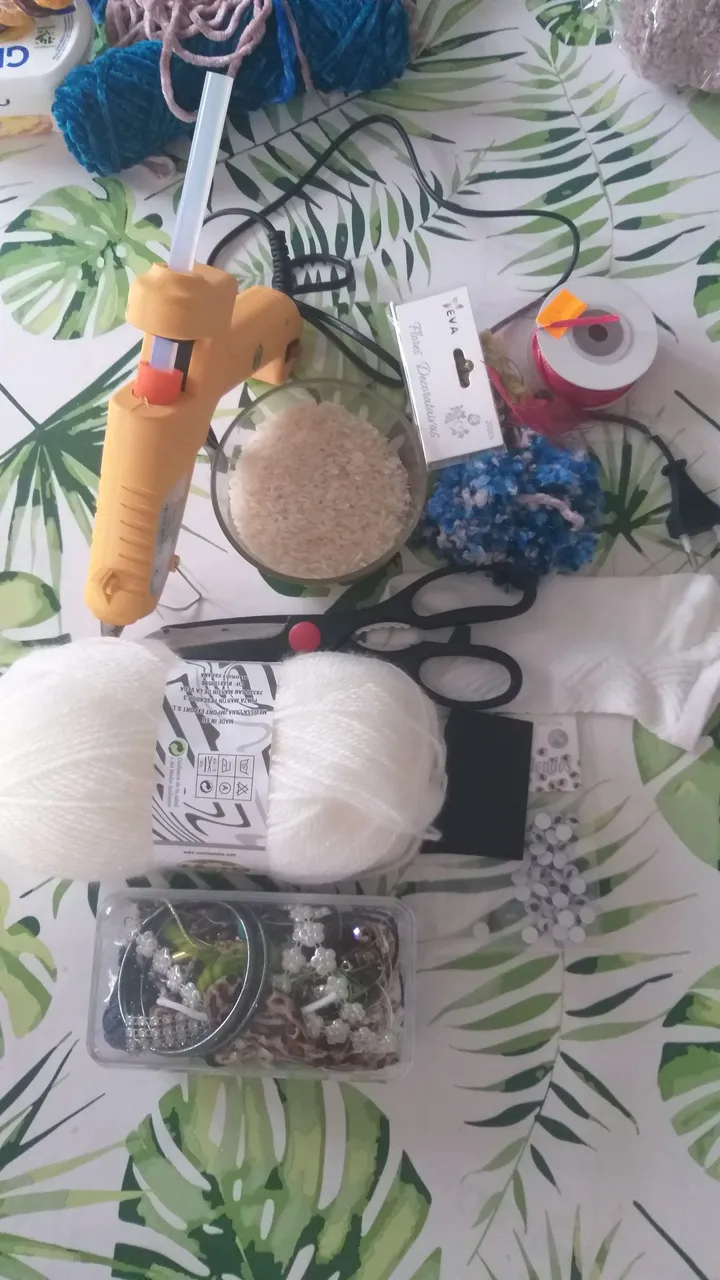
Los materiales a utilizar para realizar el perrito son:
Lana escolar un rollo grande del color de su gusto. Claro debe ser un color que tengan los perros😉
Tijera
Pistola de silicona caliente y barras de silicona
Foami o goma eva de color negro
Ojos móviles pequeños
Cinta de lazo bien fina
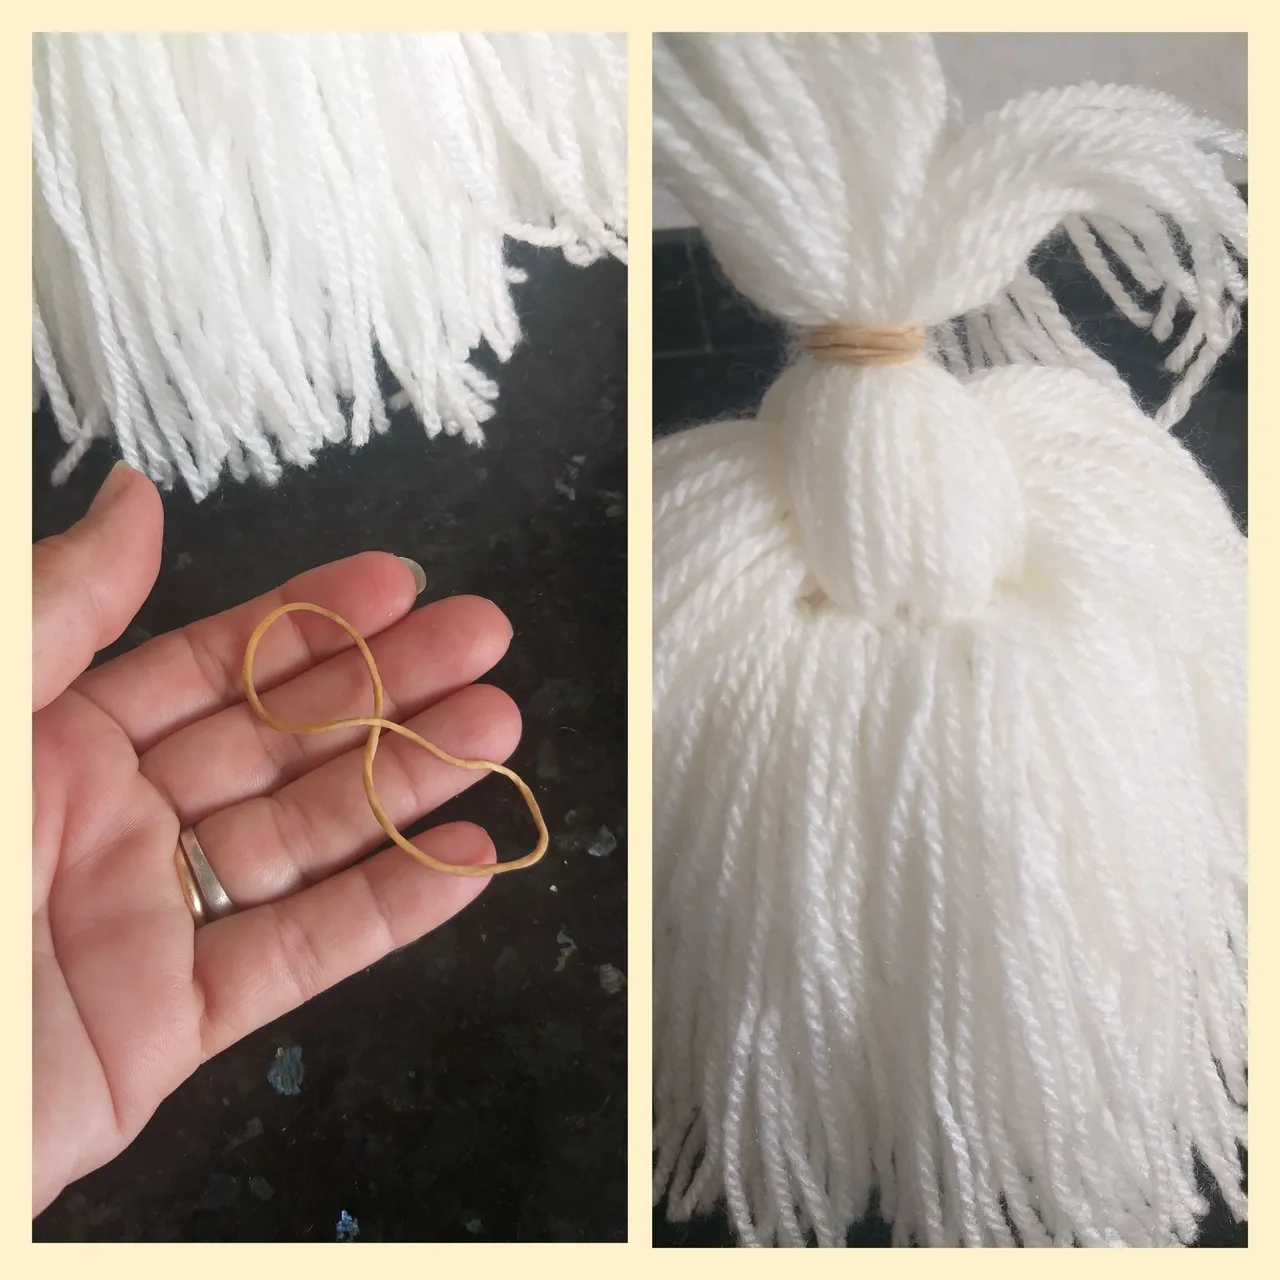
Una liga pequeña
Una media de color blanco
Arroz
Relleno
Aguja y hilo de color blanco
cartón fino
Bolígrafo o lápiz
Cinta métrica o regla
Pasos a seguir para realizar el perrito 🐩##
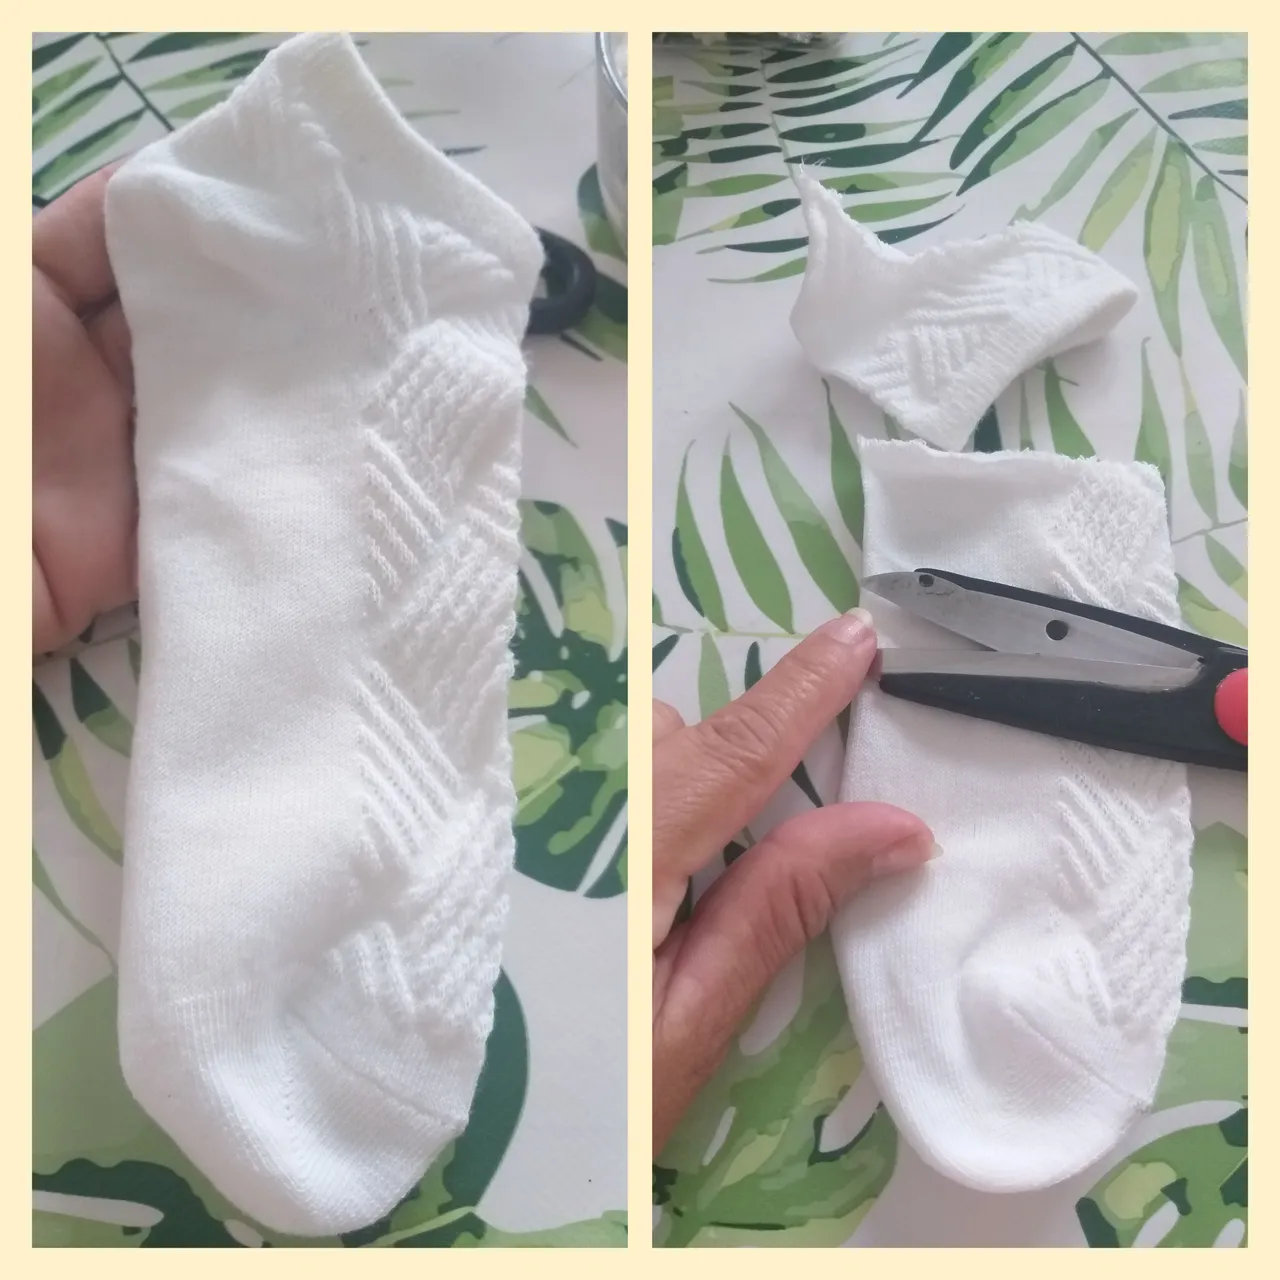
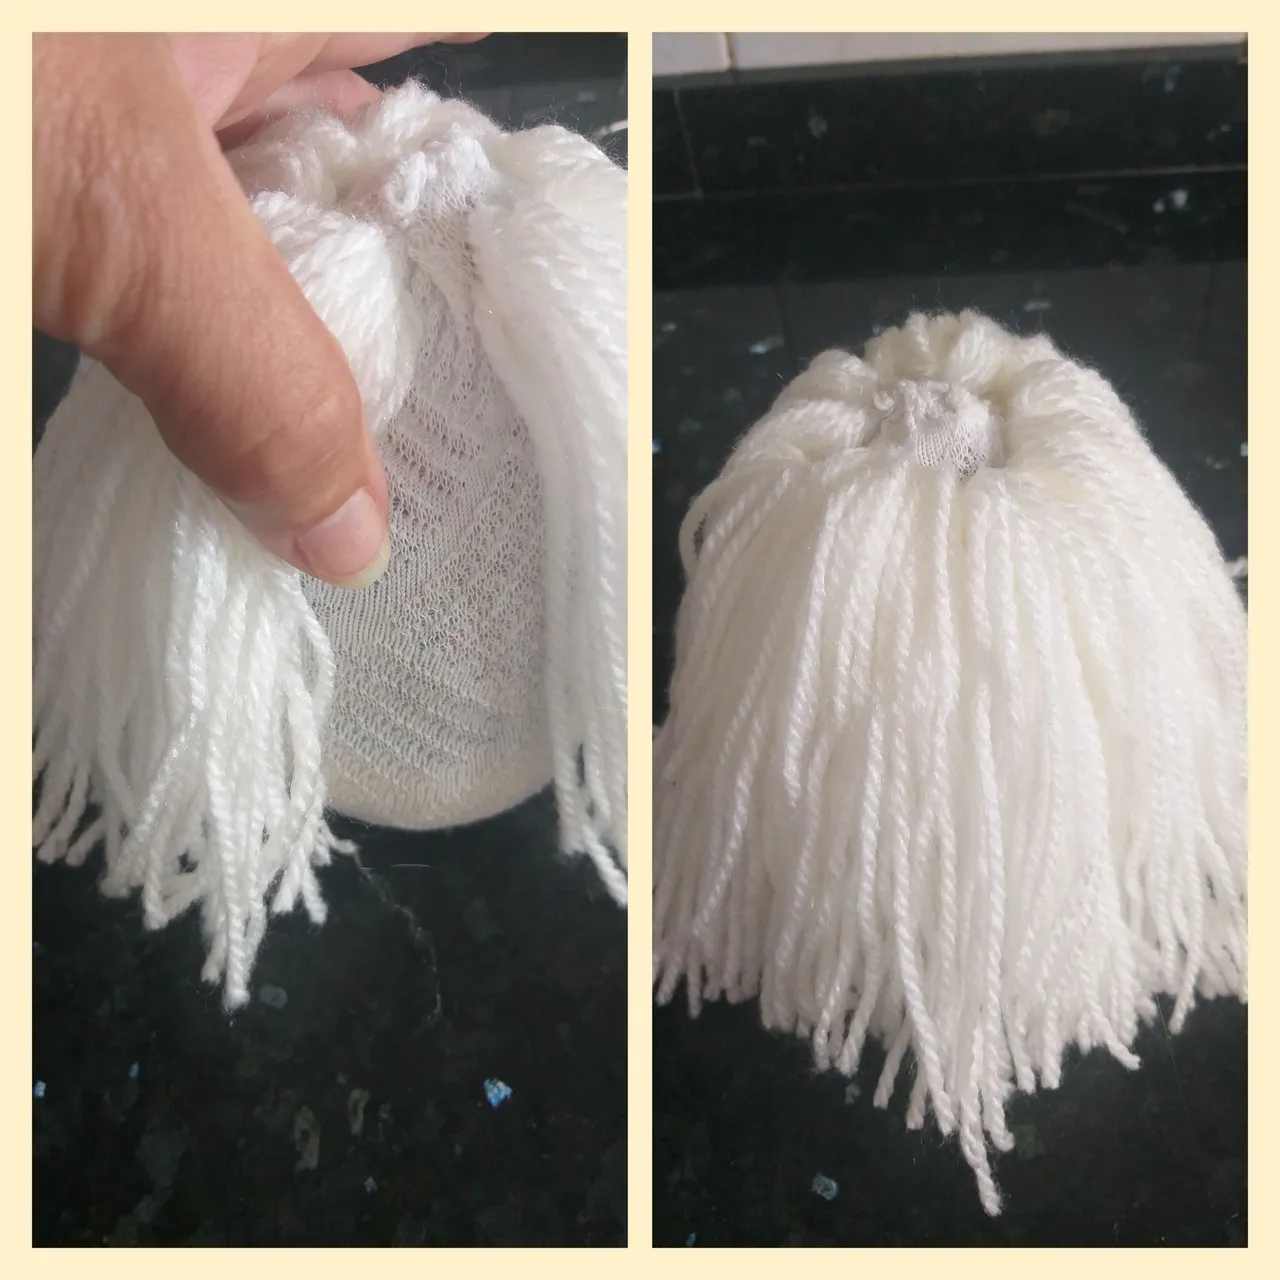
1🐩. Lo primero que debemos hacer es cortar con la tijera la parte de arriba de la media o calcetín; acá utilizamos una media tobillera que estaba sólo una, pueden ver en la imagen.
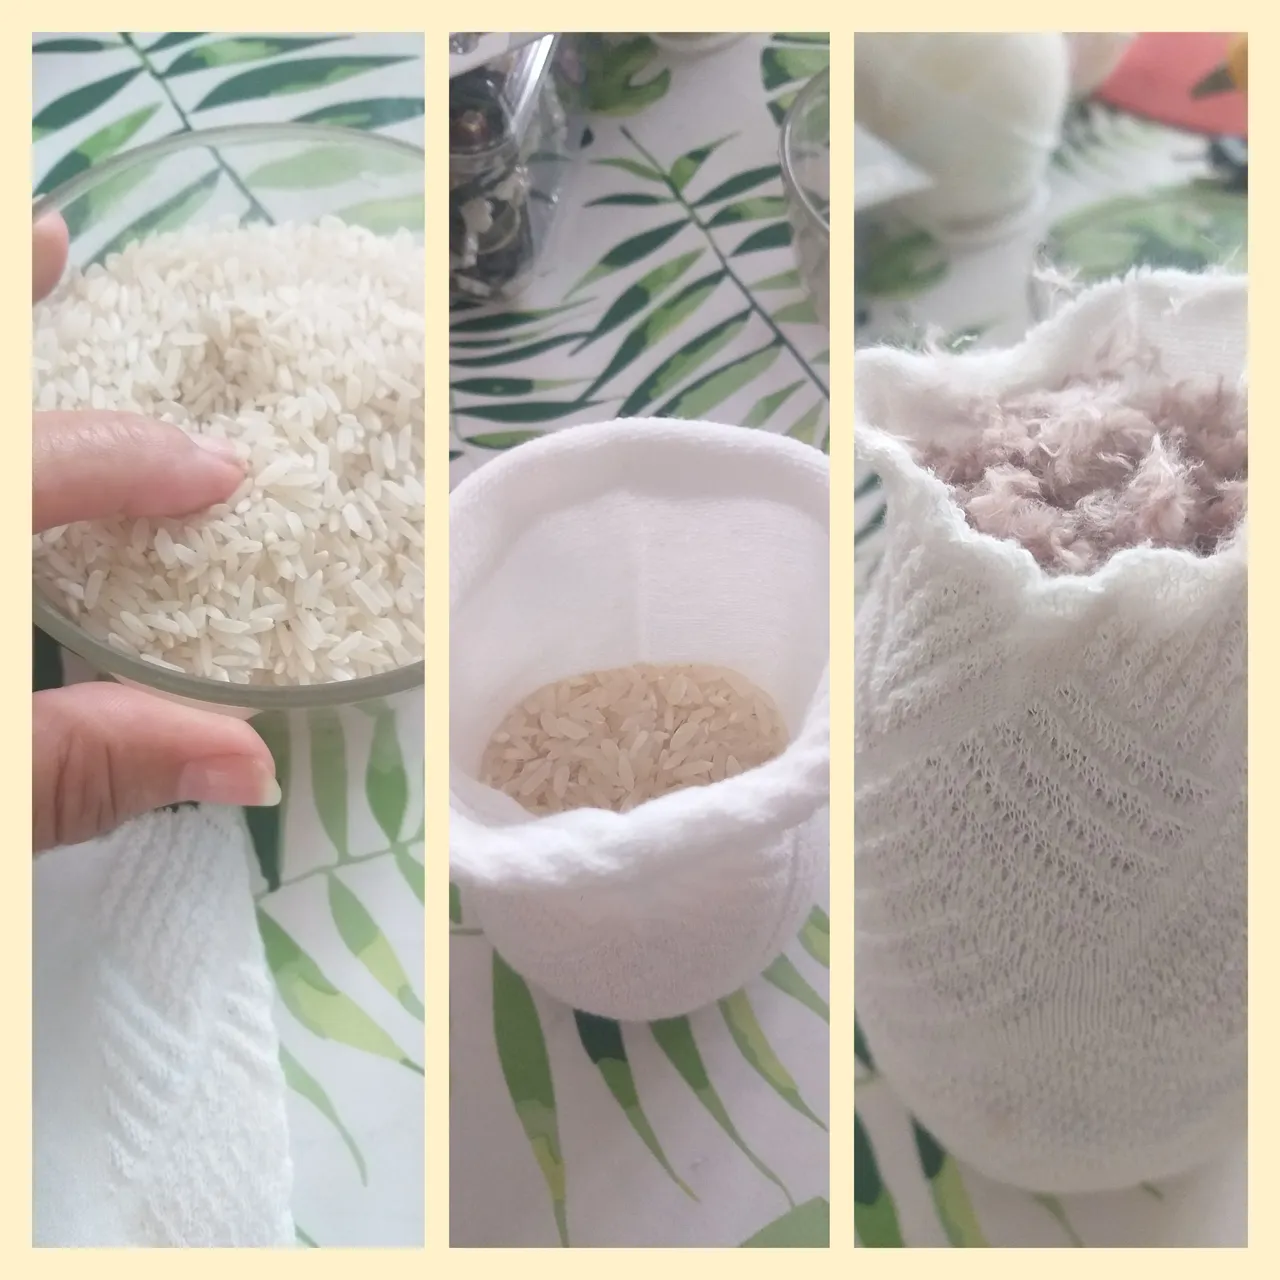
2🐩. En este paso vamos a rellenar una parte de arroz y la otra de relleno, acá se utilizó el relleno que me iba sobrando de la alfombra.También puede rellenar con guata, algodón. El arroz servirá para que el perrito pueda pararse y tener estabilidad donde lo vaya a colocar.
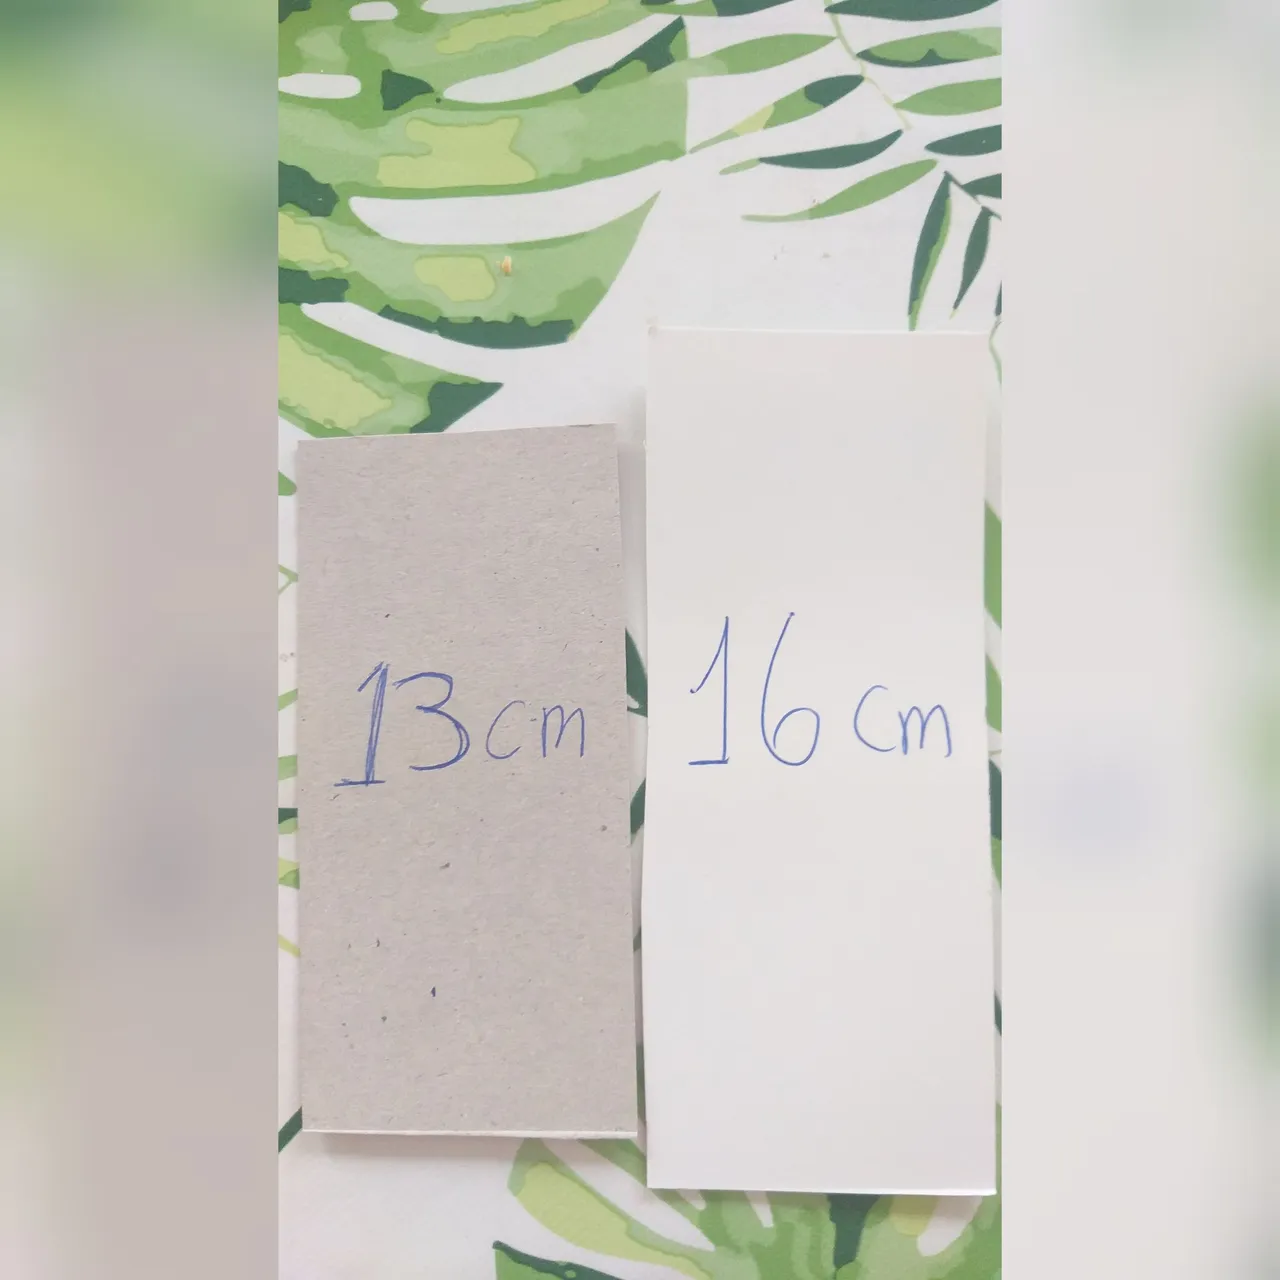
3🐩. Con la aguja y el hilo coser la abertura; la costura debe quedar como un pico, es decir unir toda la costura de una punta a la otra punta. Observar la imagen. La medida de altura es de 13 cm.

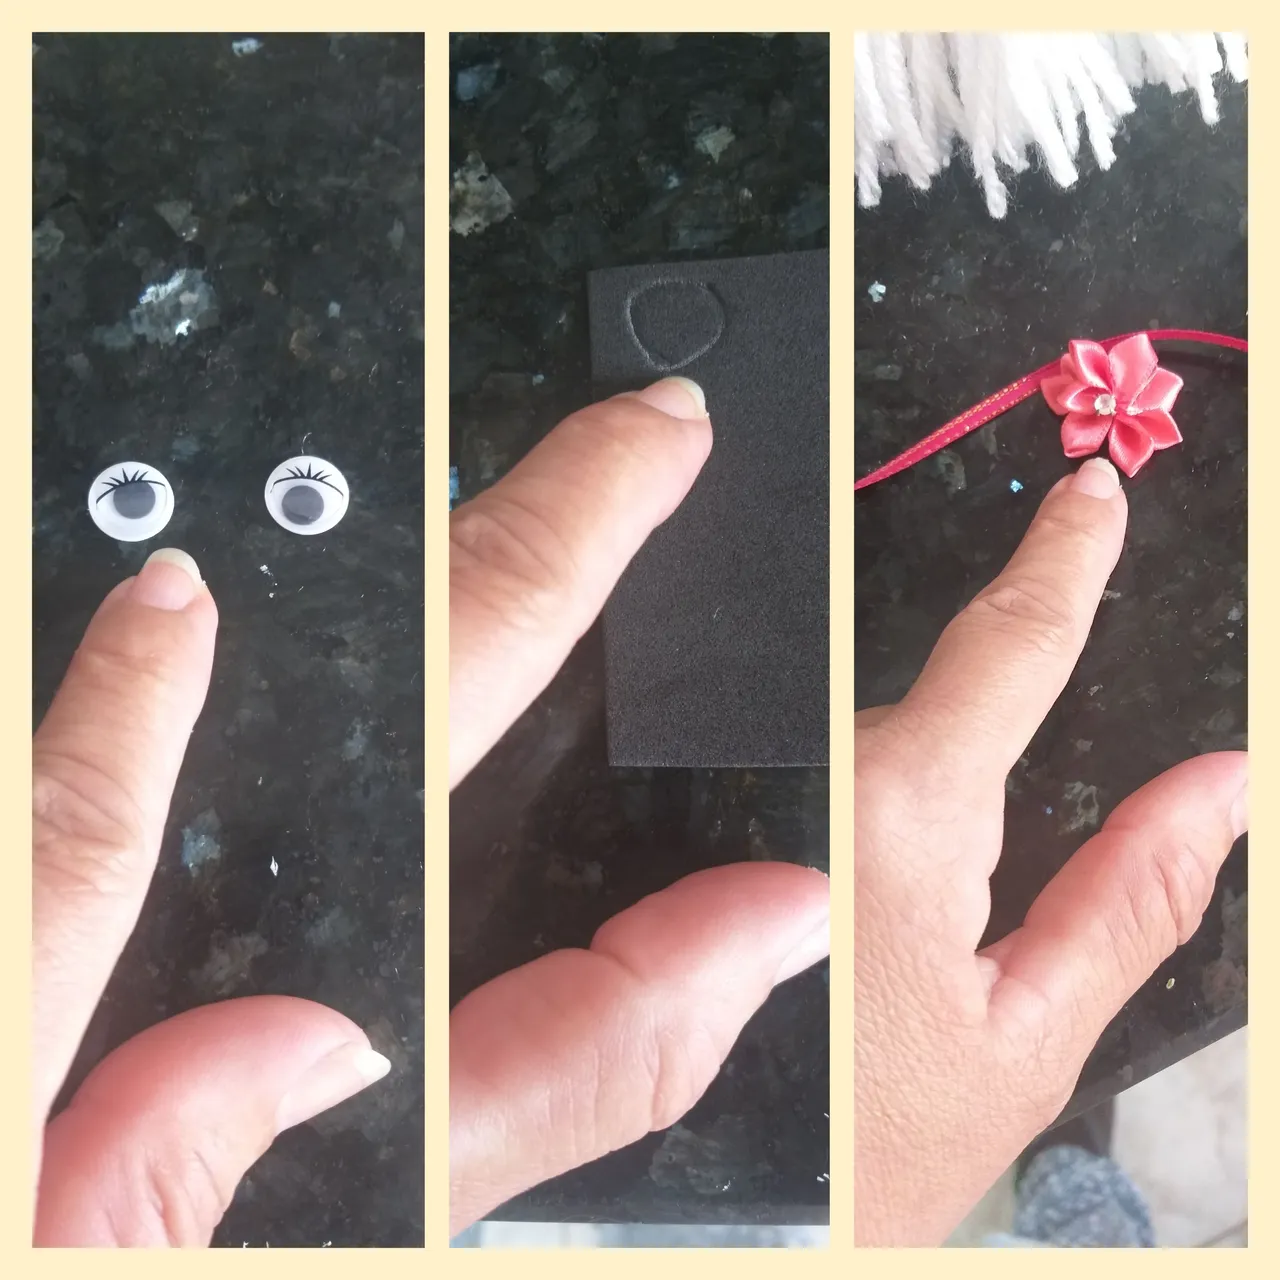
4🐩. Vamos a marcar con el lápiz y la cinta métrica al cartón fino (caja de cereal) las medidas de 13cm de altura y 8cm de ancho y recortar
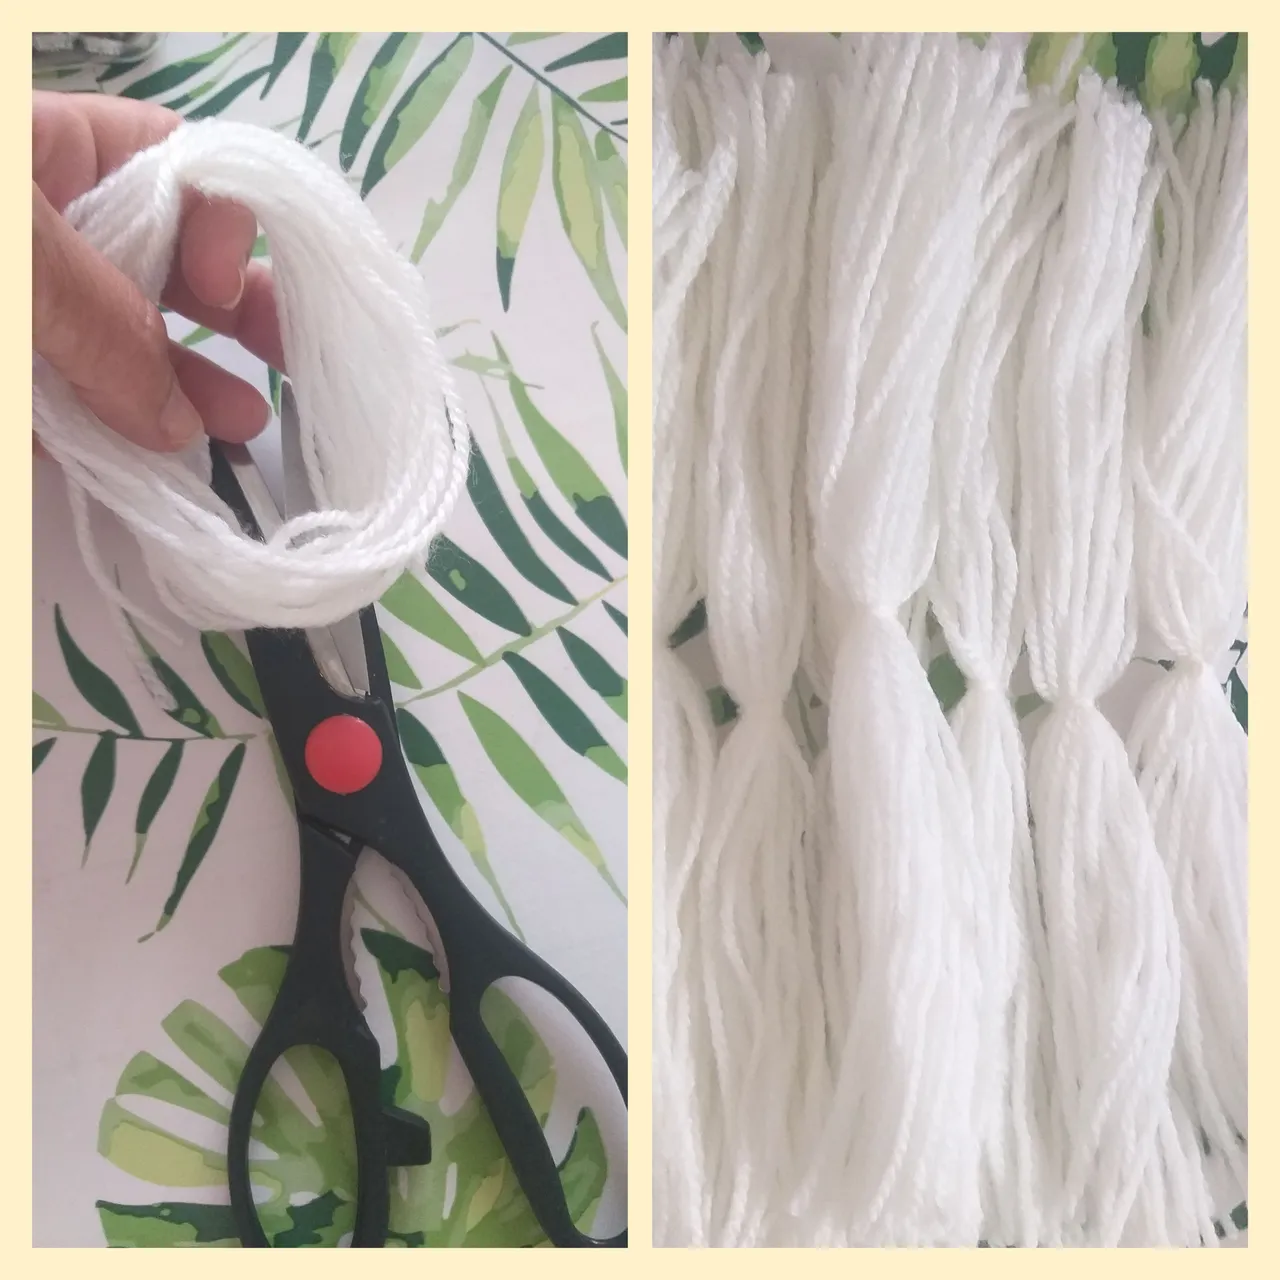
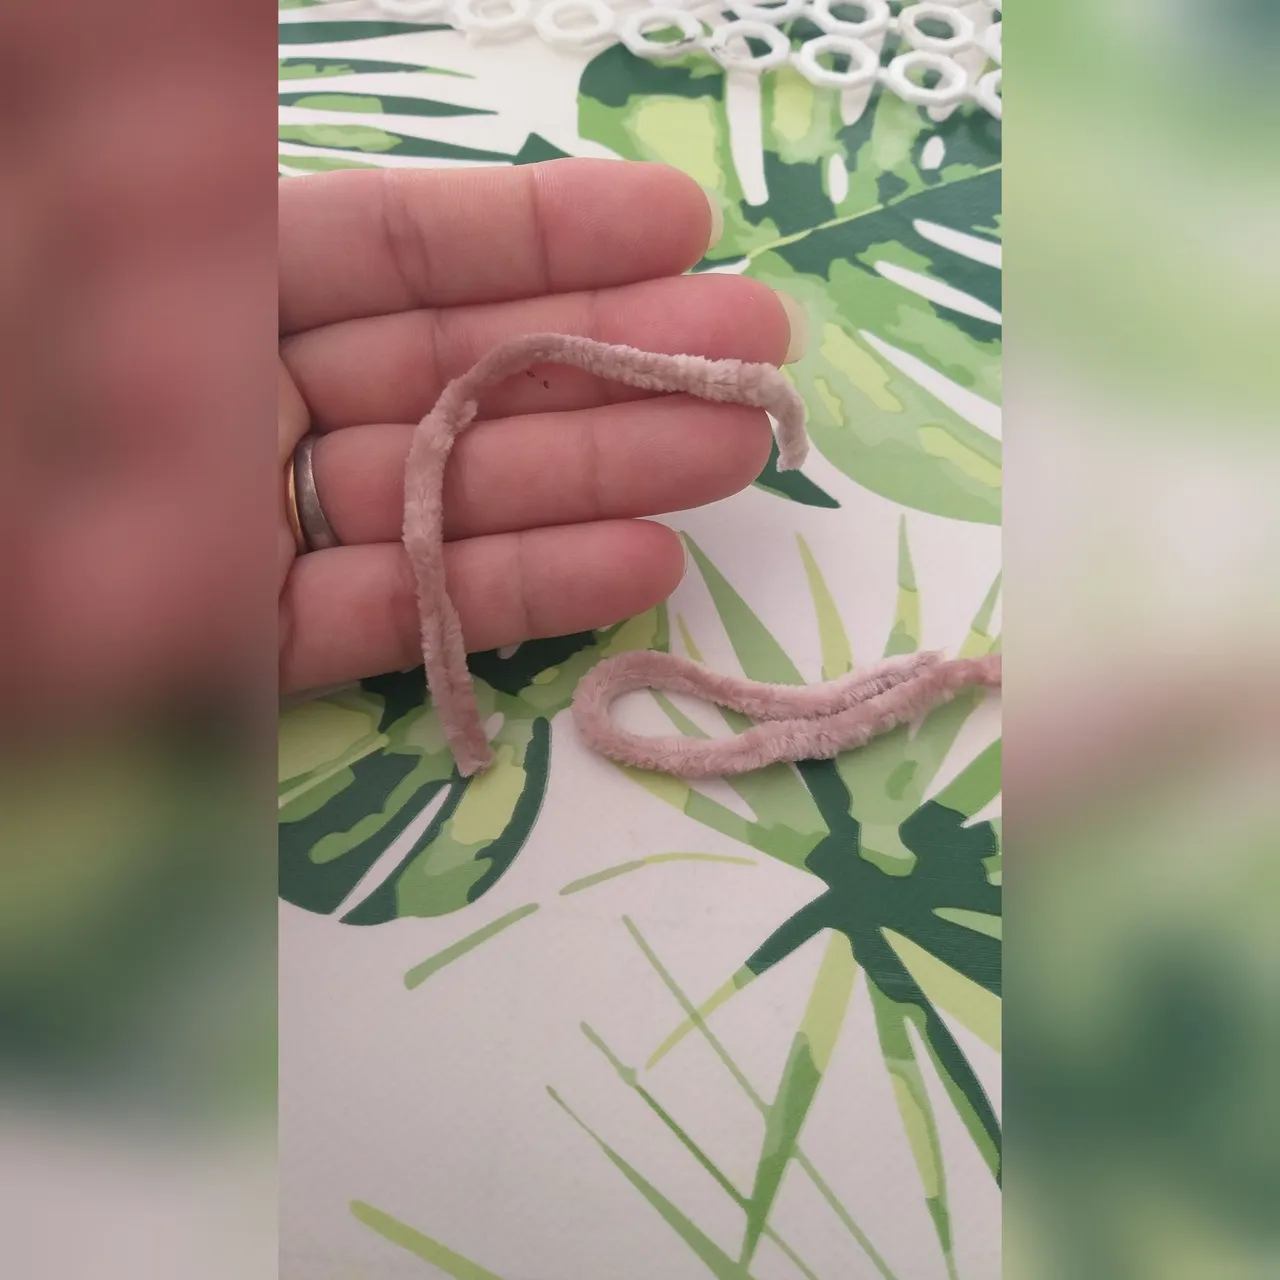
5🐩. En este siguiente paso vamos con la lana escolar a darle 25 vueltas al cuadro de cartón con la medida 13 y luego corta un pedazo de lana de 26cm y amarrar por dentro lo que enrolló y sacarlo del cartón. Observar las imágenes

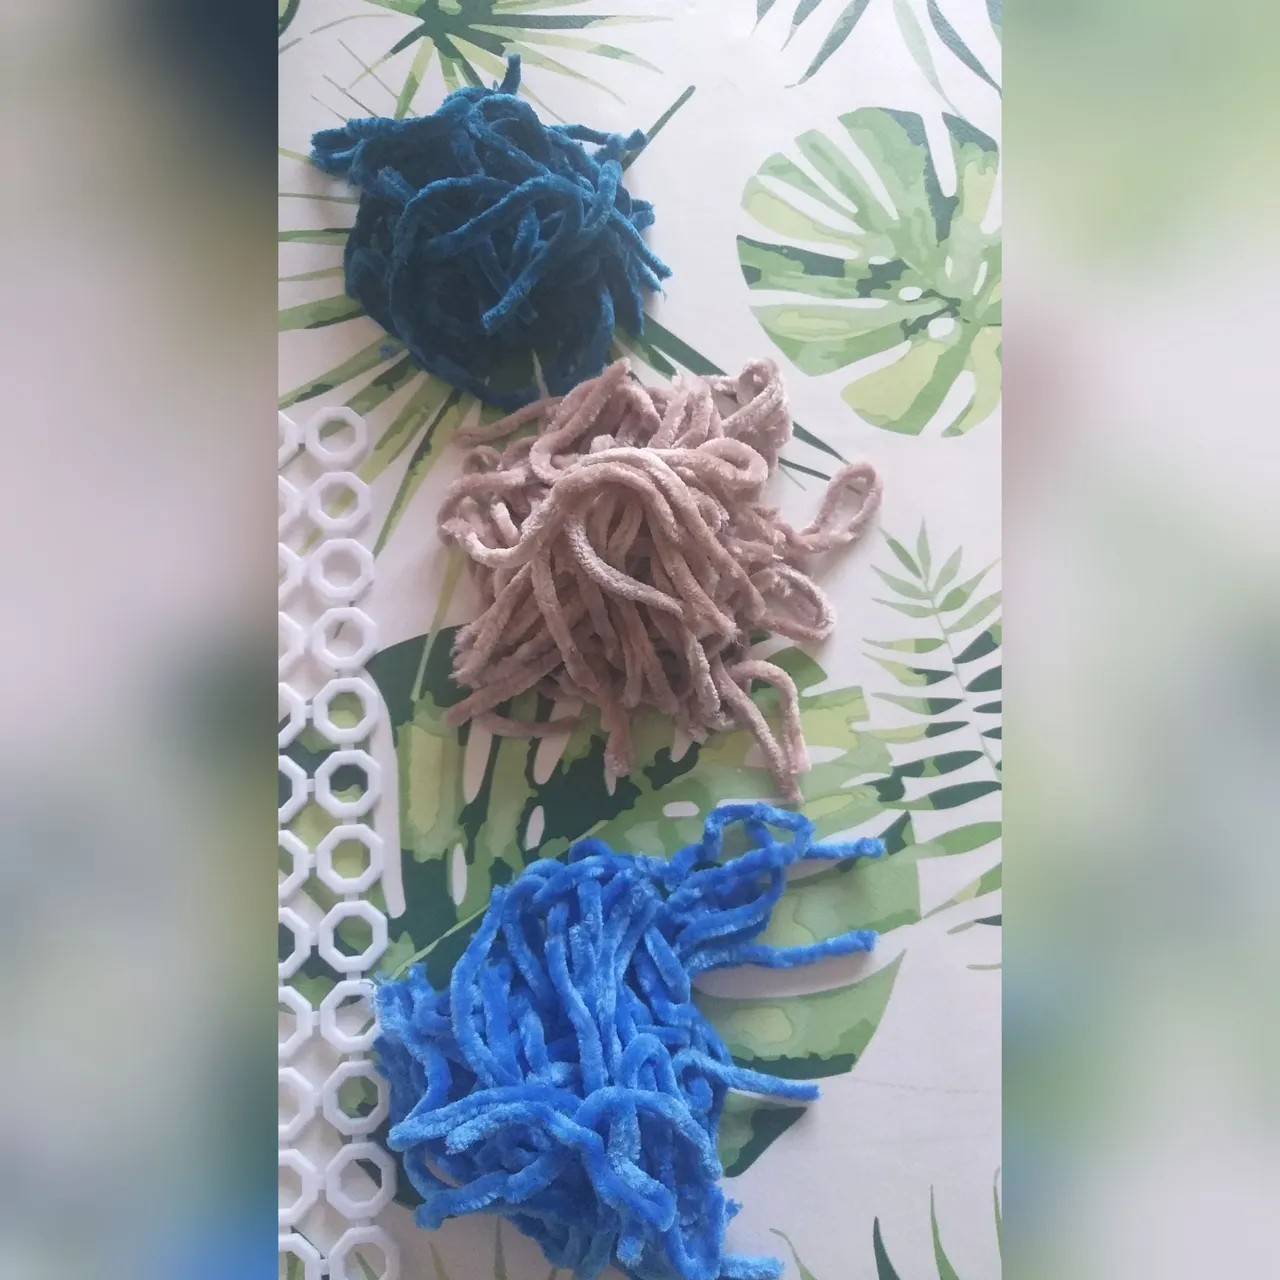
6🐩. Deberá hacer 10 igual a la anterior; es decir que deberá repetir el proceso que hizo en el paso 5 Díez veces.
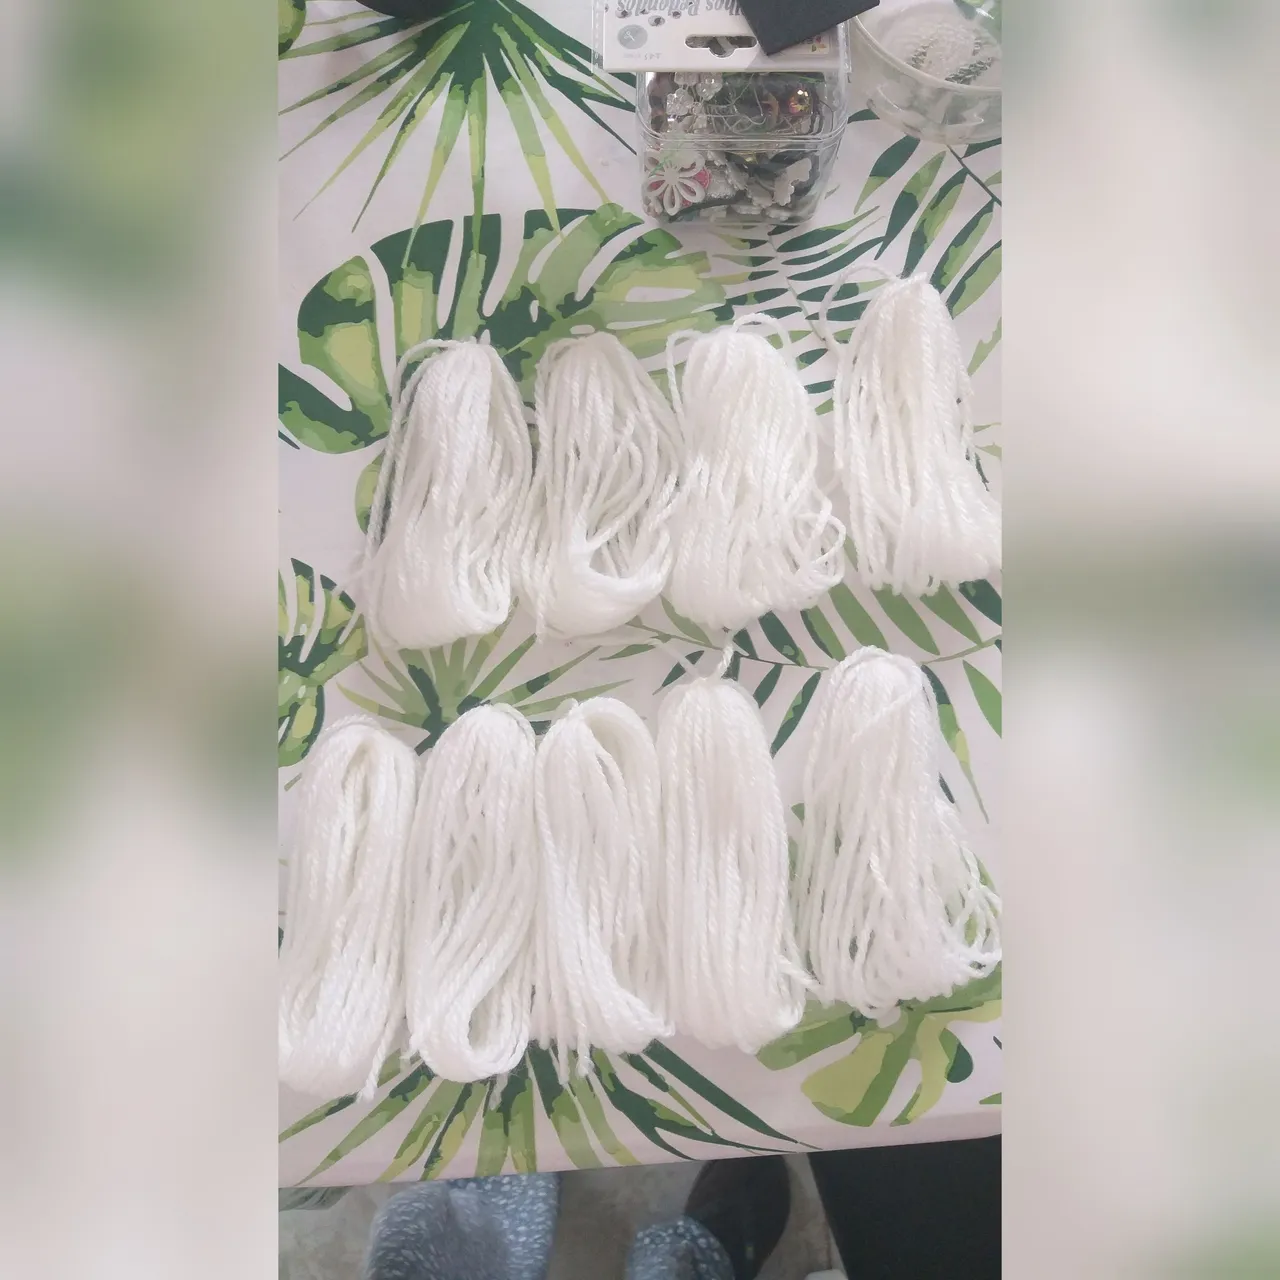
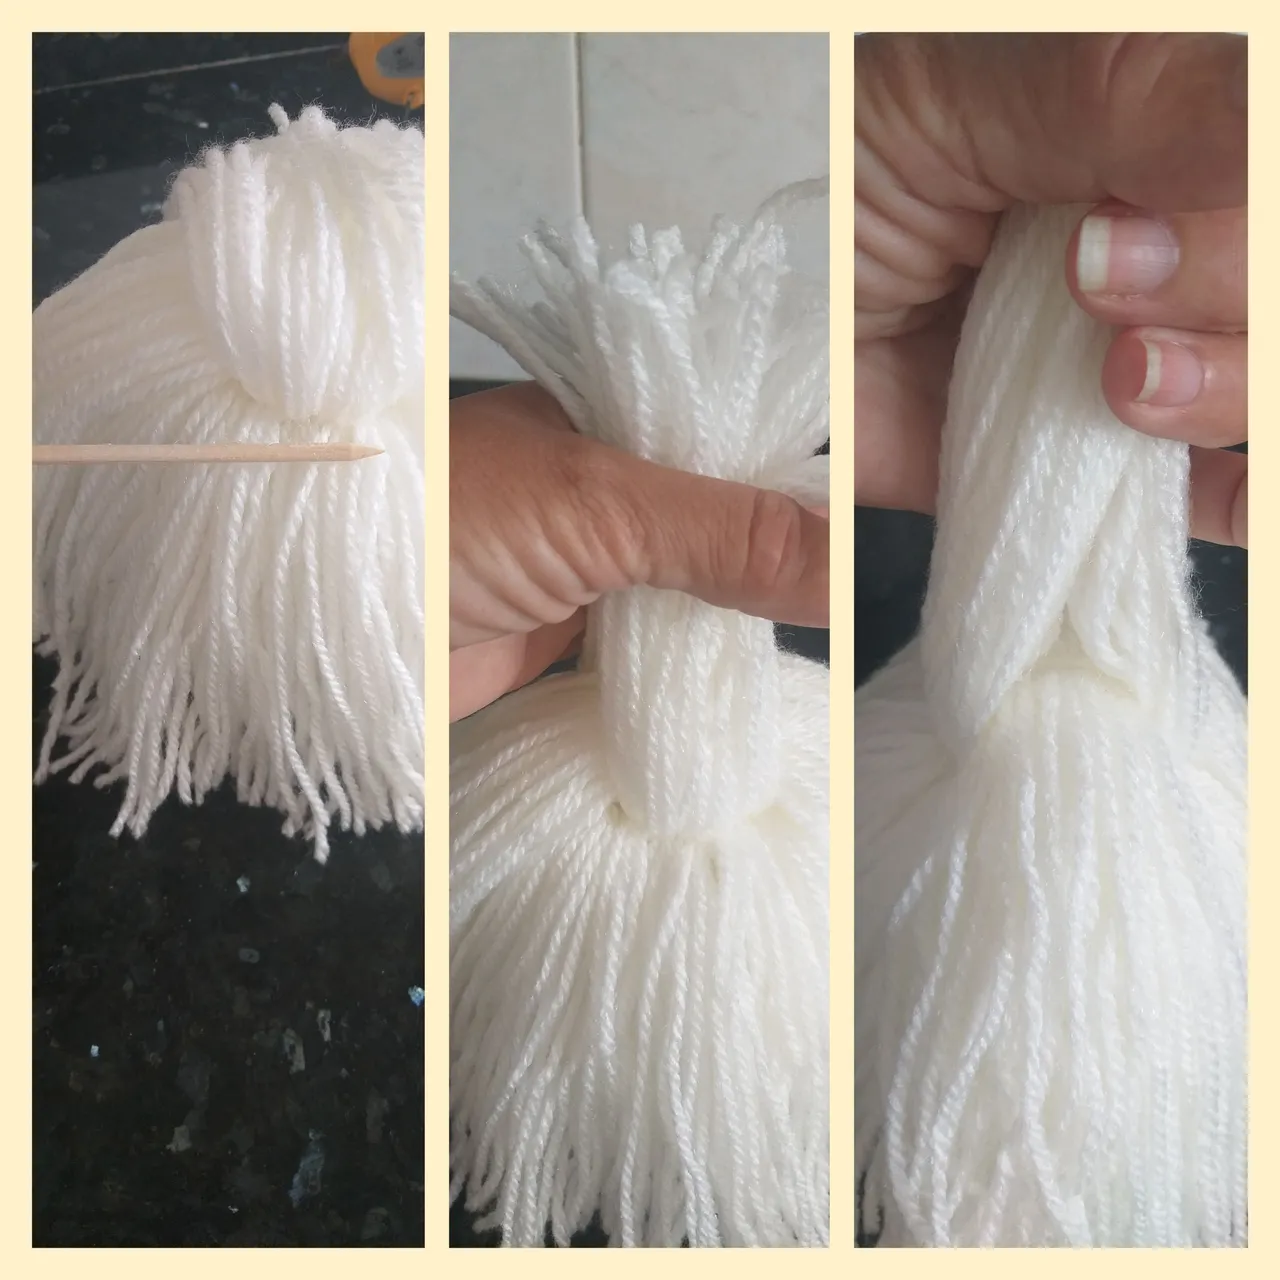
7🐩. Ahora cortamos con la tijera todos los rollos que hicimos con la lana por la parte de abajo NO por donde lo amarramos.
8🐩. Con la pistola de silicona caliente vamos a pegar cada lana (las que hicimos con él cartón), primero pegamos una detrás y después una al frente.

9🐩. Después pegamos con silicon caliente una tira de lana por ambos lados y después entre los espacios de cada una de las lanas que pegamos y dejamos una tira sin pegar.Observar las imágenes

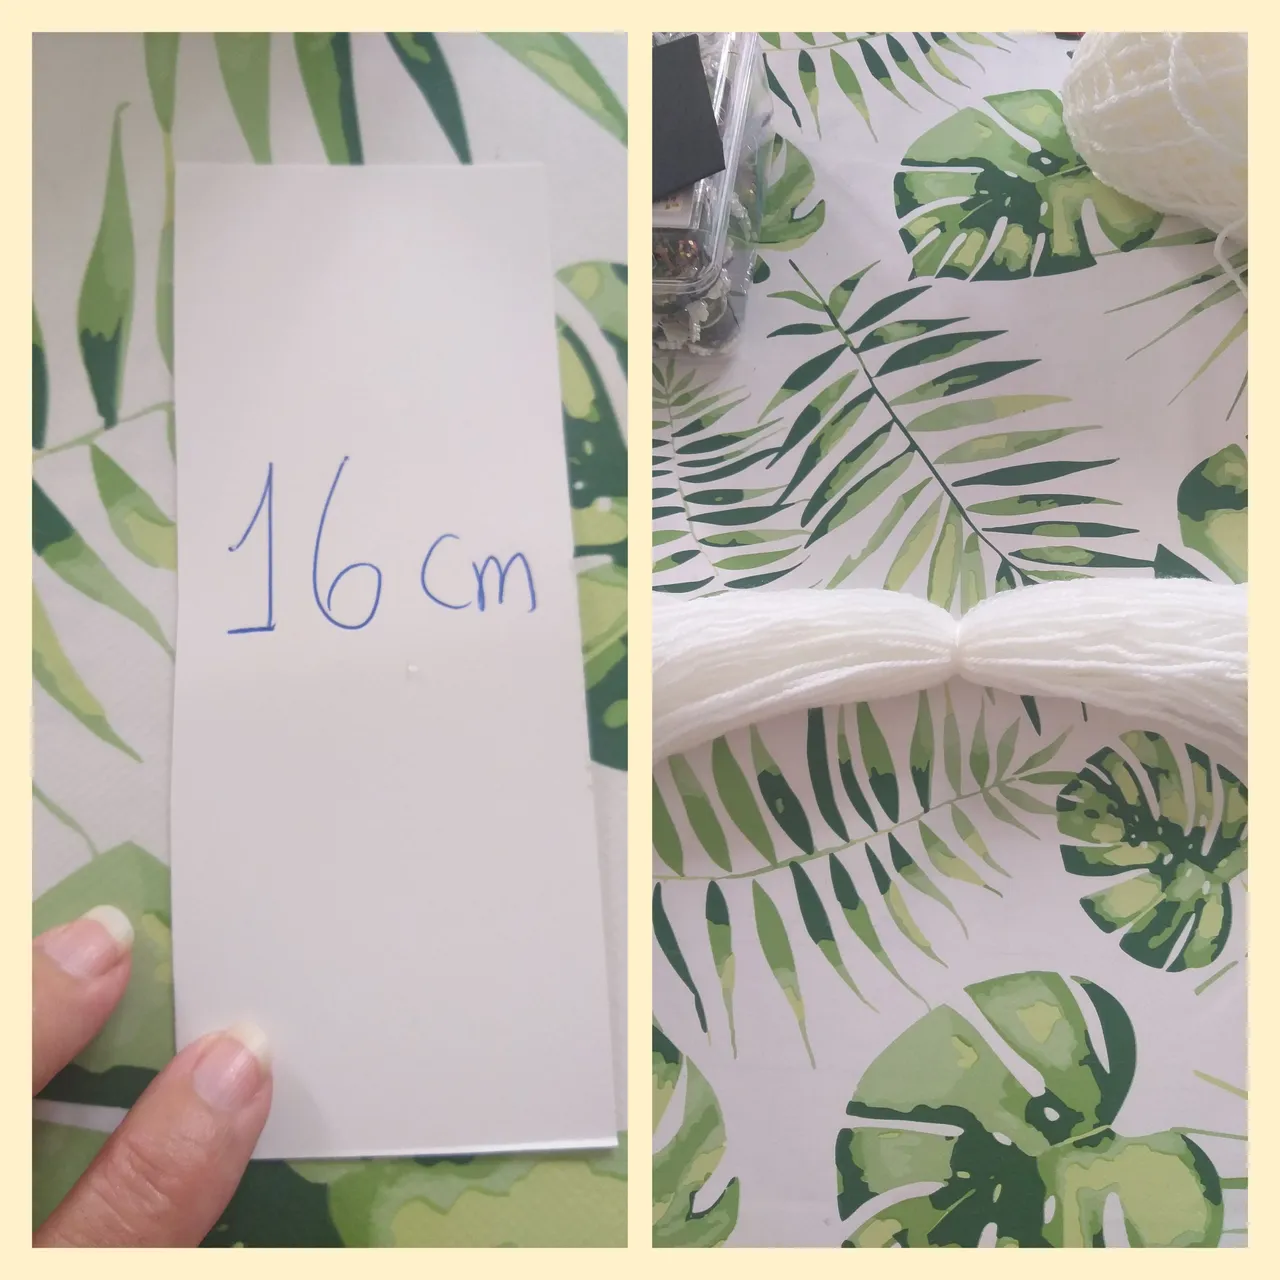
10🐩. Con el cartón la medida de 16cm de largo y 8cm de ancho enrollamos la lana dándole 75 vueltas y después amarramos y con el silicon caliente la pegamos en la parte de arriba.
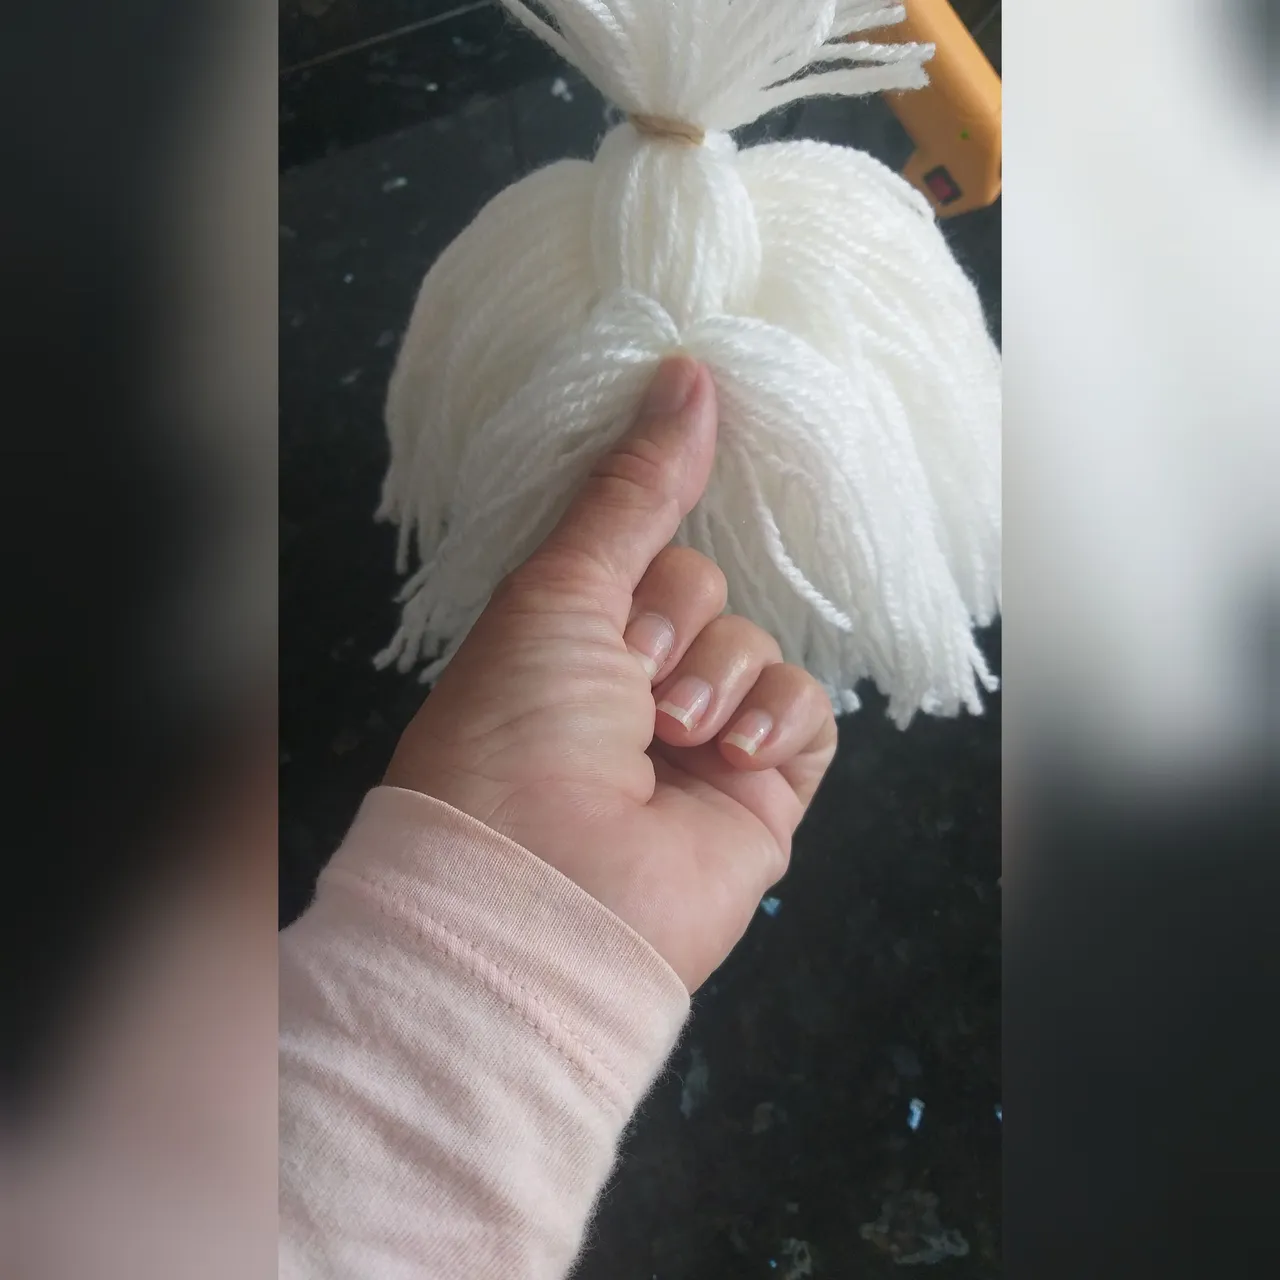
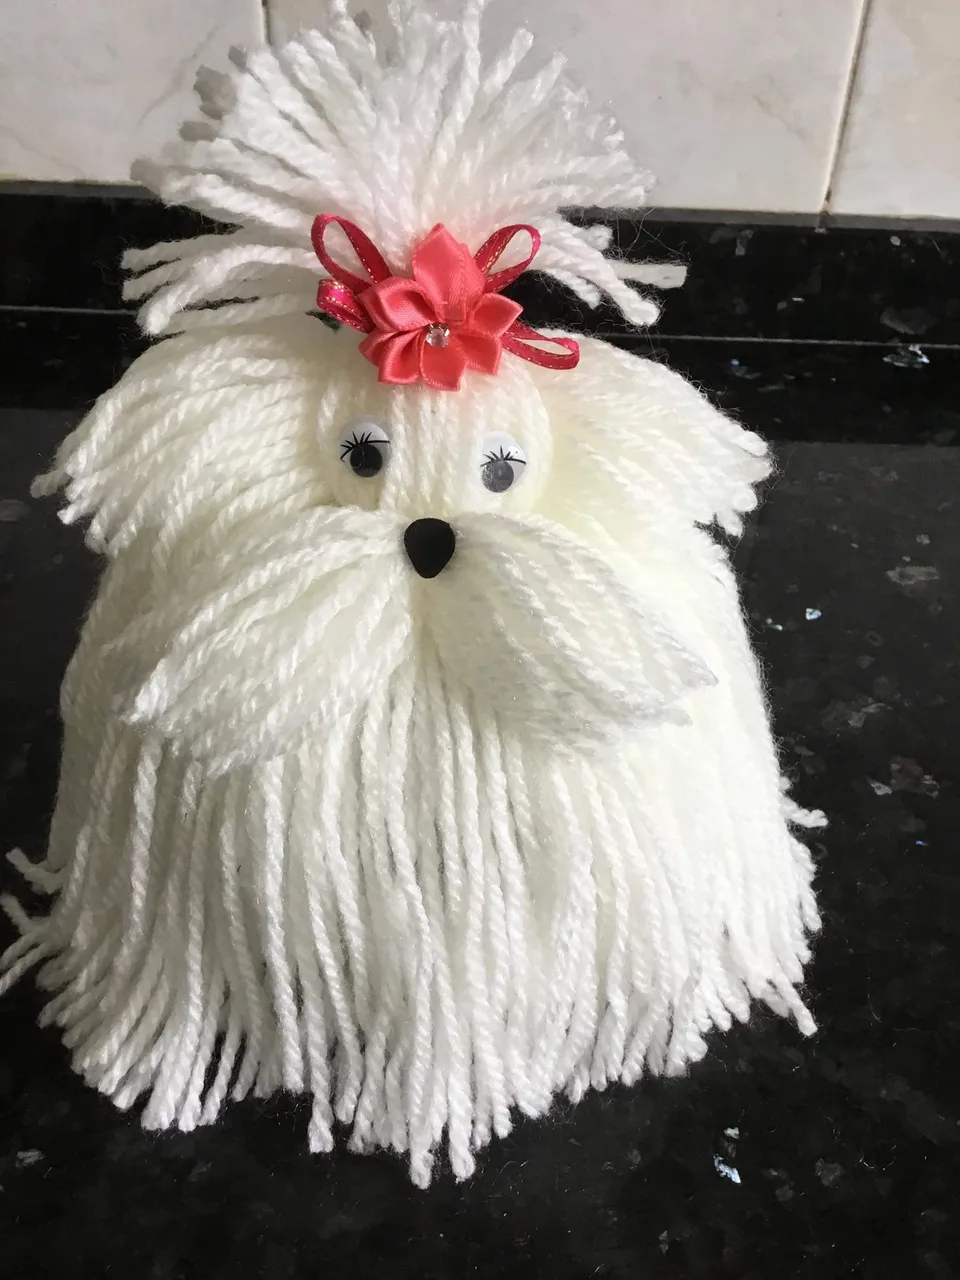
11🐩. En este paso vamos a utilizar el lápizo cualquier palito para sacar varios pelos de la parte del frente y detrás y amarramos con la liga.
12🐩. La tira que dejamos la pegaremos en la parte del frete que serán los bigotes del perrito.
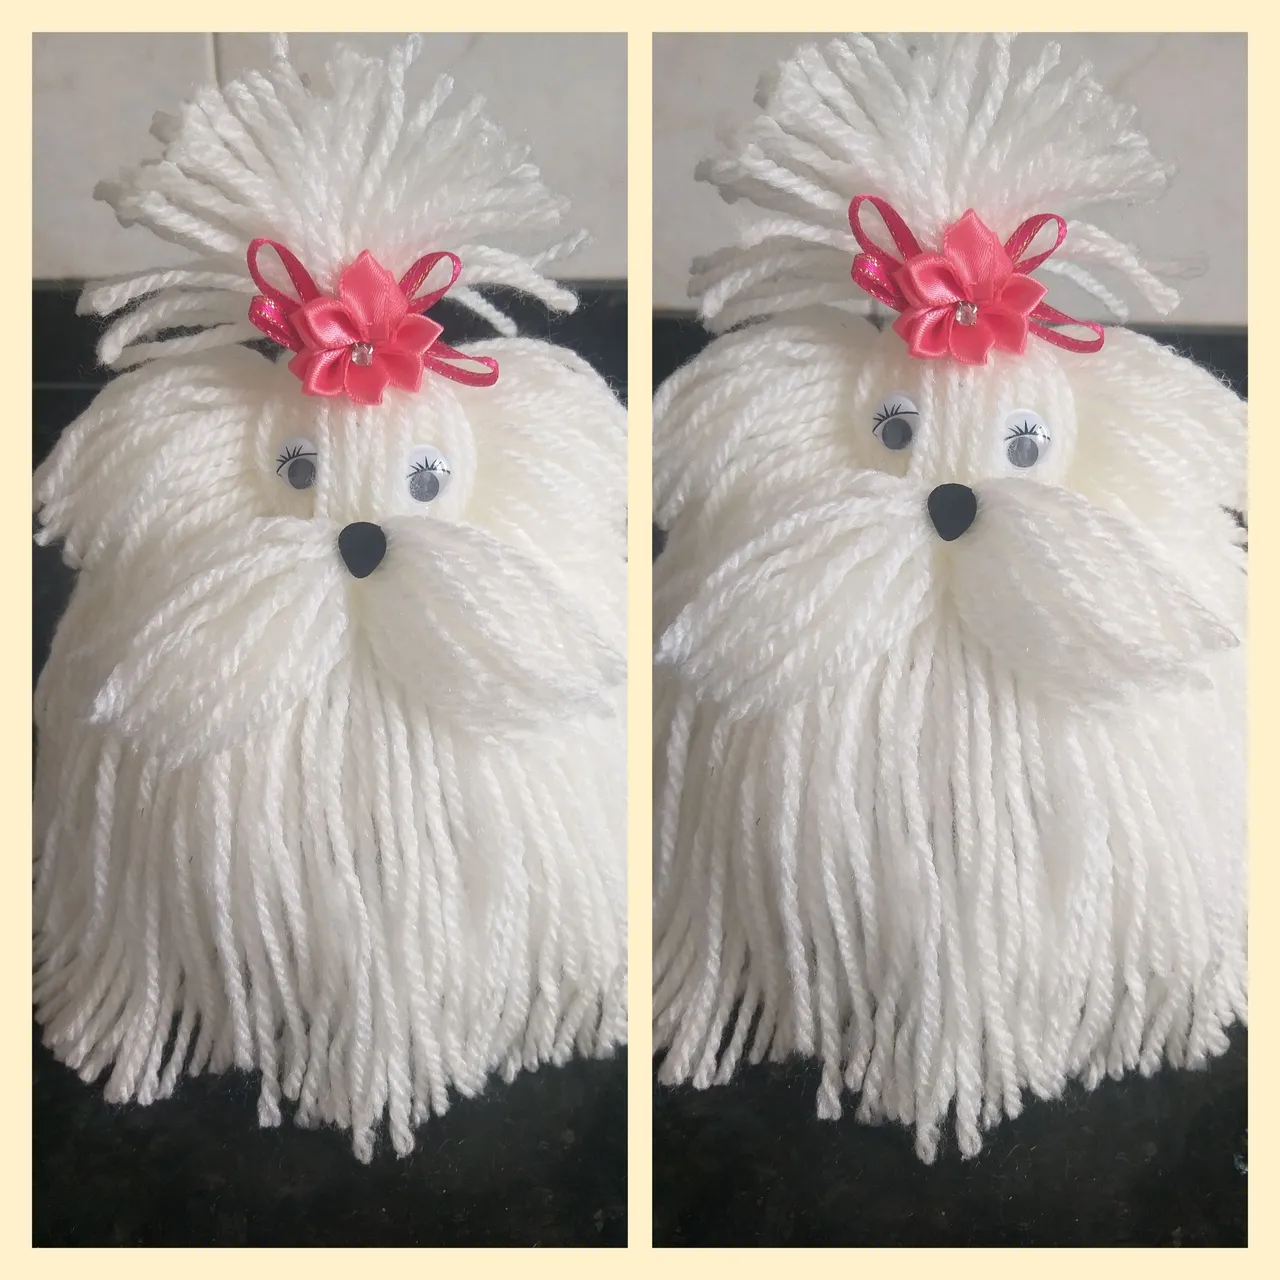
13🐩. Luego vamos a pegar los ojitos y con un pedazo de foami o goma eva de color negro le hacemos la nariz y con la cinta un lazo y después pegamos una flor. Recuerden que yo les doy la idea y ustedes pueden decorarla a su gusto.
14🐩. Luego que pegamos los ojos, nariz y el lazo, con la tijera recortamos dos dedos de lana de cada lado que van hacer las orejas del perrito y también cortamos tres dedos de los bigotes y por último emparejamos toda la parte de lana de abajo para que queden pareja.
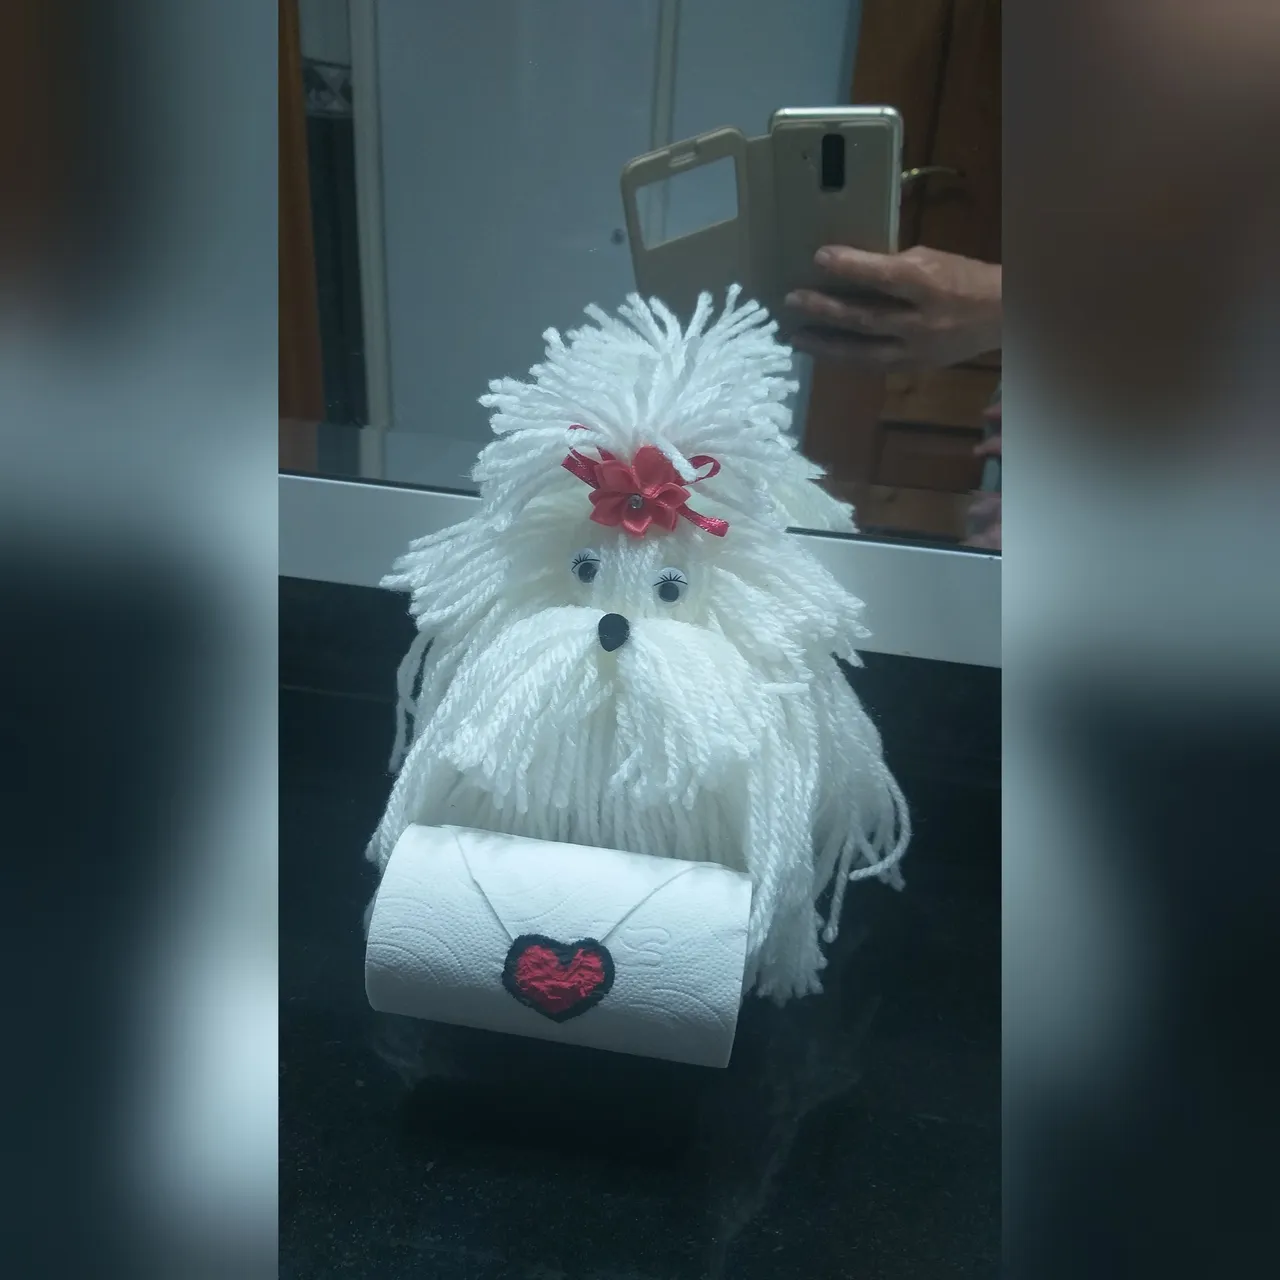
15🐩. Esto es opcional si quiere colocarlo en la casa de baño puede pegarle un rollo de cartón higiénico con un poquito de papel.
Materiales para realizar la alfombra son:
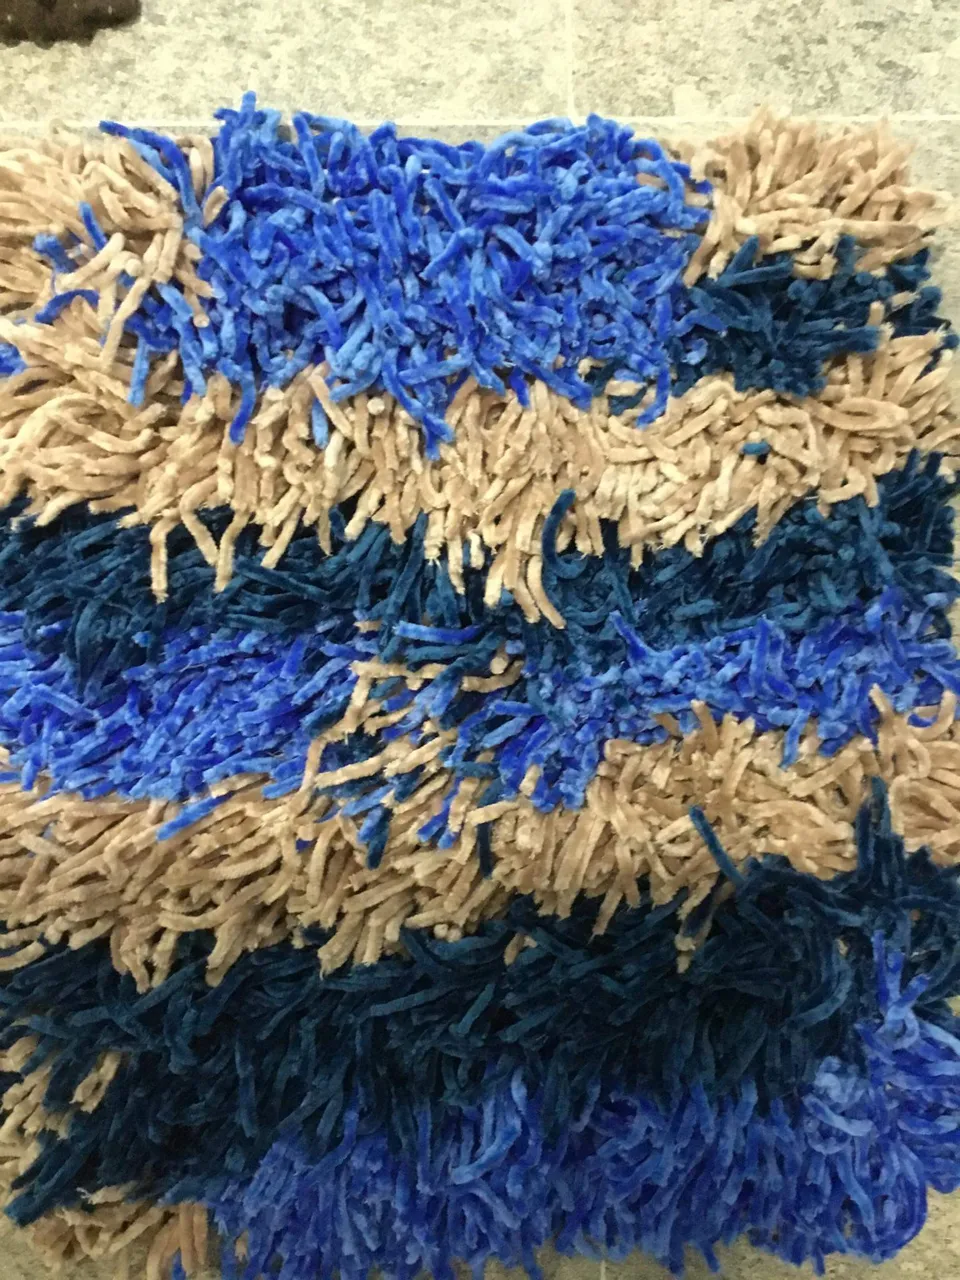
Lana de tapicería(es una lana más suave) de tres colores
Tijera
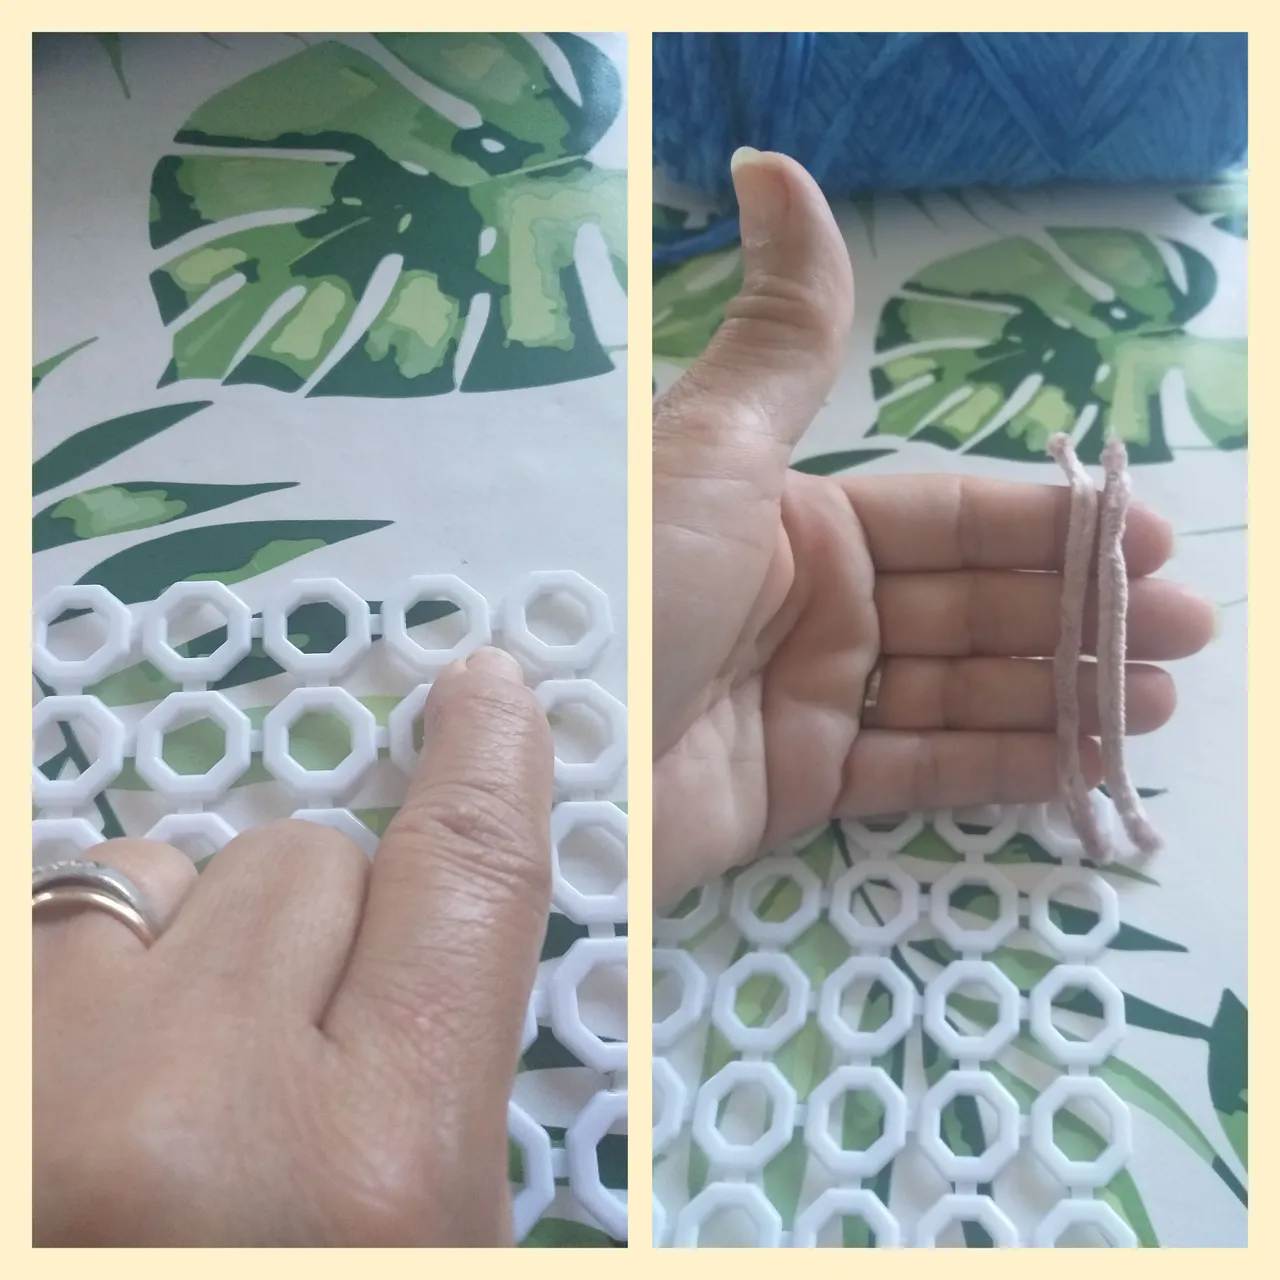
Un pedazo de rede o malla de plástico . Las medidas son dependiendo del tamaño que quiera hacer su alfombra, está rede tiene medio metro.
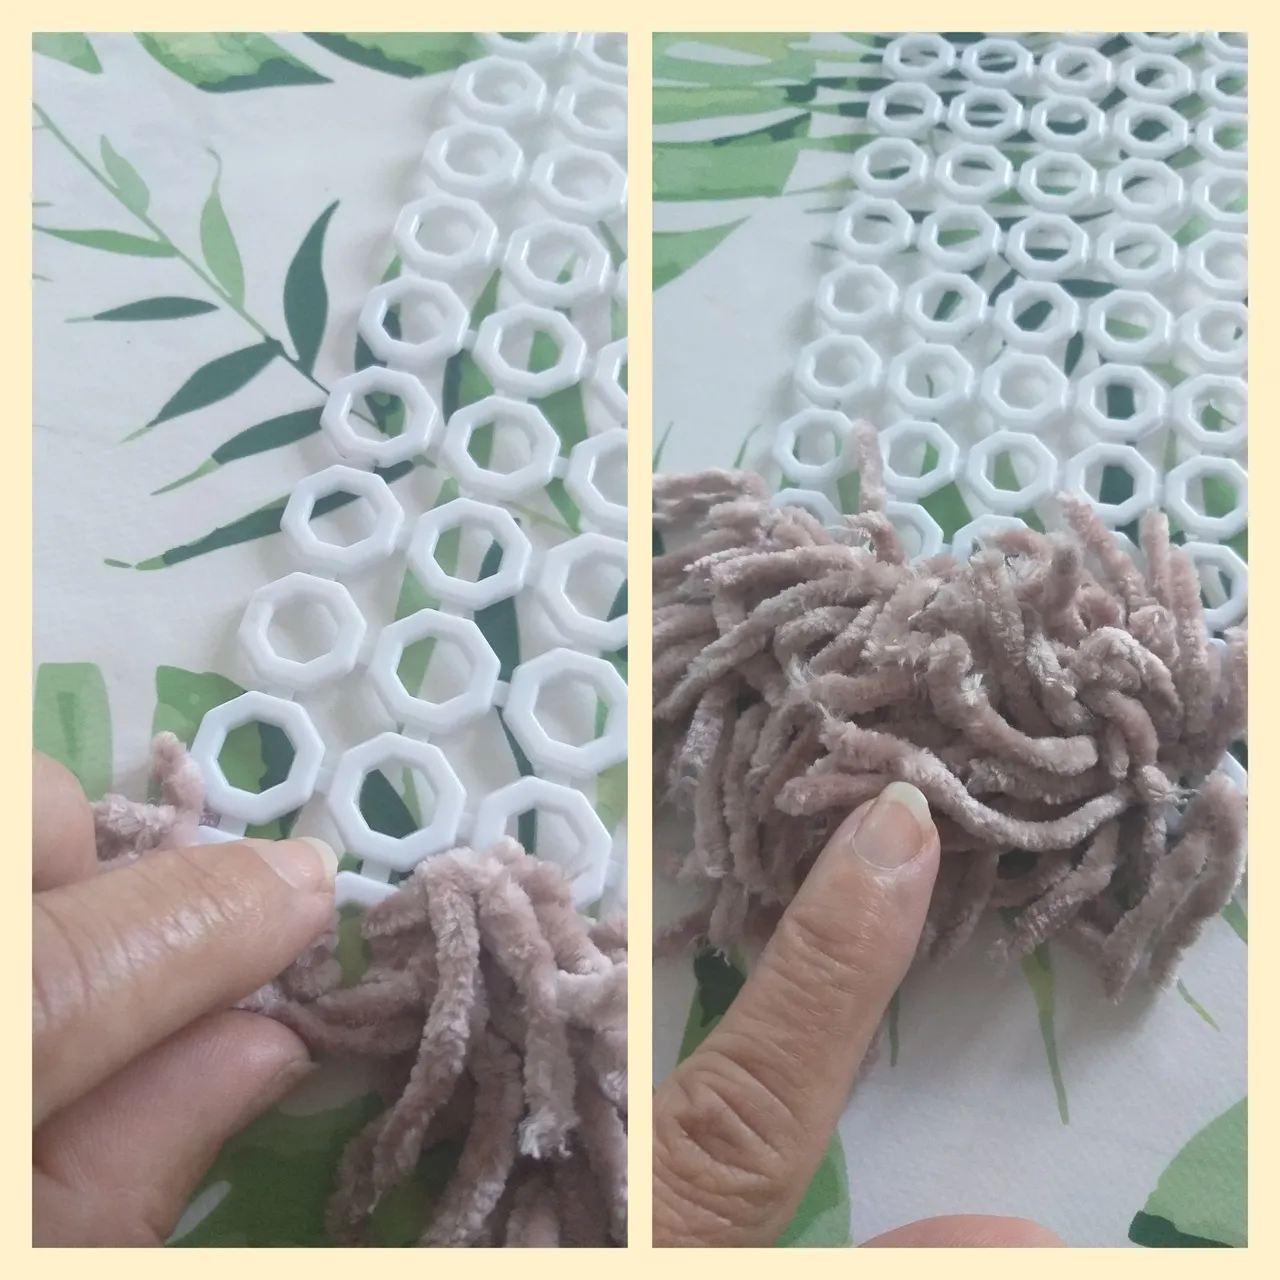
1👣. Lo primero es cortar tiras de 9cm de cada color, la cantidad depende de su rede.Vaya cortando cantidades poco a poco, para que no le vaya a sobrar y también depende de la figura que pretenda hacer en la alfombra, acá se realizó tiras de cada color.
2👣. Luego que tengamos una cantidad de tiras cortadas de cada color o si es a su gusto lo puede realizar de un sólo color.
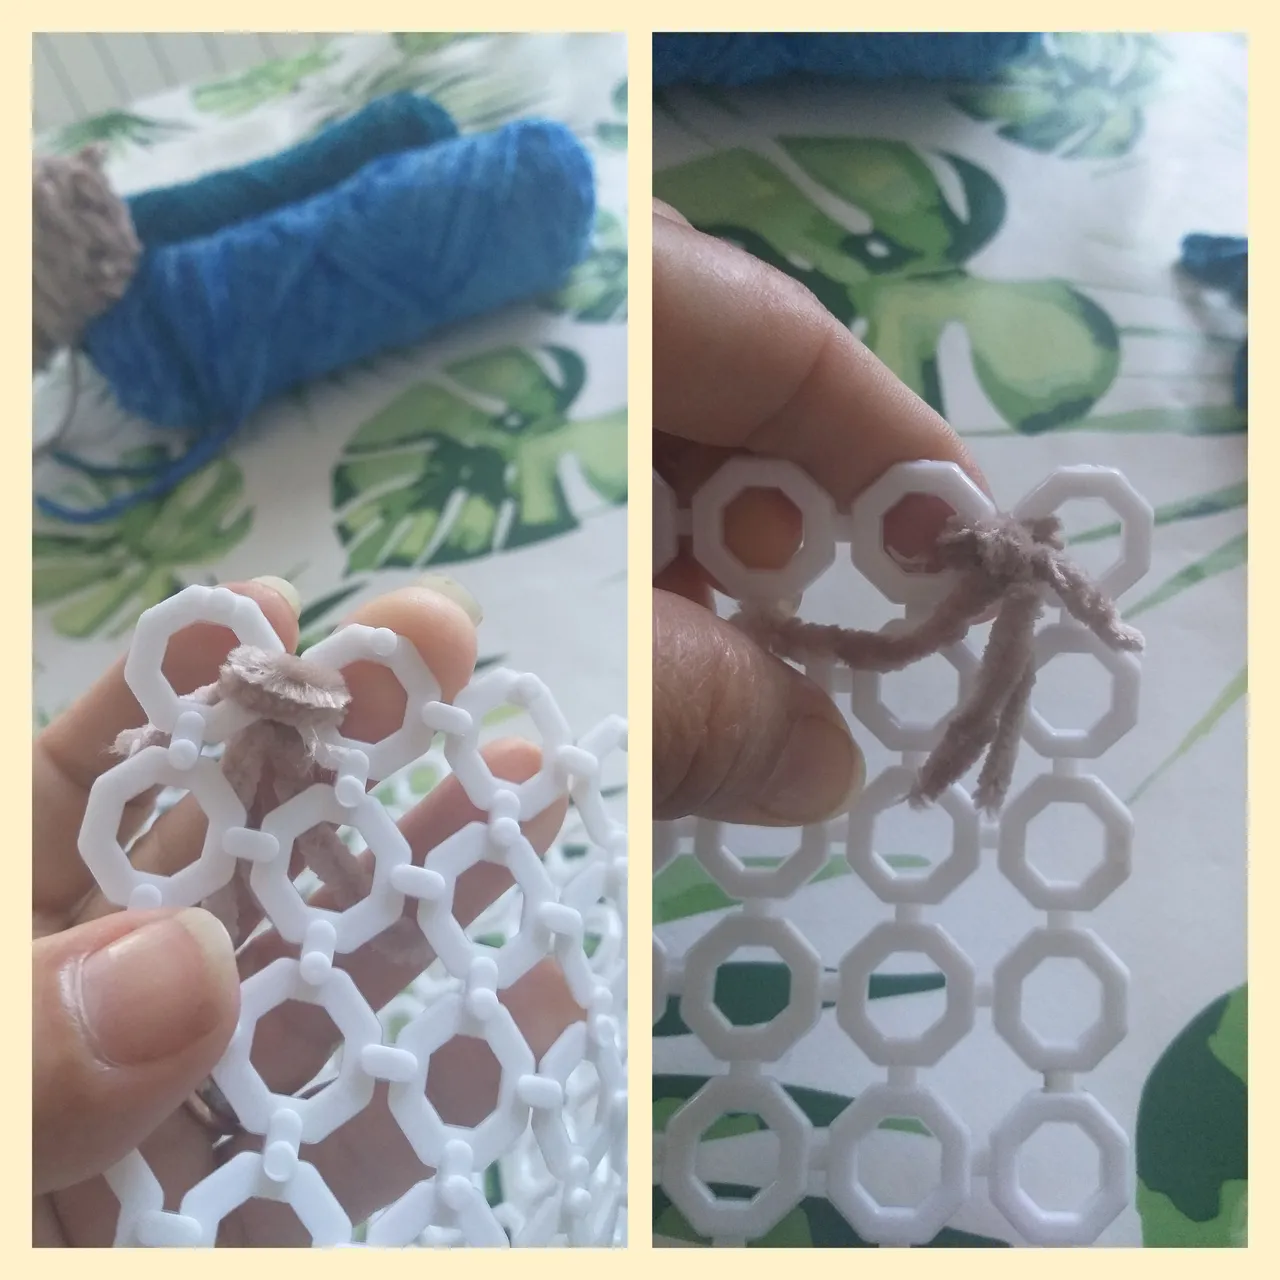
3👣. Ahora vamos a introducir la puntas de dos tiras en un orificio y después en otro orificio y por último amarrar las 4 puntas haciendo un nudo. Yo le coloqué en cada 6 orificios lana de cada color.
4👣. Repetir el mismo proceso en toda la rede o malla de plástico con cada color.
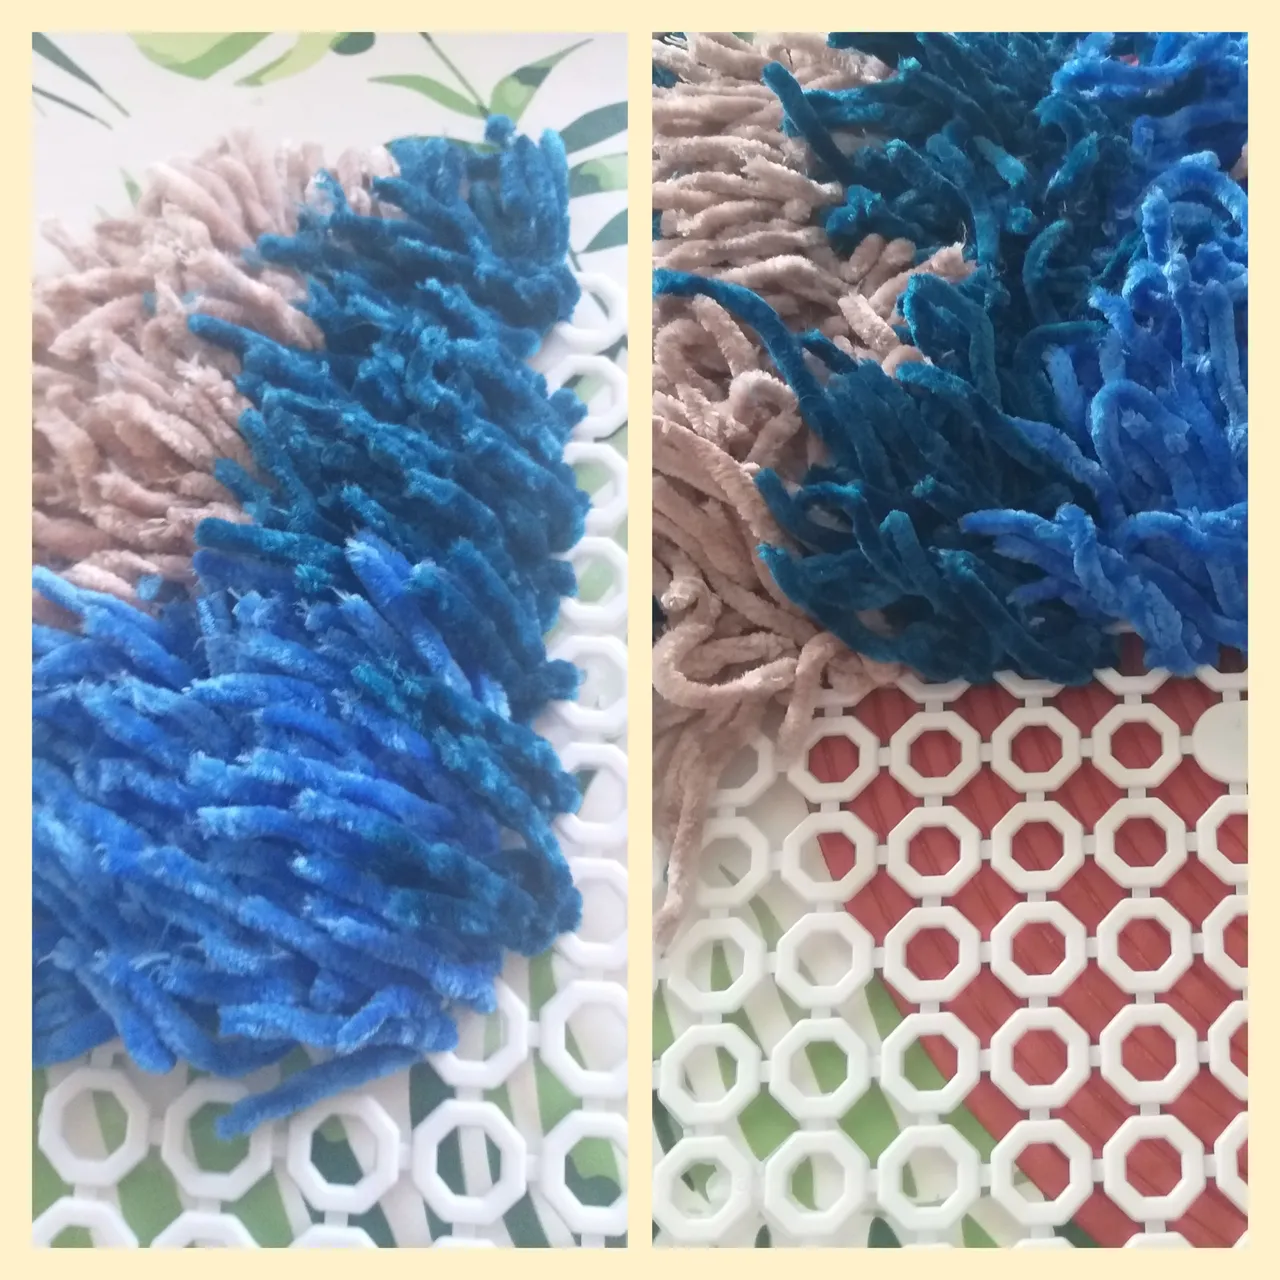
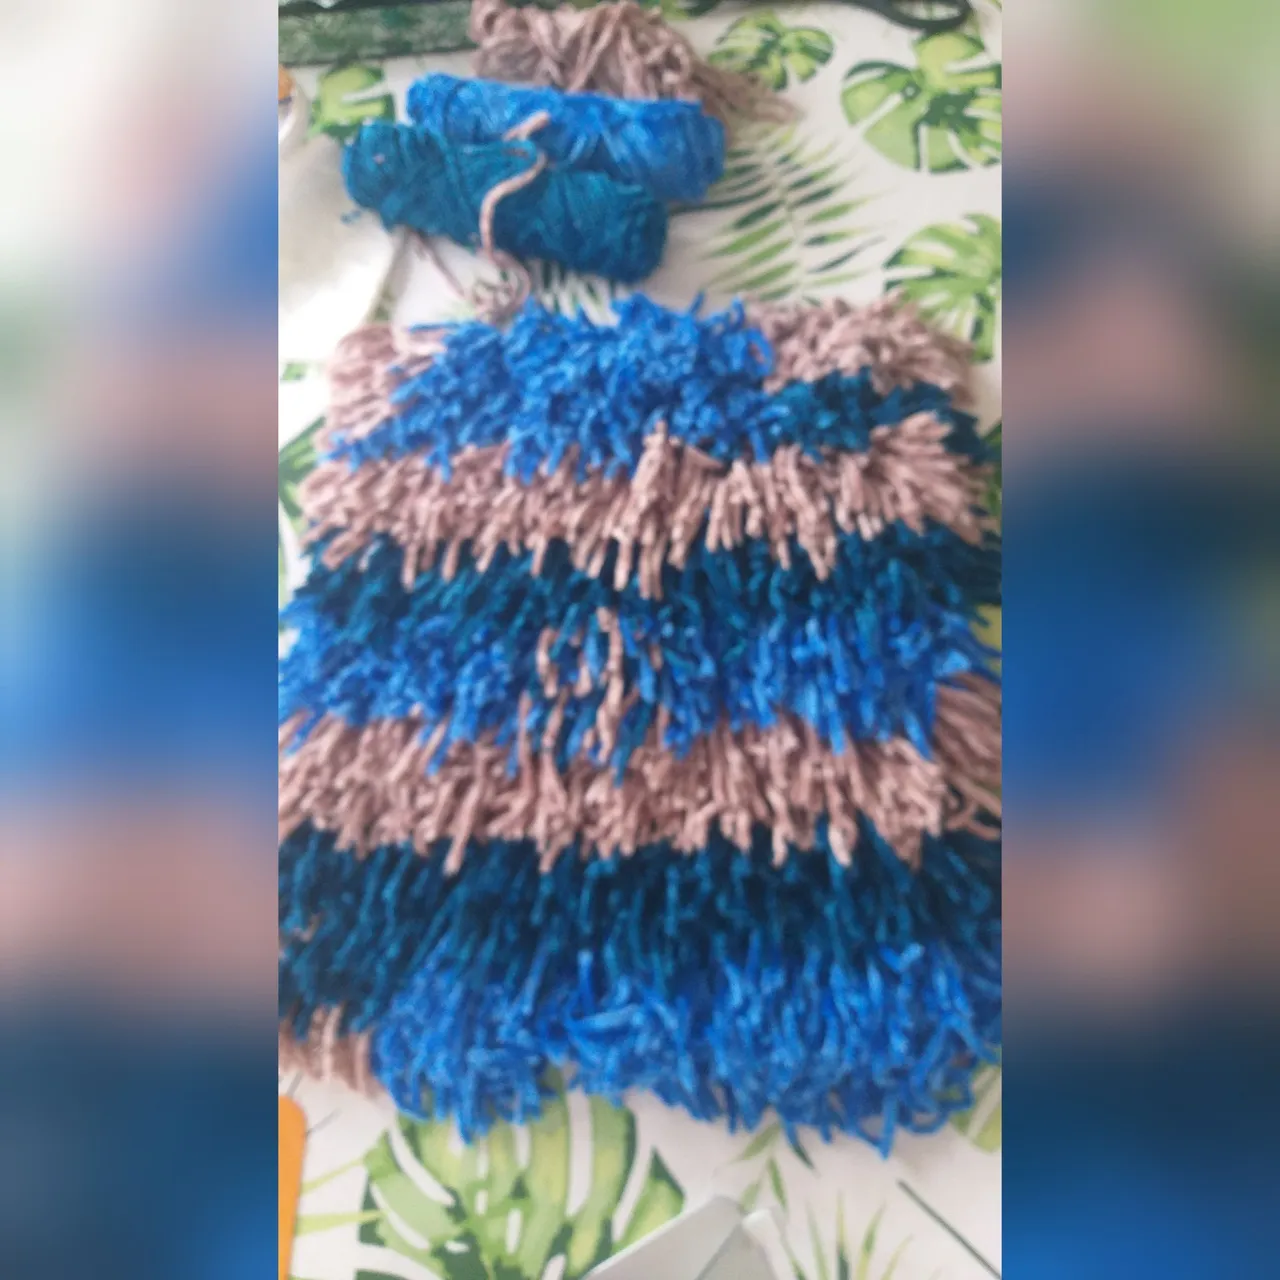
5👣. Es fácil de hacer lo que debe tener paciencia porque requiere de tiempo. Ya una vez terminado de llenar los orificios con franjas de cada color, revise si hay espacios vacíos y coloque tiras de lana en esos espacios y listo tu alfombra. Recuerde que puede hacerla del tamaño y colores que desee. También puede hacer las tiras más largas o cortas.
Que les pareció las dos propuestas que les traje en este tutorial de como podemos utilizar las lanas; hay muchas maneras de utilizarlas, pero éstas dos opciones me parecieron expectacular😍 además estamos reciclando el rollo de cartón del papel higiénico y los pedazos de redes que le han sobrado de obras anteriores. Mi perrito decorando la casa de baño al igual que la alfombra. Espero que a ustedes también les haya gustado y que se atrevan a realizarlo ustedes mismos. Muchas gracias por su apoyo aquellos que se molestan en leer y ver mis trabajos y todas aquellas comunidades que también me apoyan. Bendiciones.
Las fotos son tomadas de mi teléfono móvil Samsung Galaxy A6 y organizadas por la aplicación GridArt

English
Hi Hi
How are the members of this great and beautiful hive; Have a very successful week and mainly health. I am very happy being in contact with nature and doing my walk on the beach. Thousands of blessings to each of the members of the different communities.
In this opportunity I bring you two alternatives of how we can use school or upholstery wool. Today we have the advantage of getting countless materials for decoration or crafts on the market. This weekend I had to go to a Chinese store and I saw these two different types of wool; which we get in different colors 😍👍. I decided to buy them because I saw them very cheap; and I told myself that later I decide how to use them. Some time ago I was watching a program on TV that used some strips of cloth and made a rug and then I decided to make one and a puppy. Friends join me in the step by step so you can see what I did with the two types of wool.
The materials to use to make the puppy are:
School wool a large roll of the color of your choice. Of course it must be a color that dogs have😉
Scissors
Hot glue gun and hot glue sticks
Foami or black eva rubber
Small moving eyes
Very fine bow ribbon
Little League
One white stocking
Rice
Filling
Needle and white thread
thin cardboard
Pen or pencil
Tape measure or ruler
Steps to follow to make the puppy 🐩##
1🐩. The first thing we must do is cut the top of the stocking or sock with scissors; here we use a half ankle brace that was only one, you can see in the image.
2🐩. In this step we are going to fill one part with rice and the other with stuffing, here we used the stuffing that was left over from the rug. You can also fill with wadding, cotton. The rice will serve so that the puppy can stand and have stability where you are going to place it.
3🐩. With the needle and thread sew the opening; the seam should be like a peak, that is, join the entire seam from one end to the other end. Observe the image. The height measurement is 13 cm.
4🐩. We are going to mark with the pencil and the tape measure to the thin cardboard (cereal box) the measurements of 13cm in height and 8cm in width and cut out
5🐩. In this next step we go with the school wool to wrap 25 times around the cardboard square with the measure 13 and then cut a 26cm piece of wool and tie what was rolled inside and remove it from the cardboard. Look at the images
6🐩. You must make 10 equal to the previous one; that is, you must repeat the process you did in step 5 ten times.
7🐩. Now we cut with the scissors all the rolls that we made with the wool at the bottom NOT where we tied it.
8🐩. With the hot glue gun we are going to glue each wool (the ones we made with the cardboard), first we glue one behind and then one in front.
9🐩. Then we glue a strip of wool on both sides with hot silicone and then between the spaces of each of the wool that we glue and leave a strip without sticking. Observe the images
10🐩. With the cardboard measuring 16cm long and 8cm wide we roll the wool giving it 75 laps and then we tie it and with the hot silicone we glue it on the top.
11🐩. In this step we are going to use the pencil or any stick to remove several hairs from the front and back and tie them with the rubber band.
12🐩. We will paste the strip that we left on the part of the front that will be the puppy's whiskers.
13🐩. Then we are going to glue the eyes and with a piece of foami or black eva rubber we make the nose and with the tape a bow and then we glue a flower. Remember that I give you the idea and you can decorate it to your liking.
14🐩. After we glue the eyes, nose and bow, with the scissors we cut two fingers of wool on each side that will make the puppy's ears and we also cut three fingers of the whiskers and finally we match all the wool below so that stay a couple
15🐩. This is optional if you want to place it in the bathroom you can glue a toilet paper roll to it with a little bit of paper.
Materials to make the rug are:
Upholstery wool (it is a softer wool) in three colors
Scissors
A piece of netting or plastic mesh. The measurements are depending on the size you want to make your rug, this network has half a meter.
1👣. The first thing is to cut 9cm strips of each color, the amount depends on your network. Go cutting quantities little by little, so that you do not have leftovers and it also depends on the figure you intend to make on the carpet, here strips of each color.
2👣. After we have a number of cut strips of each color or if it is to your liking you can make it in a single color.
3👣. Now we are going to insert the ends of two strips into a hole and then into another hole and finally tie the 4 ends by making a knot. I put wool of each color in every 6 holes.
4👣. Repeat the same process throughout the net or plastic mesh with each color.
5🐩. In this next step we go with the school wool to wrap 25 times around the cardboard square with the measure 13 and then cut a 26cm piece of wool and tie what was rolled inside and remove it from the cardboard. Look at the pictures
What did you think of the two proposals that I brought you in this tutorial on how we can use wool; There are many ways to use them, but these two options seemed spectacular to me😍 we are also recycling the cardboard roll of toilet paper and the pieces of nets that have been left over from previous works. My puppy decorating the bathhouse as well as the rug. I hope that you also liked it and that you dare to do it yourselves. Thank you very much for your support those who bother to read and see my works and all those communities that also support me. Blessings.
The photos are taken from my Samsung Galaxy A6 mobile phone and organized by the GridArt application