Hola queridos amigos de #HIVEDIY, espero que todos se encuentren bien, hoy vengo a mostrarles un tutorial para elaborar un bello cuadro hecho en filigrana, cómo ya han visto en mis tutoriales anteriores amo esta bella técnica, realmente me tiene enamorada cada día veo que se pueden hacer tantas cosas con ella y que poco a poco les iré mostrando y compartiendo con ustedes lo poco que sé de de esta técnica que consiste en enrrollar tiras de papel.
Hello dear friends of #HIVEDIY, I hope you are all well, today I come to show you a tutorial to make a beautiful picture made in filigree, as you have seen in my previous tutorials I love this beautiful technique, I really love it every day I see that you can do so many things with it and little by little I will show you and share with you the little I know about this technique that consists of rolling strips of paper.
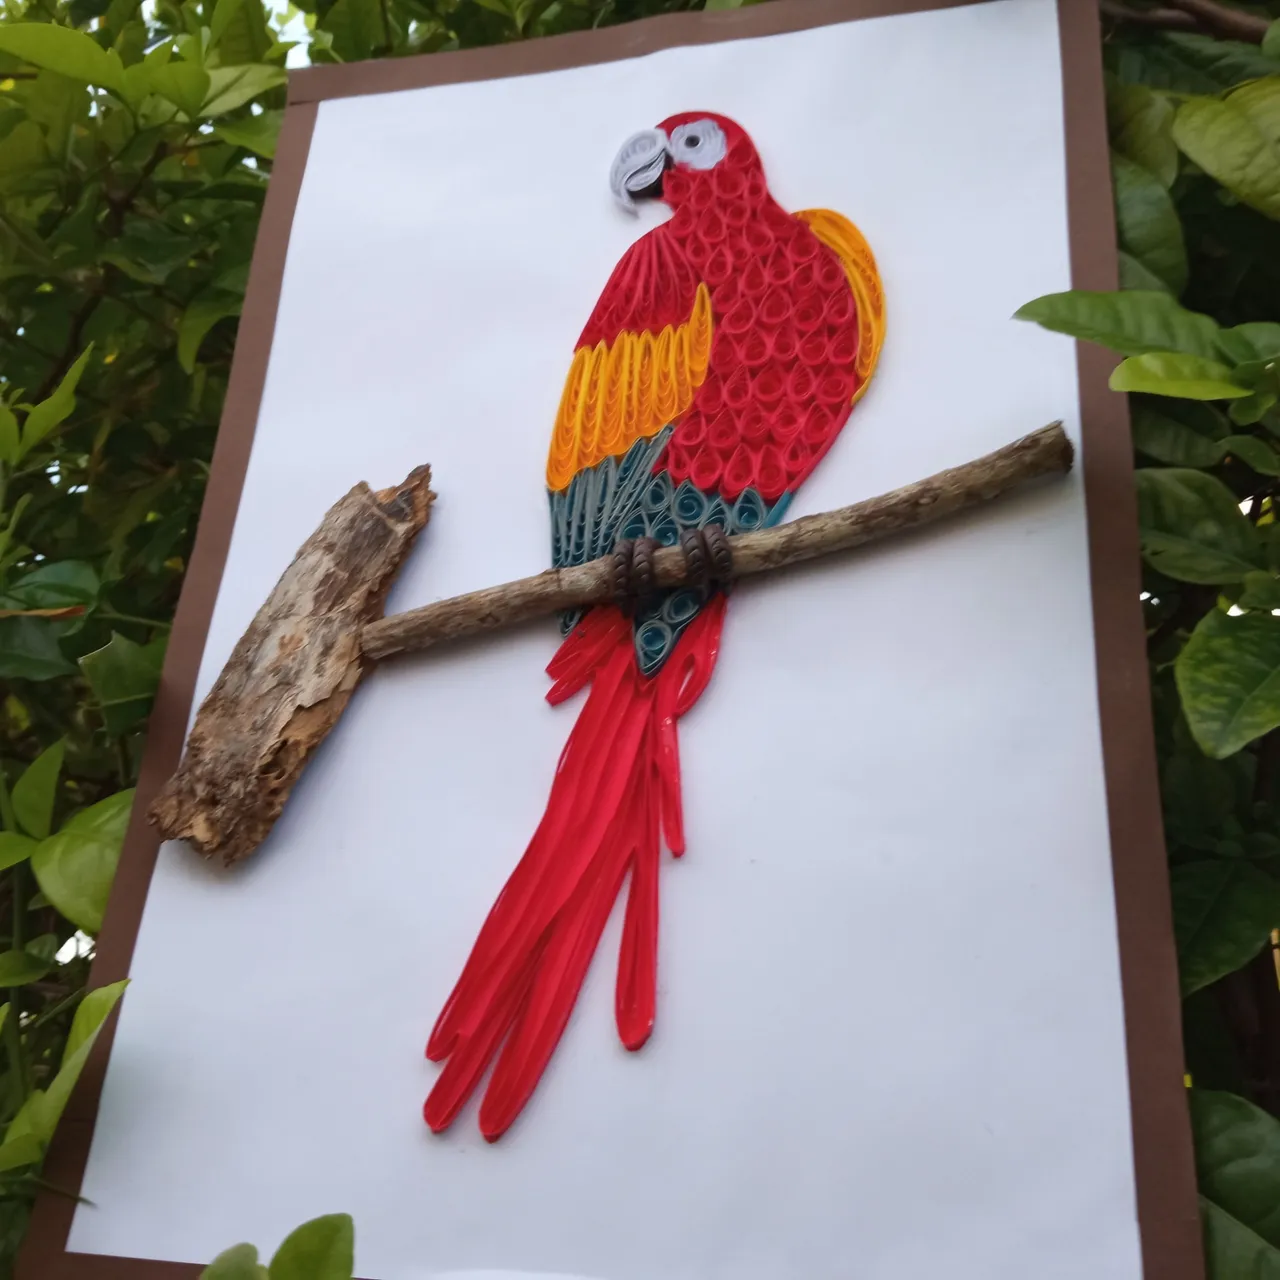
Para elaborar este cuadro me inspiré en una guacamaya roja, estás son aves muy coloridas y atractivas y siempre me han gustado, así que decidí hacer una para tenerla en mi estudio, es un cuadro ideal para adornar nuestras paredes, para obsequiar a cualquier familiar, para empezar un emprendimiento, son tantas las cosas que podemos hacer con él, lo que más me gusta de estos trabajos es que los los materiales usados son muy económicos y accesibles, así que ¡Vamos acompáñame al paso a paso.
To make this picture I was inspired by a scarlet macaw, these are very colorful and attractive birds and I have always liked, so I decided to make one to have it in my studio, it is an ideal picture to decorate our walls, to give to any family member, to start an enterprise, there are so many things we can do with it, what I like most about these works is that the materials used are very cheap and accessible, so come on join me to the step by step.
Bello cuadro de Guacamaya roja en filigrana
Beautiful painting of Red Macaw in filigree
.

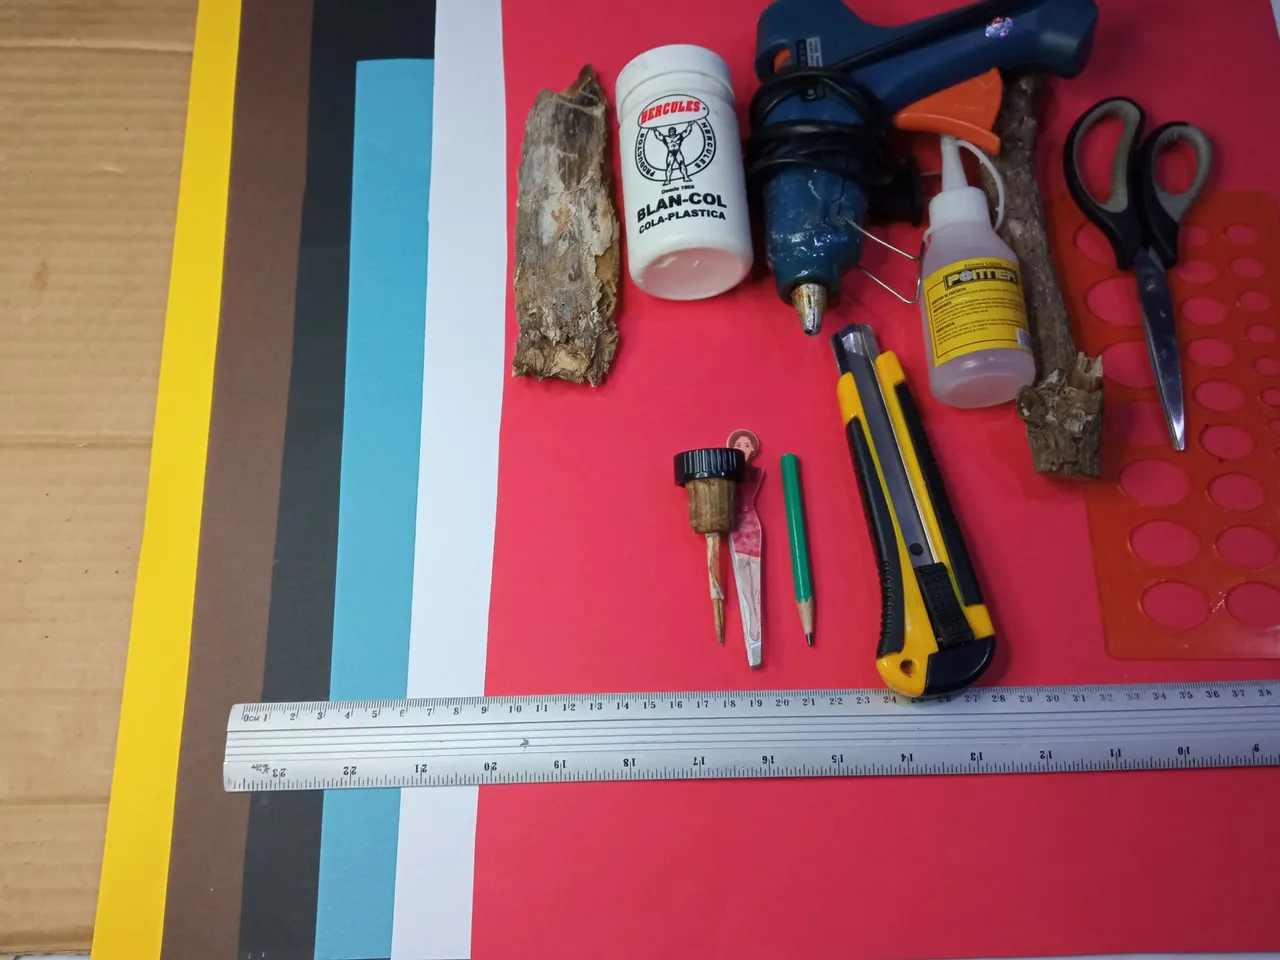
Materiales
Materials
.Cardboard (red, black, brown, brown, white, yellow, blue) Cardboard Pencil Cutter Liquid silicone White glue Popsicle stick Scissors Tree shell Thin tree stick Rolling pin Template Clamp
Pasos para la elaboración
Processing steps
.Paso 1
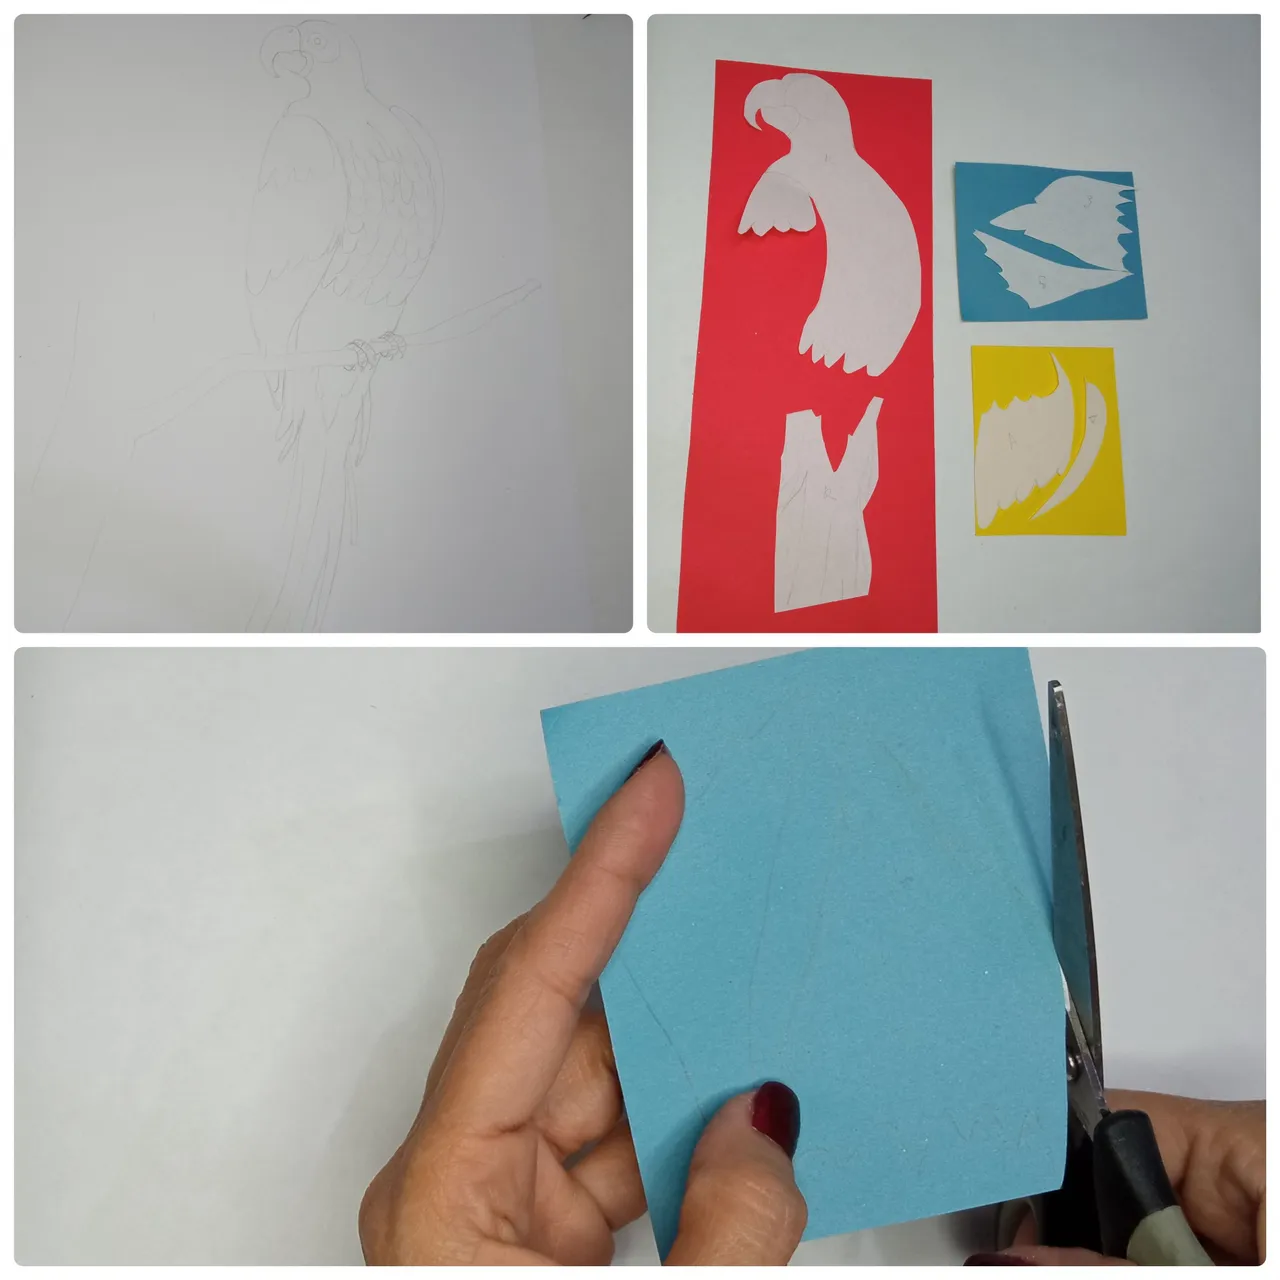
- Lo primero que haremos es dibujar una linda guacamaya, luego recortamos separando las partes y las transferimos a la cartulina con sus respectivos colores, procedemos a recortar cada una.
Step 1
The first thing we will do is to draw a beautiful macaw, then we cut out the parts and transfer them to the cardboard with their respective colors, proceed to cut out each one.
Paso 2
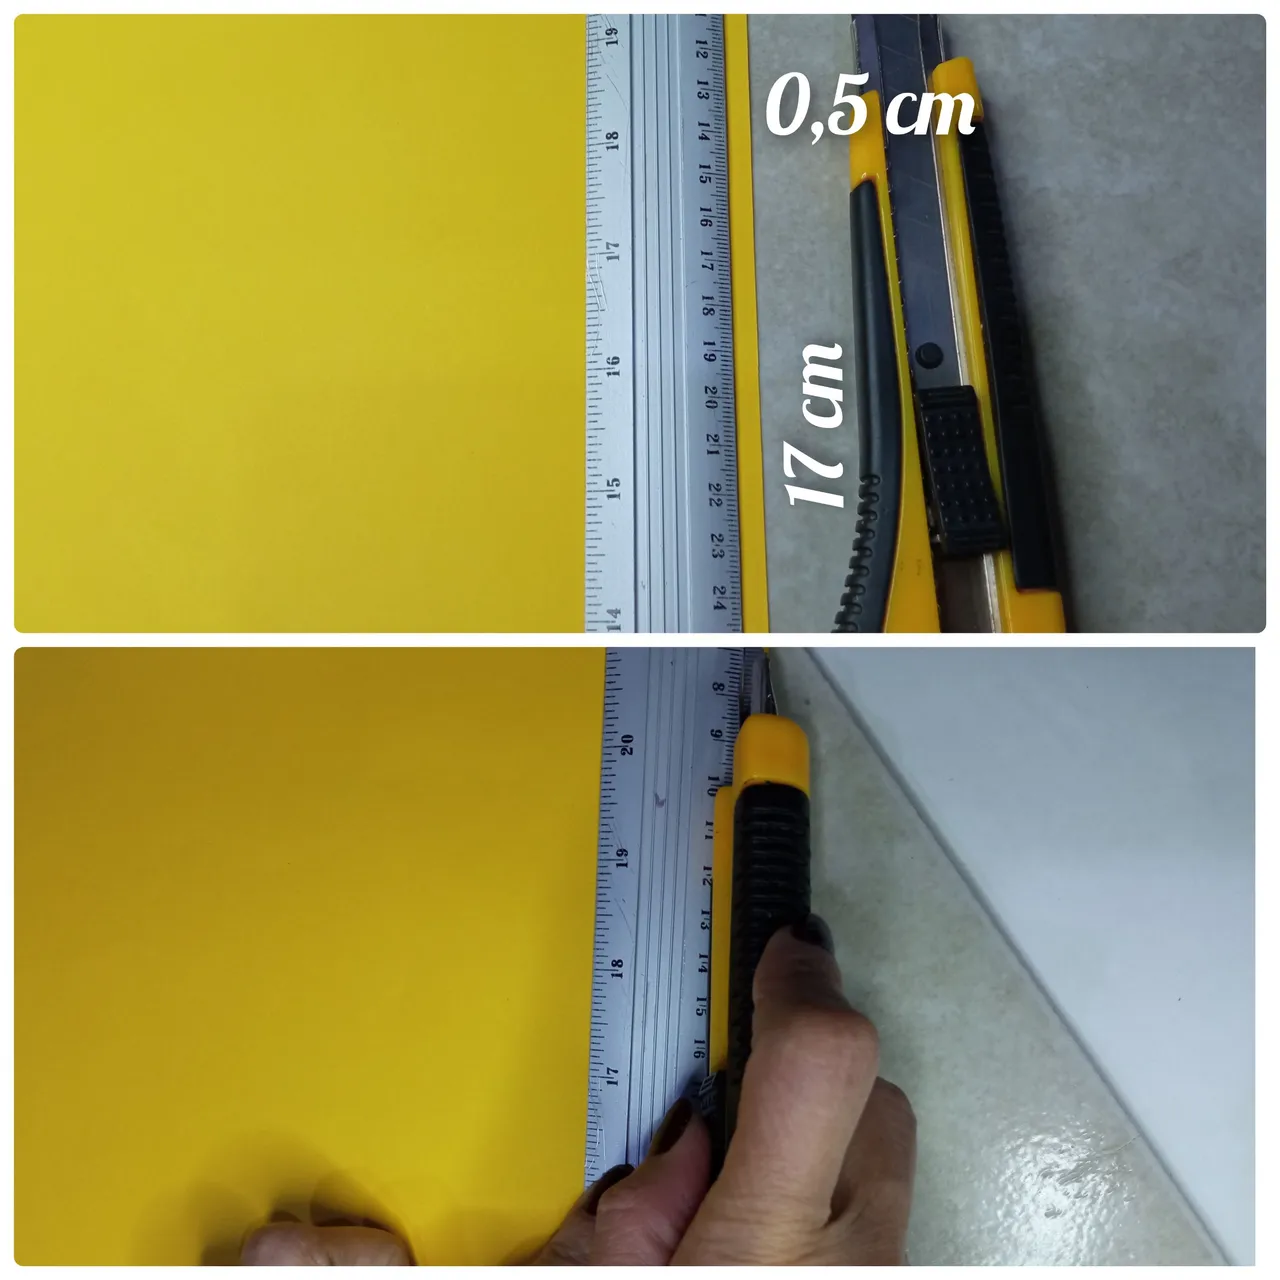
- Para las tiras, medimos y cortamos con el cúter tiras de 0,5 cm por 17 cm, de los colores que usaremos, estas tiras las venden ya listas cortadas y medidas, pero siempre es más económico hacerlo nosotros mismos, además que es relajante cortarlas.
Step 2
For the strips, we measure and cut with the cutter strips of 0.5 cm by 17 cm, of the colors we will use, these strips are sold already cut and measured, but it is always more economical to do it ourselves, besides it is relaxing to cut them.
Paso 3
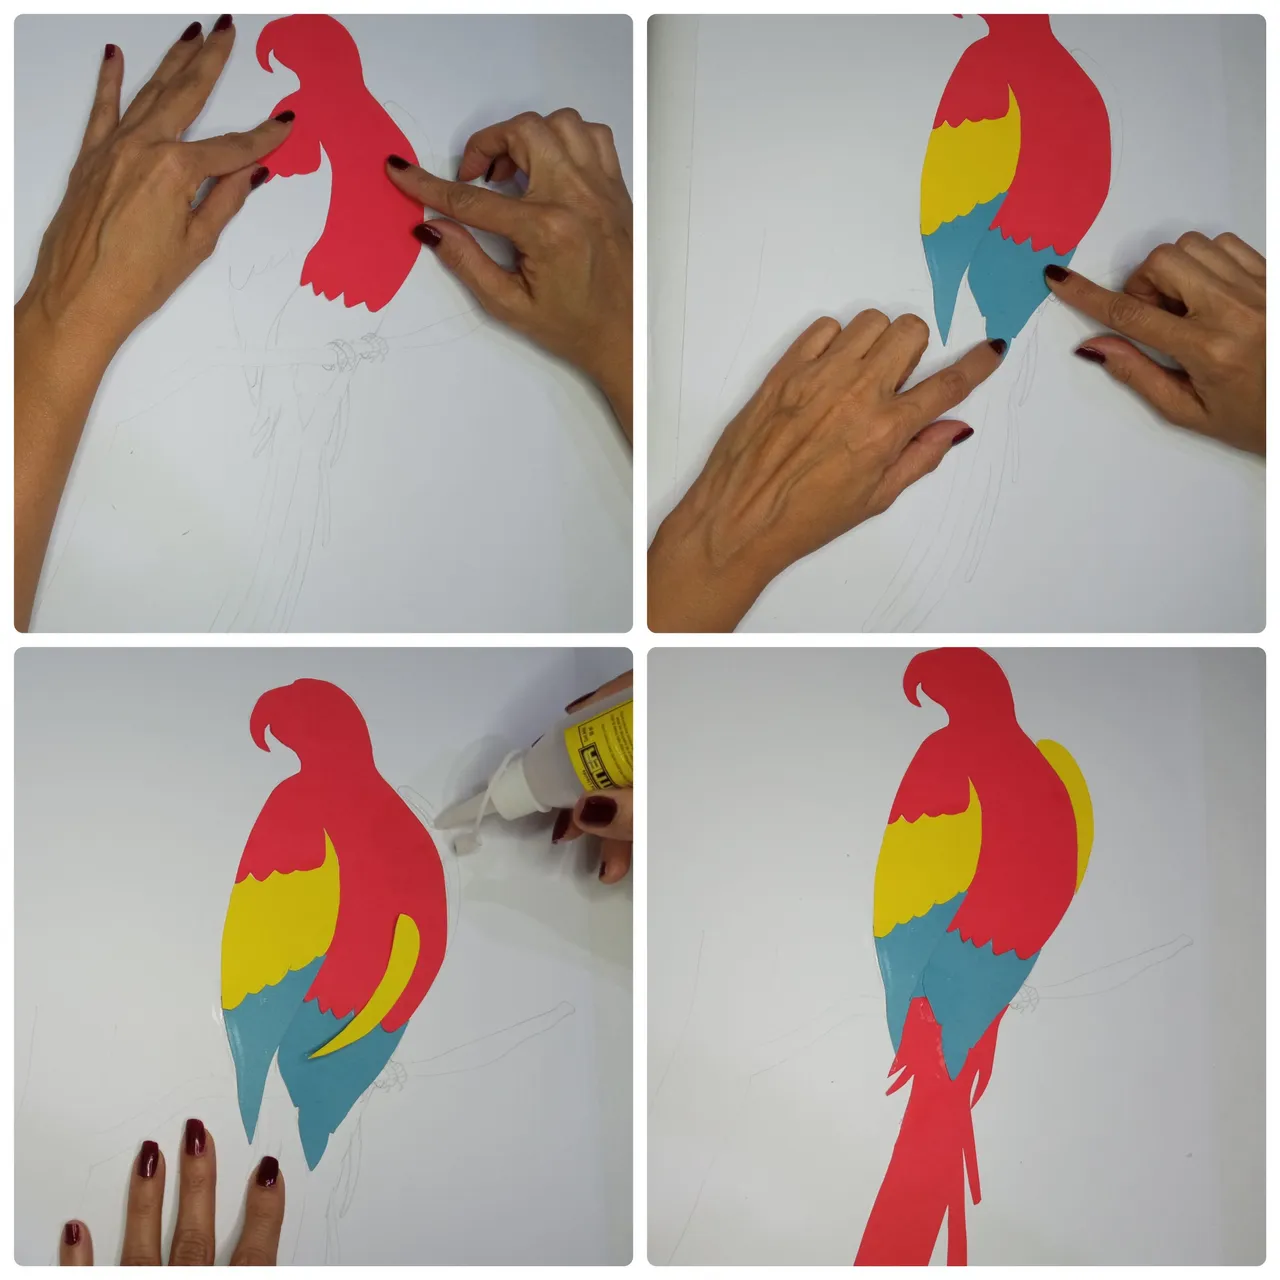
- Vamos pegando con silicón líquido cada parte de la guacamaya en la cartulina blanca, respetando los colores.
Step 3
We glue with liquid silicone each part of the macaw on the white cardboard, respecting the colors.
Paso 4
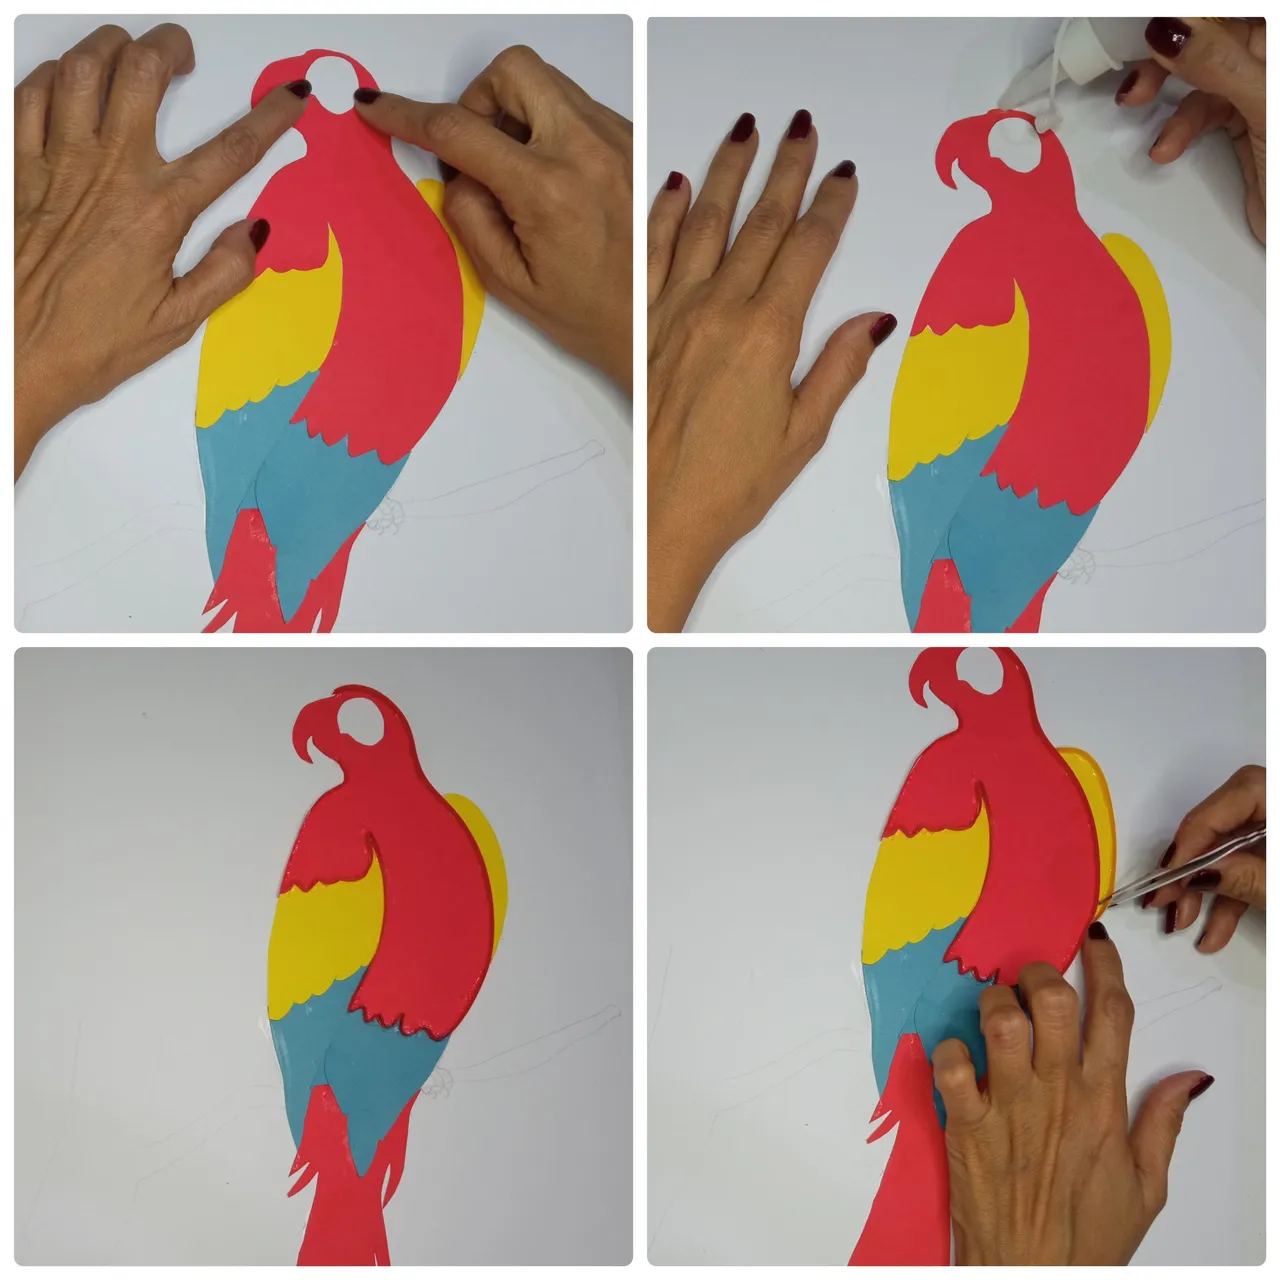
- Ahora pegamos la base del el área del ojo y vamos bordeando toda la guacamaya con tiras del color respectivo, esto lo haremos para darle un aspecto más bonito y para que a la hora de rellenar con las formas de filigrana sea más fácil.
Step 4
Now we glue the base of the eye area and border the whole macaw with strips of the respective color, this is to give it a nicer look and to make it easier to fill in the filigree shapes.
Paso 5
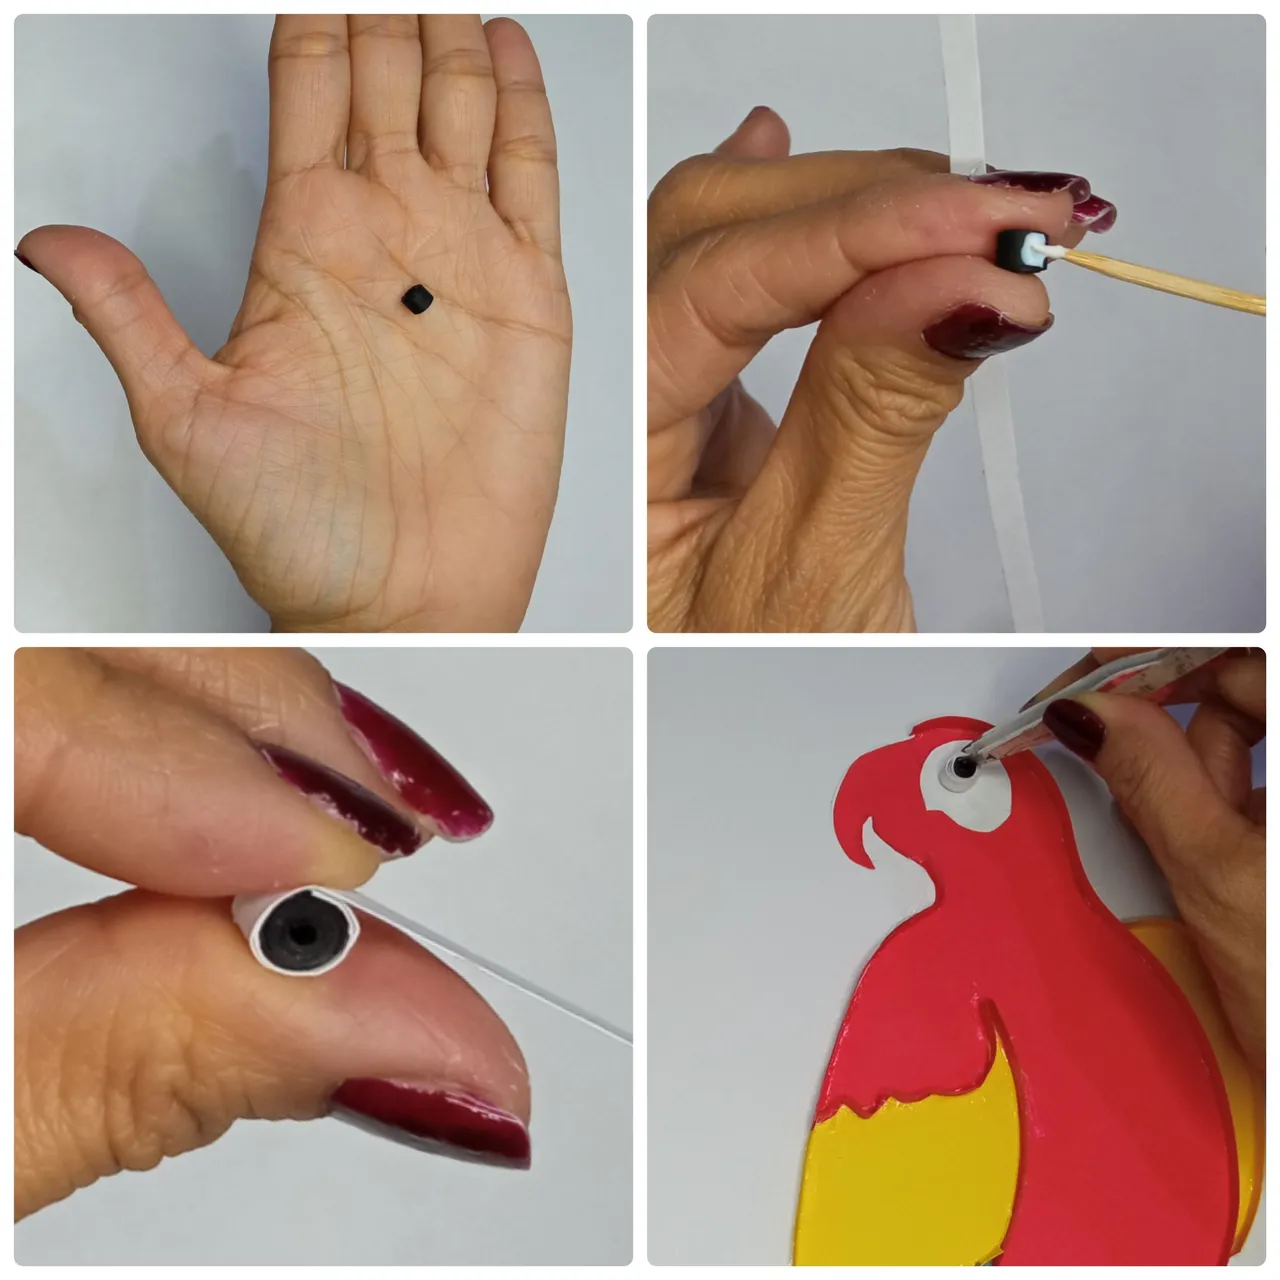
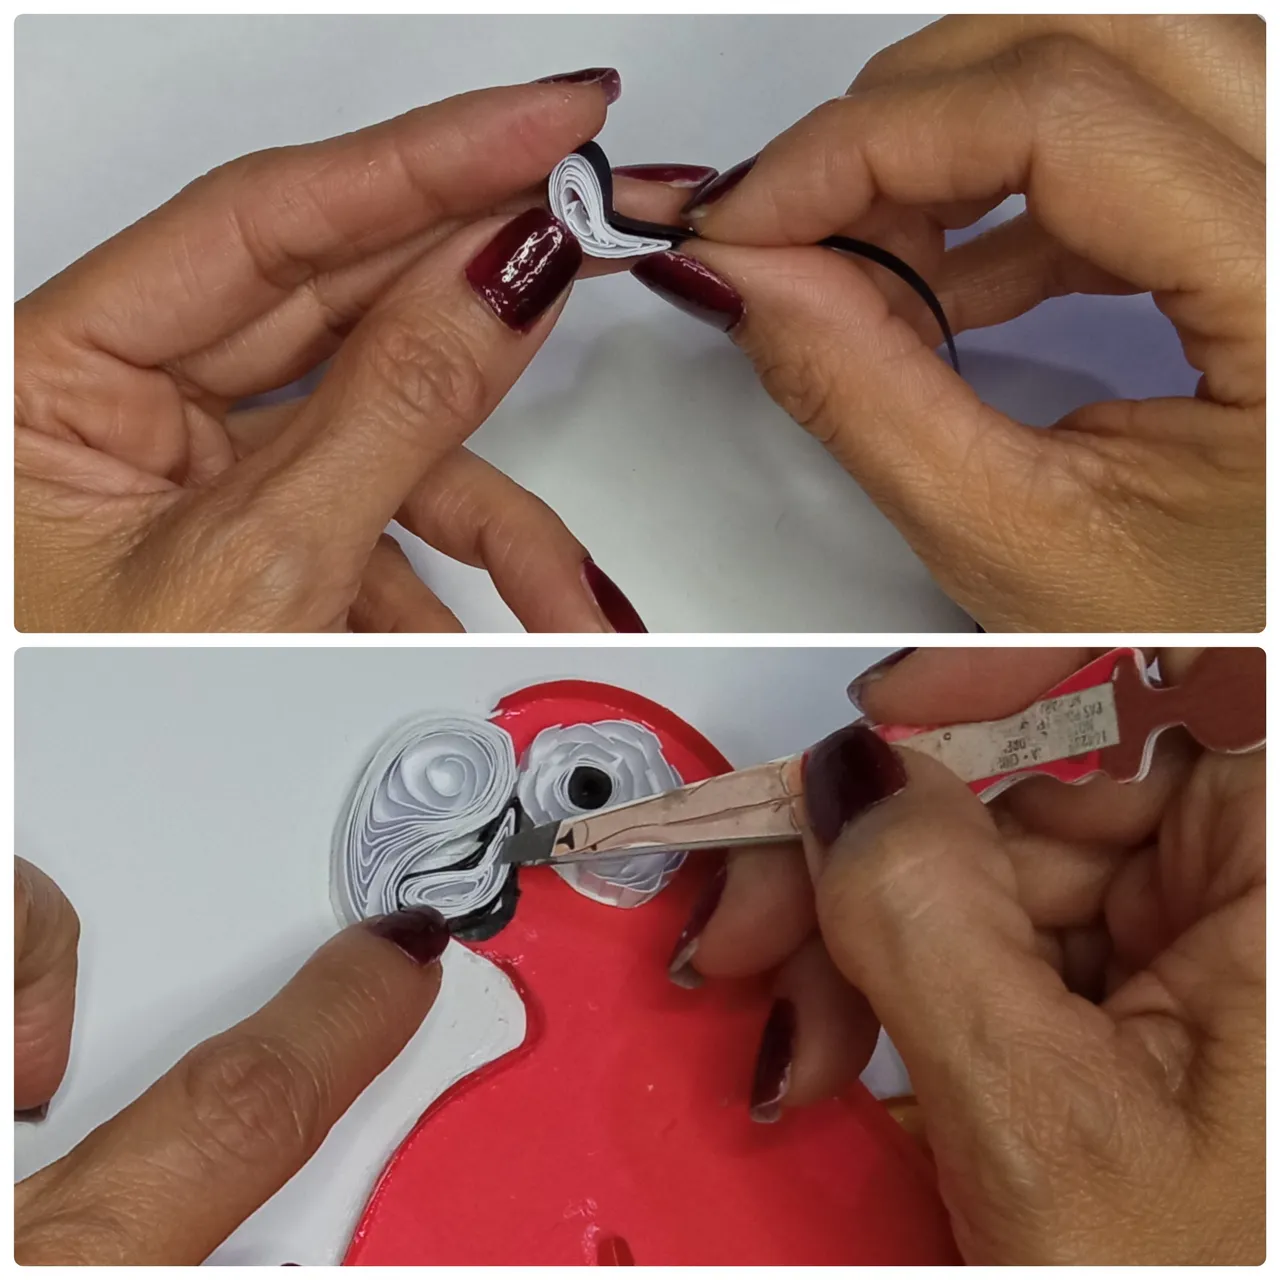
- Para el ojo, tomamos una tira de 0,5 cm por 17 cm la enrollamos hasta el final y pegamos con pega blanca formando un círculo cerrado, luego sobre él pegamos una tira blanca con las mismas medidas y enrrollamos, luego lo pegamos y ya estará listo el ojo de la guacamaya.
Step 5
For the eye, we take a strip of 0.5 cm by 17 cm, roll it up to the end and glue it with white glue forming a closed circle, then on it we glue a white strip with the same measures and roll it up, then we glue it and the macaw's eye will be ready.
Paso 6
- Para bordear el ojo, usaremos pedacitos pequeños de cartulina blanca, simulando cómo unas pequeñas escamas, luego los doblamos ayudándonos con el enrrollador y los vamos pegando alrededor del ojo de la guacamaya.
Step 6
To border the eye, we will use small pieces of white cardboard, simulating small scales, then we fold them with the help of a rolling pin and glue them around the macaw's eye.
Paso 7
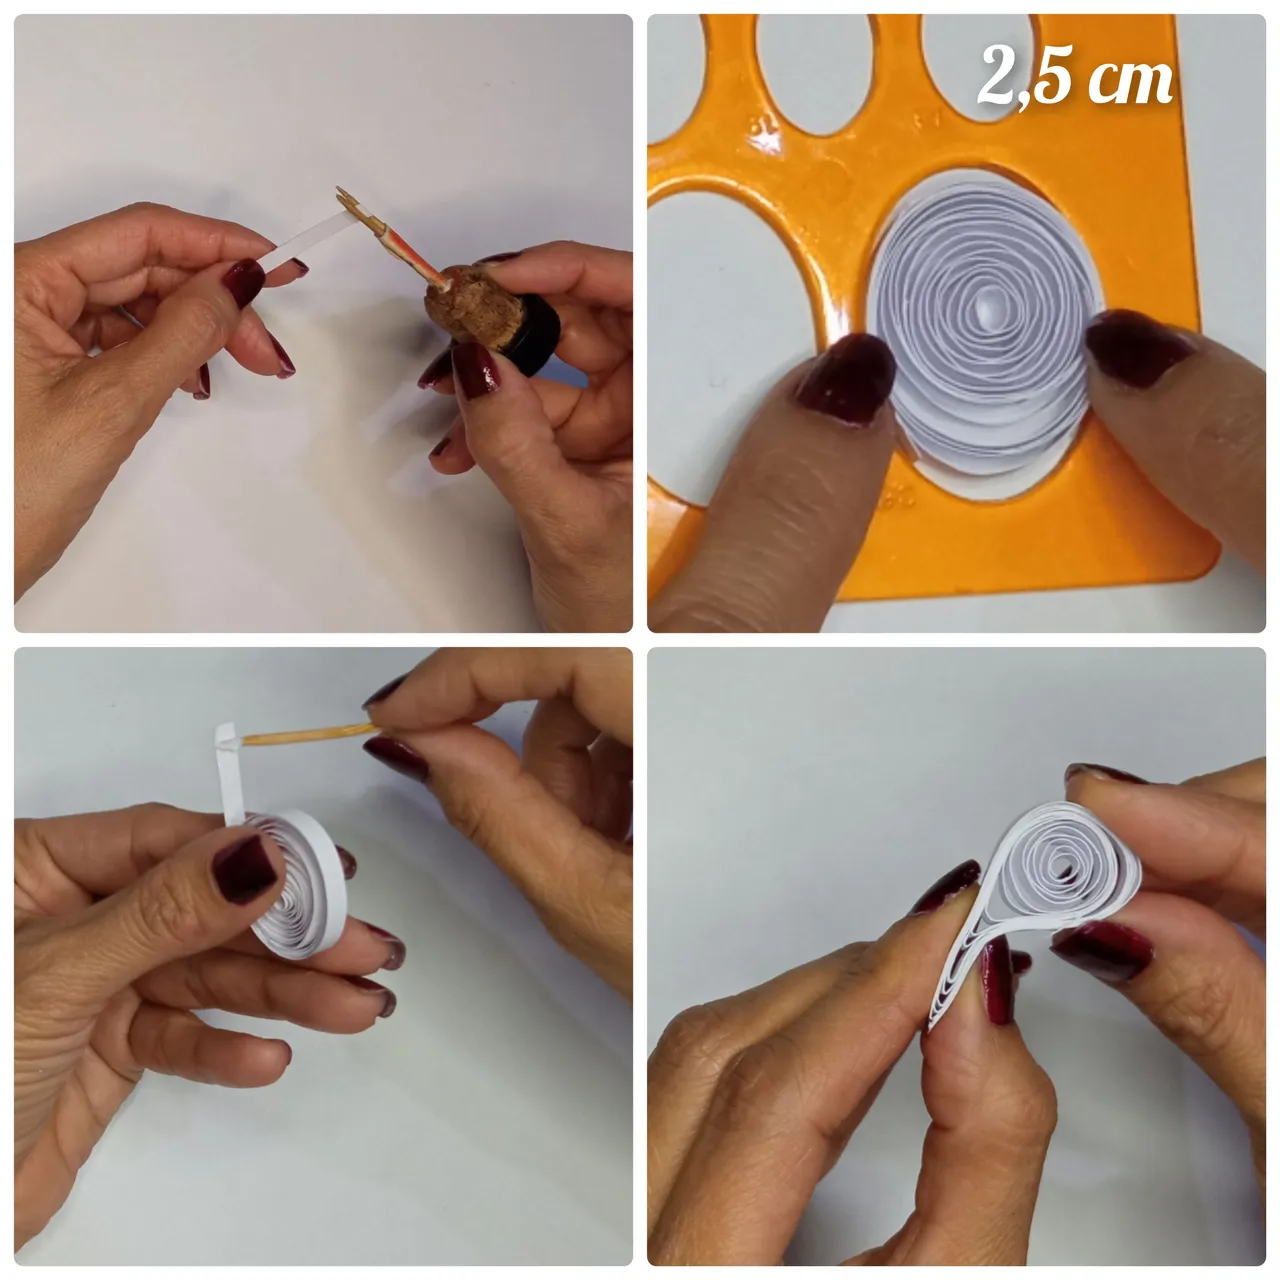
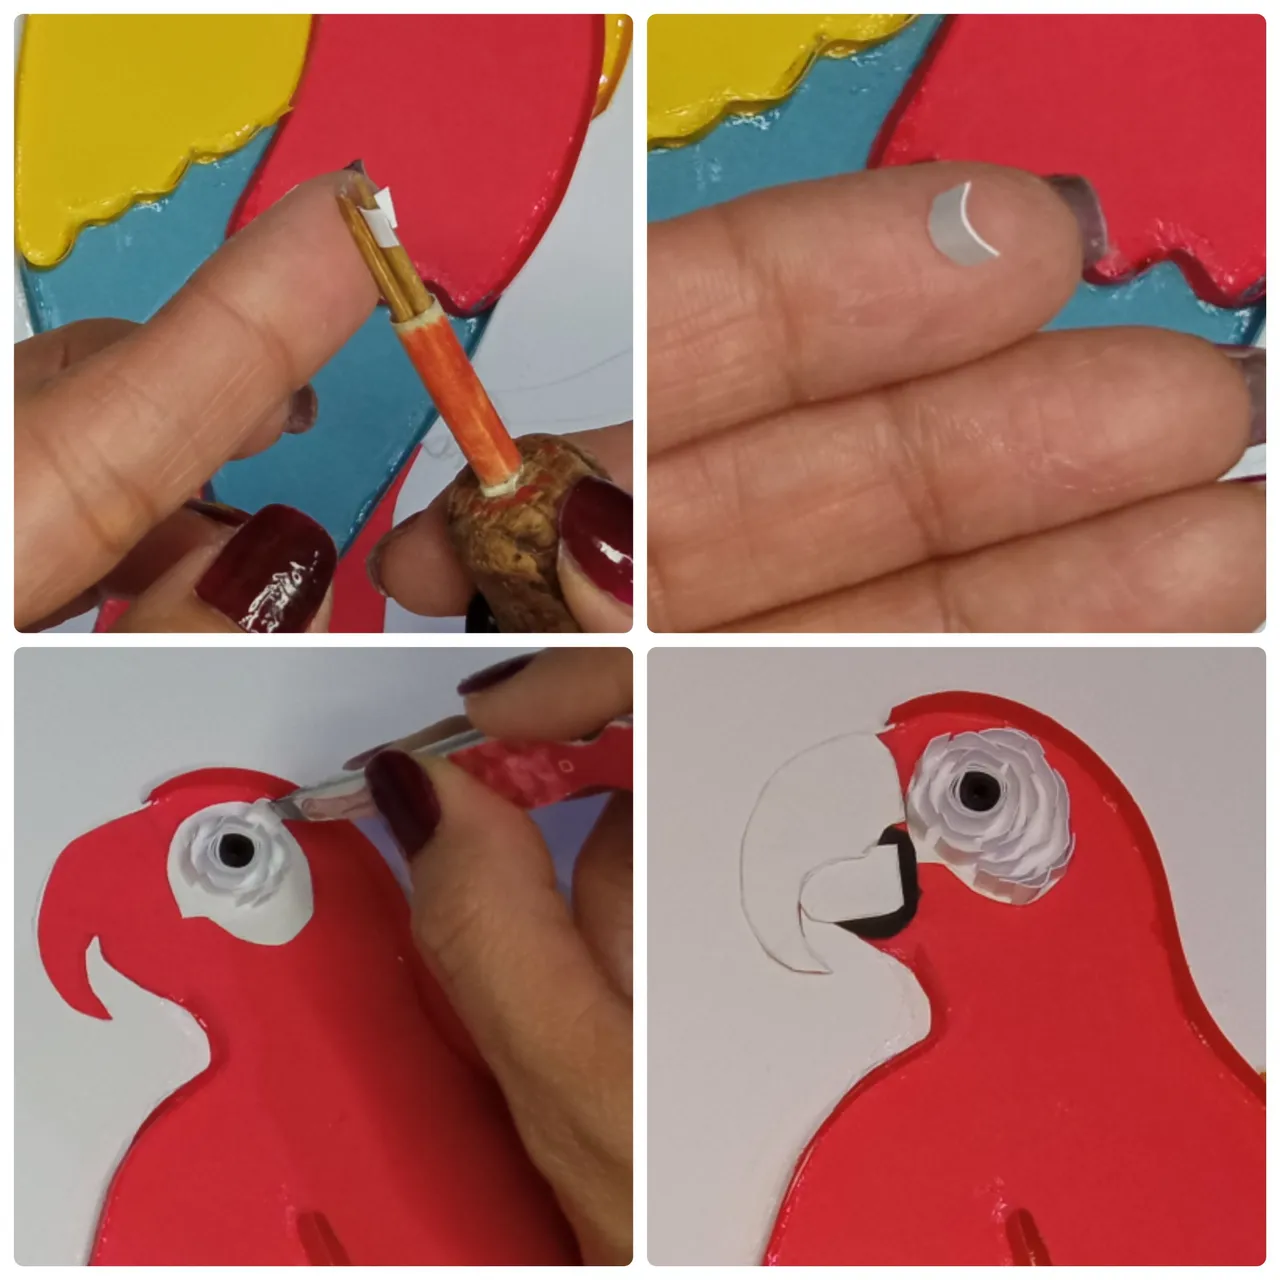
- Para el pico superior, pegamos dos tiras de 0,5 cm por 17 cm cada una, enrrollamos hasta el final sobre ella misma, luego la soltamos en la plantilla, si no tenemos plantilla podemos dibujar un círculo con la medida indicada y servirá de igual manera, hacemos el mismo procedimiento soltando con cuidado la tira, luego pegamos la punta y ya estará listo un círculo abierto, de allí partiremos para hacer la forma del pico, con los dedos índice y pulgar de la mano izquierda hacemos presión para dar forma.
Step 7
For the upper beak, we glue two strips of 0.5 cm by 17 cm each, we roll up to the end on itself, then we release it on the template, if we do not have template we can draw a circle with the indicated measure and it will serve in the same way, we do the same procedure carefully releasing the strip, then we glue the tip and an open circle will be ready, from there we will start to make the shape of the beak, with the index finger and thumb of the left hand we press to give shape.
Paso 8
- Para la parte inferior del pico, tendremos que enrrollar un tira de 0,5 cm por 17 cm y hacemos el mismo procedimiento del paso anterior, solo que al tener listo el pico lo bordeamos con una tira negra.
Step 8
For the lower part of the beak, we will have to roll a strip of 0.5 cm by 17 cm and we do the same procedure of the previous step, only that when we have the beak ready we border it with a black strip.
Paso 9

- Para rellenar el pecho de la guacamaya, haremos la forma de gota, partiendo siempre de un círculo abierto, usaremos tiras de 0,5 cm por 17 cm, luego para hacer la forma usaremos nuestros dedos índice y pulgar haciendo presión.
Step 9
To fill the chest of the macaw, we will make the drop shape, always starting from an open circle, we will use strips of 0.5 cm by 17 cm, then to make the shape we will use our index finger and thumb making pressure.
Paso 10

- Rellenamos el pecho de la guacamaya pegando la forma de gota roja, comenzamos desde la cabeza hasta cubrir toda la parte del pecho que corresponde al color rojo.
Step 10
Fill the chest of the macaw by gluing the red drop shape, starting from the head to cover all the red part of the chest.
Paso 11

- Para las alas usaremos la forma de hoja simple, es muy fácil de hacer, tomaremos dos tiras de 0,5 cm por 17 cm y vamos pasando una tira por encima de la otra y así formamos la hoja, al final cortamos y pegamos con pega blanca, haremos hojas rojas, amarillas y azules estás representarán las plumas de las alas.
Step 11
For the wings we will use the simple leaf shape, it is very easy to make, we will take two strips of 0.5 cm by 17 cm and we will pass one strip over the other and thus form the leaf, at the end we cut and glue with white glue, we will make red, yellow and blue leaves, these will represent the feathers of the wings.
Paso 12
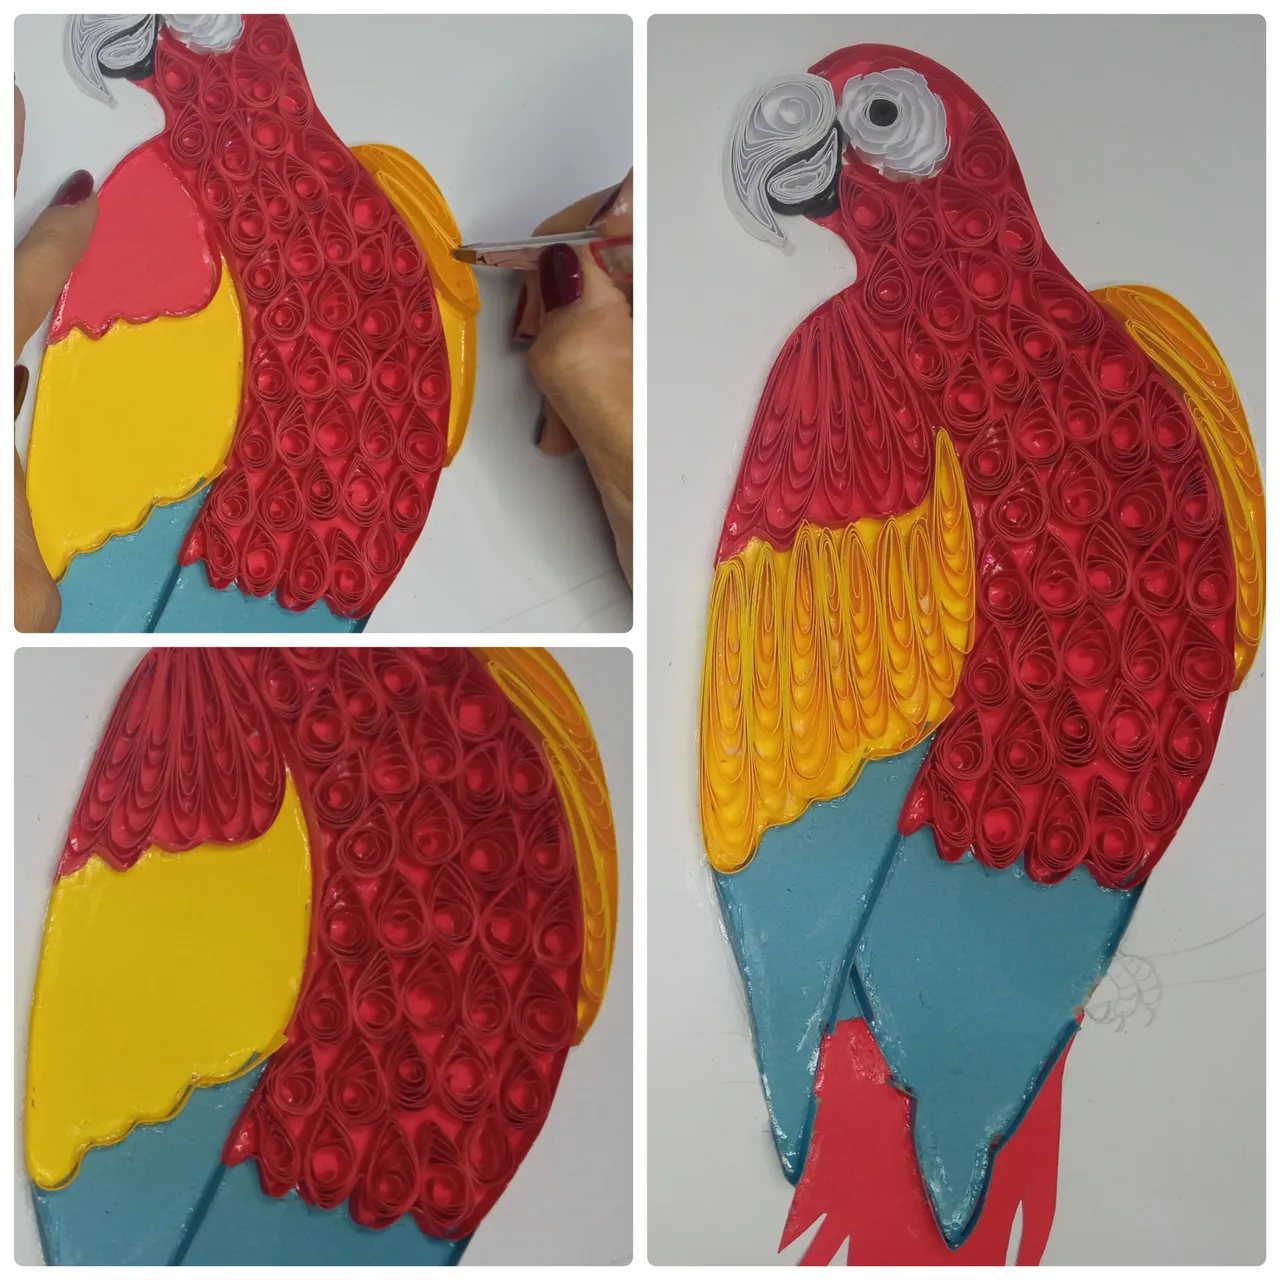
- Comenzamos a pegar las formas de hojas simples en las alas, comenzando por el las plumas amarillas, luego seguimos con las plumas rojas y después nuevamente amarillo.
Step 12
We started gluing the simple leaf shapes on the wings, starting with the yellow feathers, then followed by the red feathers and then yellow again.
Paso 13

- Llegó el momento de fijar el palito dónde irá la guacamaya posada, así que cortamos los espacios dónde irá y luego pegamos con silicón líquido.
Step 13
Now it's time to fix the stick where the macaw will perch, so we cut the spaces where it will go and then glue it with liquid silicone.
Paso 14
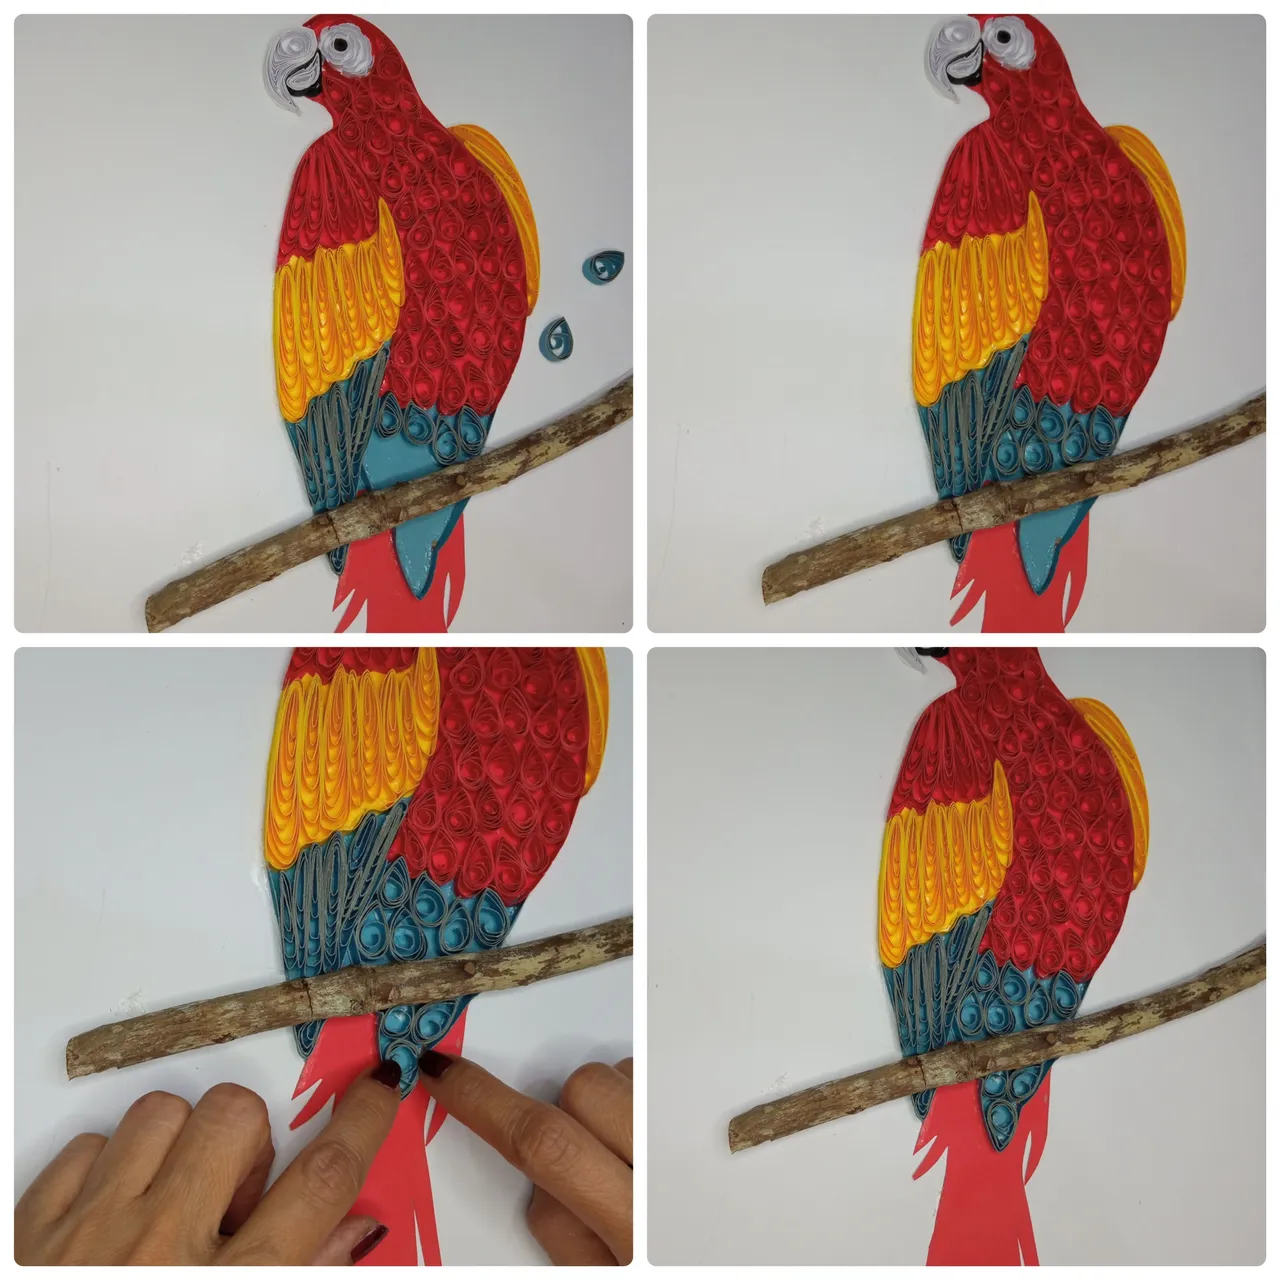
- Terminamos de rellenar la parte azul de la guacamaya, para esta haremos la forma de gota en color azul ya explicada anteriormente.
Step 14
We finish filling the blue part of the macaw, for this we will make the drop shape in blue color already explained above.
Paso 15
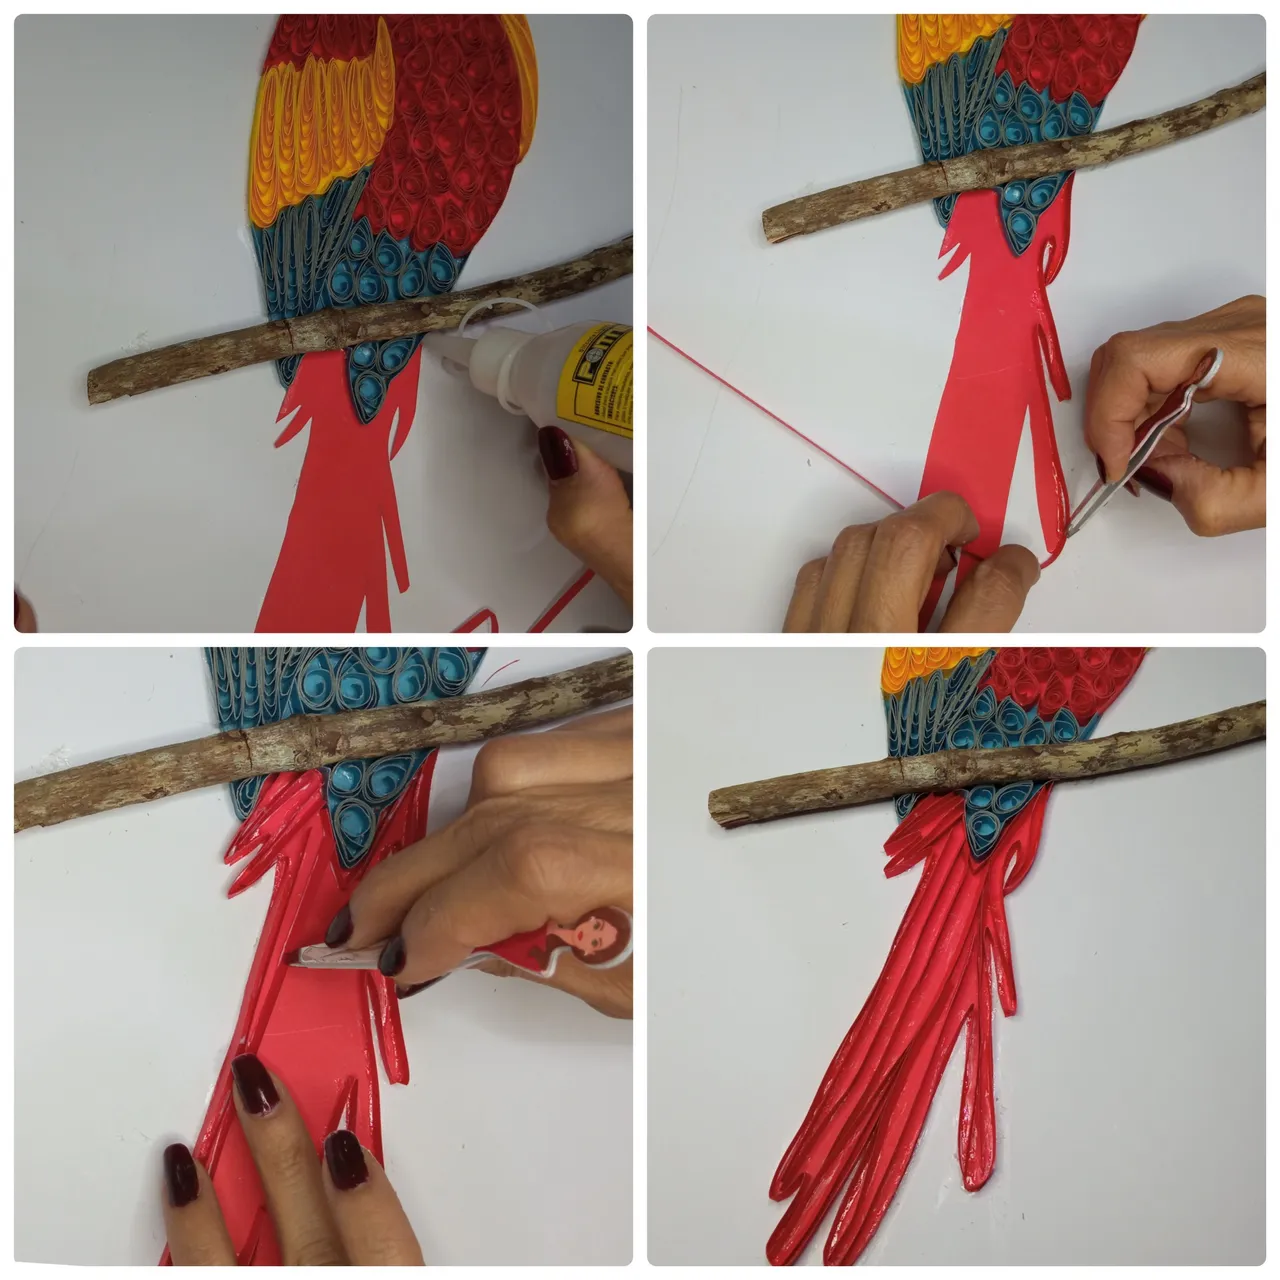
- Para la cola, bordeamos con tiras rojas y luego pegamos tiras a lo largo de ella.
Step 15
For the tail, we border with red strips and then glue strips along it.
Paso 16

- Para finalizar pegamos la cartulina blanca al cartón, con silicón caliente fijamos el tronco del árbol osea una concha de palo, las patas de la guacamaya las hacemos con plastilina, le pondremos un marco con cartulina marrón para que el cuadro de vea más lindo y mejor presentado.
Step 16
Finally, we glue the white cardboard to the cardboard, with hot silicone we fix the trunk of the tree, that is, a stick shell, we make the legs of the macaw with plasticine, we will put a frame with brown cardboard to make the picture look nicer and better presented.
Listo amigos, así quedó mi hermosa guacamaya, espero les guste
"Ready friends, here is my beautiful macaw, I hope you like it."


Todas las fotos son tomadas de mi teléfono Redmi 9, para los collages usé la aplicación collage maker y para la traducción usé DeepL traductor.
All photos are taken from my Redmi 9 phone, for the collages I used the collage maker application and for the translation I used DeepL translator.