Hola amigos de #HIVEDIY, espero que todos se encuentren bien al lado de sus seres queridos, hoy estoy de nuevo por acá y vengo a mostrarles un tutorial a todos ustedes de un bello dragón realizado con la técnica del filigrana, que consiste en enrrollar tiras de papel sobre ella misma y con ella podemos hacer cosas preciosas, ya en mis post anteriores han podido ver qué me apasiona esta bella técnica, que aunque es muy sencilla requiere de una gran paciencia, dedicación y tiempo para elaborarla, pero si le ponemos amor de seguro que nos saldrá bien y en poco tiempo ya estaremos realizando cosas lindas.
Hello friends of #HIVEDIY, I hope you are all well with your loved ones, today I am here again and I come to show you a tutorial to all of you of a beautiful dragon made with the filigree technique, which consists of rolling strips of paper on itself and with it we can make beautiful things, In my previous posts you have already seen how much I love this beautiful technique, which although it is very simple requires great patience, dedication and time to elaborate it, but if we put love for sure we will get it right and in a short time we will be making beautiful things.
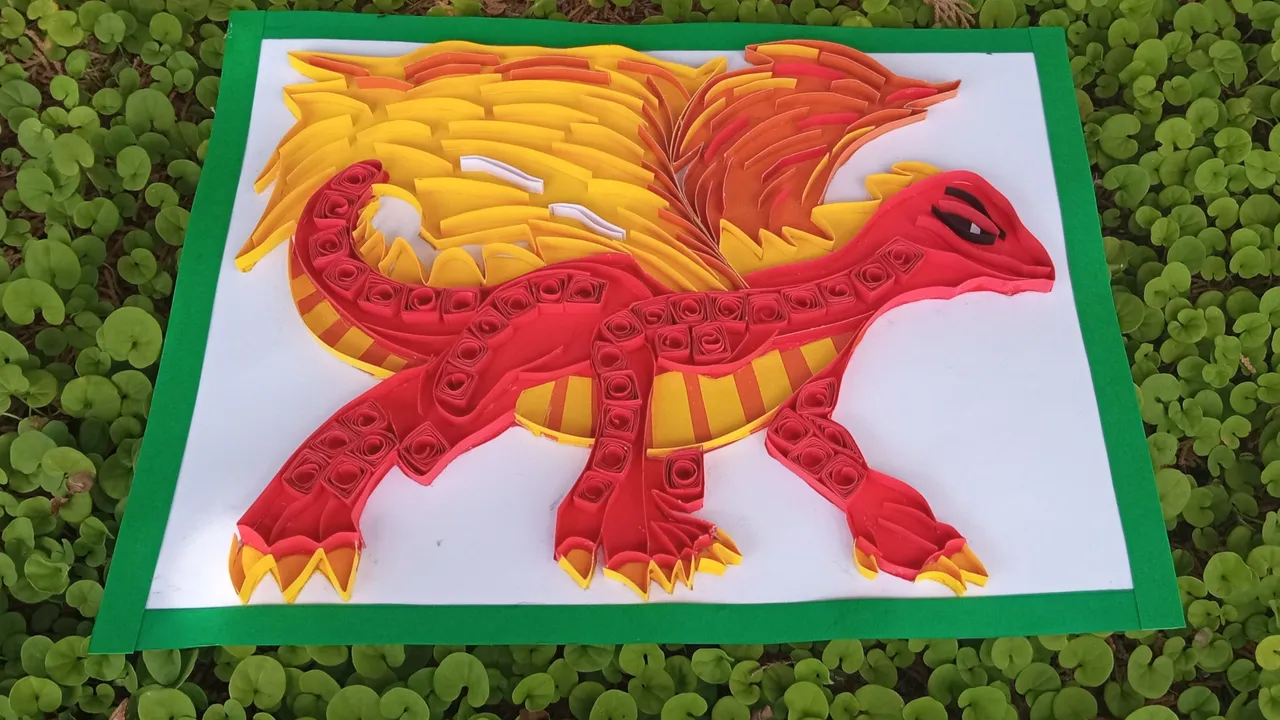
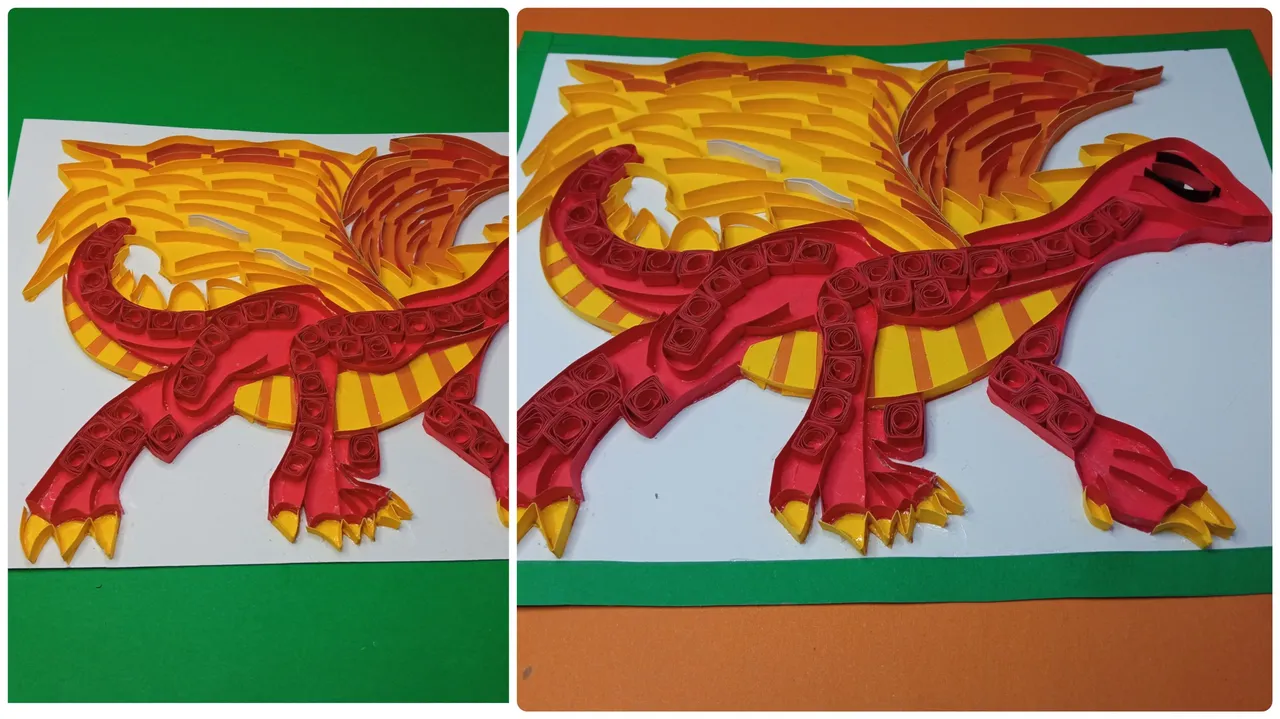
El cuadro que les traigo hoy es sobre un bello dragón llamado Fire Spitter (escupidor de fuego), estoy leyendo un poco sobre el juego de cartas de splinterland y este dragón llamó mi atención ya que tiene grandes cualidades, es pequeño y poderoso, así que me pregunté ¿Porqué no hacerlo? ¿Cómo se verá con la técnica del filigrana? y bueno me animé a realizarlo, además ya tengo una pared en mi casa destinada para todos mis cuadros y este dragón ya tiene un lugar especial.
The painting I bring you today is about a beautiful dragon called Fire Spitter, I'm reading a little about the splinterland card game and this dragon caught my attention because it has great qualities, it is small and powerful, so I asked myself why not do it? How will it look with the filigree technique? and well I decided to do it, besides I already have a wall in my house for all my paintings and this dragon already has a special place.
Los materiales usados son muy económicos y se consiguen fácilmente, por lo general siempre tenemos material de trabajos anteriores y podemos aprovechar cada pedacito de papel para hacer cosas lindas, así que ¡Vamos acompáñame al paso a paso.
The materials used are very inexpensive and easily available, usually we always have material from previous works and we can take advantage of every bit of paper to make beautiful things, so come on join me in the step by step.
Dragón escupidor de fuego
.
Fire-spitting dragon
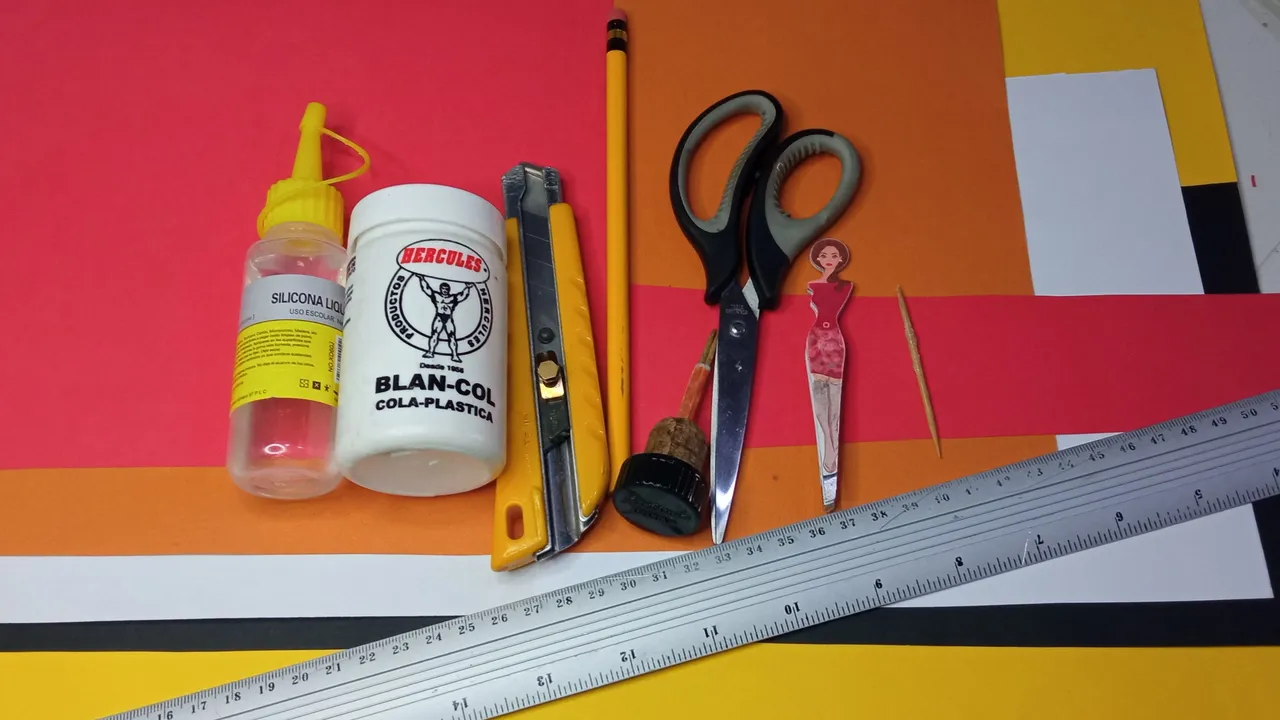
Materiales
Materials
Cardboard, white, red, orange, orange, black Cutter Liquid silicone Scissors Pencil Cutter White glue Stick Rolling pin Ruler Tweezers
Pasos para la elaboración
Steps for the elaboration
.
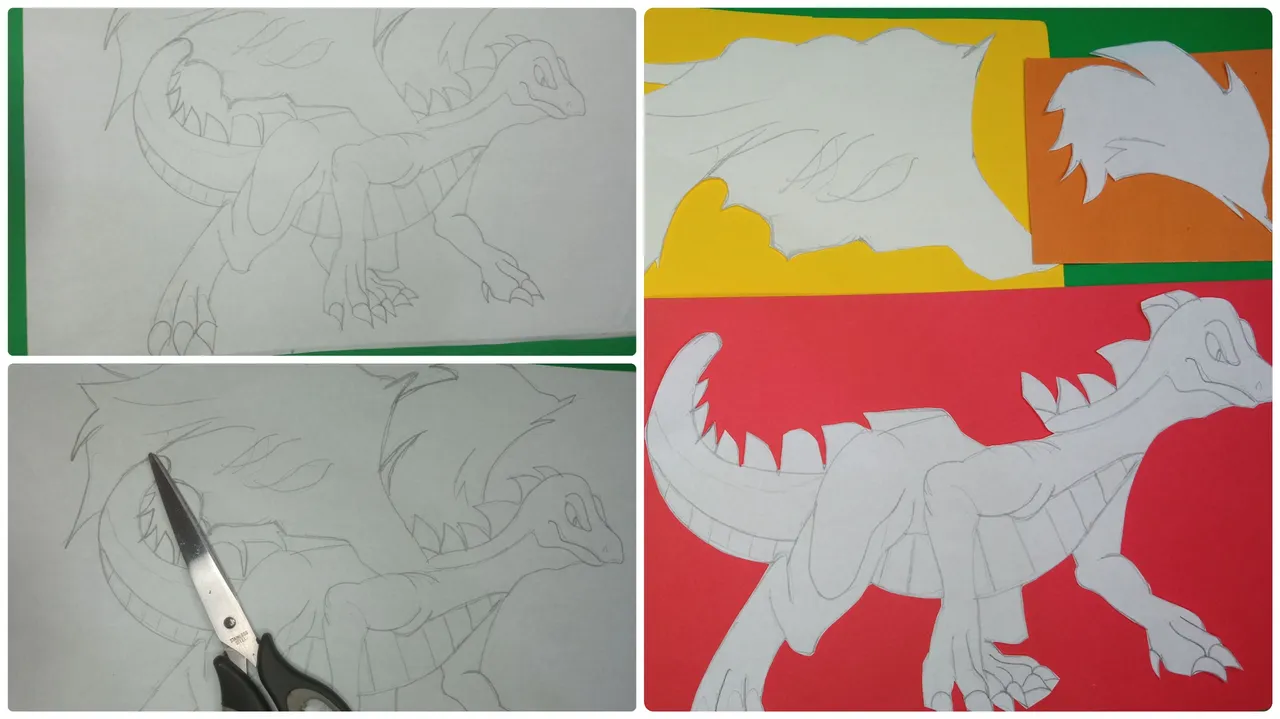
Paso 1
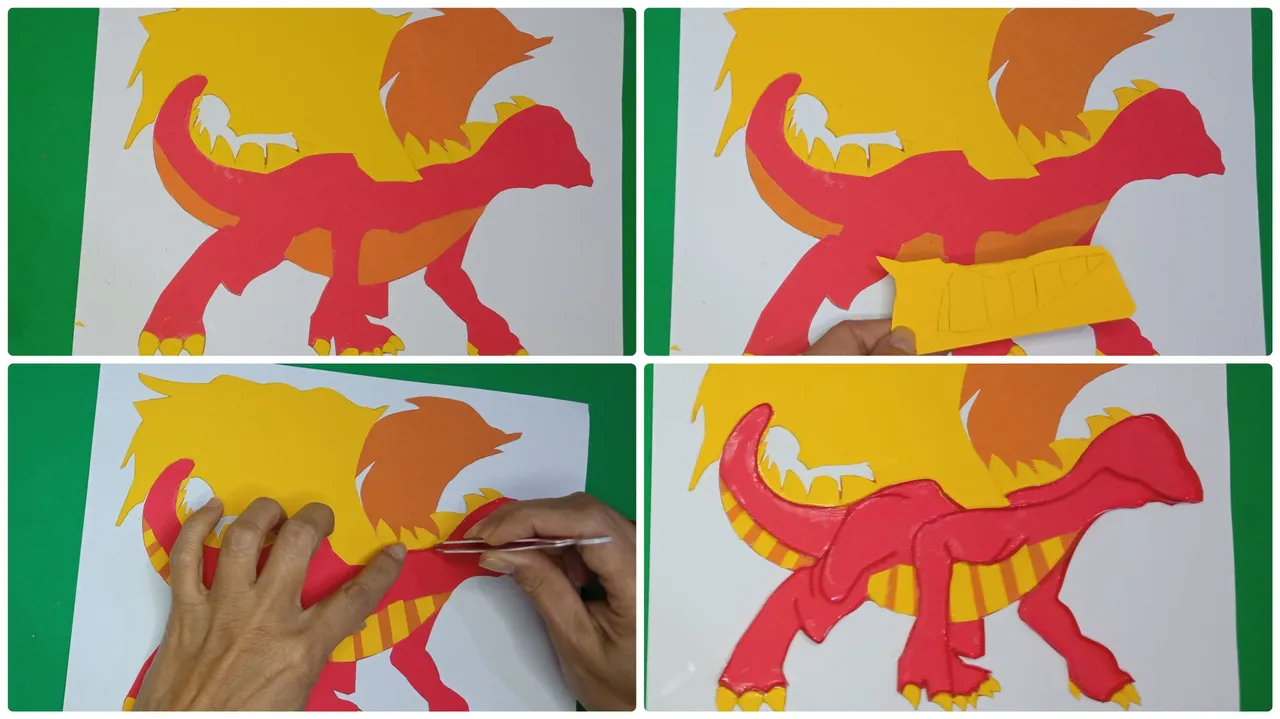
Lo primero que haremos amigos es dibujar un lindo dragón, luego lo recortamos para separar todas las partes, después lo transferimos a las cartulinas del color respectivo y procedemos a recortar.Step 1
The first thing we will do friends is to draw a cute dragon, then we cut it out to separate all the parts, then we transfer it to the respective color cardboards and proceed to cut it out.
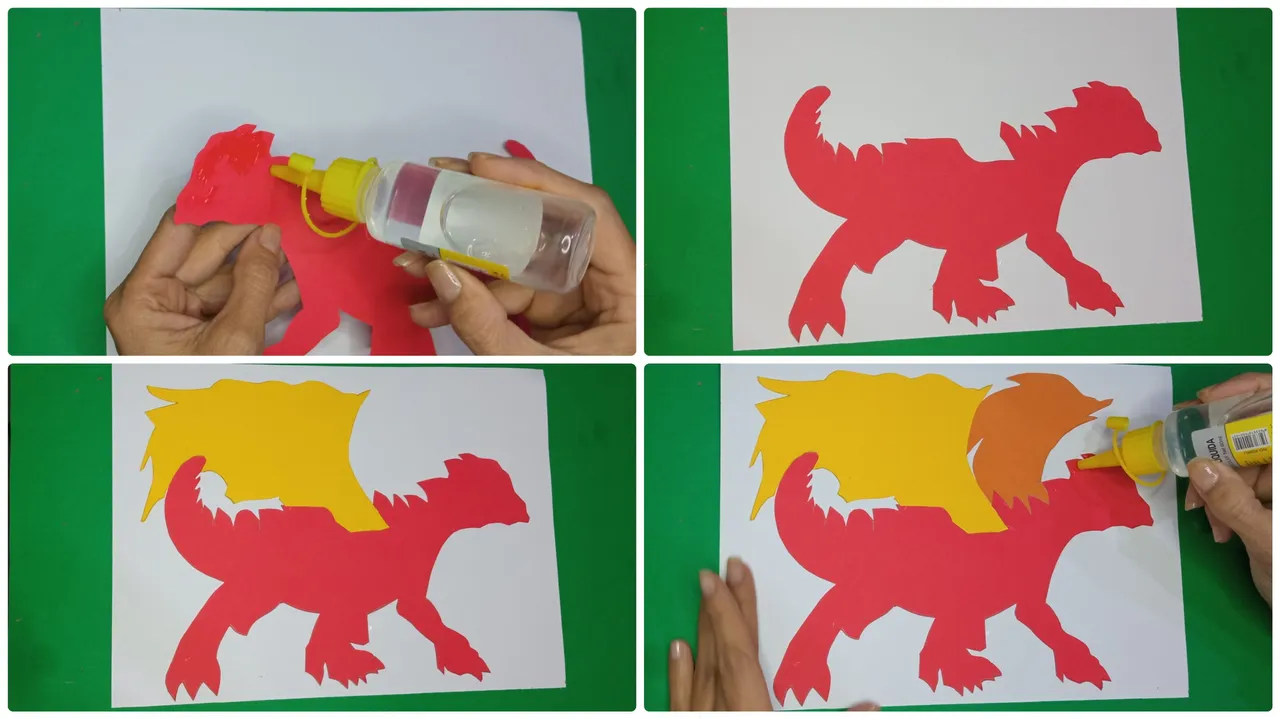
Paso 2
Pegamos cada parte en la cartulina blanca con silicón líquido para unir toda la figura, la cartulina blanca servirá de soporte para el cuadro.Step 2
Paste each part on the white cardboard with liquid silicone to join the whole figure, the white cardboard will serve as a support for the painting.
Paso 3
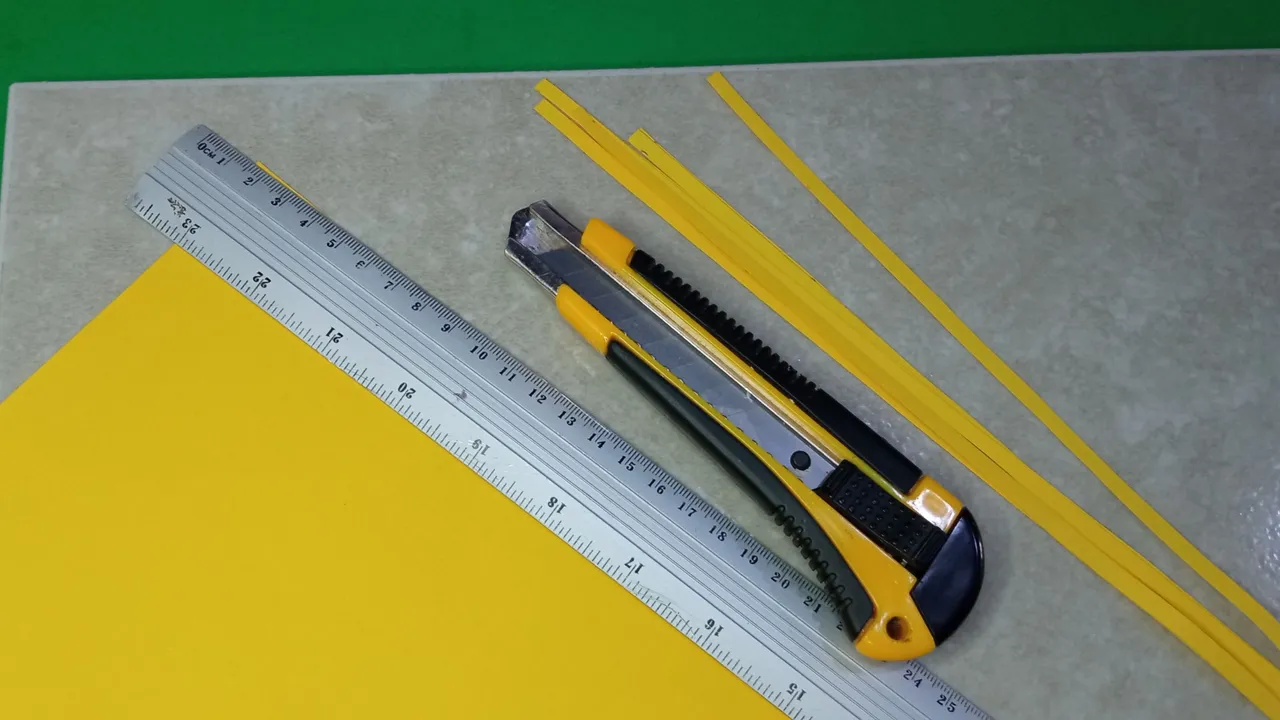
Para las tiras debemos medir 0,5 cm por 17 cm sobre la cartulina, luego cortamos con el cúter apoyándonos en una cerámica, debemos hacerlo con cuidado para no cortarnos, haremos lo mismo con los demás colores.Step 3
For the strips we must measure 0.5 cm by 17 cm on the cardboard, then cut with the cutter leaning on a ceramic, we must do it carefully so as not to cut ourselves, we will do the same with the other colors.
Paso 4
Para la barriga primero pegamos una base naranja y luego con el mismo molde marcamos en cartulina amarilla para complementar la barriga del dragón, recortamos y pegamos dejando espacio en cada tramo para que se aprecie también la parte naranja, luego con tiras comenzamos a bordear toda la silueta del dragón.Step 4
For the belly we first glue an orange base and then with the same mold we mark on yellow cardboard to complement the belly of the dragon, cut and glue leaving space in each section so that the orange part is also appreciated, then with strips we begin to border the entire silhouette of the dragon.
Paso 5
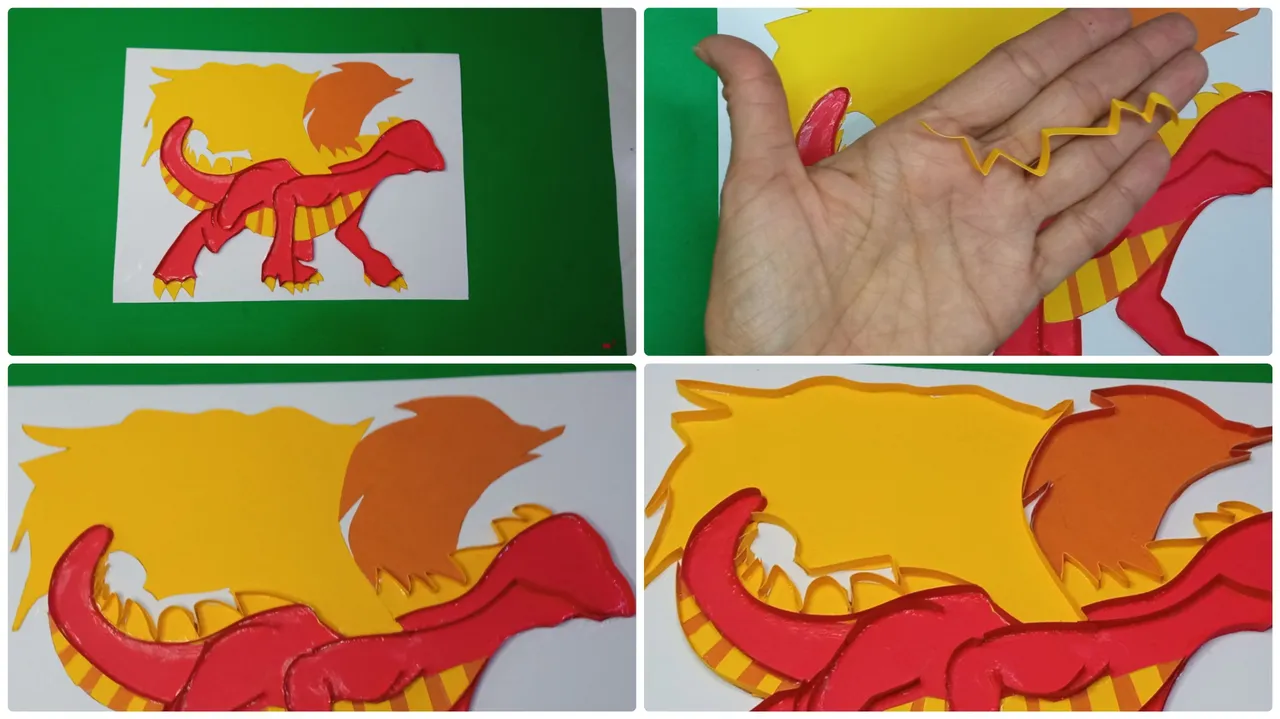
Con tiras amarillas hacemos zic zac y pegamos en la columna del dragón, también terminamos de bordear las alas con tiras del color respectivo.Step 5
With yellow strips we zic zac and glue on the column of the dragon, we also finish bordering the wings with strips of the respective color.
Paso 6
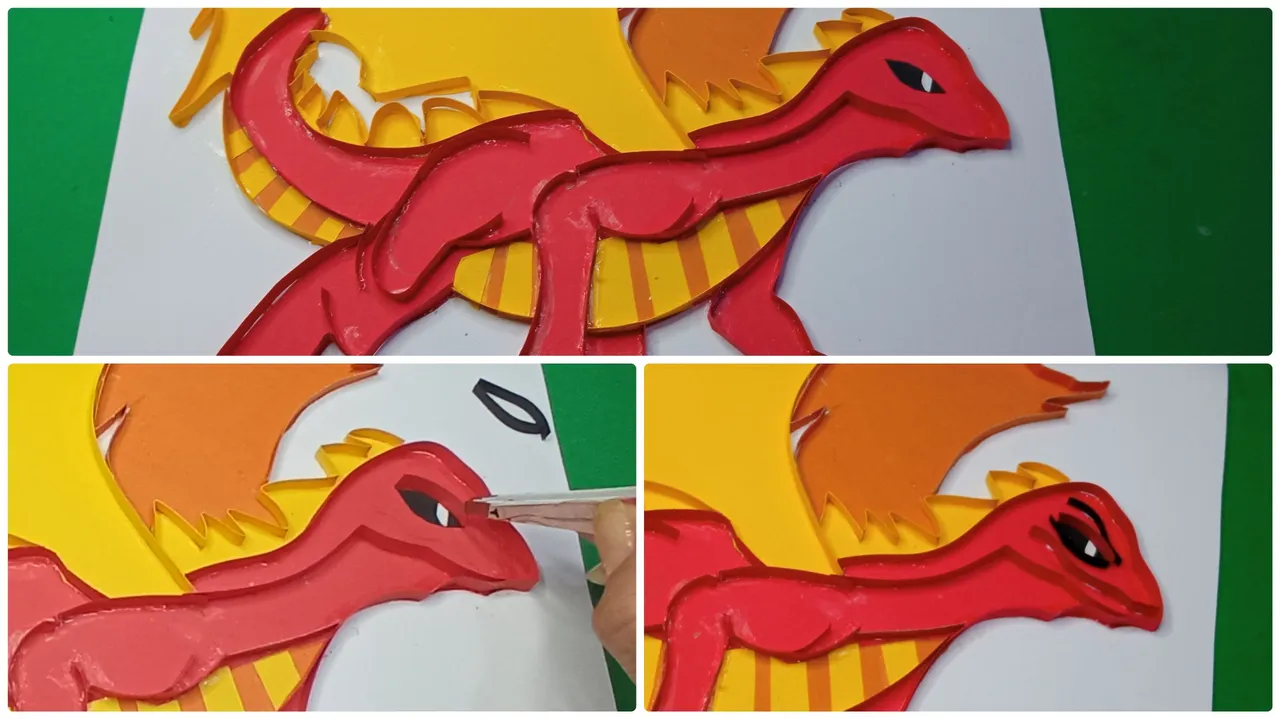
Hacemos un ojo con cartulina negra y blanca pegamos, luego con tiras pequeñas rojas y negras bordeamos el ojo para darle mejor forma.Step 6
We make an eye with black and white cardboard and glue, then with small red and black strips we border the eye to give it a better shape.
Paso 7
Para rellenar parte del cuerpo, primero haremos la forma de círculo abierto de la técnica del filigrana, es muy sencillo hacerlo, colocamos una tira dentro de los dos palitos del enrrollador y damos vuelta sobre ella misma hasta el final, en un papel tendremos ya listo un círculo del tamaño deseado y lo soltamos con cuidado, después pegamos en la punta con pegamento blanco.Step 7
To fill part of the body, first we will make the open circle shape of the filigree technique, it is very easy to do, we place a strip inside the two sticks of the winder and turn over itself until the end, on a paper we will have a circle of the desired size ready and we release it carefully, then we glue at the tip with white glue.
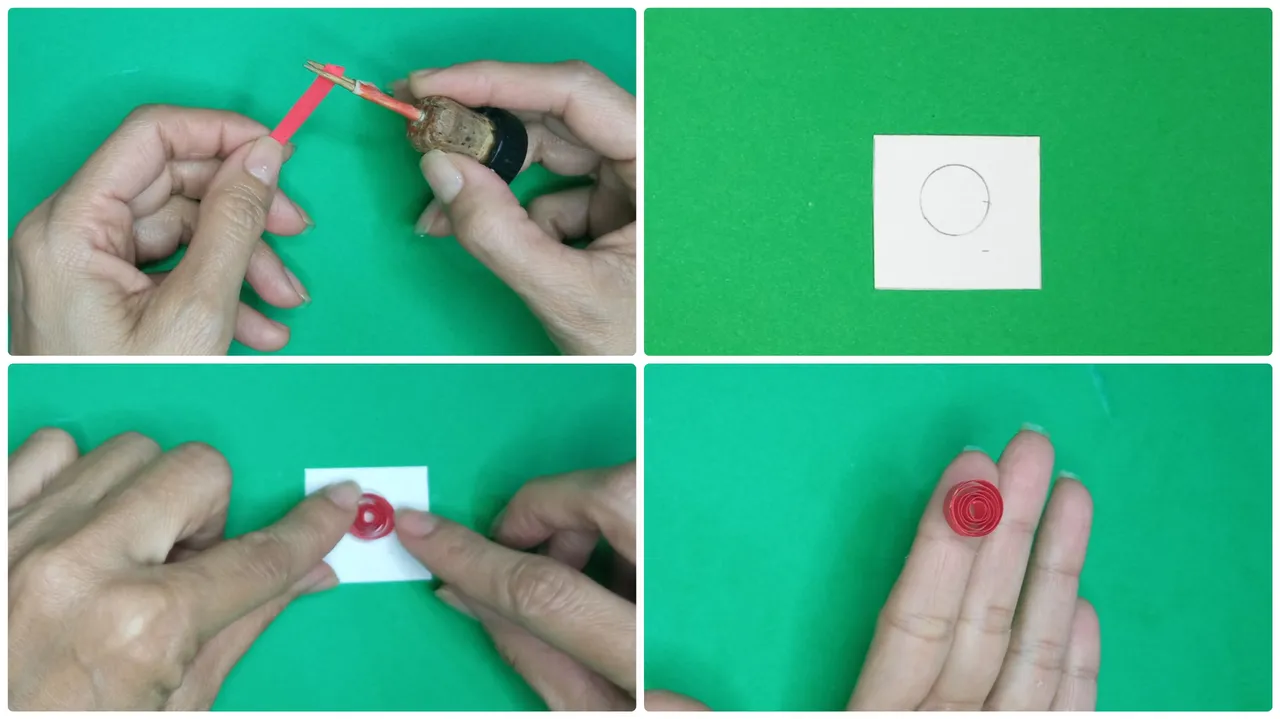
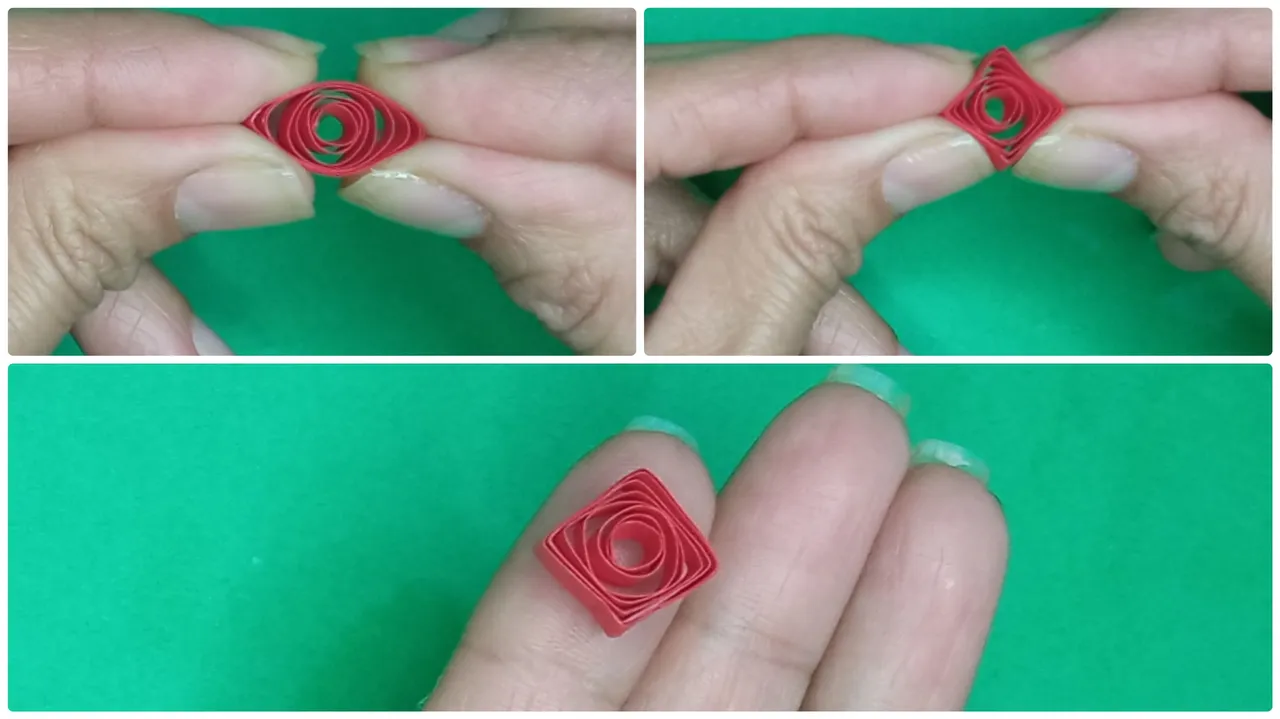
Paso 8
Con el círculo abierto ya listo formaremos la forma básica que se llama cuadrado, es muy simple, con los dedos índice y pulgar de ambas manos hacemos presión formando un óvalo, luego giramos y presionamos de nuevo dando forma de cuadrado.Step 8
With the open circle ready we will form the basic shape called square, it is very simple, with the index finger and thumb of both hands we make pressure forming an oval, then turn and press again giving the square shape.
Paso 9
Comenzamos a pegar los cuadrados en el cuerpo del dragón dejando algunos lugares vacíos para que se aprecie bien la forma del dragón, también pegamos pequeñas tiras en las garras y patas.Step 9
Start gluing the squares on the body of the dragon leaving some empty places so that the shape of the dragon is well appreciated, we also glue small strips on the claws and legs.
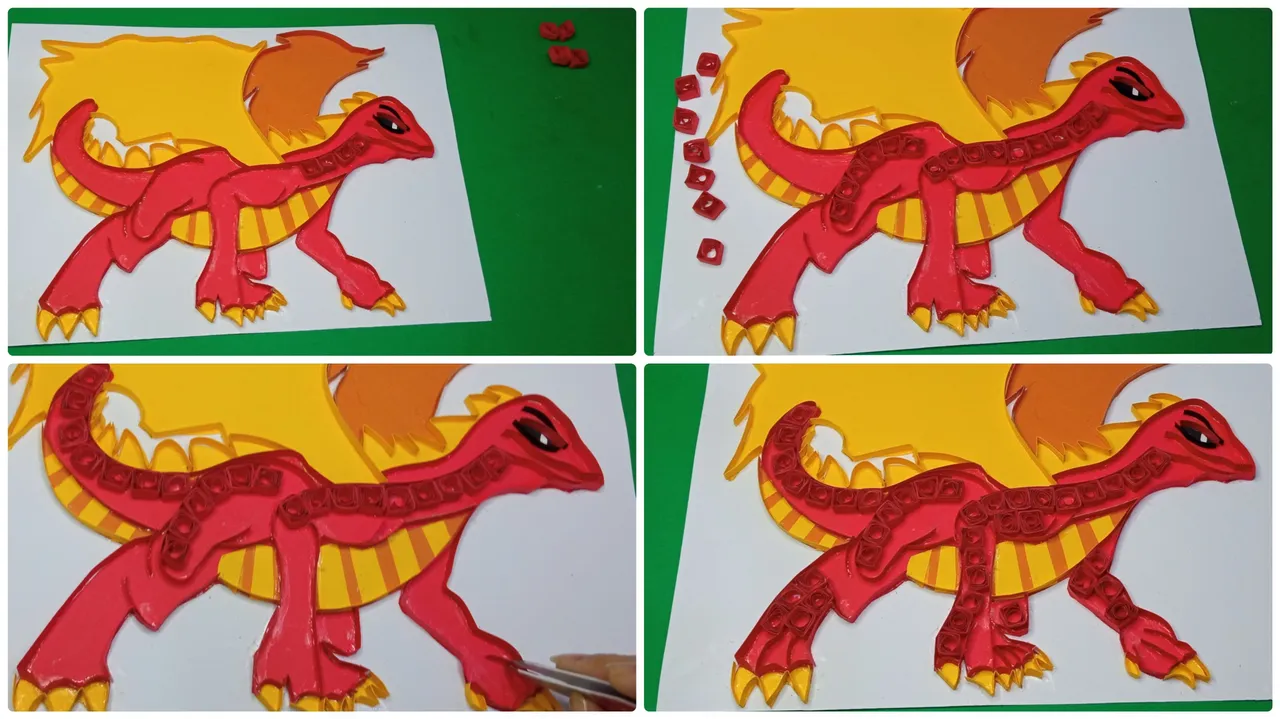
Paso 10
Luego seguimos con el ala del lado izquierdo del dragón, pegamos pequeñas tiras amarillas, naranja y blancas dando forma a la misma.Step 10
Then we continue with the wing on the left side of the dragon, we glue small yellow, orange and white strips giving shape to it.
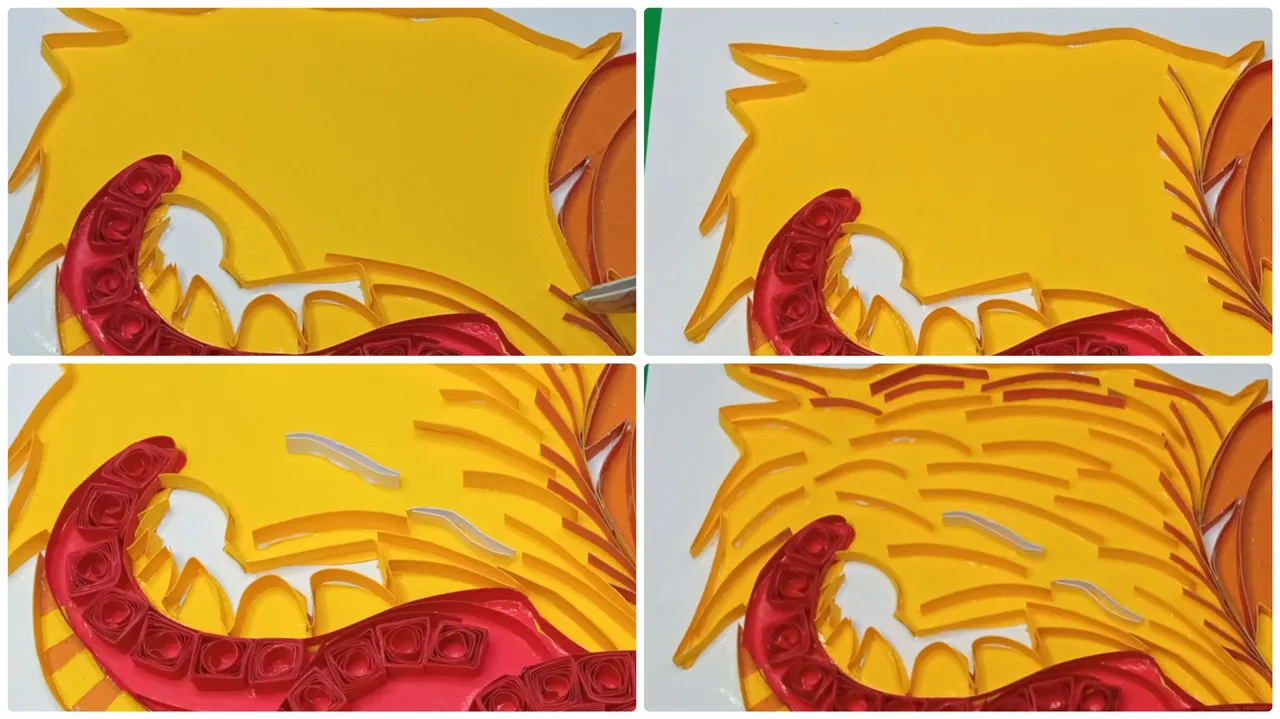
Paso 11
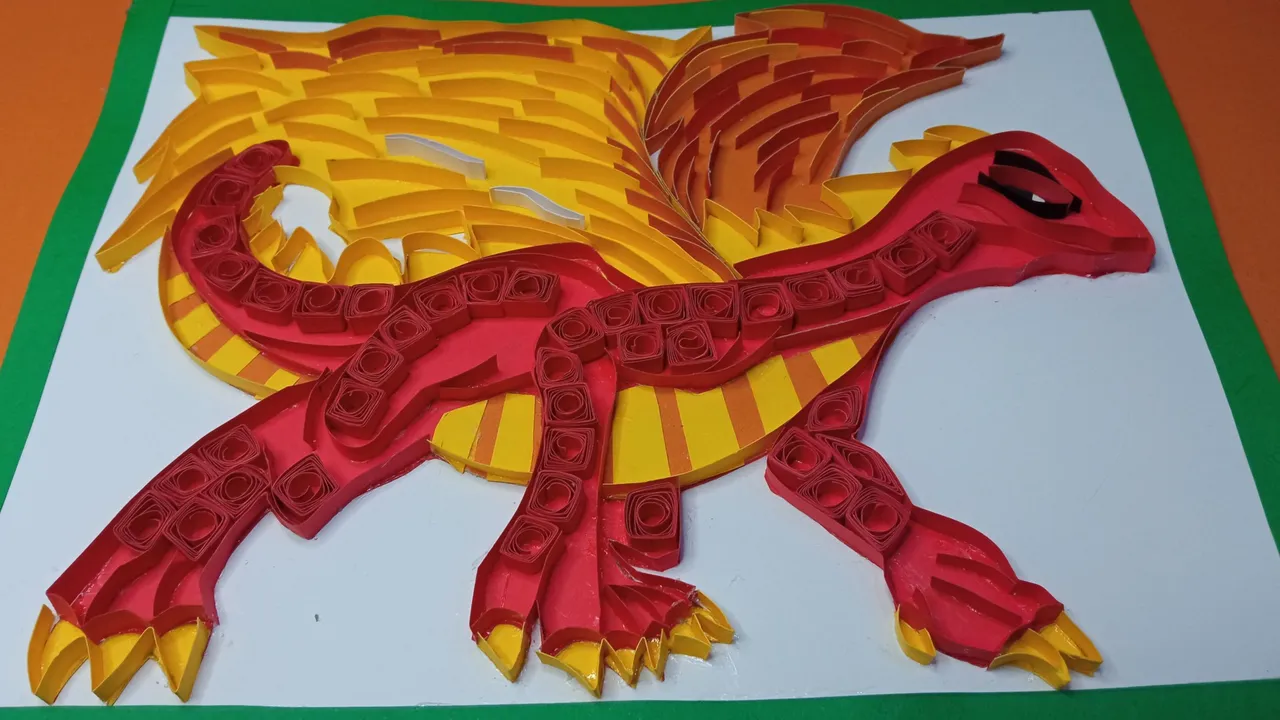
Seguimos con el ala derecha y haremos lo mismo, pegamos pequeñas tiras dentro de la misma, por último hacemos un marco con cartulina verde para que se vea más lindo y con mejor presentación.Step 11
We continue with the right wing and do the same, we glue small strips inside it, finally we make a frame with green cardboard to make it look nicer and with better presentation.
Listo amigos, así quedó mi bello dragón..
Ready friends, this is what my beautiful dragon looks like.
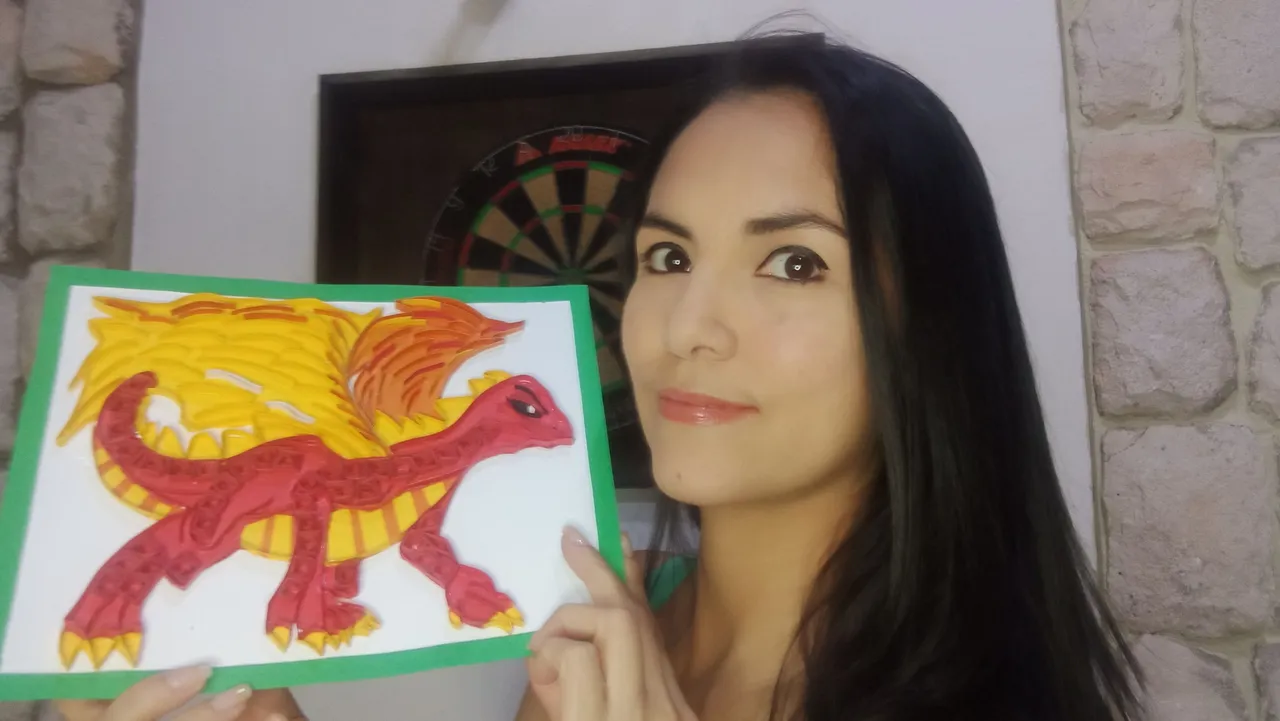

Bueno amigos, espero les haya gustado mi tutorial, hasta pronto.
Well friends, I hope you liked my tutorial, see you soon.
Todas las fotos están tomadas desde mi teléfono Redmi 9, para los collages usé la aplicación collage maker y para la traducción usé el traductor DeepL.
All photos are taken from my Redmi 9 phone, for the collages I used the collage maker application and for the translation I used the translator DeepL.