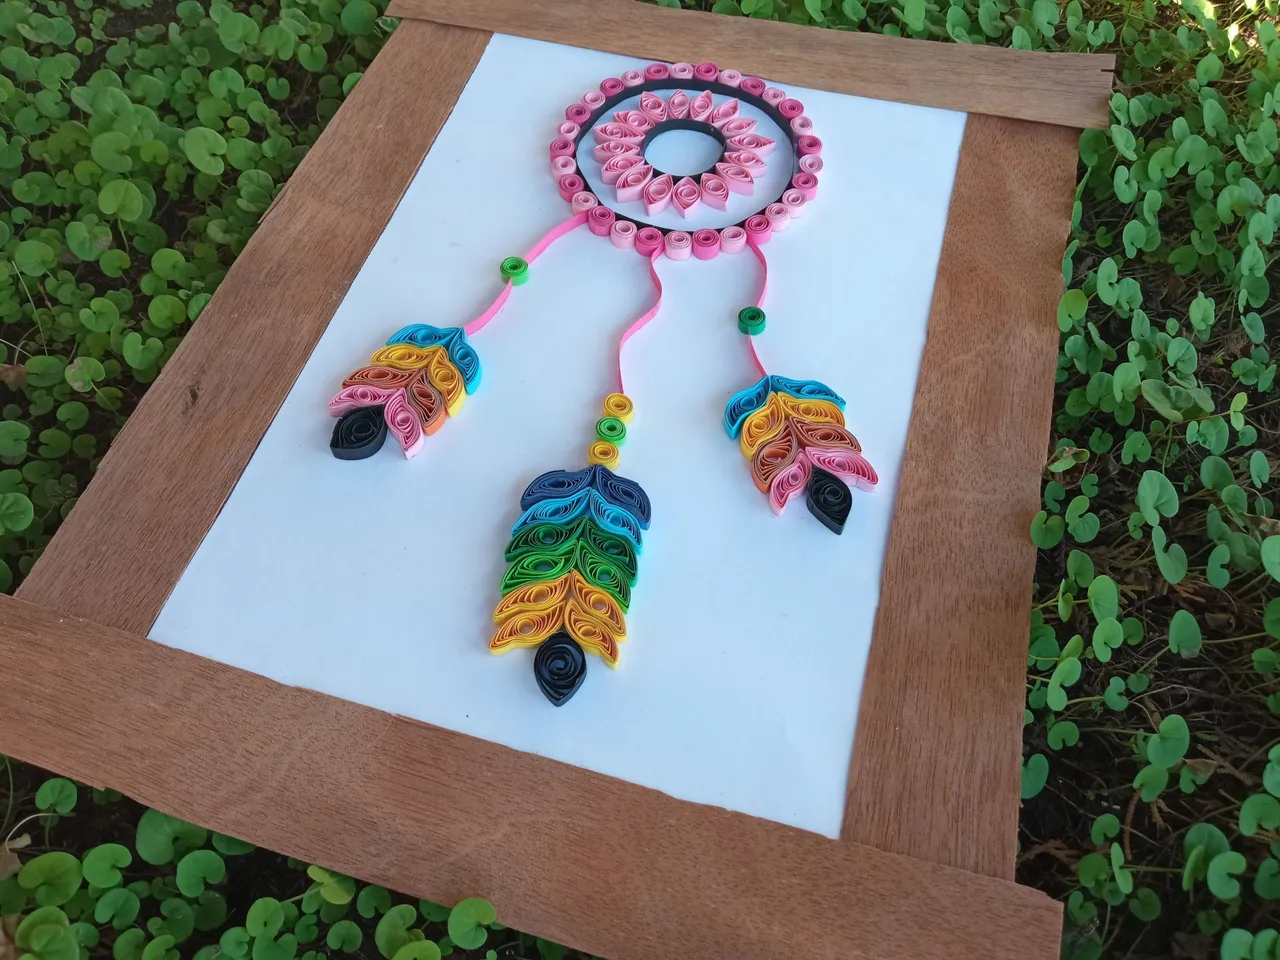
Hola amigos, hoy vine a compartir con todos ustedes un tutorial de un bello cuadro atrapasueños, es un adorno muy bonito para decorar las paredes de nuestra habitación, también lo podemos obsequiar en alguna ocasión especial a un ser querido, los materiales usados son muy económicos y algunos son reciclados.
Hello friends, today I came to share with all of you a tutorial of a beautiful dream catcher picture, it is a very nice decoration to decorate the walls of our room, we can also give it as a gift on a special occasion to a loved one, the materials used are very economical and some are recycled.
Los atrapasueños son especiales, por lo general son usados en las habitaciones para que tengamos sueños positivos, llenos de buena vibra,muchos lo usan como amuleto de protección, en mi caso lo uso colgado en el retrovisor del carro y fué un obsequio de una gran amiga.
The dream catchers are special, they are usually used in the rooms to have positive dreams, full of good vibes, many use it as a protection amulet, in my case I use it hanging on the rearview mirror of the car and it was a gift from a great friend.
Usé la técnica del filigrana para realizar el cuadro, esta consiste en enrrollar tiras de papel y luego hacer formas,parece difícil pero no lo es, solo debemos tener dedicación y mucha paciencia para realizar este tipo de trabajo, vale la pena el esfuerzo ya que el resultado final siempre es hermoso, además.
I used the filigree technique to make the picture, this consists of rolling strips of paper and then make shapes, it seems difficult but it is not, we just have to have dedication and patience to perform this type of work, it is worth the effort because the end result is always beautiful, moreover.
Atrapasueños
.
Dream Catcher
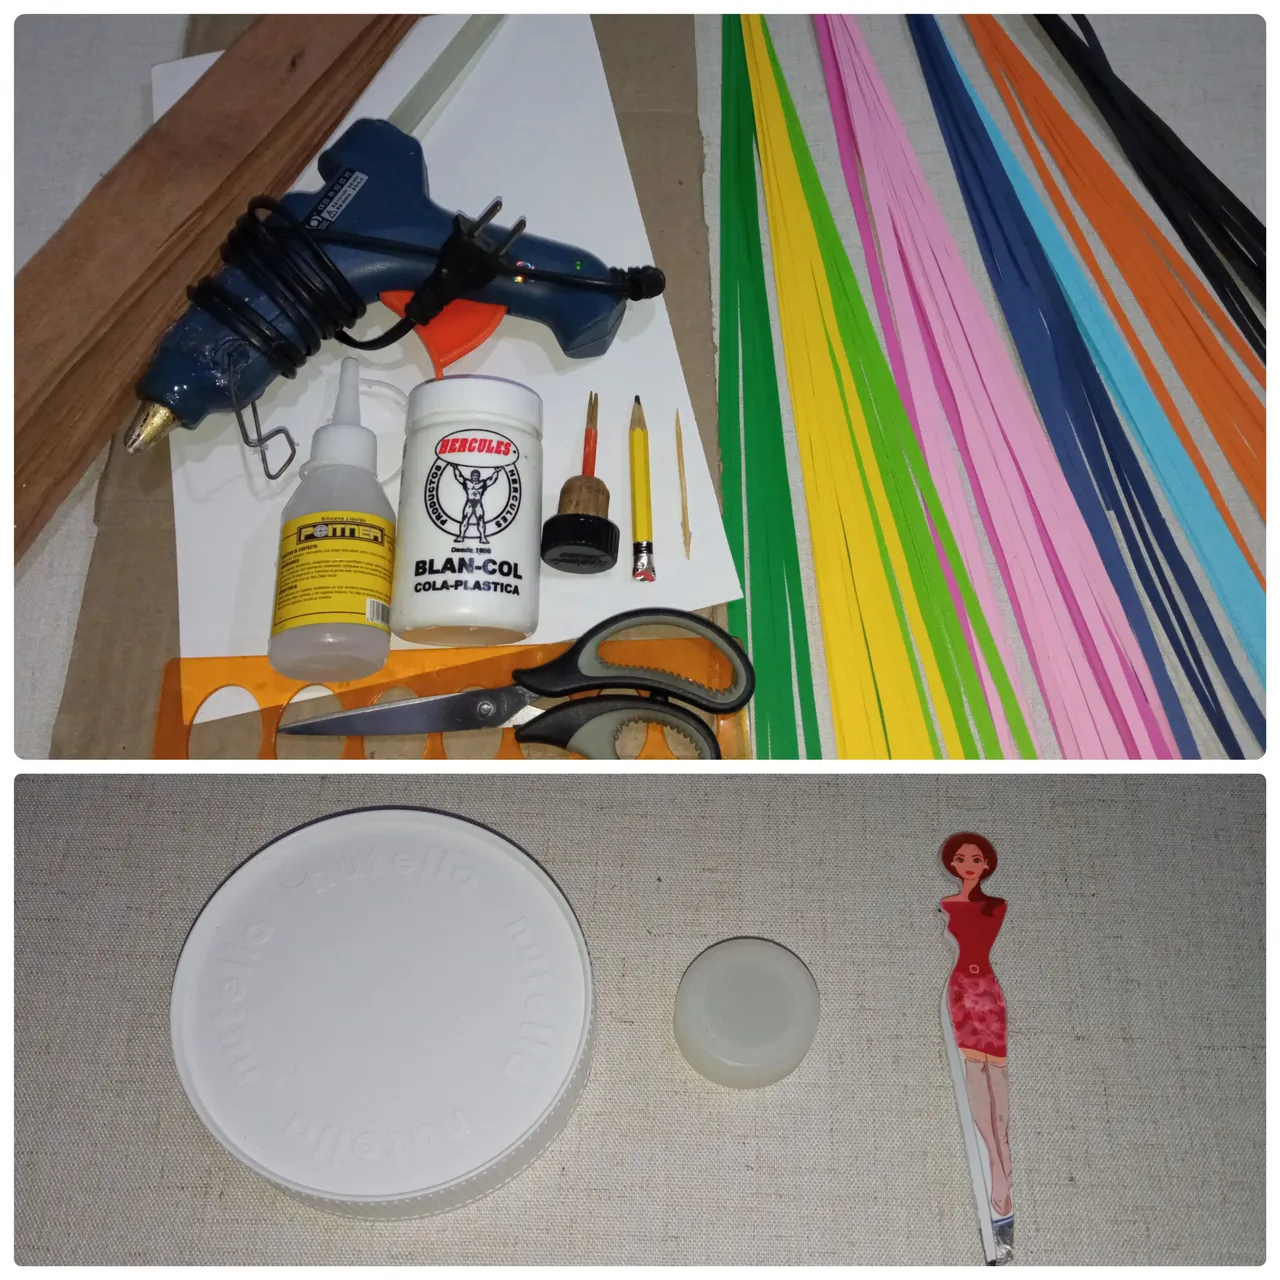
Materiales
Materials
.
Strips of cardboard 28 cm by 0.5 cm pink, fuchsia, blue, green, yellow, black, orange, green, yellow, black, orange Cardboard White cardboard Liquid silicone Hot silicone White glue Scissors Template Stick Pencil Plastic caps Tweezers Wooden slats
Paso 1
Lo primero que haremos es mostrar algunas de las formas básicas de la técnica del filigrana y qué usaremos para elaborar nuestro bello cuadro atrapasueños.Step 1
The first thing we will do is to show some of the basic shapes of the filigree technique and what we will use to make our beautiful dream catcher painting.

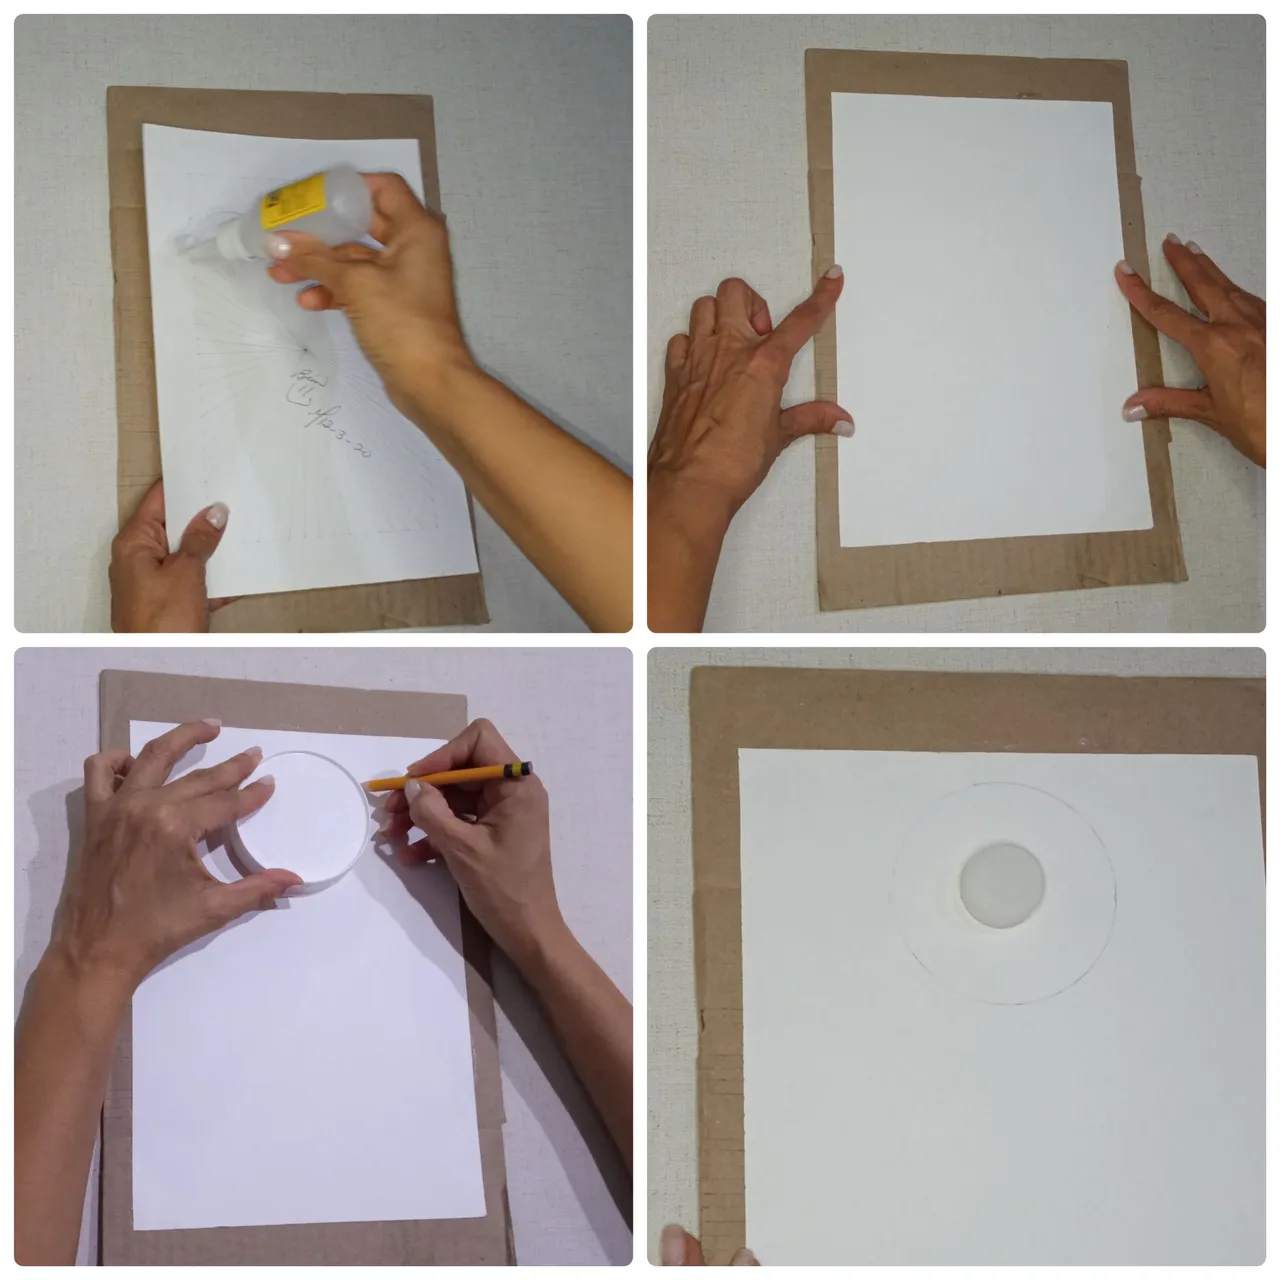
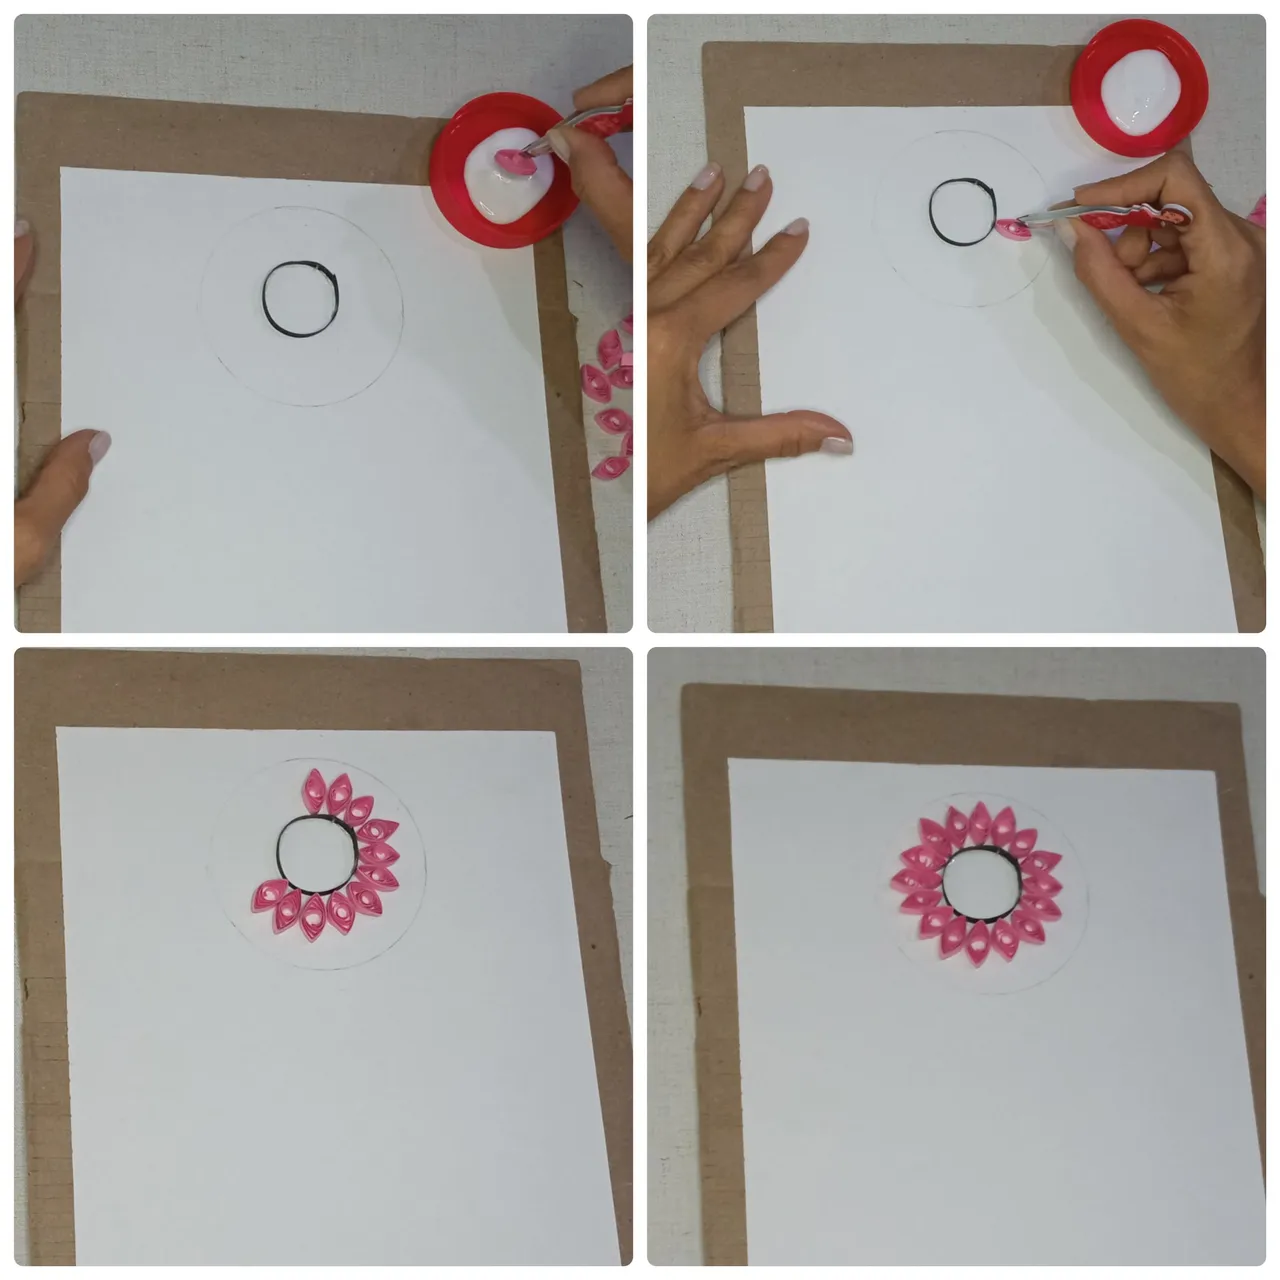
Paso 2
Luego preparamos lo que será la base de nuestro cuadro, pegamos con silicón líquido la cartulina blanca al cartón, luego dibujamos dos círculos uno pequeño y otro grande con ayuda de las tapas plásticas, estos serán el punto de inicio del atrapasueños.Step 2
Then we prepare what will be the base of our picture, we glue with liquid silicone the white cardboard to the cardboard, then we draw two circles, one small and one large with the help of the plastic caps, these will be the starting point of the dreamcatcher.
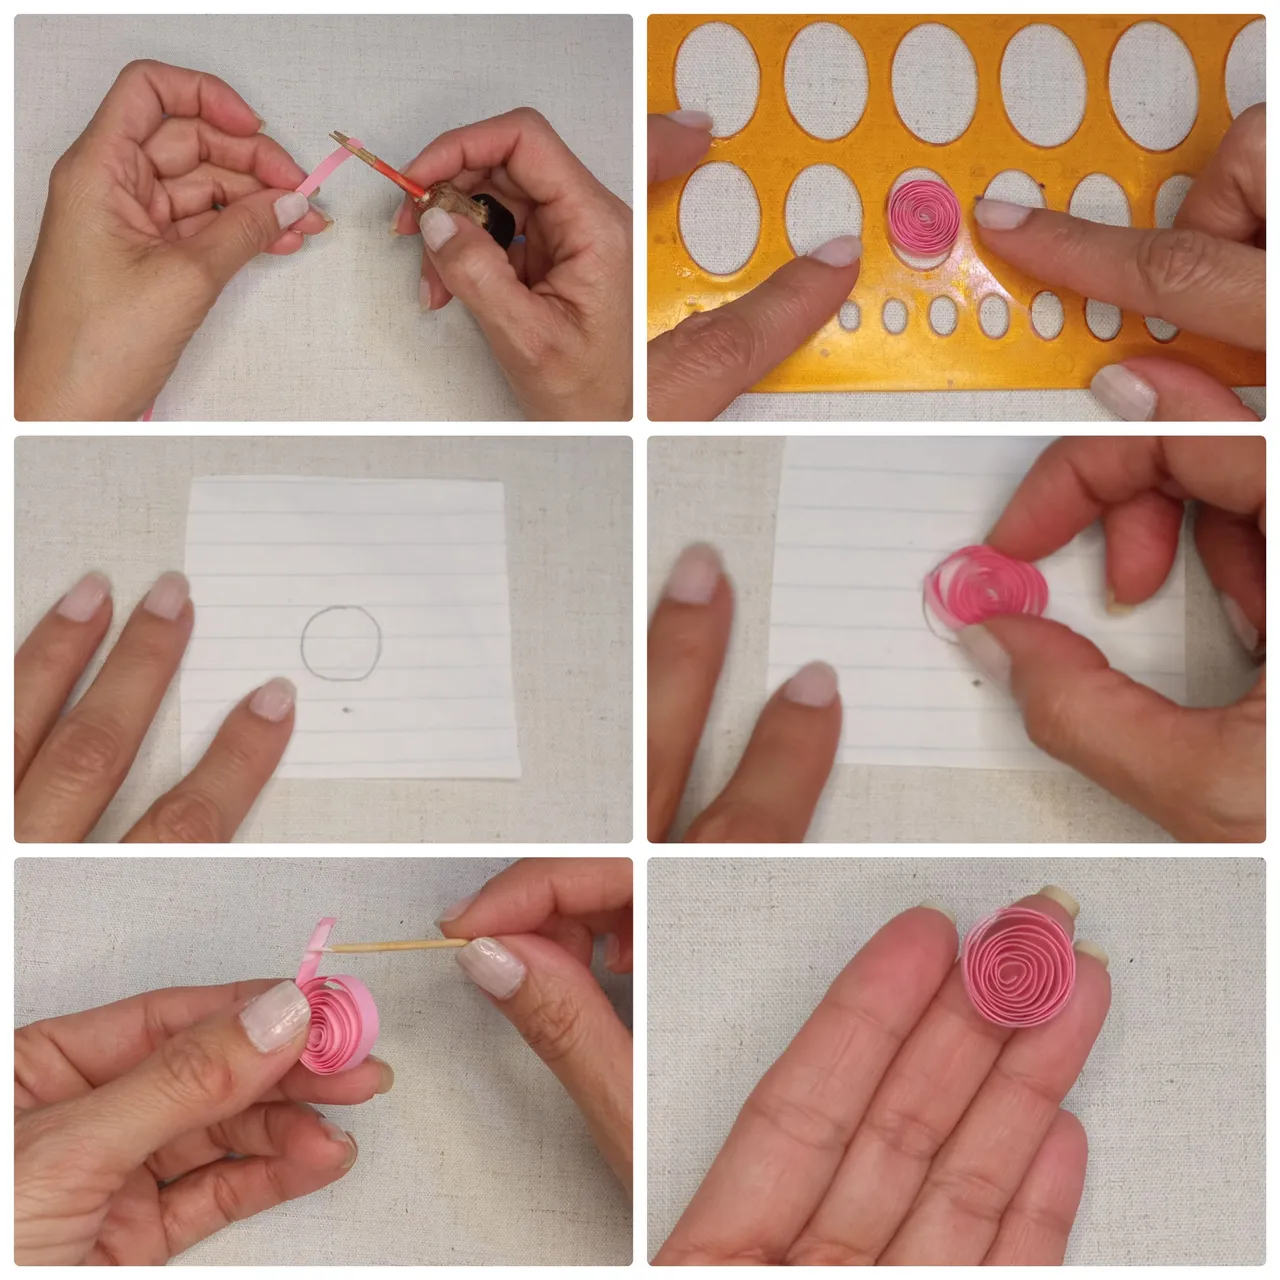
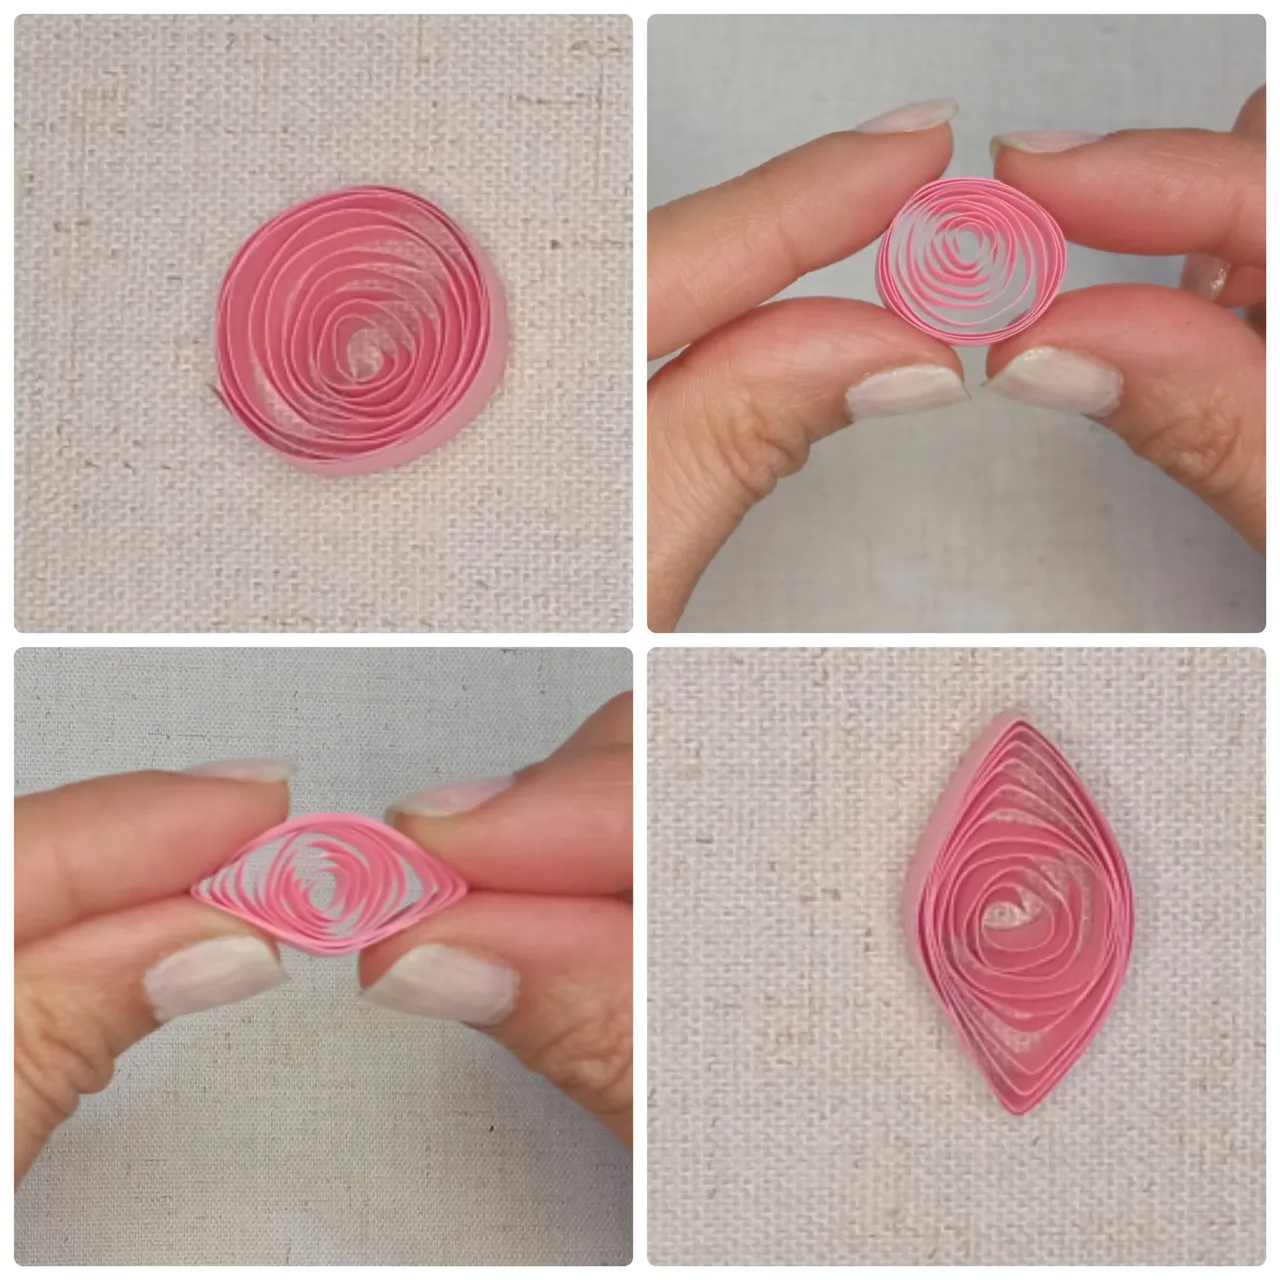
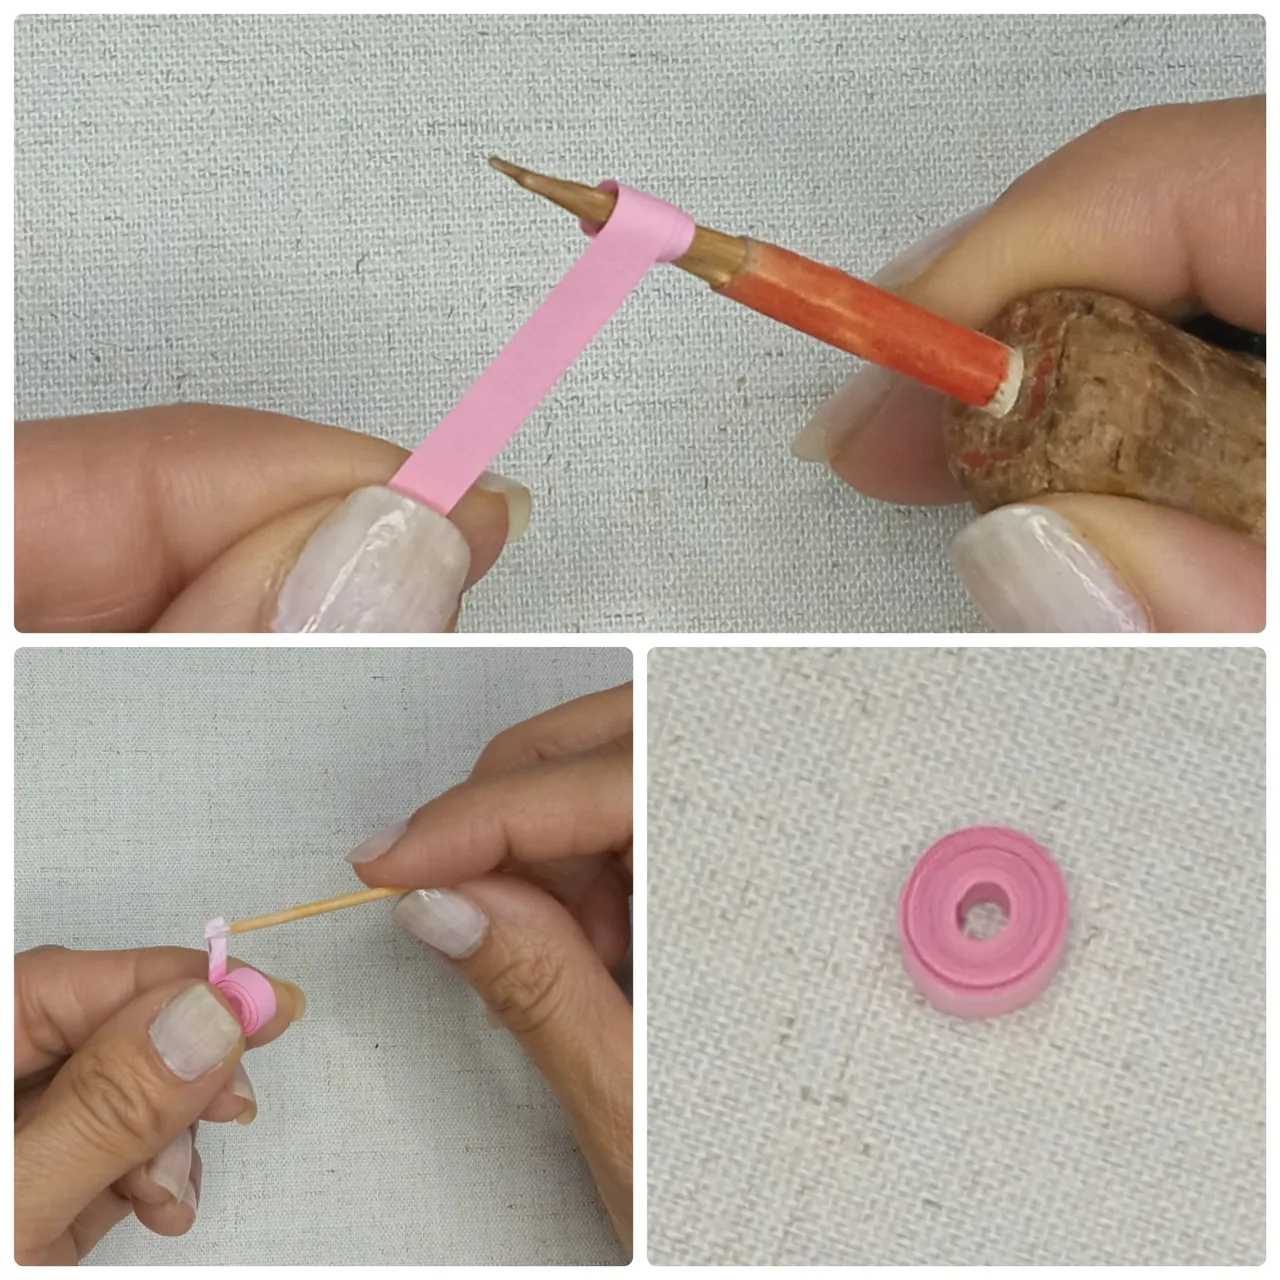
Paso 3
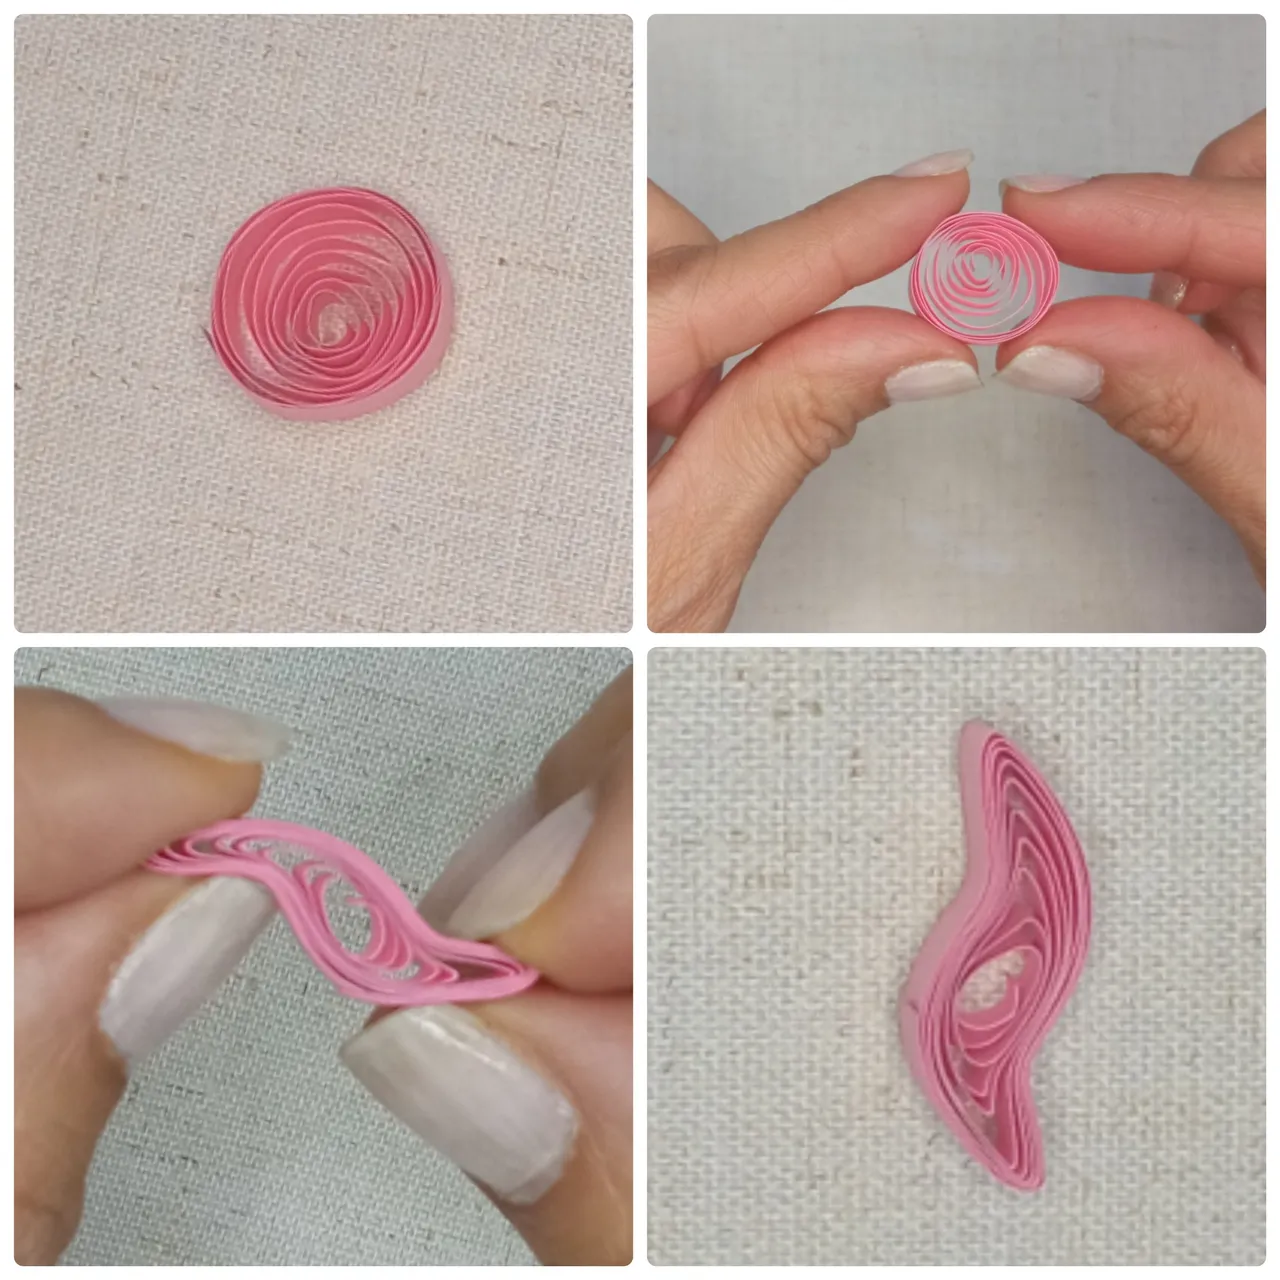
Haremos la primera forma del filigrana que es un círculo abierto, comenzamos colocando una tira en el enrrollador entre los dos palitos, luego vamos dando vuelta sobre ella misma hasta el final, soltamos el rollito en la plantilla con cuidado para que no se desarme, si no tenemos plantilla podemos ayudarnos dibujando un círculo en un papel del tamaño deseado, luego con pegamento blanco y el palito pegamos en la punta y ya tendremos un círculo abierto, gran parte de las formas del filigrana se realizan partiendo del círculo abierto, el enrrollador lo podemos hacer de una manera muy sencilla, con un corcho, dos palitos y tirro.Step 3
We will make the first form of the filigree which is an open circle, we start by placing a strip in the coiler between the two sticks, then we go around it until the end, we release the roll on the template carefully so that it does not disassemble, If we do not have a template we can help ourselves by drawing a circle on a paper of the desired size, then with white glue and the stick we glue on the tip and we will have an open circle, most of the filigree shapes are made starting from the open circle, the coiler can be made in a very simple way, with a cork, two sticks and a strip.
Paso 4
Para la parte central del atrapasueños usaremos la forma básica que se llama ojo u óvalo, esta es muy fácil de hacer, tomamos el círculo abierto ya explicado anteriormente, luego con los dedos índice y pulgar de ambas manos presionamos dando forma de ojo, tendremos que hacer 16 de estos en color rosado para el círculo más pequeño.Step 4
For the central part of the dreamcatcher we will use the basic shape called eye or oval, this is very easy to make, we take the open circle already explained above, then with the index finger and thumb of both hands we press giving shape of eye, we will have to make 16 of these in pink color for the smallest circle.
Paso 5
Con silicón líquido pegamos una tira negra sobre el círculo, después comenzamos a bordearlo con los ojos rosados, nos ayudamos con una pinza, de esta manera será más fácil sujetarlos, los pegamos con pegamento blanco.Step 5
With liquid silicone we glue a black strip on the circle, then we start to border it with the pink eyes, we help ourselves with a clamp, this way it will be easier to hold them, we glue them with white glue.
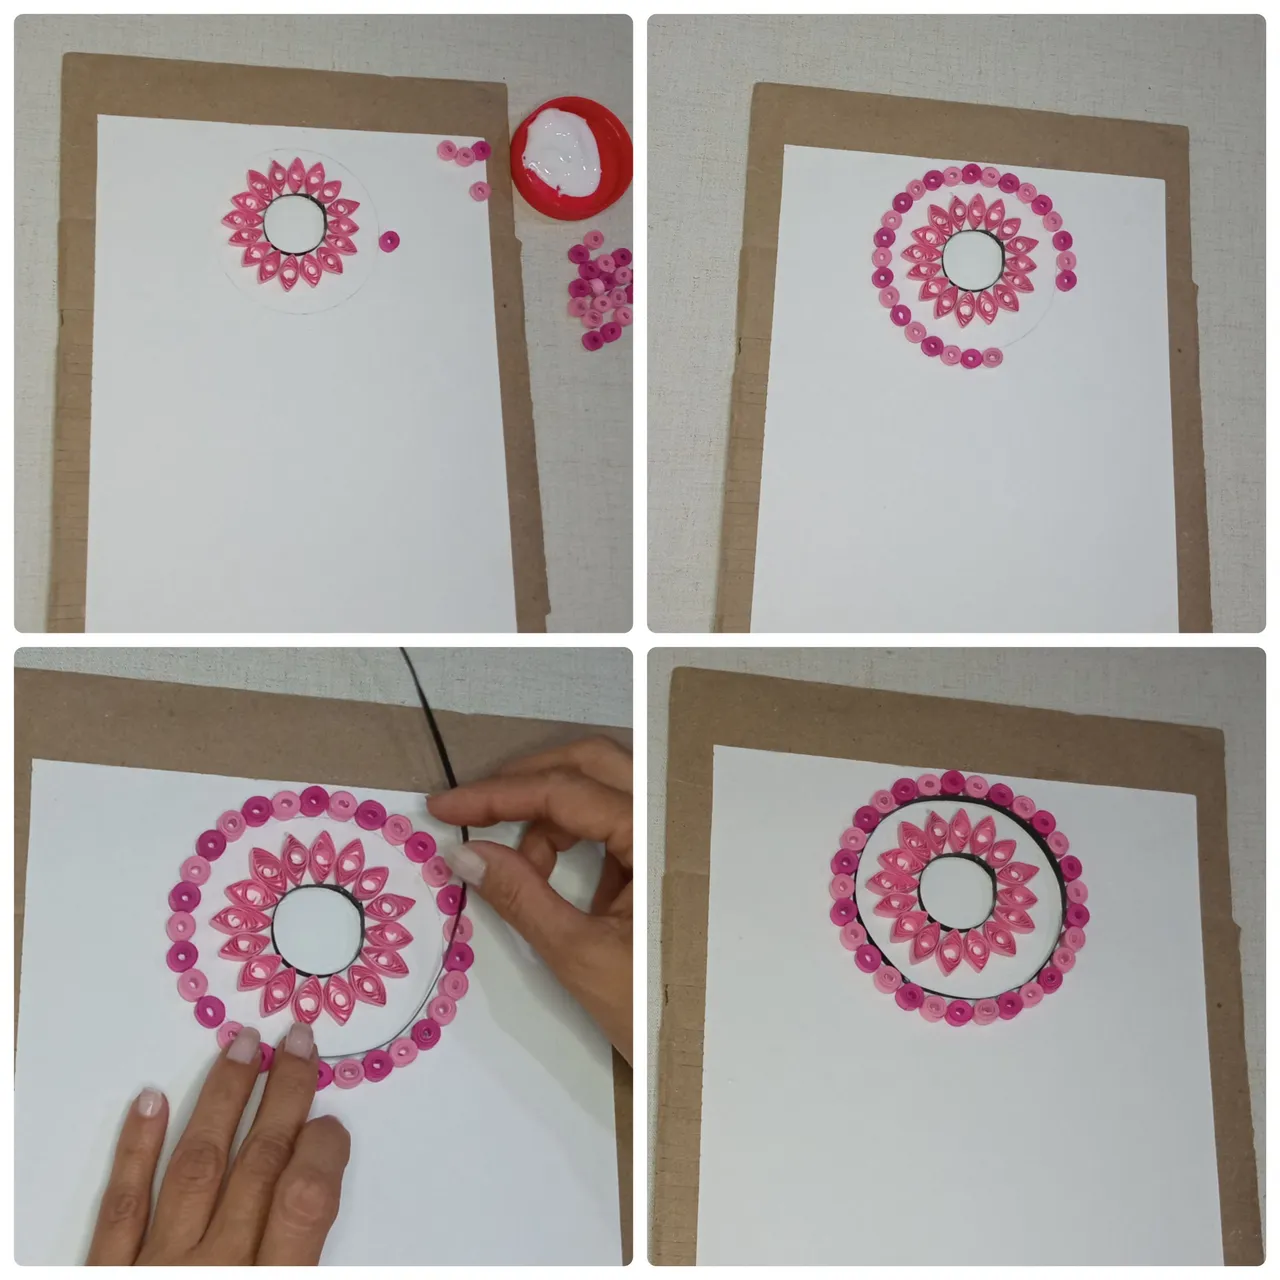
Paso 6
Para rellenar el aro más grande haremos unos círculos cerrados, esta es otra forma del filigrana, tomamos una tira y la enrrollamos hasta el final sobre ella misma, lugo sin soltarla pegamos en la punta y así tendremos el círculo cerrado, haremos 29 entre fucsia y rosado.Step 6
To fill the larger ring we will make closed circles, this is another form of the filigree, we take a strip and roll it up to the end on itself, then without releasing it we glue it at the tip and so we will have the closed circle, we will make 29 between fuchsia and pink.
Paso 7
Pegamos los círculos cerrados alredededor del aro grande, intercalando los colores, fucsia y rosado, luego colocamos una tira negra por dentro en el borde para realzar el aro.Step 7
Paste the closed circles around the large hoop, alternating the colors, fuchsia and pink, then place a black strip inside the edge to enhance the hoop.
Paso 8
Para las plumas de nuestro atrapasueños, partiremos de un círculo abierto para hacer la forma de hoja, con los dedos índice y pulgar de las dos manos hacemos una pequeña inclinación, la derecha hacía arriba y la izquierda hacia abajo, así daremos la forma de la hoja, haremos 24 hojas de distintos colores.Step 8
For the feathers of our dream catcher, we will start from an open circle to make the leaf shape, with the index finger and thumb of both hands we make a small inclination, the right one upwards and the left one downwards, so we will give the shape of the leaf, we will make 24 leaves of different colors.
Paso 9
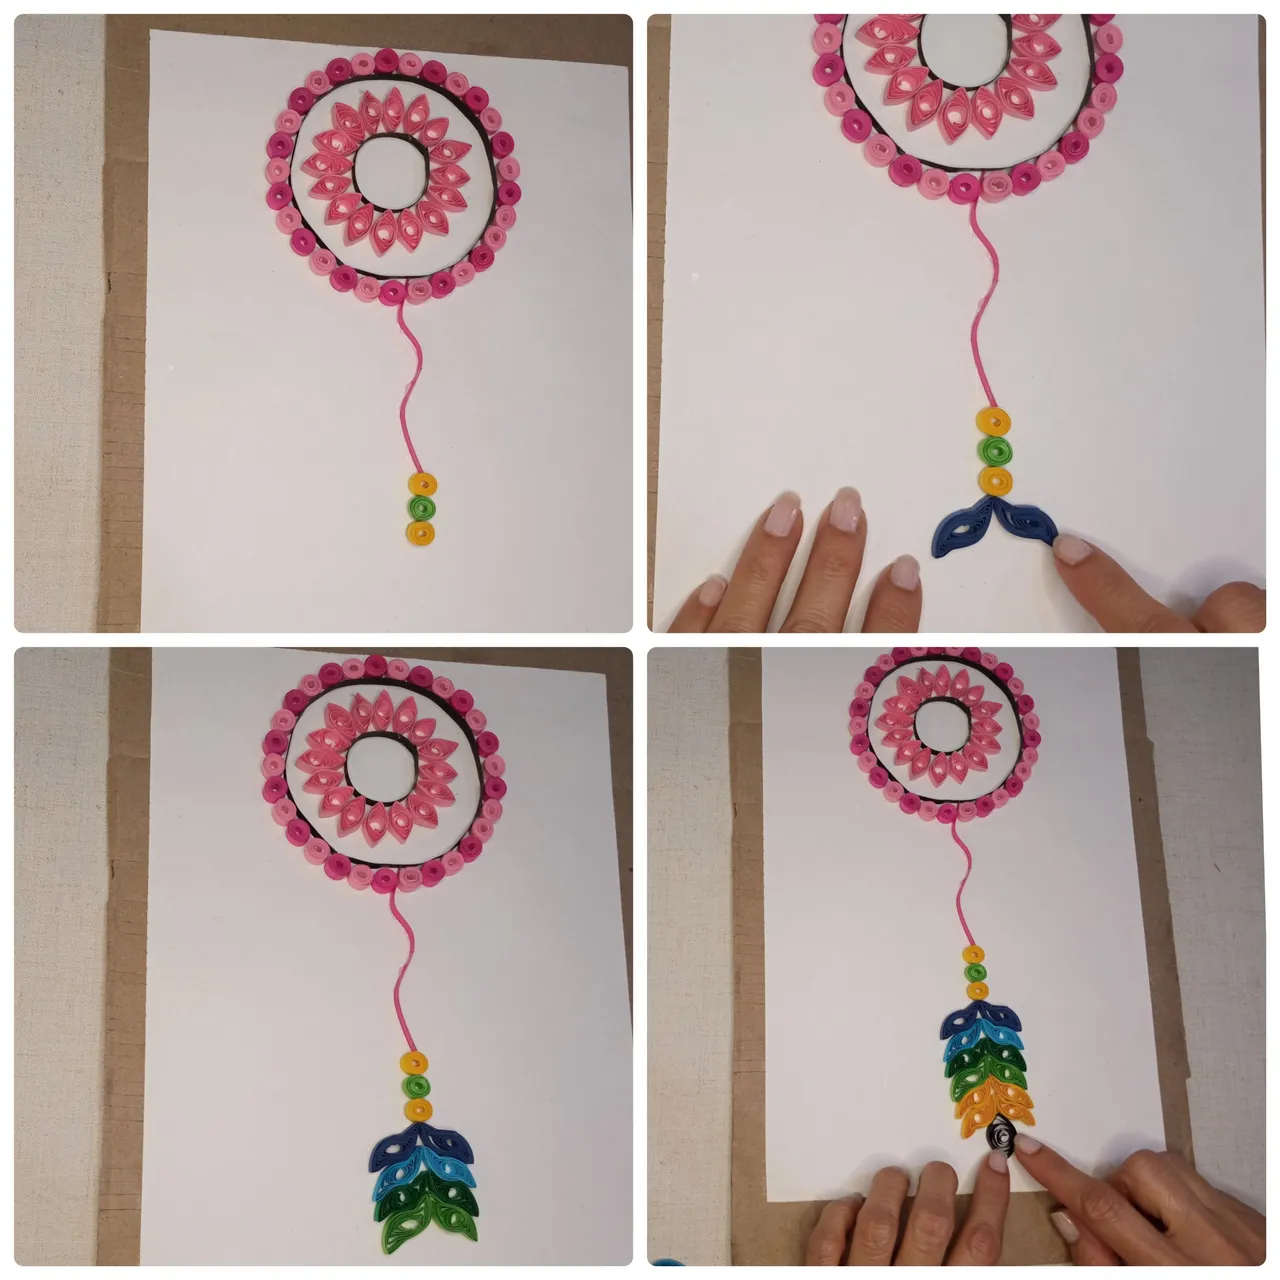
Una vez listos nuestros aros, vamos a colocar las plumas comenzando con la del centro, pegamos una tira rosada de manera ondulada esta sujetará la pluma, luego pegamos circulos cerrados que asemejan cuentas, después vamos colocando las hojas de dos en dos y del mismo color hasta formar la pluma, pondremos 12 hojas en total, en la punta colocamos un ojo u óvalo negro.Step 9
Once our rings are ready, we are going to place the feathers starting with the center one, we glue a pink strip in a wavy way this will hold the feather, then we glue closed circles that resemble beads, then we place the leaves in pairs and of the same color to form the feather, we will put 12 leaves in total, at the tip we place an eye or black oval.
Paso 10
Seguimos con la pluma del lado derecho, comenzando por colocar una tira y una cuenta, luego armamos la pluma con 8 hojas de colores y en la punta un ojo u óvalo negro.Step 10
We continue with the feather on the right side, starting by placing a strip and a bead, then we assemble the feather with 8 colored leaves and at the tip an eye or black oval.
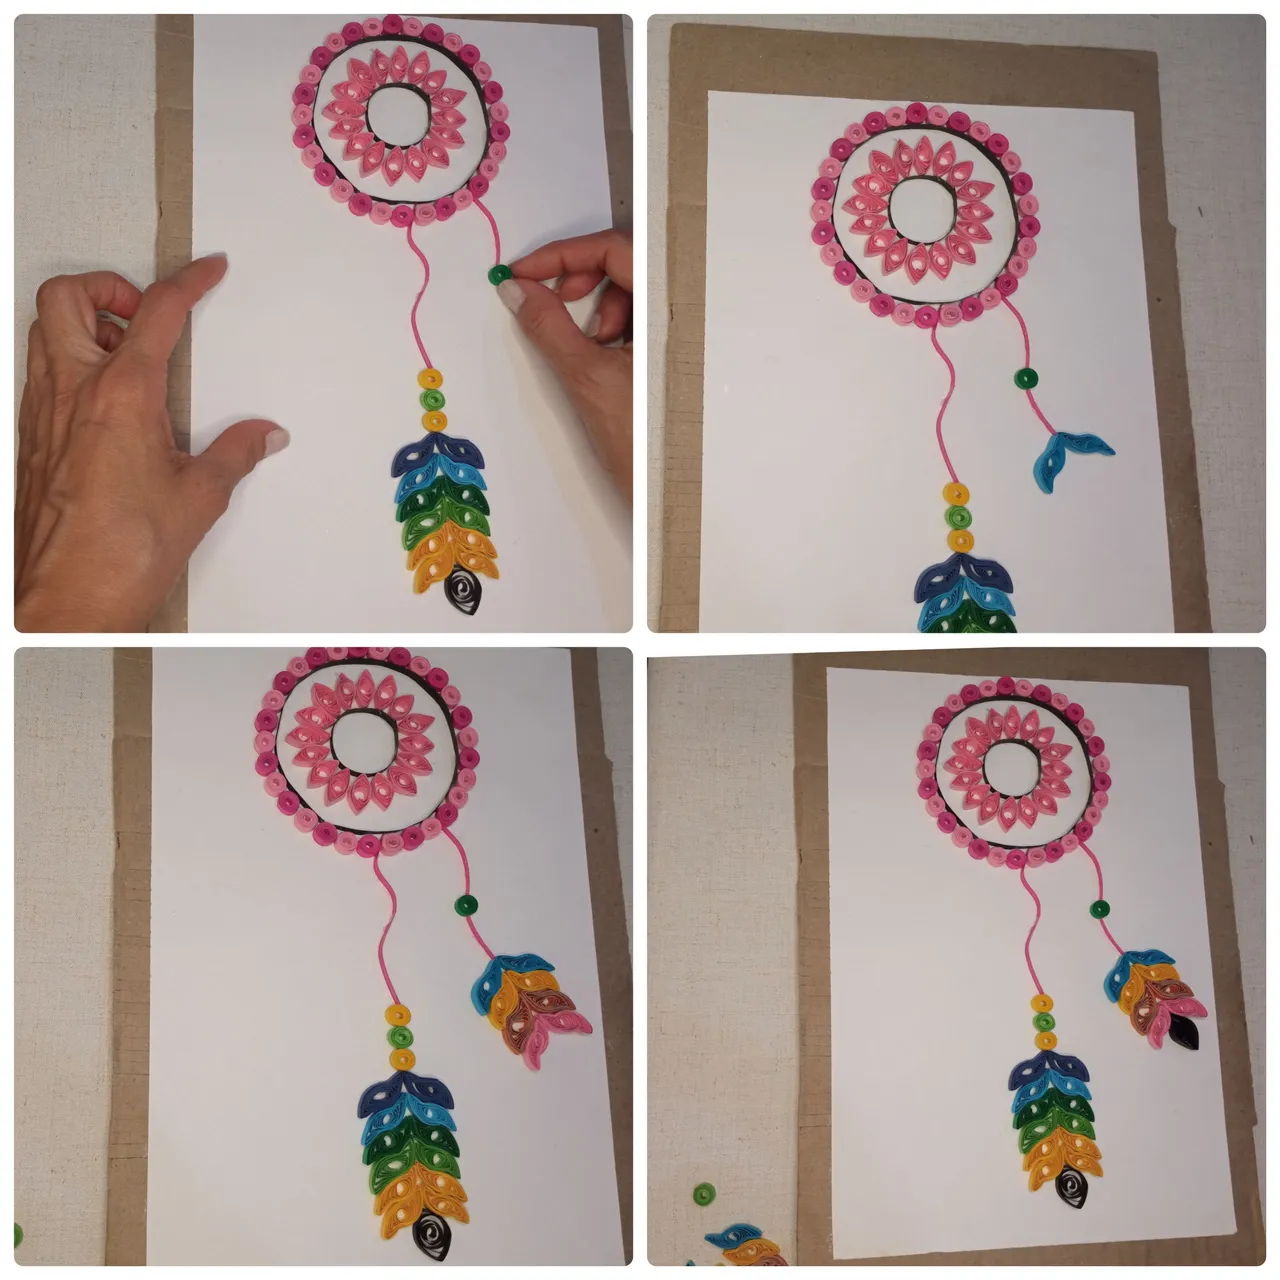
Paso 11
Luego armamos la pluma del lado izquierdo, repitiendo el procedimiento de la pluma del lado derecho.Step 11
Then we assemble the feather on the left side, repeating the procedure for the feather on the right side.
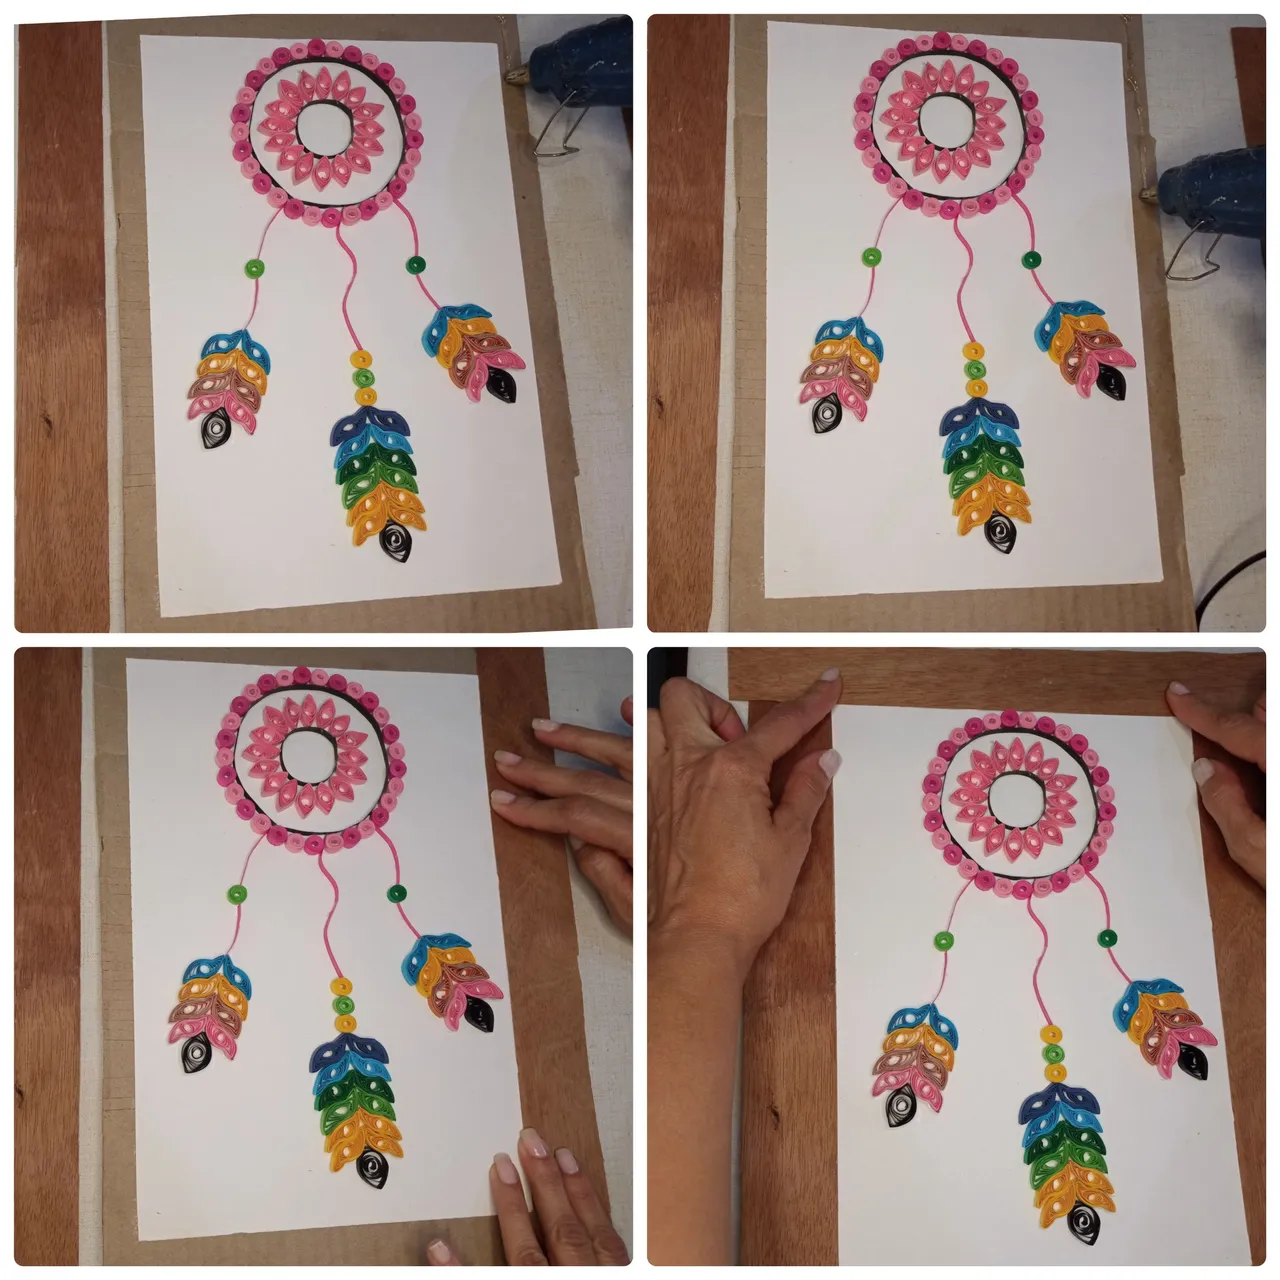
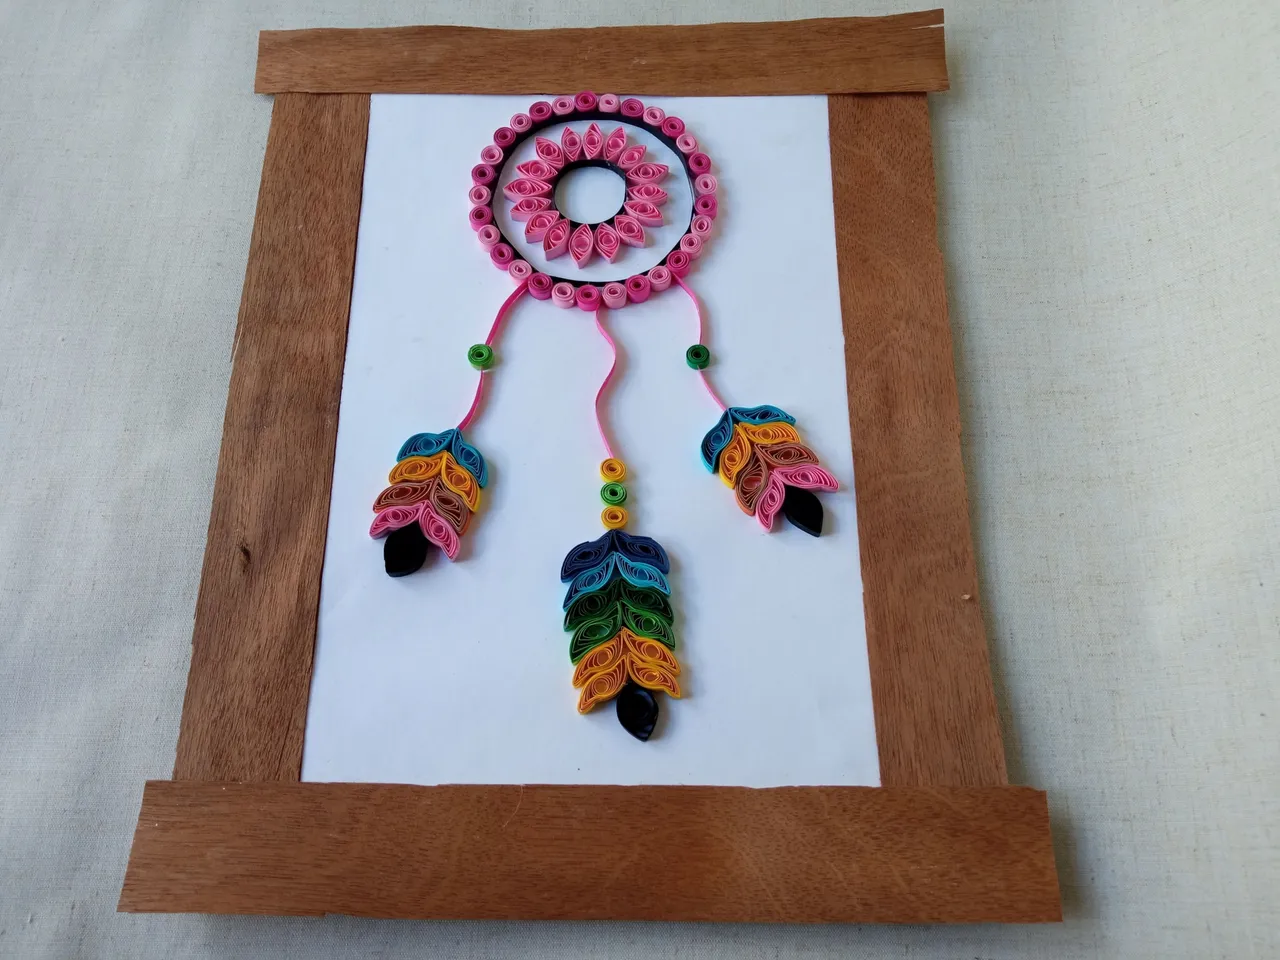
Paso 12
Para finalizar pegamos con silicón caliente las láminas de madera sobre el cartón para formar un marco, le darán un toque lindo al cuadro y con una bonita presentación.Step 12
Finally, we glue with hot silicone the wooden sheets on the cardboard to form a frame, which will give a nice touch to the picture and a nice presentation.
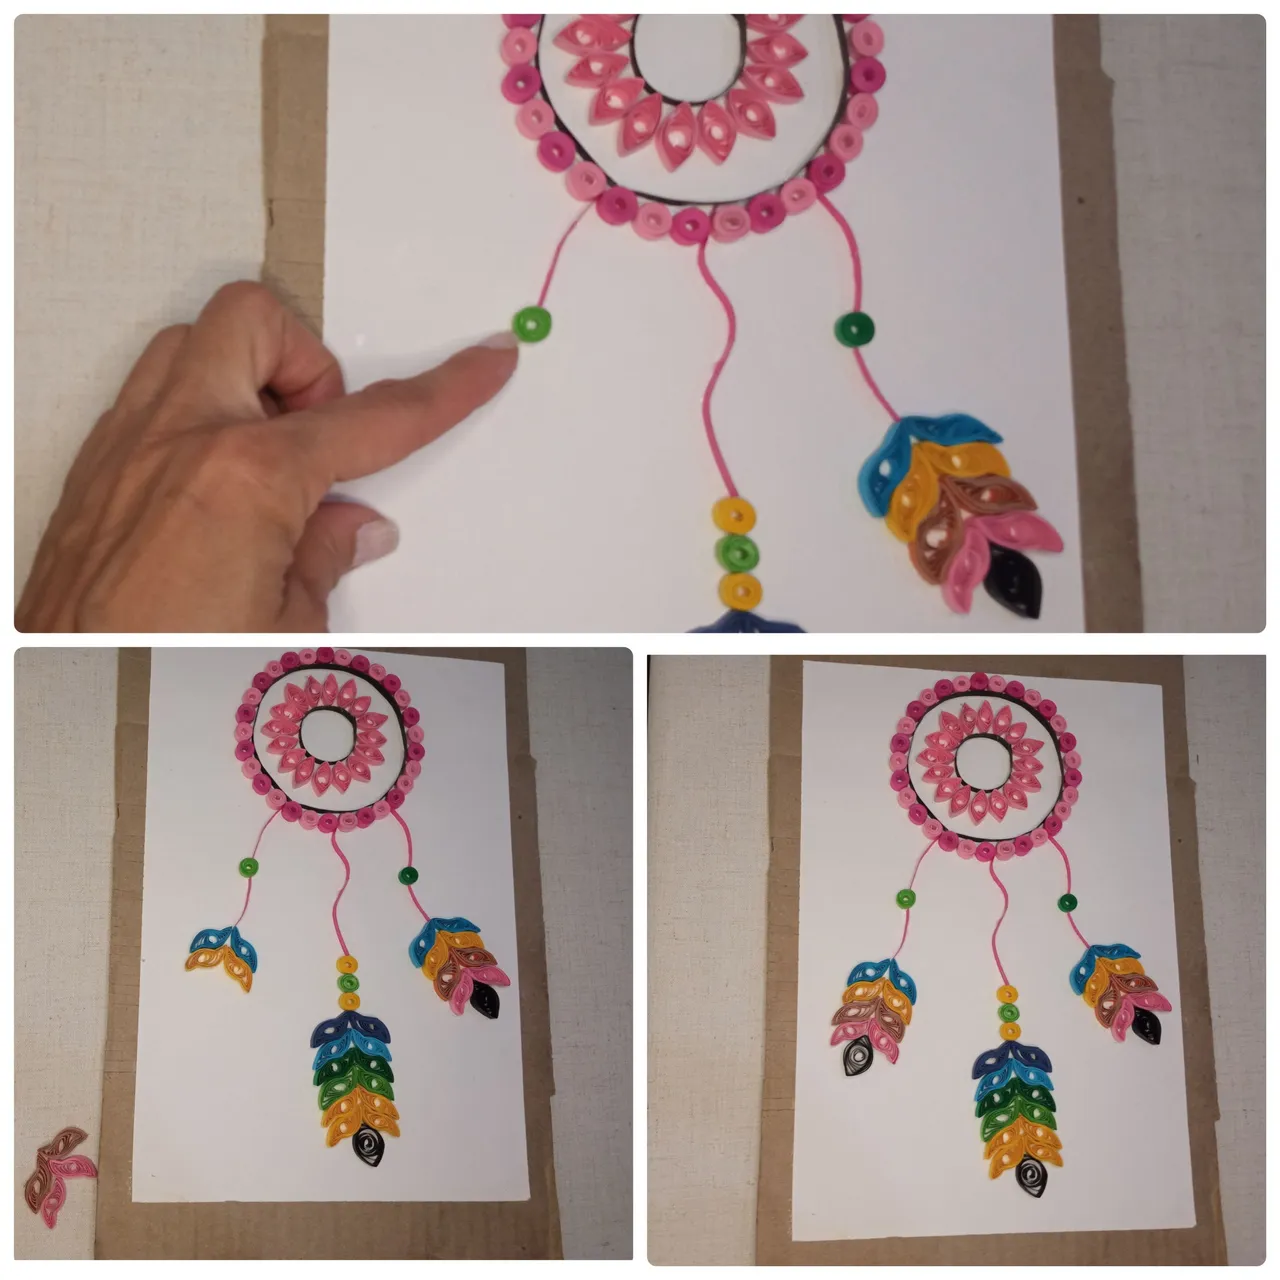
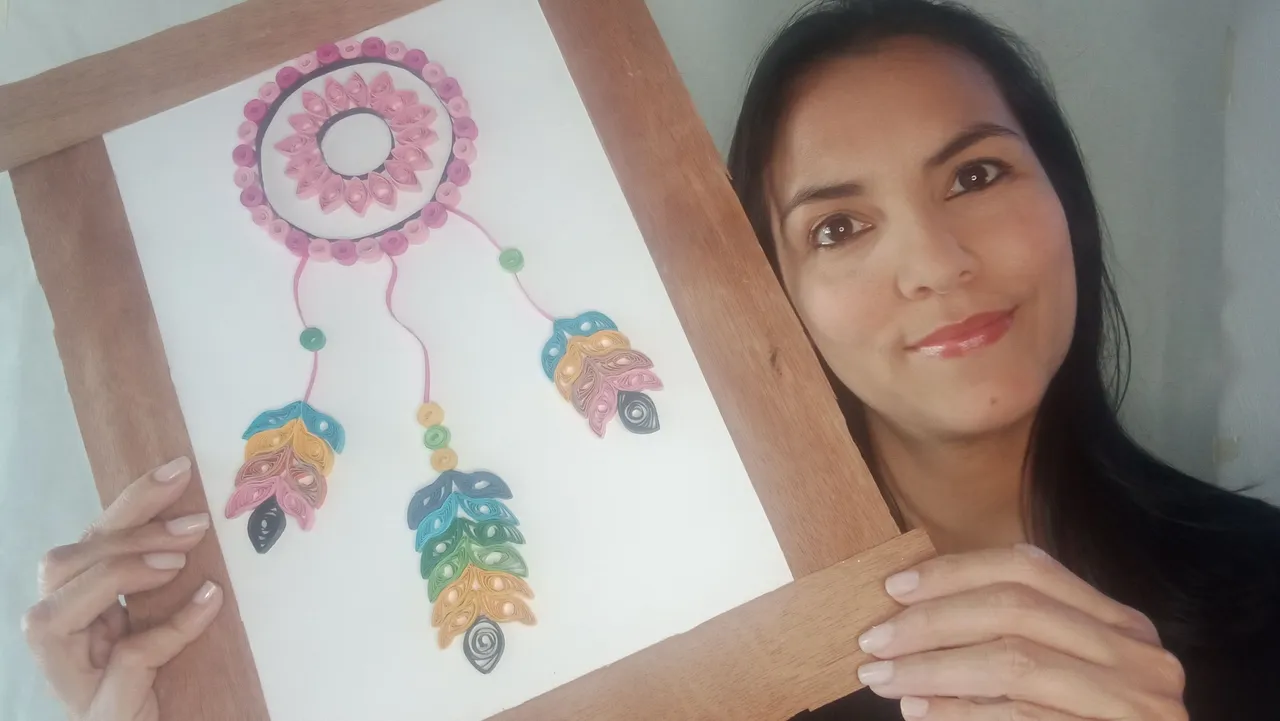
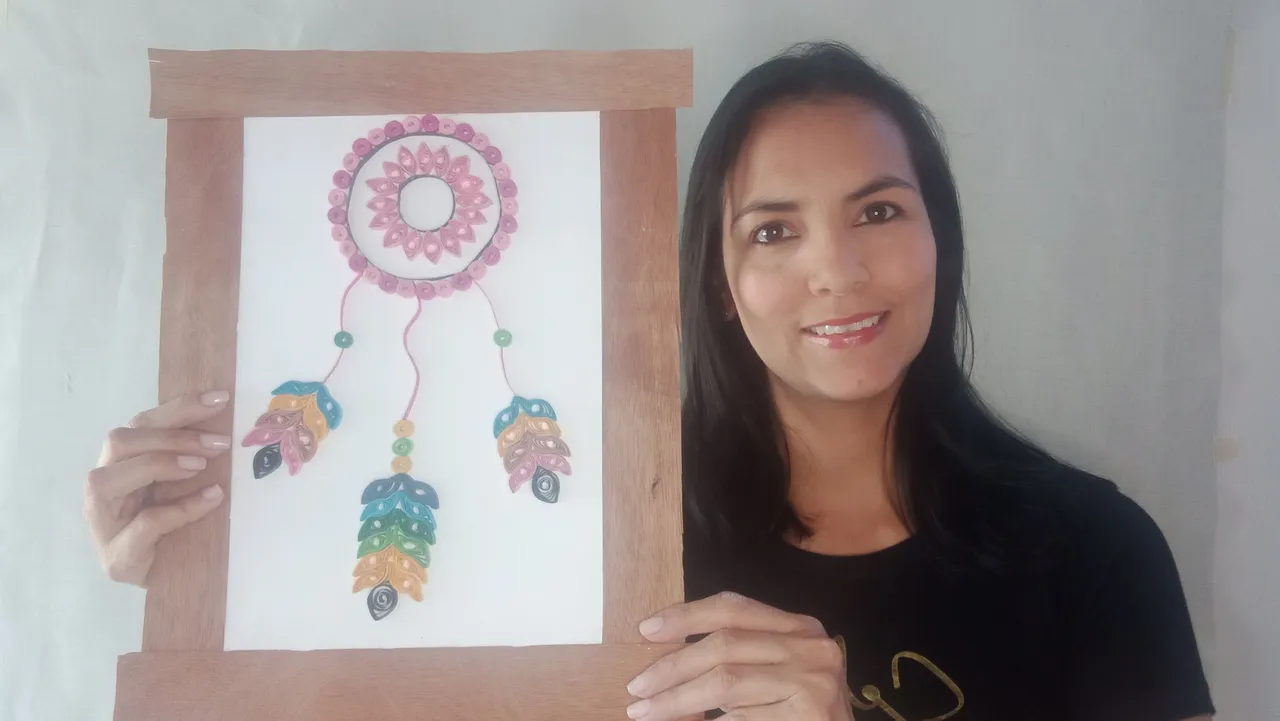
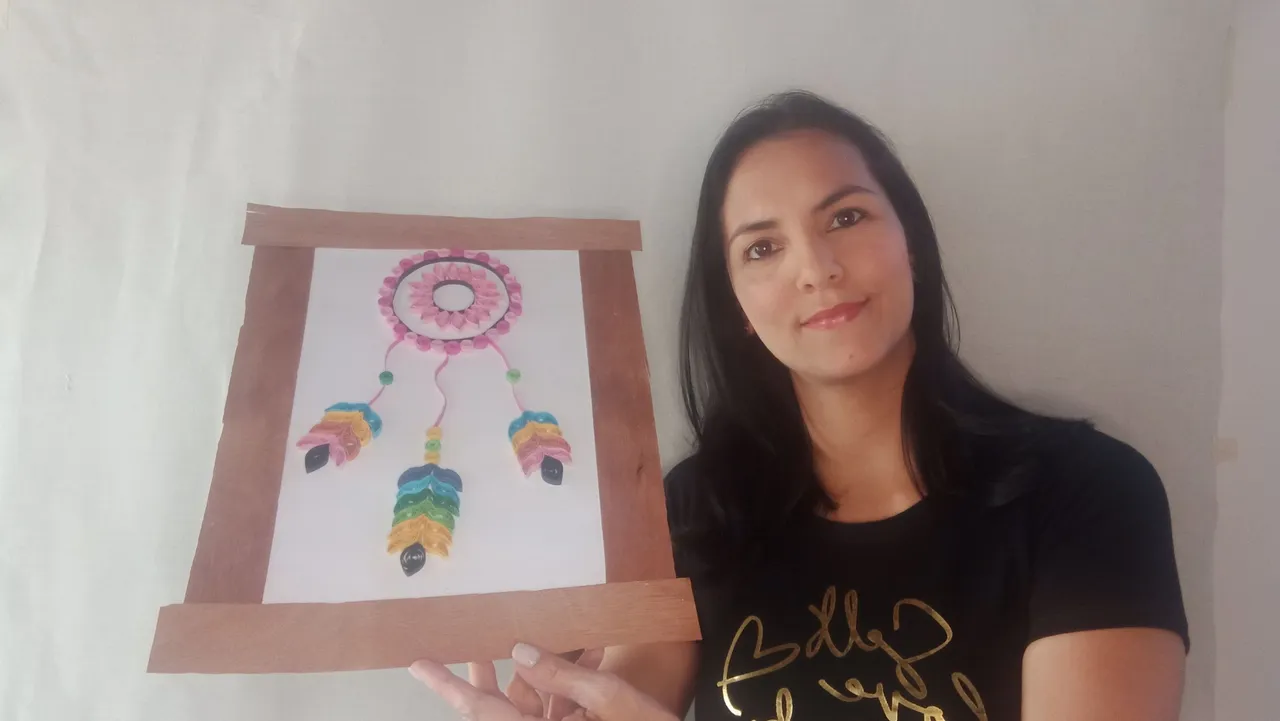
Listo amigos así quedó mi cuadro atrapasueños, espero sea del agrado de todos.
Ready friends, this is how my dreamcatcher painting turned out, I hope everyone likes it.

Todas las fotos son tomadas de mi teléfono Redmi 9, para los collages usé la aplicación collage maker y para la traducción usé DeepL traductor.
All photos are taken from my Redmi 9 phone, for the collages I used the collage maker application and for the translation I used DeepL translator.