*****English version*****
Greetings to all, Hivers friends. On this occasion I bring you another sculpture a bit particular, but before getting into the subject I would like to comment a little about what this figure means. You see, some time ago I worked on a sculpture inspired by a community. The astronaut from the @discovery-it community.
You can see that figure publication by following this link:
@gaboamc2393/por-que-me-gusta-discovery-it-mi-escultura-because-i-like-discovery-it-my-sculpture
The astronaut was the emblematic figure of the community, as it was in its profile image. It was the work I did for a contest of that community, which I won thanks to that figure. The point is that since I made the sculpture, I was thinking of making other figures that represented each community in which I am active.
The problem with this idea is that it is not easy to find something that represents certain communities, so the task is complicated. However, the challenge was already posed and I decided to start this task with a community that I consider as my home, since it was the community where I started my way in HIVE. I am referring to @theterminal.
This community gave me a lot of support and I would like to make not one, but several figures as a way of thanking them for their support. I will make that community a representative figure of some members of their staff, a sculpture composed by several figures...
Having said all this, I present to you the first sculpture of this series: Iron Kitty.
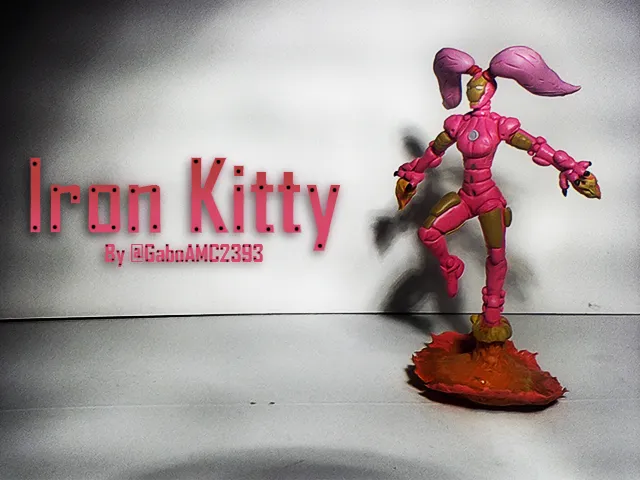
The idea of this figure is inspired by one of the staff members of TheTerminal community. In this case I am referring to @thekittygirl. The figure is a mix between a female Iron Man, a cat and pink, a lot of pink. I chose Iron Man because he is a very technological character, who knows how to solve problems and find answers to difficult questions. Miss Kitty from TheTerminal is like that. You can ask her different kinds of questions and she always has the answer. Plus, she likes cats and pink, so when you mix all this together you get an Iron Kitty figure.
All that being said, I'll show you how I made her. Let's get started!
The first thing I made was a base for the figure composed of wires and wooden sticks, which I covered with plasticine of different colors to make something similar to fire, as seen in the following image:
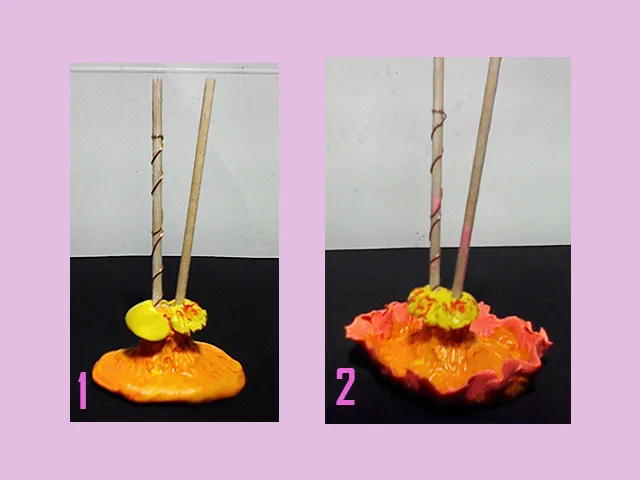
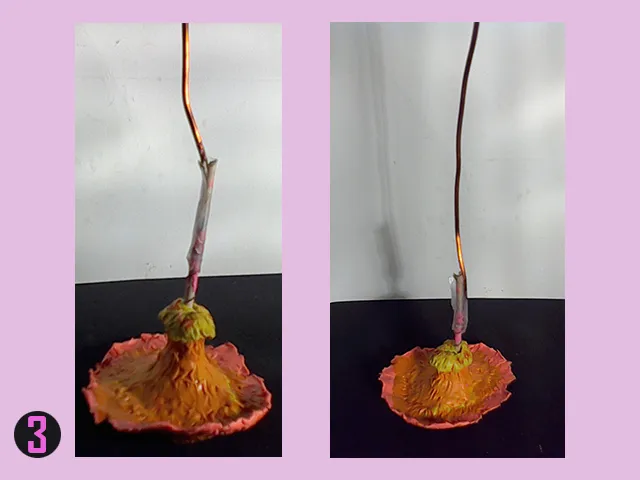
When I finished the base, I noticed that it didn't look quite right and decided to make a change, a change that undoubtedly influenced a better final product. I simply removed one of the wooden sticks and placed a copper wire that would serve as a base for the rest of the figure:
Once I had made my base, I began to place pink plasticine, and then started with the molding of the legs (4). I used my hands to simply mold it into a female silhouette (5) and then continued adding more plasticine for the torso, then placed more wire for the arms (6).
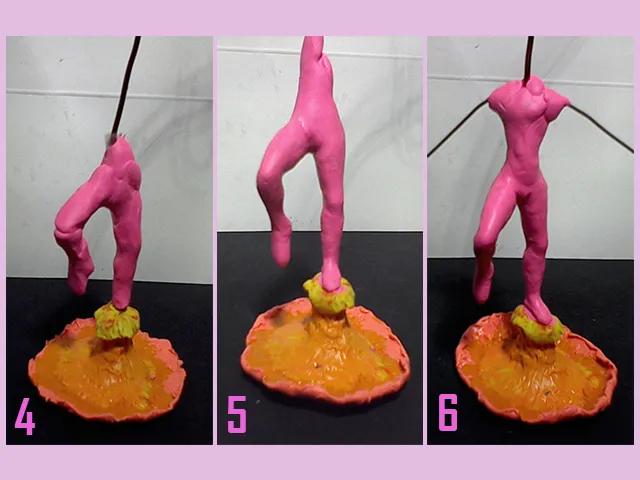
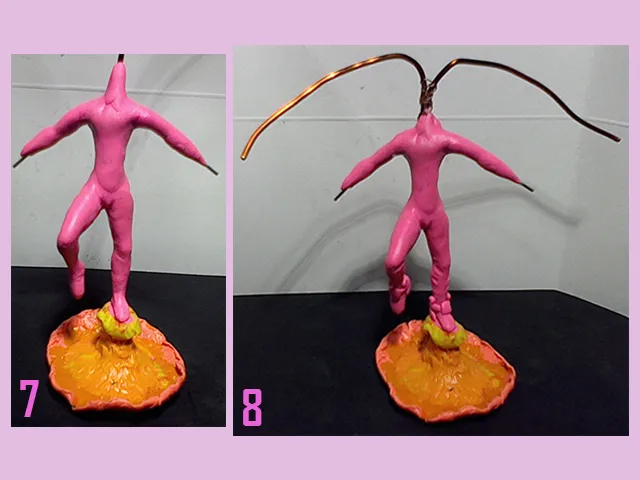
I went on to cover the rest of the figure with more plasticine] (7) and placed the wire base for what would be the pink hair pigtails that our Iron Kitty would have outside the helmet(8).
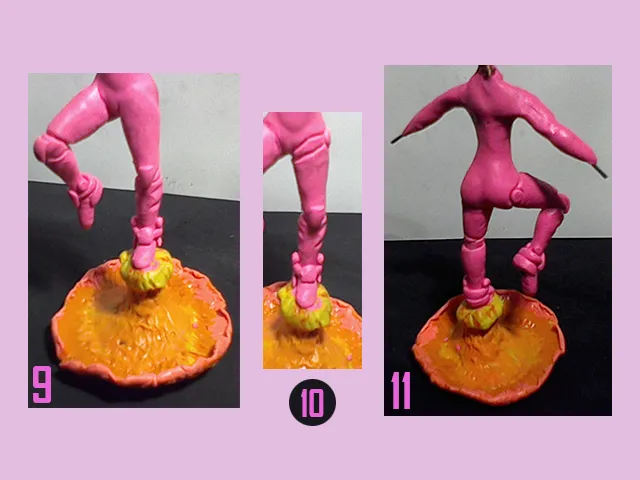
To start shaping the armor of the figure, I helped myself with a needle to sculpt all those details that the armor has. I used two types, a common sewing needle and a thick knitting needle. I started first with the feet, then the knees (9), then the thighs (10) and waist details (11).
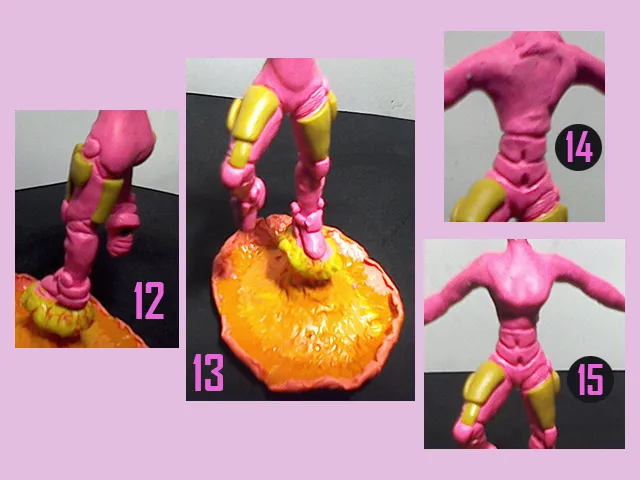
After defining the details with the needle, I used "golden" plasticine (at least a similar color), to place plates of that color on the thighs, like the ones on Iron Man's armor (12 and 13). Then I used the same sewing needle to outline the waist and belly (14). Finally I added more pink clay for the chest (15).
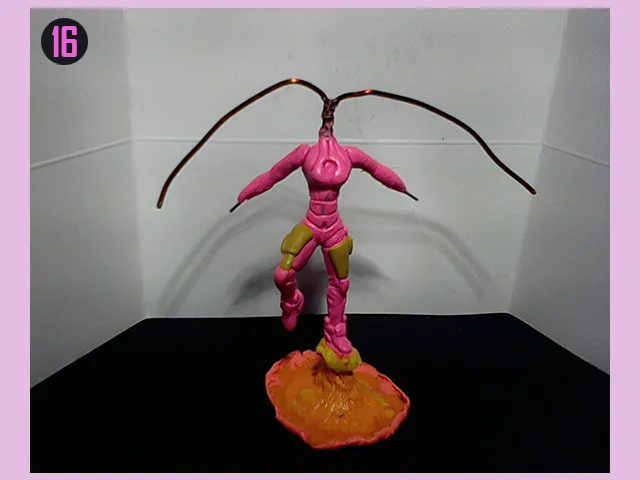
Again I used both needles to make more details of the armor on the chest, I made a hole for what would become the heart of the armor and this is how the figure looks so far:
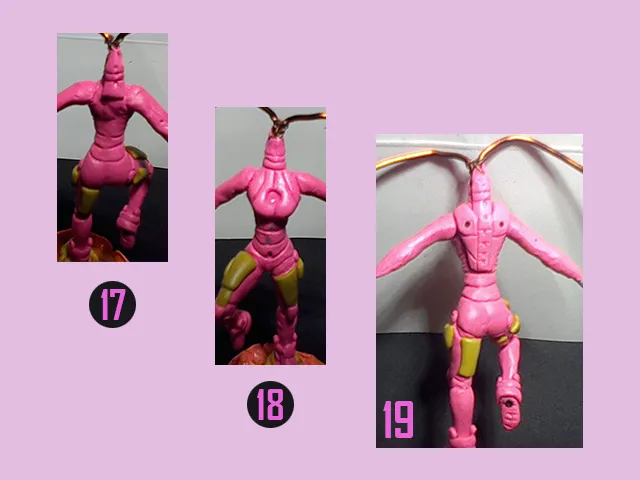
Next would be the neck and back. I placed small squares of plasticine on what would be the neck (17) and then I used the needle to outline the neck (18). When it was time to work on the back, I placed several plasticine plates and molded them with the help of a needle until I achieved the desired result (19).
Ready the torso, time to go with the arms. I made them like the usual Iron man arm, with the shoulder pads, the golden plate on the biceps, but with cat claws, because it could not be Iron Kitty without cat claws. In the image below you can see that first I worked on the left arm (20), with many details in both the front and the back area (21). Then I continued with the right arm (22).
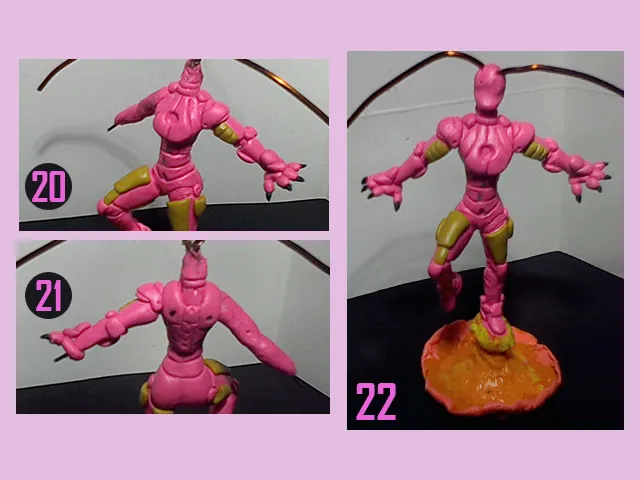
The idea of placing the figure in this position was to simulate that it was beginning to take flight, so I placed something like a propellant fire in each cat claw (23).
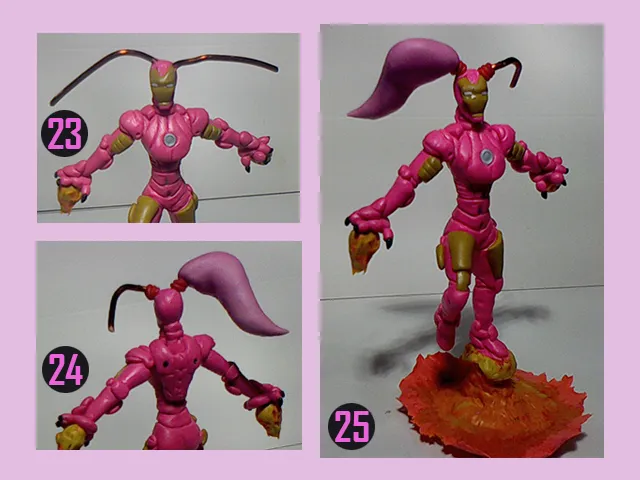
By this point I had finished the face but did not take photos of the creative process. However, when I finished the face I realized that short pigtails would look better than long pigtails, so I shortened the wire I had intended for this and started with the right pigtail (24 and 25).
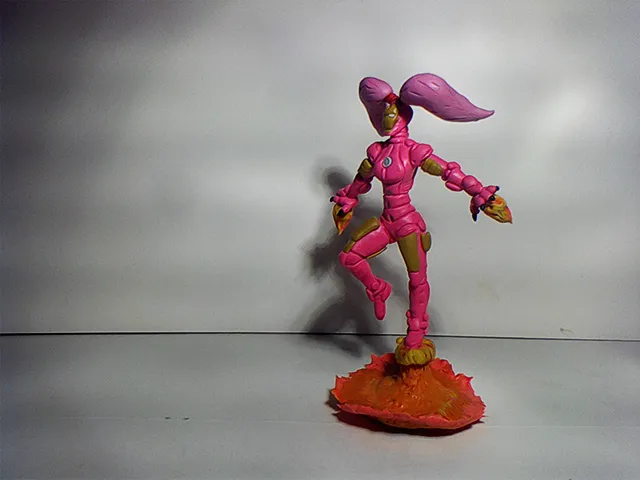
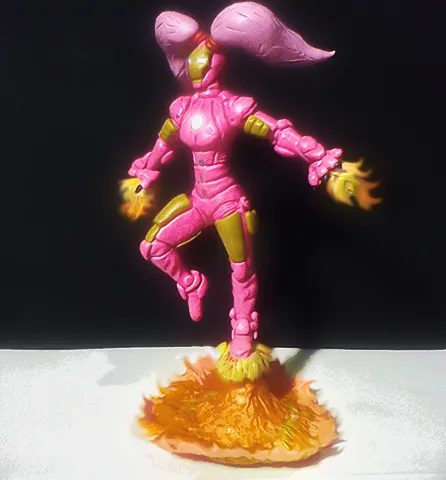
Finally, the figure was finished and this is the result:
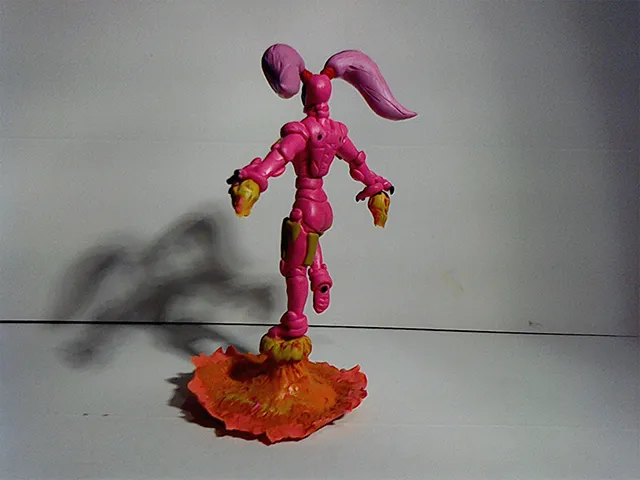
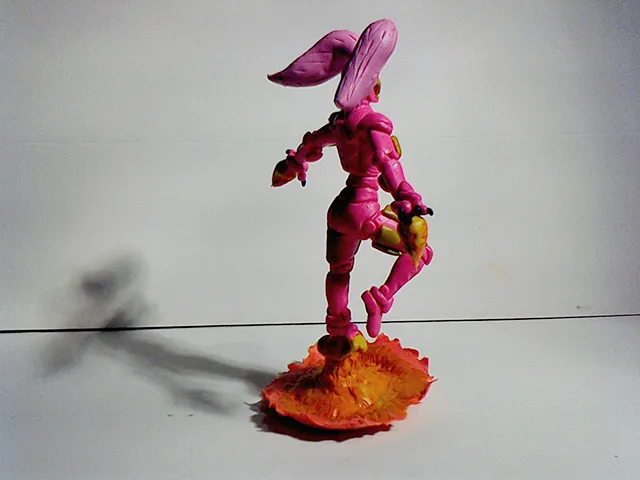
Here are a few photos from other angles:
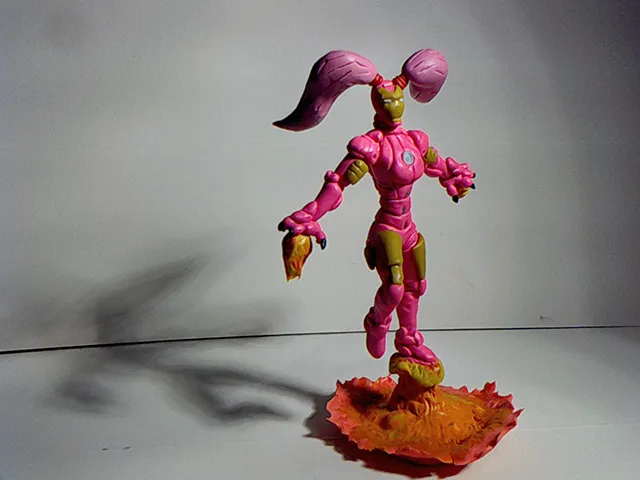
And then an edit to improve the flying effect that I had previously given to the figure:
What did you think of this figure? I sincerely hope you liked it. It is a gift to Miss Kitty, I hope she likes it and that she remembers that there are users who value her work. To the other members of The Terminal staff @wesphilbin , @stayten , @jamerussell, @justclickindiva and @brittandjosie , wait because I'll tell you that you guys are also part of this art project that I will call: "The Terminal Assemble".
Without more to add, I invite all of you who have read my post to leave your opinion of my sculpture in the comments, I will be happy to read them. This has been my Iron Kitty, I hope you all like it. I say goodbye then...
See you next time!
*****Versión en español*****
Saludos a todos, amigos Hivers. En esta ocasión les traigo otra escultura un poco particular, pero antes de entrar en materia me gustaría comentar un poco qué significa esta figura. Verán, hace tiempo trabajé en una escultura inspirada en una comunidad. El astronauta de la comunidad @discovery-it.
Pueden ver esa publicación de la figura siguiendo este enlace:
@gaboamc2393/por-que-me-gusta-discovery-it-mi-escultura-because-i-like-discovery-it-my-sculpture
El astronauta era la figura emblemática de la comunidad, pues estaba en su imagen de perfil. Fue el trabajo que hice para un concurso de esa comunidad, el cual gané gracias a esa figura. El punto es que desde que hice la escultura, estuve pensando en hacer otras figuras que representasen a cada comunidad en la que estoy activo.
El problema de esta idea es que no es fácil encontrar algo que represente a ciertas comunidades, así que la tarea es complicada. Sin embargo, el reto ya estaba planteado y decidí comenzar esta tarea con una comunidad que considero como mi casa, ya que fue la comunidad en la que empecé mi camino en HIVE. Me refiero a @theterminal.
Esta comunidad me brindó mucho apoyo y me gustaría hacer no una, sino varias figuras en forma de agradecimiento por el apoyo. Le haré a esa comunidad una figura representativa de algunos miembros de su staff, una escultura compuesta por varias figuras...
Dicho todo esto, les presento a la primera escultura de esta serie: Iron Kitty.
La idea de esta figura está inspirada en uno de los miembros del staff de la comunidad TheTerminal. En este caso me refiero a @thekittygirl. La figura es una mezcla entre un Iron Man femenino, un gato y rosado, mucho rosado. Escogí Iron Man porque es un personaje muy tecnológico, que sabe resolver problemas y encuentra respuestas a preguntas difíciles. La señorita Kitty de TheTerminal es así. Puedes hacerle distintos tipos de preguntas y siempre tiene la respuesta. Además, le gustan los gatos y el rosado, así que al mezclar todo esto se obtiene una figura de Iron Kitty.
Dicho todo esto, les mostraré como la hice. ¡Comencemos!
Lo primero que hice fue una base para la figura compuesta de alambres y palillos de madera, la cual cubrí con plastilina de distintos colores para hacer algo similar al fuego, como se aprecia en la siguiente imagen:
Cuando terminé la base, noté que no se veía del todo bien y decidí hacerle un cambio, un cambio que sin duda influyó en un mejor producto final. Simplemente retiré uno de los palillos de madera y le coloqué un alambre de cobre que serviría de base para el resto de la figura:
Una vez hecha mi base, comencé a colocar plastilina rosada, para luego comenzar con el moldeado de las piernas (4). Usé mis manos simplemente para moldear hasta dar una silueta femenina (5) y luego continué añadiendo más plastilina para el torso, luego coloqué más alambre para los brazos (6).
Continué cubriendo con más plastilina el resto de la figura] (7) y coloqué la base de alambre para lo que serían las coletas de cabello rosado que tendría nuestra Iron Kitty fuera del casco(8).
Para comenzar a dar forma a la armadura de la figura, me ayudé con una aguja para esculpir todos esos detalles que tiene la armadura. Usé dos tipos, una aguja común de coser y otra aguja gruesa de tejer. Comencé primero con los pies, luego las rodillas (9), después los muslos (10) y detalles de la cintura (11).
Tras definir bien los detalles con la aguja, usé plastilina "dorada" (al menos un color parecido), para colocar placas de ese color sobre los muslos, como los que tiene la armadura de Iron Man (12 y 13). Luego usé la misma aguja de coser para delinear la cintura y el vientre (14). Por último agregué más plastilina rosada para el pecho (15).
Nuevamente usé ambas agujas para hacer más detalles de la armadura en el pecho, hice un agujero para lo que vendría a ser el corazón de la armadura y así va quedando la figura hasta ahora:
Lo siguiente sería el cuello y la espalda. Coloqué pequeños cuadritos de plastilina en lo que sería la nuca (17) y luego usé la aguja para delinear el cuello (18). Llegado el momento de trabajar en la espalda, coloqué varias placas de plastilina y las moldeé con ayuda de una aguja hasta lograr el resultado deseado (19).
Listo el torso, hora de ir con los brazos. Estos los hice como el brazo habitual de Iron man, con las hombreras, la placa dorada en el biceps, pero con garras de gato, porque no podía ser Iron Kitty sin garras de gato. En la imagen a continuación pueden observar que primero trabajé en el brazo izquierdo (20), con muchos detalles tanto en la zona frontal como en la zona trasera (21). Luego continué con el brazo derecho (22).
La idea de colocar la figura en esta posición, era la de hacer una simulación de que estaba comenzando a tomar vuelo, así que coloqué algo parecido a un fuego propulsor en cada garra de gato (23).
Para este punto ya había terminado la cara pero no tomé fotos del proceso creativo. Sin embargo, al terminar la cara me di cuenta que unas coletas cortas se verían mejor que unas coletas largas, así que acorté el alambre que había destinado para esto y comencé con la coleta derecha (24 y 25).
Finalmente, la figura quedó terminada y este es el resultado:
Les dejo a continuación unas cuantas fotos desde otros ángulos:
Y a continuación una edición para mejorar el efecto de vuelo que antes había dado a la figura:
¿Qué les ha parecido esta figura? Espero de corazón que les haya gustado. En sí es un regalo a la señorita Kitty, espero que le guste y que recuerde que sí hay usuarios que valoramos su trabajo. A los otros miembros del staff de The Terminal @wesphilbin , @stayten , @jamerussell, @justclickindiva y @brittandjosie , esperen porque les adelanto que también forman parte de este proyecto de arte al que llamaré: "The Terminal Assemble".
Sin más que agregar, los invito a todos los que han leído mi publicación a dejar su opinión de mi escultura en los comentarios, yo estaré encantado de leerlos. Esta ha sido mi Iron Kitty, espero les guste a todos. Me despido entonces...
¡Hasta la próxima!

Imagenes editadas con Photoshop
Fotos tomadas con tablet HP stream 7
Traducido con DeepL
Photos edited with Photoshop
Photos taken with HP stream 7 tablet
Translated with DeepL
Últimos tres post/Last three posts:
Harvest Weekend / Fin de semana de cosecha
Zapatos rotos / Broken Shoes
My coins and bills collections #2 / Mi colección de monedas y billetes #2