Hey!
Today I turned this XYO Network device, a Raspberry 3, into a Minetest server for my boys.

Lens:
Super Carenar f=35mm 1:2.8 @ F8.0I had no idea why I had invested in such a shitcoin to begin with, but having done so, I was sent this device to use as a bridge for their sentinels. Now, it's a good piece of equipment, albeit a bit over priced as I could've gotten a RaspberryPi 3 for much cheaper than what I had paid.
Minetest is a game a lot like Minecraft, but it is Free (as in Freedom, as well as in Beer). You can copy it, use it, learn from it, and change it to your liking, as it is FOSS: Free and Open Source Software.

Minetest is also programmed in C++, so it is much easier on older hardware than Minecraft is, and doesn't require extra layers of software (Java Runtime Environment, or JRE) to run on.

Miro's house
Because it's free, you can find plenty of mods and add-ons that you can use to personalize your gaming experience.

Inside Miro's house
But yeah. Here's how you can create a Minetest RaspberryPi server of your own.
Installation

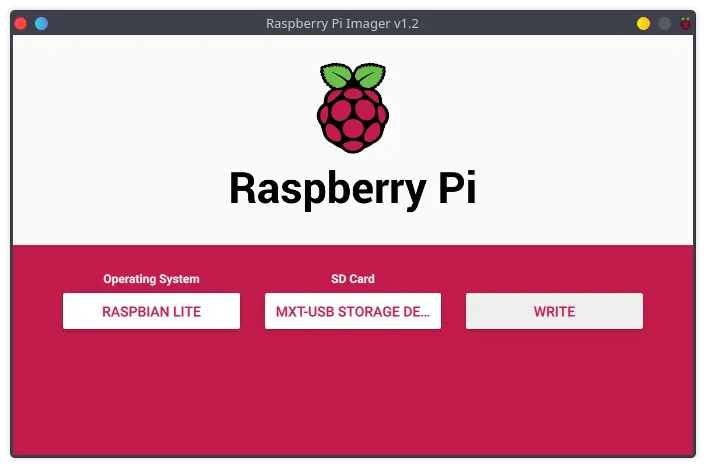
Creating a bootable Raspbian SDcard.
I chose the minimal Raspbian image (Raspbian Lite), as I know I don't need to use graphics or even the monitor on this install. I recommend you use the same.
For the first run, put the Raspbian SDcard into the slot, connect the board to your monitor, keyboard and ethernet cable. If you have a USB Wi-Fi dongle, or Raspberry 4, you may not need to use a cable. Also have a usb charger connected to the micro-usb port.
Setup
(Note: In the end of this first part, You'll need to have an SSH client software (like PuTTY for Windows users) installed on your computer!)
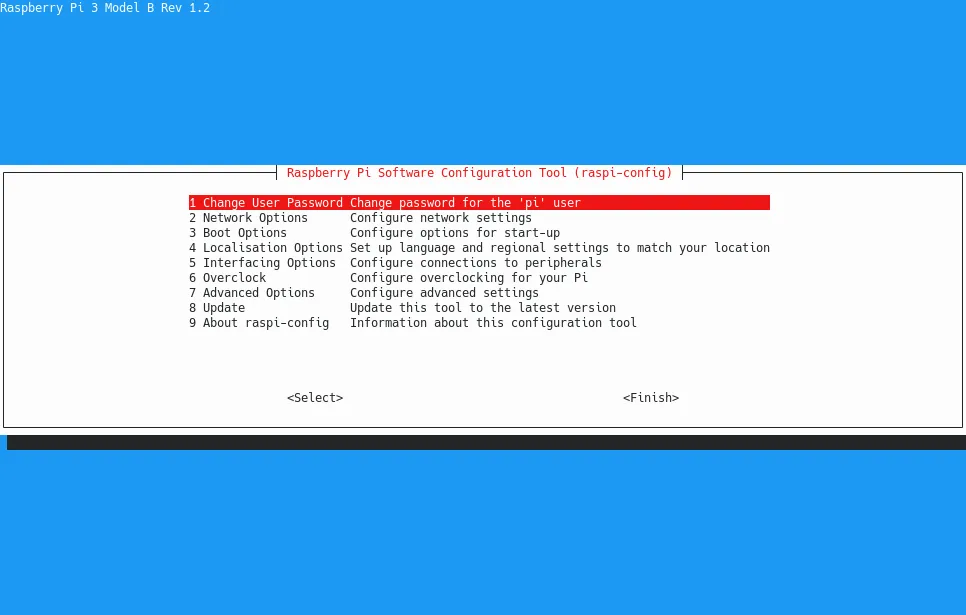
First I ran the command sudo raspi-config to change some settings.

raspi-config
- It's makes good sense to change the password before anything else. Choose a strong pass. Choose setting Change User Password.
- Next you will need to turn on SSH to enable remote management. Choose Interfacing Options, then SSH, and Yes
- If you want to use Wi-Fi, go to Network Options, Wi-Fi, and enter your preferred SSID name, and the WPA2 password.
- Optionally, if you want to keep using the keyboard and monitor connected on your RPi device, you might want to set up your preferred locale and keyboard layout from Localisation Options.
After all this is done, check the IP address of your device with the ifconfig command.

Take note of the IP address on either eth0, or wlan0
The eth0 address is your address if you are using a network cable, and the wlan0 is for the Wi-Fi. In my case the correct IP address is 192.168.1.115.
You can run shutdown -h now, and after the device has powered off, remove all cables and put it anywhere. Only the micro usb cable and a charger is needed from now on.
If you haven't installed an SSH client, PuTTY, or equivalent now, you should do so now.
In the next chapter, you'll need to connect to your RaspberryPi over SSH.
Installing Minetest
Since the Minetest is a bit old in the current Raspbian (Debian Buster) Stable repository, you'll need to do a bit of commandline magic to add the more recent Testing repository to your install sources.
Fear not, as it is a relatively easy cut-and-paste job from here on out. I'll walk you through it.
Preparations
SSH into your RaspberryPi now, using the IP address we observed when setting up the RaspberryPi. In my case it was 192.168.1.115. Use the account-name "pi", and the good password you chose for it. Using Putty should be pretty easy and straightforward. In the case of OSX or Linux, you can use the command:
ssh -l pi 192.168.1.115
(Replace the IP address with yours.)
First, let's update and upgrade the installation to the latest software, with:
sudo apt update && sudo apt upgrade
Press Y, when it asks you to confirm the upgrade.
Next, we need to edit a file. Use the command sudo nano /etc/apt/sources.list, and copy the next lines to the file:
# Backports repository
deb http://deb.debian.org/debian buster-backports main contrib non-free
# deb http://deb.debian.org/debian buster-backports-sloppy main contrib non-free
Exit the nano editor by pressing both Control and X together on your keyboard. It will ask you if you want to save the file, press Y for Yes.
Now run sudo apt update again to update the repositories. If it complains of missing keys, use the next commands to add the keys. Then run the update command again.
sudo apt-key adv --keyserver keyserver.ubuntu.com --recv-keys 04EE7237B7D453EC
sudo apt-key adv --keyserver keyserver.ubuntu.com --recv-keys 648ACFD622F3D138
The install
After you have updated the repositories, you can install minetest-server. I must remind you, that since we are installing from the backports repository, we can't install with the normal apt install command as it will override the backports, we'll thus need to force the install from the backports repository using an another command:
sudo apt -t buster-backports install minetest-server
We are now almost done!
The minetest-server daemon will automatically start, but we'll still need to do something to make it work... When I tried it, I couldn't connect to the server, and when I did some troubleshooting, I found that the server daemon was for some odd reason trying to use the IP 1.1.1.1 as its address, thus failing everything.
So fire up the editor once again:
sudo nano /etc/minetest/minetest.conf
From this file you can edit the name of your server and whatever options you want, but first and foremost, find and change the line:
# bind address =
to point to the IP address you checked earlier, which in my case was 192.168.1.115
bind address = 192.168.1.115
Save the configuration file by pressing CTRL-X again, and then restart the minetest-server running the next command:
sudo service minetest-server restart
Finally, try it out!


I wish you will all have fun trying this out! 😁
Also, you don't have to have a RaspberryPi at hand. The server will run on practically any computer if you can install a Debian on it.
The game itself runs on Windows, OSX, and Linux. Go get it now!
I'm eager to hear what you think about this howto. And sorry for being so late posting the daily photo. It took me quite a while to write this thing.
Oh, and if you want, I can do a post on adding different mods to the server.
See you Tomorrow!
Next |
|---|
| Daily and Fresh 📷 #64 |
| Daily and Fresh 📷 #65 |
| Daily and Fresh 📷 #66 |
| Daily and Fresh 📷 #67 |
| Daily and Fresh 📷 #68 |
Previous |
|---|
| Daily and Fresh 📷 #62 |
| Daily and Fresh 📷 #61 |
| Daily and Fresh 📷 #60 |
| Daily and Fresh 📷 #59 |
| Daily and Fresh 📷 #58 |
Weeklies |
|---|
Weekly and Fresh 📸 #8 |
Weekly and Fresh 📸 #7 |
Weekly and Fresh 📸 #6 |
Weekly and Fresh 📸 #5 |
Weekly and Fresh 📸 #4 |
Like my post? 🍻 Buy me a beer! 🍻