Footy Cash: The Fantasy Sports Coin With Masternodes

Masternode VPS Setup
Footy Cash is the cryptocurrency that is changing the fantasy sports landscape.
Privacy and transaction speed are two of the most common issues in the online gambling industry. To address these issues, Footy Cash has introduced brand new wallets complete with Masternodes.
The new wallet provides a number of important features:
- InstantX
- Transactions
- DarkSend Technology
- Stealth Addresses
- Secure In-Wallet Messaging
Users will be able to send anonymous transactions, allow them to participate in fantasy sports without providing personal information, accruing fees, and waiting days or weeks for their withdrawals to be processed.
The best part for many investors are the Masternodes. Each Footy Cash (XFT) Masternode requires 5,000 XFT. You get daily rewards for setting it up, and as the price increases this will be a very handsome reward and a wise investment.
Instructions for Ubuntu 16.04 LTS VPS server
Use Putty application to ssh into your Ubuntu 16.04 LTS VPS Server:

Perform the following commands:
$ sudo apt-get update
$ sudo apt-get upgrade
$ sudo apt-get install make git nano autoconf autogen automake libboost-all-dev libssl-dev
libdb++-dev g++ htop libgmp3-dev wondershaper
$ sudo apt-get install build-essential libcrypto++-dev libqrencode-dev libminiupnpc-dev libgmpdev
libgmp3-dev libtool

Install Footy Cash version 2.0.0.5 from Github :
$ cd tmp
$ sudo git clone https://github.com/footycash/FootyCashV2.git

After that cd into footycash directory and perform the following commands:
1. $ cd tmp
2. $ cd Foo*
3. $ cd src
4. $ cd leveldb
5. $ sudo chmod 755 * -R
6. $ cd ..
7. $ sudo make -f makefile.unix clean && make -f makefile.unix USE_UPNP= -j 1
8. $ sudo mv footycashd /usr/local/bin
9. $ cd ~
10. $ cd .footycashv2
Now we can start the footycashd daemon:
$ footycashd
You first notice that the daemon won’t start. The reason for this is because there is no information in the footycash.conf file yet. We must add the correct parameters; so we edit the file with nano:
$ nano footycash.conf
Now paste the following into the footycash.conf file:
rpcuser=footycashrpc
rpcpassword=XXXXXXXXXXXXXXXXXXXXXXX
rpcallowip=127.0.0.1
listen=1
daemon=1
server=1
staking=0
# masternode=1
# masternodeaddr=XX.XX.XX.XX:17018
# masternodeprivkey=XXXXXXXXXXXXXXXXXXXXXXXXXXXX
addnode= 92.222.124.88
addnode=45.58.121.142
addnode=66.55.130.13
addnode=72.178.196.79
addnode=213.250.22.35
addnode=109.157.39.60
addnode=49.3.48.231
addnode=120.146.235.230
addnode=31.22.27.27
addnode=90.145.211.170
addnode=95.96.92.78
addnode=186.68.217.188
addnode=82.39.218.201
addnode=2.155.144.78
addnode=141.89.216.78
addnode=46.4.37.60
addnode=74.208.235.170
addnode=151.236.245.93
addnode=84.75.61.166
addnode=35.189.249.117
addnode=27.67.40.1
addnode=77.249.216.150
addnode=186.68.217.188
addnode=82.39.218.201
addnode=2.155.144.78
addnode=141.89.216.78
addnode=46.4.37.60
addnode=74.208.235.170
addnode=151.236.245.93
addnode=84.75.61.166
addnode=35.189.249.117
addnode=27.67.40.1
addnode=77.249.216.150
addnode=96.10.34.116
addnode=seedv2.footycash.com
Replace the XXXX in rpcpassword with a password or leave the default that the program has chosen for you:
rpcpassword=XXXXXXXXXXXXXXXXXXXXXXX
also put the server IP address in the masternodeaddr parameter:
# masternodeaddr=68.54.124.32:17018
(Leave the “#” comment symbol in for now – it will be uncommented later before we start the masternode – the “#” symbol de-activates the parameter in the footycash.conf file)
Now press CTRL + X
Save the file as footycash.conf
Now we can start the footycashd daemon:
$ footycashd
Wait at least 5 to 10 minutes for the blockchain to sync:
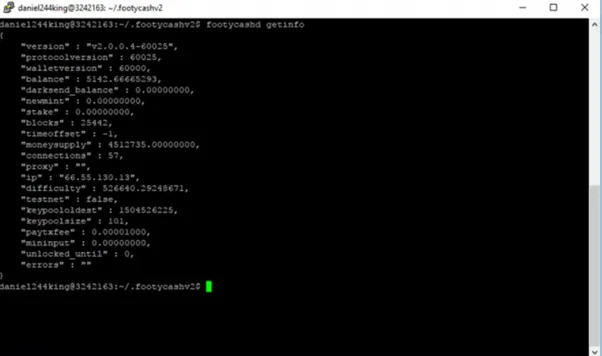
$ footycashd getinfo
The getinfo console command will give you the number of blocks downloaded.
You can see the total number of blocks on the bottom of the Footy Cash block explorer:
http://xft.dblocks.io
Now encrypt your footycashd wallet with a password:
$ footycashd encryptwallet <wallet-passphrase>
If you need to unlock the wallet for 1000 seconds then use the following command:
$ footycashd walletpassphrase <passphrase> 1000
Setting up the Masternode
Once the footycashd daemon is running we can get the private key for the masternode:
$footycashd masternode genkey
The console should output the private key for the masternode.
Place that key in to the footycash.conf file that we edited earlier in this document. Using nano uncomment the masternode lines (remove the # symbols).
Copy the private key, the server IP address, and tcp port into the footycash.conf file then save the file when you <CTRL X>:
# masternode=1
# masternodeaddr=67.56.130.22:17018
# masternodeprivkey=PGw7ts6WcbyMn34rd37ts6WcbyMyMn34rd
Next we can generate the masternode’s “0” wallet. In the console type:
$footycashd getaccountaddress 0
The console will give you a FOOT address for the “0” account.

Sending coins to account “0” address.
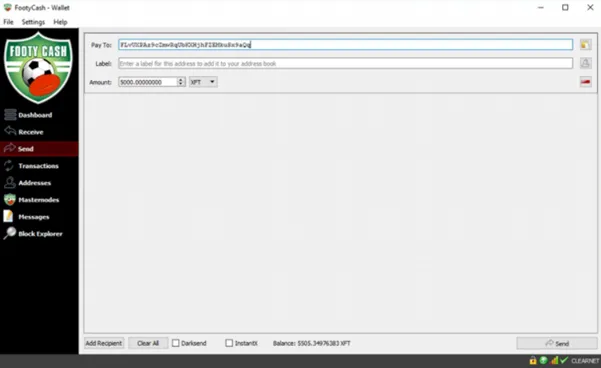
The account “0” address that the footycashd console gives you is the address you are going to deposit your masternode coins into. Send 5000 coins to the account “0” address:

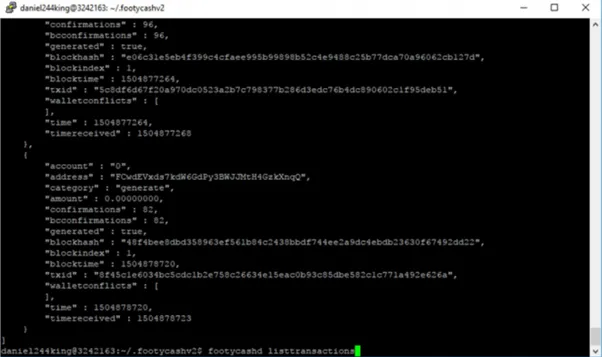
Once the coins are sent we can check them:$ footycashd listtransactions

The console will list all transactions going to the server wallet. Find the transactions for the coins that you sent to account “0”. The listtransactions command will list the transaction for the coins you sent and tell you the number of confirmations on that transaction.
You will have to wait for at least 10 to 15 confirmations before you can activate the
masternode.
After you get at least 15 confirmations then shutdown the footycashd daemon:
$ footycashd stop
Once the server daemon is stopped edit the footycash.conf file again and remove the comment symbols “#” from the masternode lines – this will activate those parameters in the footycash.conf file. Save the footycash.conf file when you exit via CTRL +X:
(
Now we can restart the footycashd daemon then afterward start the masternode:
$ footycashd
$ footycashd masternode start <wallet-passphrase>
(
To check the status of footycashd:
$ footycashd getinfo
( )
)
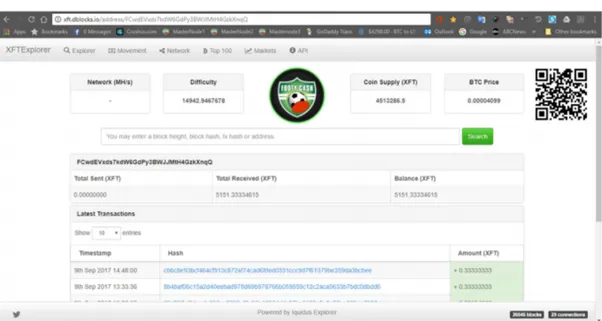
You can check the coins going in to your masternode by going to the block explorer and entering your account “0” address in to the search: http://xft.dblocks.io/
(
Security for your Linux VPS Server
Linux VPS Server used in this document is Qhoster: https://www.qhoster.com/linux-vps.html
(
Things to do after buying Linux VPS Server:
Please see the following links on hardening your Masternode VPS server against hackers:
https://www.rosehosting.com/blog/first-steps-after-getting-an-ubuntu-vps/
Setup 2FA on your VPS server:
https://www.rosehosting.com/blog/secure-your-ssh-using-two-factor-authentication-onubuntu-16-04/
Harden your Ubuntu 16.04 LTS:
http://www.techrepublic.com/article/how-to-harden-ubuntu-server-16-04-security-in-fivesteps/

Footy Cash Website http://footycash.com/

Twitter https://twitter.com/Footy_Cash

https://join.slack.com/t/footycash/shared_invite/MjE5MTU2ODE5MTQyLTE1MDExMTY3NDQtOTAzYjgyNjRkOQ